Module 5
1. Module 5
1.23. Page 3
Module 5: Angles
Explore
In this activity you will explore the relationships among angles formed when two parallel lines are intersected by a third line.
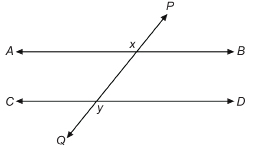
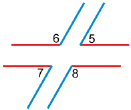
In the diagram ![]() intersects the parallel lines at points x and y. The goal of this activity is to determine relationships among the angles formed at x and y.
intersects the parallel lines at points x and y. The goal of this activity is to determine relationships among the angles formed at x and y.
The intersecting line is called a transversal.
 Self-Check
SC 1. Look at the following diagram that shows a red line, a blue line, and a green line.
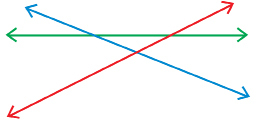
Which line or lines are transversals?
 Try This
In this activity you will explore angles formed by a transversal. Share your work from this activity and place the information in your course folder. Work with a partner if possible.
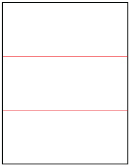
Step 1: Take a blank sheet of paper and fold it twice to form two parallel creases when unfolded.
Self-Check
SC 2. Explain how you folded the paper and why, when unfolded, the creases are parallel.
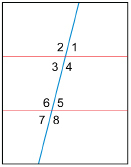
Step 2: Fold the paper again but, this time, fold the paper vertically instead of horizontally. When unfolded, the crease
will cross both parallel creases. With the aid of a ruler, draw lines on the creases. Number the angles as shown in the
diagram.
Step 3: Cut the sheet in two between the two sets of angles. One possible cut is the dashed line in the diagram.

Step 4: Cut out the four angles—∠5, ∠6, ∠7, and ∠8—by cutting along the two intersecting lines that form the angles.
Step 5: Take ∠5 and compare the angle by placing it on each of ∠1, ∠2, ∠3, and ∠4. Are any of those angles congruent (the same measure) to ∠5? If there are congruent angles, list them in the following table.
Step 6. Repeat Step 5 for ∠6, ∠7, and ∠8.
TT 7. Complete a table like the following for Steps 5 and 6.
|
Angle |
Congruent Angles from ∠1, ∠2, ∠3, and ∠4 |
|
∠5 |
|
|
∠6 |
|
|
∠7 |
|
|
∠8 |
|
TT 8. If all congruent angles are shaded the same colour, how many different colours would you need for this diagram? Explain your answer.
 Share
Share
How many colours would you need in TT 8? Make a visual representation by folding a new piece of paper or by drawing a new representation using a computer. Colour in all the angles that are congruent to each other with the same colour. Use as many colours as are necessary. How many colours did you need? Share your diagram or a photo of your diagram with your partner or group. How do your drawings compare?
Save a record of your discussion and your answers to TT 6, TT 7, and TT 8. Place your work in your course folder.