Module 3
1. Module 3
1.25. Page 3
Module 3—Electrical Phenomena
Describing Electric Fields

The same theories that you have used with gravitational fields also apply to electric phenomena. After all, if a charged balloon can make strands of hair stand on end without touching them, the balloon must be surrounding itself with an electric field. In this case, the balloon is the source of the field, so it is called the source charge. The individual strands of hair are acting as test bodies, which provide physical evidence that the balloon is surrounded by an electric field.
 Try This: Exploring Electric Field Lines
A simulation will be used to help visualize both the magnitude and direction of the electric field surrounding a single point charge. Consider the large, coloured charge the source charge for the electric field. The small, grey dots represent positive test charges influenced by the field.
You may be required to enter a username and password. Contact your teacher for this information. Open the Electric Field Point Charge simulation.
TR 1. Press the “grid” button (![]() ), and drag the positive charge randomly around the display area. Notice the vector arrows that extend outwards when the charge passes near all the points on the grid. The vector arrows represent the electric field produced by the spherical charge. Sketch the electric field vectors on diagrams like those shown below.
), and drag the positive charge randomly around the display area. Notice the vector arrows that extend outwards when the charge passes near all the points on the grid. The vector arrows represent the electric field produced by the spherical charge. Sketch the electric field vectors on diagrams like those shown below.

TR 2. In what direction does the electric field always point for a positive source charge?
TR 3. On the simulation, switch the charge to negative by dragging the charge slider (Q) to the left until the charge becomes blue. Sketch the electric field vectors on diagrams like those shown below.
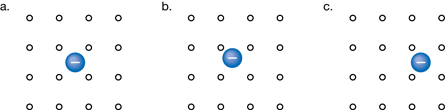
TR 4. In what direction does the electric field always point for a negative source charge?
 Read
Read
 Did You Know?
The symbol for energy is E which is a scalar quantity measured in joules. The symbol for electric field strength is
You can learn more about electric fields and how they differ from gravitational fields by reading “Magnitude and Direction of an Electric Field” on pages 546 and 547 of your textbook.
 Self-Check
SC 6.
- Explain why gravitational field lines are always drawn toward the centre of the source.
- Explain why this simple rule cannot always apply in the case of electric fields.
- Explain how the direction of an electric field vector is determined for a given location outside a source charge.
- State the equation for the electric field. Label each of the variables in this equation.
Self-Check Answers
SC 6.
- Gravitational field lines are always drawn toward the centre of the source because this is the direction of the gravitational force on test masses.
- In the case of electric phenomena, the electrostatic force is not always directed toward the source. Electrostatic forces can attract or repel test charges depending upon the sign of the test charge and the sign of the source charge.
- The direction of an electric field vector is determined by the direction of force on a small positive test charge for a given location outside a source charge.

Read
Read “Example 11.1” on page 548 of your textbook. As you go through this example, first identify the key steps and then focus on the details in each step.
SC 7.
Try “Practice Problems” 1 and 2 on page 548 of your textbook.
Self-Check Answers
SC 7. Answer
Page 548 Practice Problem 1
Given
Required
The magnitude of the electrostatic force.
Analysis
Paraphrase
The force is 1.60 × 10⁻¹⁶ C.
Page 548 Practice Problem 2.
Given
Required
The magnitude of the charge on the small charged sphere.
Analysis
Paraphrase
The magnitude of the charge on the small sphere is 6.40 × 10⁻¹⁹ C.
The magnitude of the electric field at some distance from a point charge can be determined from another equation that is derived from Coulomb’s law. The process of deriving this equation is similar to your earlier work deriving a second equation for gravitational field from Newton’s law of universal gravitation.
Read
To see how this second equation for electric field is derived and applied, read from the bottom of page 548 to the end of “Example 11.2” on page 549 of your textbook. As you go through this derivation, first identify the key steps and then focus on the details in each step. Note how this work parallels your previous practice with gravitational fields.
Try This
TR 5. Calculate and illustrate the electric field strength at a distance of 4.25 × 10⁻¹ m from a +3.00 μC charged particle. Use the simulation to verify your field diagram.
TR 6. Calculate the electric field strength 6.50 × 10⁻² m from a –5.00 μC charged particle. Sketch the electric field lines around the source. Use the simulation to verify the directions of your field lines.
 Module 3: Lesson 4 Assignment
Remember to submit the answer to A 1 and A 2 to your teacher as part of your Module 3: Lesson 4 Assignment.
A 1. Calculate and illustrate the electric field strength at a distance of 8.25 m from a +6.50 μC charged particle. Use the simulation to verify your field diagram.
A 2. Calculate how far from a –5.00 μC charged particle the electric field strength 7.2 × 10⁷ N/C is toward the charge.