Elements of Design
| Site: | MoodleHUB.ca 🍁 |
| Course: | COM1005 Learn EveryWare |
| Book: | Elements of Design |
| Printed by: | Guest user |
| Date: | Friday, 26 December 2025, 9:30 AM |
Session 1: Elements of Design
|
Getting Ready
Digital technology has become integrated into every aspect of visual communications. New digital techniques and tools for designers and artists are being invented every day. Many more options and solutions for design and art projects can be explored in greater detail and in less time. The ease of use and inexpensive cost of hardware and software has given the public the ability to create computer-generated graphics and artwork. However, the availability of technology advances in imaging and production techniques will not cover up what is essentially a bad design. The history of design teaches us the same elements and principles of design have always existed, regardless of the medium or technique. The Element of Design
Prerequisites: There are no prerequisites for this lesson Lesson Outcomes: By the end of Session 1: "Elements of Design", students should be able to:
|

Assessment InformationAs you work through this lesson, you should complete the following assignments:
 Complete the Colour Wheel Assignment and upload the completed project into the Colour Wheel Assignment Folder Complete the Colour Wheel Assignment and upload the completed project into the Colour Wheel Assignment FolderComplete the Value Scale Assignment and upload the completed project into the Value Scale Assignment Folder
More information on these assignments can be found in the "Reflect and Connect" section of this lesson.
|
Session 1: Elements of Design
Line
|
Let’s start with a definition, a line is a mark made by a tool as it is drawn across a surface. The tool can be almost anything; it could be a pencil, brush, a computer and mouse, or even a finger. Also, a line is defined as a moving dot or point, and can be called an open path.
Line is an important element of visual communication because it can be used to define shape, contours, and outlines, also to suggest mass and volume. It may be a continuous mark made on a surface with a pointed tool or implied by the edges of shapes and forms.
Lines are one of the basic elements of design. Alone or in combination with other lines or shapes they can aid in the readability, appearance, and message of a design. Use lines to: |

Session 1: Elements of Design
Types of Lines
Outlines:
Outlines are lines made by the edge of an object or its silhouette. An outline makes an object seem flat and is usually the same thickness throug-out. Tracing around an object placed on a sheet of paper is one way to create an outline. Contour:
Lines that describe the shape of an object and the interior detail. For example, a contour drawing of a person's face would include the line defining the shape of the head and additional lines that describe the surfaces and planes of the facial features. Gesture:
Gesture lines are line that are energetic and catches the movement and gestures of an active figure. Sometimes gesture lines are called movement lines, and they emphasize direction and fluidity. They are typically done quickly in the form of a rough sketch as the model moves. Therefore they lack detail. Sketch Lines:
Sketch lines provide more detail tahn outlines, contour lines, and gesture lines. They can be drawn very quickly, but they sometimes have a polished appearance. Sketch lines often give an object the appearance of depth, or three-diemnsionality. Calligraphic:
Greek word meaning “beautiful writing.” Precise, elegant handwriting or lettering done by hand. Also artwork that has flowing lines like an elegant handwriting. Implied:
Lines that are not actually drawn but created by a group of objects seen from a distance. The direction an object is pointing to, or the direction a person is looking at.
|


 Try This
Session 1: Elements of Design
Shape and Form
|
The general outline of something is a shape, and can also be defined as a closed form or path. There are many ways to depict shapes on a two-dimensional surface. A shape is as an area that stands out from the space next to, or around it, due to a defined or implied boundary, or because of differences of value, colour, or texture. Shapes can also show perspective by overlapping. They can be geometric or organic. Shapes in visual communication can be used to add interest, style, and theme to a design. Shape & form play a large role in photography and video and is often overlooked by amateurs. Cagegories of Shapes and Forms:Geometric:Circles, squares, rectangles and triangles. We see them in architecture and manufactured items. |
|


 Try This
Session 1: Elements of Design
Space
|
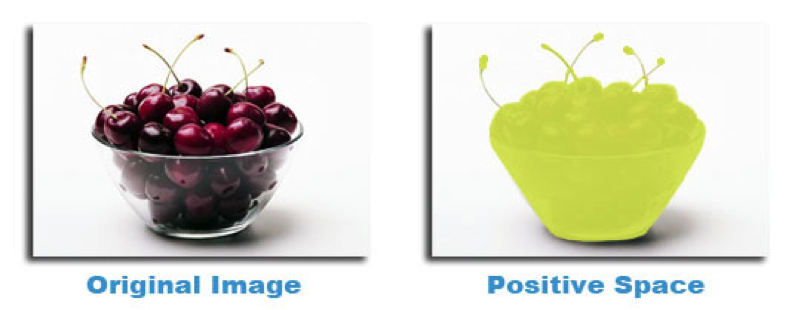
Space is the area provided for a particular purpose. It may have two dimensions (length and width), such as a computer screen, or it may have three dimensions (length, width, and height) like a TV Studio. Space includes the background, foreground and middle ground. Space refers to the distances or areas around, between or within components of a piece. There are two type of space: positive and negative space. Positive space refers to the space of a shape representing the subject matter. Negative space refers to the space around and between the subject matter.
Space in a two-dimensional drawing or graphic refers to the arrangement of objects on the picture plane. The picture plane is the surface of your medium, be it paper, canvas or screen for example. You can have a picture plane that is a crowded space with lots of objects or an empty space with very few objects in the picture plane. A two-dimensional poster has heights and width but no depth. The illusion of depth can be achieved by using perspective. This is the technique used to have your image look likes it is moving to the distance like a landscape or cityscape. Categories of SpacePositive Space
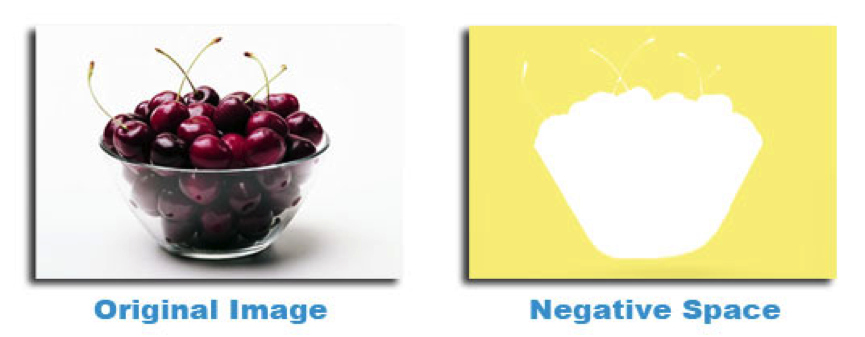
Simply put, positive space is best described as the areas in a work of art that are the subjects, or areas of interest. In an image positive shapes are the solid forms in a design such as a bowl of cherries. In this example it is shown by green shape over the bowl of cherries. Negative Space:
Negative space is area around the subjects, or areas of interest. In an image the negative space is the area around the positive shape. Shown below by the yellow area around the bowl of cherries. Check out this short video, which looks at the idea of positive and negative space: Picture Plane
Is the flat surface of where the image will be displayed it could be your monitor, drawing paper, canvas, TV, etc... CompositionIs the organization and placement of the elements on your picture plane. Focal Point
Is the object or area you want the viewer to look at first. This is always important in making sure you are giving the right element the most attention. The relationship between a figure in the background is a fundamental association of a positive and negative or shape versus space. But in a curious way, space around figures has shape to. To orchestrate a harmonic balance of the parts of the design, it is critical to achieve a sense of the relationship between the shapes of the design and the configuration of the space around the shapes. Experienced designers know the importance of paying equal attention to the shape of the figures in the shape of the surrounding space or background. |
|
While no one but you may see this hands on exercise, take the time to do it just as if you were turning it in for a grade. It will help reinforce what you have learned.
|


 Try This

Lesson 1: Elements of Design
Value
|
Value is a design element that refers to the relationship between light and dark on a surface or object. Value is also referred to as tone when talking about black and white images.
In this rhino image the whites create an impression that the blacks are "blacker" than they would be if most of the image were black and no areas were very light. The reason is that the tonal range of the image provides the necessary contrast that allows you to see what the artist wants you to see. Different value relationships produce different effects, both visual and emotional. When the narrow range of values, which is called low contrast, is used in the design, it evokes an emotional response from the viewer. The emotional response is different when the design has a wide range of values, or high contrast. The range of values from black to white is the tonal range available to a designer. The ability to use that range effectively lets the designer determine the mood of an image and create and control the ambiance.
Snow Hummocks, Yosemite National Park, California © Ansel Adams |


Session 1: Elements of Design
Categories of Value
Tint:
Adding white to colour paint to create lighter values such as light pink or blue. Shade:
Adding black to paint to create dark values such as dark blue or dark red. High Key:
A high-key image consists primarily of light tones, without dark shadows. A photograph or painting so composed features a diminished tonal range of primarily whites and light grays. Low Key:
A low-key image consists primarily of dark tones. A painting or image is low key if its dominant values are dark. Value Contrast:
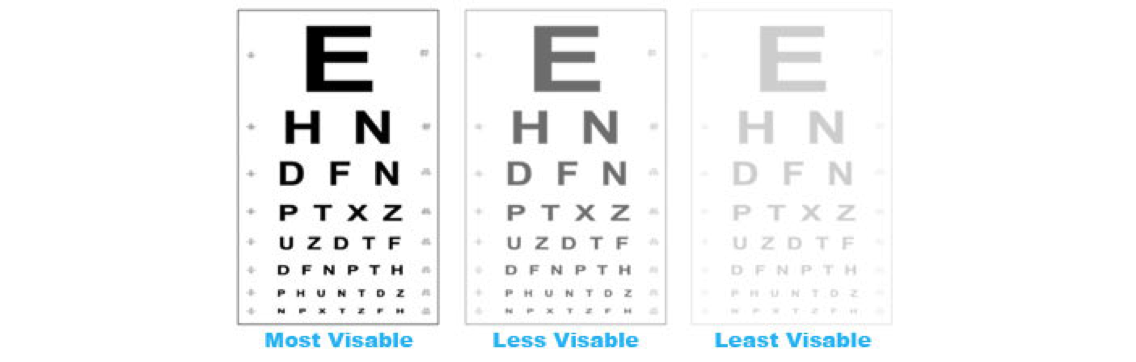
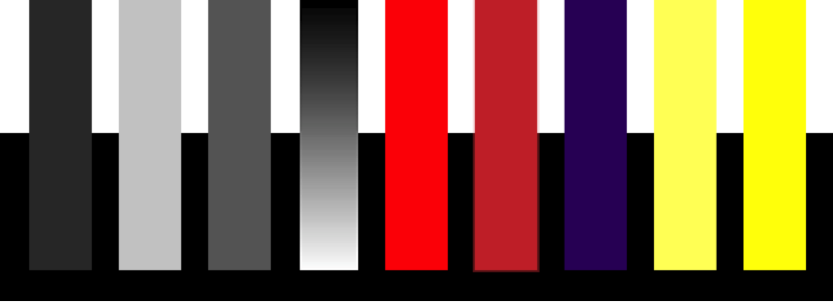
Light values are placed next to dark values to create contrast or strong differences. Look at the examples above and ask yourself which bars stand out the most against their surroundings. The first, (dark) bar is clearly visible against the white background but barely visible against the black. The second, (light) bar 's contrasts are the opposite. The third (gray) bar is equally visible against both black and white but not as visible as the high contrast areas of the first two bars. The fourth (black to white) bar has maximum contrast at either end. The coloured bars add hue and saturation as variables. The two red bars are middle values and contrast equally with black and white. The brightness of the red, however, makes it more visible. The violet bar corresponds to the first dark gray bar in contrast -- high against white but low against black. The two yellow bars correspond with the second light gray bar in contrast. The brighter yellow does make that bar more visible even against the white -- but that contrast is still low and will be noticeable only depending ont the background. For example, against black it has both strong value contrast and strong colour appeal. Value Scale:
Ascale that shows the gradual change in value from its lightest value, white to its darkest value black. |
||||||
|


 Try This
|
a) |
causes elements of the design to stand out or recede; or, |
|
b) |
directs the eye to specific information; or, |
|
c) |
creates a mood (Describe that mood. Is it quiet elegance, high tech, or playful? Is it high energy or calm and soothing?) |
2. With paper and pencil, or in your favorite graphics program, experiment with using value. Draw simple shapes such as circles and squares. Place objects ranging from light to dark on light and dark backgrounds. Mix objects of different values and create static and dynamic groupings. Experiment with using light type on dark backgrounds. Which combinations of light and dark values are easiest to read?
Here is a short video which shows how to use Adobe Illustrator to adjust value and a video on how to add gradients to shapes in Microsoft Word:
Session 1: Elements of Design
Texture and Pattern
|
Texture is the surface quality or the perceived surface quality. In the creation of visual design, there are two types of texture: real and implied. Categories of Texture:Tactile (Real):
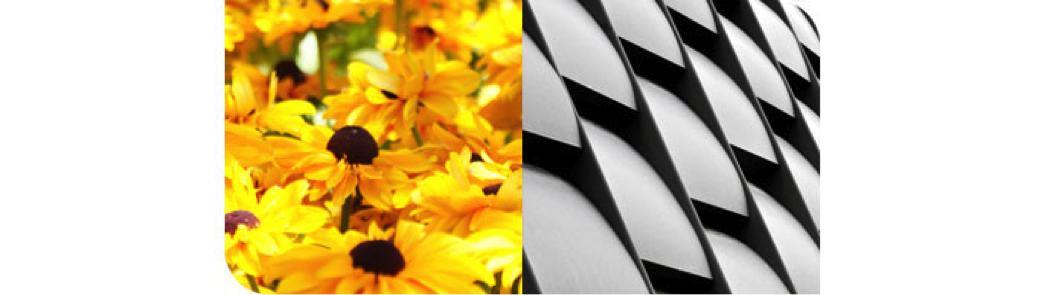
*this is obviously not tactile - it is impossible to recreate tactile texture on a screen Tactile means touch. Tactile texture is the actual (3D) feel of a surface. This is of paramount importance to three-dimensional design but of only moderate interest in two-dimensional design. Examples of this include sandpaper, cotton balls, tree bark, puppy fur, etc. Implied (Visual):Visual texture refers to the illusion of the surface's texture. It is what tactile texture looks like (on a 2D surface). The textures you see in a photograph are visual textures. No matter how rough objects in the photograph look, the surface of the photograph is smooth and flat. The texture may look rough, fizzy, gritty, but cannot actually be felt. PatternA recognizable motif regularly repeated produces a pattern. Pattern requires repetition -- in design as in life (a pattern of behavior). The more regular the repetition, the stronger the pattern. Compare this field of flowers with a side of a building. Both have a repeating motif. The most noticeable patterns occur when you see the group before the individuals -- notice the organization first (the building). All of the motifs in a pattern have surfaces, so there is always texture. But there is not always pattern -- only when you notice it.
Patterns are generally more noticeable than textures. This makes them a stronger visual element for controlling attention. |
|

 Try This:
Session 1: Elements of Design
Colour
|
Colour is seen either by the way light reflects off a surface, or in coloured light sources. Colour and particularly contrasting colour is also used to draw the attention to a particular part of the image. There are primary colours, secondary colours, and tertiary (third level) colours. Complementary colours are colours that are opposite to each other on the colour wheel. Complementary Colours:The complementary colour of a primary colour (red, blue, or yellow) is the colour you get by mixing the other two primary colours. So the complementary colour of red is green, of blue is orange, and of yellow is purple. The complementary of a secondary colour is the primary colour that wasn't used to make it. So the complementary colour of green is red, of orange is blue, and of purple is yellow. An easy way to determine a complementary colour is that they are directly opposite on a colour wheel. Analogous Colours:Analogous colours are colours that are found side by side on the colour wheel. These can be used to create colour harmony. Orange, yellow-orange, and yellow are an example of analogous colours. They are blended nicely in Sunflowers, a painting by Vincent Van Gogh. How do you know that these colours are closely related? They share a colour—each of them contains some yellow.
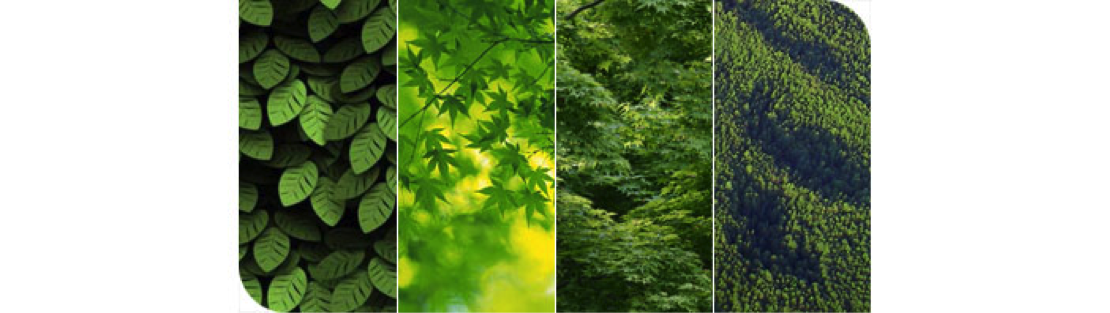
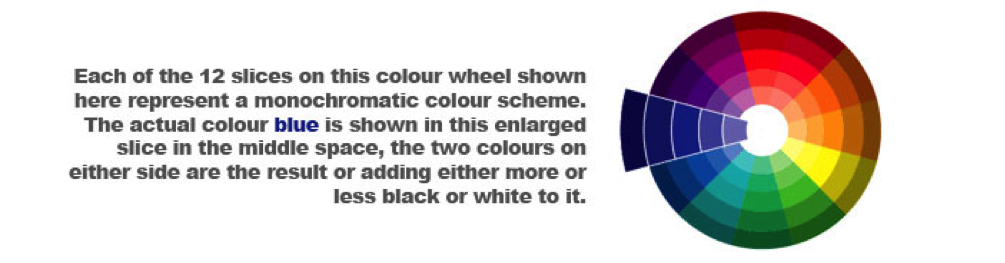
Vincent Van Gogh Sunflowers (1888) Monochromatic colours: Monochromatic colour schemes are derived from a single base hue, and extended using its shades, tones and tints (that is, a hue modified by the addition of black, gray (black + white) and white). As a result, the energy is more subtle and peaceful due to a lack of contrast of hue. Monochromatic colour schemes may be considered boring unless there is diversity within the design. Warm & Cool Colours: Warm colours are a group of colours that consist of reds, yellows, and oranges. Cool colours are groups of colours that consist of purples, greens, and blues. Colour Theory:Understanding and utilizing colour effectively comes more easily to some than others; however, one thing is certain–the study of colour deserves your attention. It is a powerful and highly provocative design element. Colour is difficult to control when creating an original work, and even more so when work is reproduced in print or viewed on a computer screen. Hue:
Hue is the name of the colour, for example, red or green, blue or orange. Value:
Value is the range of lightness or darkness, for example a light green or a dark green, a light yellow or dark yellow. Shade, tone, and tint are different aspects of value. Saturation:
Saturation is the brightness or dullness of a colour, that is, bright red (100%) or dull red (10%), bright blue or dull blue. Chroma and intensities are synonyms for saturation. |
|


 Try This:
Session 1: Elements of Design
Colour Part 2
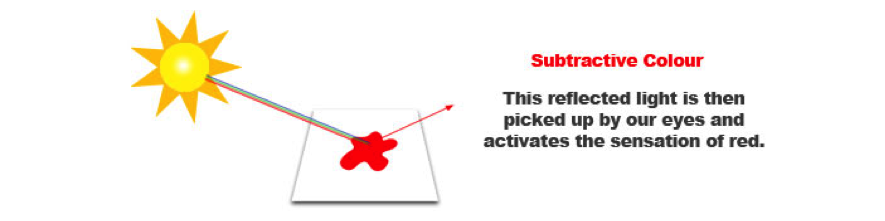
Subtractive ColourAll objects that surround us are made of different materials and all these materials have the property of absorbing or reflecting light.
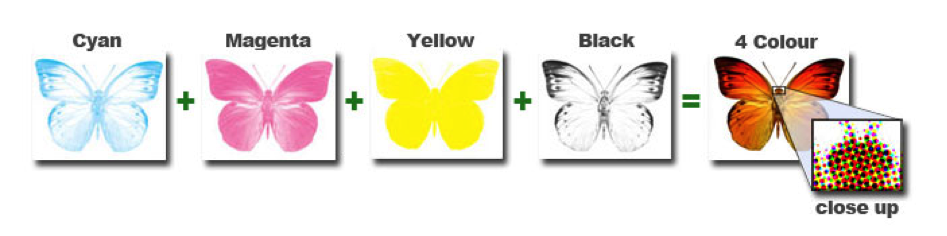
If you add a drop of yellow to the red ink the pigments will mix and the resulting pigment will still reflect the red light and part of the green light. This combination, will create the sensation of orange CMYK ColourThe printing processes use subtractive colours to create all the colours that we can see on a printed surface. So, printing actually uses four colours that are considered primary: Cyan, Magenta, Yellow and Black, abbreviated as CMYK also known as four-colour process printing. Four–colour process is used to reproduce colour photographs, artwork, and illustrations. The viewer perceives full colour that is created by dot patterns of cyan, magenta, yellow, and/or black.
The number of colours that can be reproduced in printing is smaller than the number of colours that can be seen on a computer screen.
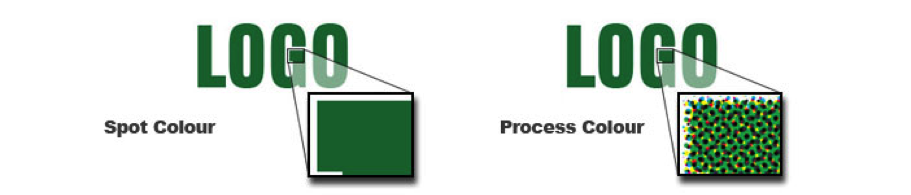
Spot Colour PrintingIn offset printing, another way to produce colour is by using spot colour–a colour that is printed with its own separate ink, as opposed to creating a specific colour from process colour. Most often spot colour is used when three or fewer colours are indicated in the design. Using more than three spot colours is very expensive. For indicating and creating spot colour, a popular colour matching system called Pantone matching system is used.
Check out this short video, which reviews spot vs. process colour printing:
|
||||||
|


 Try This:
Session 1: Elements of Design
Session 1: Self Check and ProjectIn this section of the lesson, students will check their understanding of what they have already learned by completing the colour wheel assignment and the visual scale assignment. |
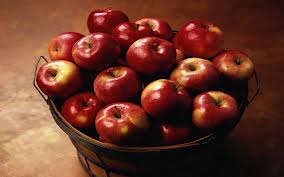
Session 1 Evaluation:Assignment 1: Colour Wheel in Photographs AssignmentObjective: In this assignment, you will be learning about the colour wheel, digital photography and graphic layout. By the time you have completed this assignment, you will have taken many different digital photographs, ensuring that you have taken photographs of each of the colours on the colour wheel, edited the photographs and arranged them into a circle (to resemble the colour wheel). Step 1: Using any image capture device that you have available (digital camera, iPod, iPad, etc.) you will be taking photographs that highlight the primary (red, yellow, blue) and secondary (orange, green, purple). You will have to take a lot of photos so that your final photos are great, in terms of composition, focus, and color. Be sure that you are taking photos that showcase a subject. For instance, if you are looking for something red, you may wish to shoot a bowl of big red apples, and not just take a picture of a red piece of paper.
Step 2: Once you have taken and selected your best photographs that emphasize the primary and secondary colors, you will need to arrange the photos as per the Color Wheel. Your 6 best photos should be uniform in size and shape (you will need to edit the photos with your favorite photo editing software) and arranged the same order as the color wheel below, eg. yellow at the top, orange at the 2:00 position, etc. You may overlay photos, or space them out. Play around with the composition, and decide what works best for you. You may use a PowerPoint slide or other computer program to display your photographic color wheel. All of the photos used in your composition MUST be original to you. You may NOT use any photographs or images taken by anyone else for this assignment. Step 3: Once complete, save your document (be sure it has your name on it) and upload it into the appropriate assignment folder. Evaluation: Image choice 12 marks – 2 per photo Are the images that you have chosen original images? Do they have a clear subject? Is the majority of the photograph the colour it is supposed to represent on the colour wheel? Composition 8 marks total Is the colour wheel in the correct order? Are the photos uniform in shape and size? Is it arranged in a circle and look like a colour wheel? Does the composition have a title that reflects the work produced?
Assignment #2: Value Scale AssignmentObjective: Value Scale – Find a Black and White image (not a logo) and use it to create an 8-step scale of grays ranging from white to black. This image can be one that you have taken, or can be an image you find online (if you are using an image that is not your own, please give credit to the photographer and site that you go it from). Arrange the gray shapes on a page to create the effect of moving back into space. Explain the process you used to create the gray-scale. (10 marks) Example:
If you have any questions about these assignments, please contact your teacher. |
 Once complete, please submit your completed assignment into the
Session 1: Elements of Design
Lesson Summary
|
In this section, students were introduced to the most basic ideas concerning the elements that make up visual design. The elements of design are the building blocks used to create a work of visual communication. These elements of design included:
Students examined how each of these elements of design can be used when creating compisitions and had the opportunity to create a compisition of their own photographs. In the next lesson, students will start to explore the principles of design, which go hand in hand with the elements of design.
Before continuing on, please review the lesson objectives that were presented to you at the beginning of the lesson. If you have any questions, please contact your teacher before moving on. By the end of Session 1: "Elements of Design", students should be able to:
|
Checking InOnce you have completed the colour wheel assignment, the visual scale assingment and reviewed the lesson objectives above, you may continue onto Session 2. |