Lesson 7: Introduction to Trigonometry
| Site: | MoodleHUB.ca 🍁 |
| Course: | Mathematics 10C |
| Book: | Lesson 7: Introduction to Trigonometry |
| Printed by: | Guest user |
| Date: | Friday, 19 December 2025, 3:27 AM |
Description
Created by IMSreader
Focus
Module 1 Part 2: Trigonometry
Lesson 7: Introduction to Trigonometry
** Always have your calculator in degree mode. Check by hitting the MODE button and looking at the third line. The word degree must be darkened**
Focus

treehouse: © Ewan Chesser/shutterstock; surveyor: © Joe Gough/shutterstock
As you have worked through the previous lessons, you have been adding shapes to create your own personal place. You have been asked to provide measurements and calculations for your shapes. Using a program like Google SketchUp makes it pretty easy to show measurements, since you can simply click on the tape measure and then drag the measure alongside your shapes. If only life were that simple!
Imagine building a tree house. There would be some measurements that are difficult to take, like the height of the tree—it’s not too easy (or safe) to climb a tree with a tape measure in your hands!
 Did You Know?
Trigonometry was first developed for use in astronomy and geography.
Luckily, there is a great mathematical concept called trigonometry. In the construction industry, surveying allows people to use trigonometry to calculate unknown lengths, so direct measurements are not required.
In this lesson you will explore trigonometry and answer questions such as, what does trigonometry mean and how does it work?
When you have completed this lesson, you will move on to Lesson 8 where you will learn how to solve for a missing side and then Lesson 9 where you will solve for a missing angle.
Outcomes
At the end of this lesson, you will be able to
- explain the meaning of sin, cos and tan in a right triangle.
- use the SIN, COS and TAN buttons on your calculator.
Lesson Questions
By the end of this lesson, you should feel comfortable solving the following questions:
-
In what situations can the concepts of trigonometry be used to solve problems?
-
How do I determine the sine, cosine, and tangent ratios for a given angle in a triangle?
- How do I use my calculator to find, sin, cos and tan for a given angle?
 Lesson Completion and Assessment
As you work through each lesson, complete all the questions and learning activities in your binder using paper and pencil, clearly labeling your work (they refer to this as your course folder). These include the Are you Ready, Try This, Share and Self Check questions. Check your work if answers are provided. Remember that these questions provide you with the practice and feedback that you need to successfully complete this course.
Once you have completed all of the learning activities, take the Lesson Quiz. This is the assessment for each lesson and is locate under the Assess tab or by using the Quizzes link under the Activities block.
** Note – Share questions may have to be done on your own depending on your learning situation**
Launch
Module 1 Part 2: Trigonometry
This section checks to see if you have the prerequisite knowledge and skills to be able to complete this lesson successfully.
Are You Ready?
Complete these questions in your course folder (binder). If you are experiencing difficulty, you may want to use the information and the multimedia in the Refresher section to clarify concepts before completing these exercises.
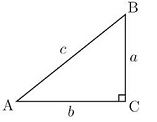
1. What is a right triangle?
2. In any triangle, what is the sum of the measures of the three angles?
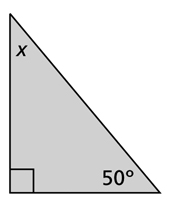
3. Calculate the missing angle in the triangle below.
4. State the Pythagorean theorem, and explain when you would use it.
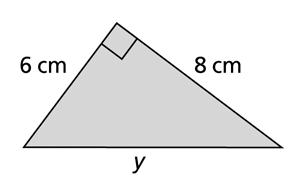
5. In the following triangle, we know the lengths of two sides. Use the Pythagorean theorem to calculate the length of the hypotenuse.
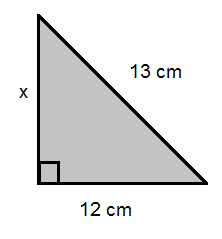
6. In the following triangle, we know the lengths of one side and the length of the hypotenuse. Use the Pythagorean theorem to calculate the length of the unknown side. Hint - re-arrange the formula first.
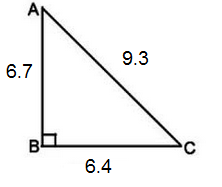
7. Find the length of the missing side or hypotenuse. Round answers to the nearest tenth.
a. 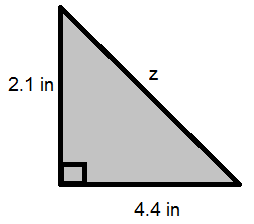
b. 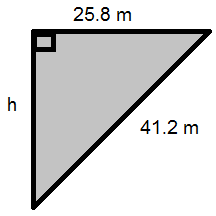
Once you have completed these exercises to the best of your ability, use the provided answer link to check your work.
If you feel comfortable with the concepts covered in the questions, move forward to Discover. It is also RECOMMENDED you work through the resources in the Refresher to review these important concepts before continuing through the lesson.
 Refresher
Are you able to tell if a triangle is a right triangle? Test your ability to do so by going to the multimedia piece titled “Right Triangle.” On the bottom of the website is an interactive definition of a right triangle.
Use the multimedia item titled “Pythagorean Theorem” to see another visual definition.
The multimedia piece titled “Exploring the Pythagorean Theorem” allows you to change the side lengths of a right triangle to see the effect on the length of the hypotenuse.
At the website, choose the “Interactive” button near the middle of the page. You will be presented with a visual explanation of the Pythagorean theorem.
Materials
-
ruler
-
protractor
-
calculator
-
graph paper
In addition, specific materials are required for the Going Beyond section where you have the opportunity to build a simple sundial. The materials you will require to build the sundial will depend on the design that you choose. You will find out what materials you need by doing an Internet search.
Discover
Module 1 Part 2: Trigonometry
Discover
 Watch and Listen

© Ramon Berk/shutterstock
Have you ever wondered how pilots calculate a safe angle of descent when they are landing 747 planes? Go to “Exploring Trigonometry” and view the video, which talks about how trigonometry is used at airports. You will find the video on the right-hand side of the website.
|
|

 Try This 1 - 4
Go to Try This 1 - 4 , print (or copy by hand) and complete each part on your page. Check your work using the link below.
Possible TT1-4 (Try This 1 - 4) Solutions
 Share
Share
Get together with another student or students (if possible) and compare your results.
-
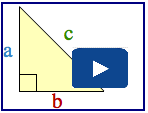
Compare the size of your triangle (the lengths of a, b, and c) with the other ones that have been posted on the discussion board. What do you notice?
-
Compare the ratios
 ,
,  , and
, and  with others in your class. What do you notice?
 -
Can you make a generalization from your results?
Try This
Go to Try This 5 - 6 , print and complete (or copy by hand).
Use the link below to check your answers to Try This 5 - 6.
Possible TT5 - 6 (Try This 5 - 6) Solutions
Explore
Module 1: Part 2 Trigonometry
Glossary Terms
Retrieve your handout titled “Glossary Terms” from your binder. Add the following terms:
-
adjacent side
-
cosine ratio
-
hypotenuse
-
opposite side
-
proportional
-
Pythagorean theorem
-
reference angle
-
right triangle
-
sine ratio
-
solving a triangle
-
tangent ratio
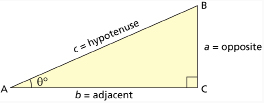
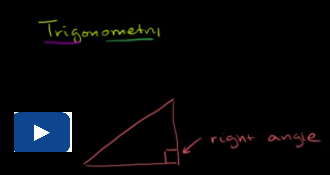
NAMING OF SIDES
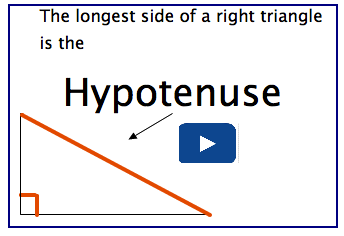
The three sides of a right triangle are known by three different names. You need to be able to identify the opposite side, the adjacent side, and the hypotenuse.
The term hypotenuse may already be familiar to you. Have a look at the diagrams where the orange arrows each point to the hypotenuse. Can you see a pattern? If you were given a right triangle, how could you identify the hypotenuse?
The great thing about the hypotenuse is that it never changes locations—it is always directly across from the right angle.
Did you discover that pattern when you viewed the diagrams?
The two other sides that you need to identify are the opposite side and the adjacent side. The location of these other two sides will change, depending on which angle is being considered in the question.
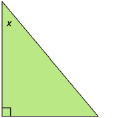
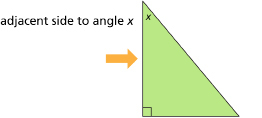
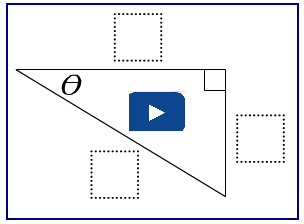
For example, if you had the triangle to the right, you can see that the angle we need to find is labelled x. So, in this case, x is the reference angle. Can you tell which side is opposite from angle x?
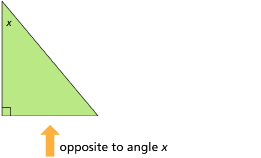
If you said the bottom, you are correct!
See how the bottom side is opposite (or directly across) from angle x? In this case, we would label the bottom as the opposite side.
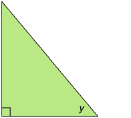
What about in the case to the left? Can you identify the opposite side if you are using angle y as the reference angle?
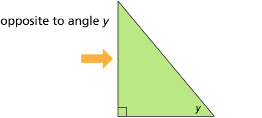
In this case, the left side is opposite from the reference angle.
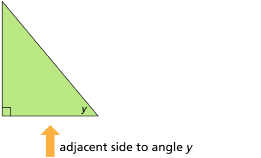
Now that you can label the hypotenuse and the opposite side of a right triangle, all you need to do is label the remaining side as the adjacent side. You can also think of the adjacent side as the side between the reference angle and the 90° angle. Please review the examples below.
Learn and Listen
The interactive piece titled “Shape and Space” allows you to practise identifying the sides of a triangle by dragging and dropping the opposite, adjacent, and hypotenuse sides into their correct locations. You can find the interactive piece on the right-hand side of the website.
 Self-Check
Complete the following self check using the link below to practice identifying the hypotenuse, the opposite side and the adjacent side.:
Explore 2
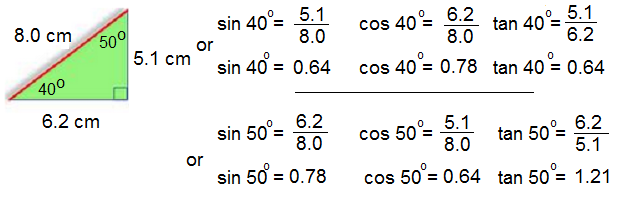
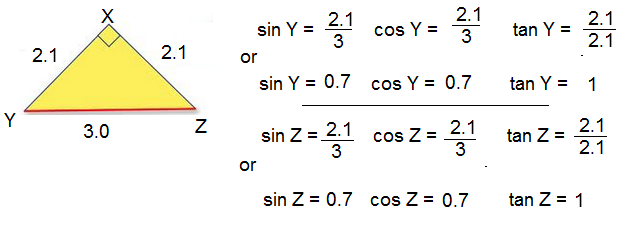
The ratios that you calculated in the Discover section were ![]() ,
,![]() and
and ![]() .
.
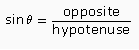
These ratios have names.
-
The sine ratio is the ratio of the length of the side opposite the reference angle to the length of the hypotenuse.

-
The cosine ratio is the ratio of the length of the side adjacent to the reference angle to the length of the hypotenuse.

-
The tangent ratio is the ratio of the length of the side opposite the reference angle to the length of the side adjacent to the reference angle.

The definitions can be summarized by the following:
|
|
|
|

Notice that the ratios are based on the location of the reference angle.
A great way to remember the trigonometric ratios is by using the following:
SOH CAH TOA
If you chant SOH CAH TOA many times, the chant will stay in your head. (It sounds like “soak-a-toe-ah!”) Here’s what it means:
-------------------------------------------------------------------------
 Tip
Tip
For any calculations involving trigonometry, you must make sure that your calculator is in the “Degree” mode. Have a look at the calculator screen. Typically, calculators will show “Deg,” “Rad,” or “Grad.” You need your calculator to show “Deg.” If you see either “Rad” or “Grad,” you need to press the mode button until you see “Deg.”
If you cannot find the mode button, or if your calculator does not show any of the “Deg,” “Rad,” or “Grad” modes, then you can find out how to change the mode by reading in the calculator’s manual. These manuals can be searched on the Internet by typing your calculator’s make and model number into a search engine.
It is extremely important that you are in Degree mode. If not, your calculations will not be correct.
----------------------------------------------------------------------------------
Learn and Listen
Watch this short video that shows how to find the sin, cos and tan of an angle given a triangle.
Here are some solved examples to study (all the sides are given so we do not have to use pythagorus)
1. Given the following triangles, state the sin, cos and tan for each of the acute angles in the triangle. ** Note - never find sin, cos and tan for the right angle**
a.
b. 
c.
Learn and Listen
Watch this short video that shows how to find the sin, cos and tan using your calculator.
Here are some solved examples to study ( and practice) for using your calculator to find sin, cos and tan.
1. Use your calculator to find the following values. ( round to the nearest thousandth)
a. sin 56o = 0.829
b. cos 32o = 0.484
c. tan 71o= 2.904
d. sin 22o = 0.375
e. cos 61o = 0.485
f. tan 29o = 0.554
 Self-Check
Complete the following self check using the link below to check your work.
1. Find the sin, cos and tan for the acute angles. Write your answer in both fractional and decimal form ( round the decimal form to the nearest thousandth).
a.
b. 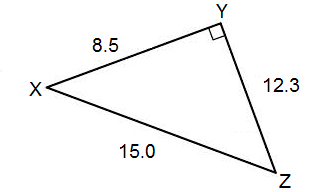
2. Use your calculator to find the following answers. Round to the nearest thousandth. ( Make sure your calculator is in degree mode).
a. sin 35o
b. cos 17o
c. tan 49o
d. sin 68o
e. cos 84o
f. tan 26o
Connect
Module 1 Part 2: Trigonometry
![]() Lesson Assessment
Lesson Assessment
Complete the lesson quiz posted under the Assess tab or by using the Quizzes link under the Activitires block. Also, ensure your work in your binder (course folder) is complete.
![]() Project Connection **NOT ASSIGNED**
Project Connection **NOT ASSIGNED**
At this time, you should work on your Unit 1 Project. Go to the Unit 1 Project, and complete the Lesson 7 portion of the project.
![]() Going Beyond
Going Beyond

Janis Christie/Photodisc/Getty Images
There are many uses of trigonometry. A sundial is a device that measures time based on the position of the Sun. A sundial is designed in such a way that the Sun casts a shadow from a sharp, straight edge onto a flat surface marked with lines that indicate the hours of the day.
In theory, a stick stuck in the ground could form the basis of a sundial. In reality, it’s not that simple. Earth’s axis is tilted, which means that the apparent movement of the Sun through the sky changes every day. If this isn’t accounted for, a sundial that tells perfect time today will be slightly wrong next week and very wrong next month.
See if you can find out how to build a sundial by doing a search on the Internet. Use the search terms “how to build a sundial.” Then look through a few of the websites to find a simple set of instructions.
(After you construct a real sundial, perhaps you will be interested in adding a virtual sundial into your unit project!)
In order to construct a sundial accurately, you will need to find the direction “due north” and you will also need to know the latitude of the town or city where you reside.
Note: Grande Prairie has a latitude of approximately 55°, Calgary is 51°, and Edmonton is 53°. You can go online to look up the latitude of your community. The multimedia piece Latitude Table shows a table that includes the latitude of many communities in Alberta.
Latitude & Longitude Table for Alberta
|
Place |
Latitude Deg (N) |
Latitude Min |
Longitude Deg (W) |
Longitude Min |
|
Acadia Valley |
51 |
12 |
110 |
04 |
|
Alix |
52 |
27 |
113 |
13 |
|
Alsands |
57 |
30 |
111 |
25 |
|
Barrhead |
54 |
08 |
114 |
24 |
Summary
Module 1 Part 2: Trigonometry
Lesson 7 Summary
In this lesson you examined the following key questions:
-
In what situations can the concepts of trigonometry be used to solve problems?
-
How do I determine the sine, cosine, and tangent ratios for a given angle in a triangle?
- How do I use my calculator to find, sin, cos and tan for a given angle?