Lesson 1
| Site: | MoodleHUB.ca 🍁 |
| Course: | Math 20-2 SS |
| Book: | Lesson 1 |
| Printed by: | Guest user |
| Date: | Tuesday, 30 December 2025, 7:25 AM |
Description
Created by IMSreader
1. Lesson 1
Module 1: Trigonometry
Lesson 1: Working with Multiple Triangles
Focus
Trigonometry can be used to determine distances and angles when it is not feasible to measure them directly.
For example, Gerard is a window washer who charges his clients based on the area to be washed. He knows the width of an office tower, but he also needs the height. Although he dressed up as Spiderman at Halloween, he can’t crawl up the outside of buildings. This means that he can’t just use a tape measure to determine the building’s height. He could, however, stand on the roof of an adjacent building and determine the height indirectly using trigonometry.
angle of depression: an angle with one horizontal arm, and one arm below horizontal
angle of elevation:an angle with one horizontal arm and one arm above horizontal
From the top of the adjacent building, Gerard uses a clinometer and determines that the angle of depression to the base of the office tower is 38° and the angle of elevation to the top of the office tower is 52°.
You will be presented with a number of definitions in this lesson. Remember to add any definitions and corresponding diagrams to your Glossary Terms document.
Gerard’s first step would be to draw a diagram. He might draw one like this:

You will notice that the diagram Gerard drew has two right triangles. You might remember from previous math courses that knowledge of trigonometry and the Pythagorean theorem will be helpful in solving problems that involve triangles.
In this lesson you will use the primary trigonometric ratios and the Pythagorean theorem to solve problems involving multiple right triangles.
This lesson will help you answer the following inquiry question:
- How can you use multiple triangles to solve indirect measurement problems?
Important!
Your calculator must be set to degree mode for all calculations done in Mathematics 20-2.
Just like there are different units of measure for distance (e.g., kilometres and centimetres), there are different units of measure for angles (e.g., degrees and radians). And just like you would get an incorrect answer if you used kilometres where centimetres were expected, you will get incorrect answers if you use radians or grads instead of degrees.
Have a look at your calculator screen. Typical calculators will show “Deg,” “Rad,” or “Grad.” If your calculator shows “Deg,” it is in degree mode. If your calculator shows either “Rad” or “Grad,” you need to press the Mode or DRG button until you see “Deg.”
If you cannot determine how to set your calculator to degree mode, you will need your calculator’s manual. These manuals can often be found on the Internet by entering your calculator’s make and model number into a search engine.
Assessment
- Lesson 1 Assignment
This lesson provides you with opportunities to investigate, discuss, and practise the knowledge and skills you are learning. For instance, in Try This and Share, you can check your answers with other students to see if you are on track. If you are having difficulty with concepts or calculations, contact your teacher.
All assessment items you encounter need to be placed in your course folder. You should have already had a discussion with your teacher about which items you will be handing in for marking. Make sure you follow your teacher’s instructions.
Save a copy of the Lesson 1 Assignment to your course folder. You will receive more information about how to complete the assignment later in this lesson.
Time
Each module is made up of lessons. Each lesson in Mathematics 20-2 is designed to be completed in approximately 80 minutes. You may find that you require more or less time to complete different lessons depending on your strengths. It is important that you progress at your own pace based on your individual learning requirements.
1.1. Launch
Module 1: Trigonometry
Launch
In a previous math course, you learned the primary trigonometric ratios:
You also learned the Pythagorean theorem:
a2 + b2 = c2
You may remember these ratios with the acronym SOH CAH TOA. The SOH CAH TOA Animation should help you remember these ratios.

Before working with multiple triangle problems, you should ensure you are comfortable with the primary trigonometric ratios and the Pythagorean theorem.
1.2. Are You Ready?
Module 1: Trigonometry
Are You Ready?
This section presents questions to help you determine if you have the skills and knowledge to complete this lesson successfully. Answer the questions and check your solutions. If you are experiencing difficulty, you may want to use the information in the Refresher section to clarify concepts before moving on to the Discover section.

1.3. Refresher
Module 1: Trigonometry
Refresher
This section will help refresh your memory on the use of primary trigonometric ratios and the Pythagorean theorem. Look at this section if you had difficulty with the questions from Are You Ready?
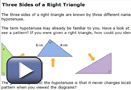
You may find it helpful to review Three Sides of a Right Triangle from the Mathematics 10C course.
The definitions for the primary trigonometric ratios are given in the following table.
| Trigonometric Ratio | Definition | Formula |
| sine | the ratio of the length of the side opposite the reference angle to the length of the hypotenuse | |
| cosine | the ratio of the length of the side adjacent to the reference angle to the length of the hypotenuse | |
| tangent | the ratio of the length of the side opposite the reference angle to the length of the side adjacent to the reference angle |
The interactive piece titled “Exploring Trigonometry” allows you to practise identifying the sides of a triangle by dragging and dropping the opposite, adjacent, and hypotenuse sides into their correct locations. You can find the interactive piece on the right-hand side of the website.
The sine, cosine, and tangent ratios can be used to determine lengths of sides and measures of angles. When you open the piece titled Finding Angles and Lengths Using Sine, Cosine, and Tangent Ratios, you can view examples of how each ratio is used.
Under the Finding Angles box, click “Sine,” “Cosine,” and “Tangent” to see examples of how each ratio can be used to determine missing angles depending on the information that you have. Then, under the Finding Lengths box, click “Sine,” “Cosine,” and “Tangent” to see examples of how each ratio can help to find missing side lengths in a right triangle.
You should now be more comfortable using the primary trigonometric ratios.
The Pythagorean theorem is defined as a2 + b2 = c2 where a and b are sides adjacent to the right angle and c is the longest side, called the hypotenuse.
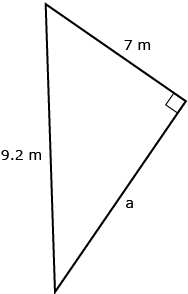
Example 1
Find y. The answer should be rounded to the nearest tenth of a metre.
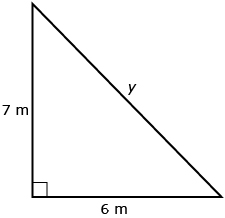
Use the Pythagorean theorem.

Take the square root of both sides.
y = 9.2 m
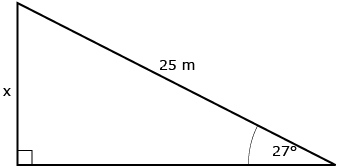
Example 2
Determine x.
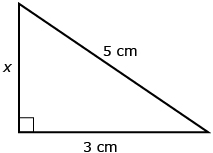
Use the Pythagorean theorem.
Go back to the section titled Are You Ready? Try the questions again. If you are still having difficulty, contact your teacher.
1.4. Discover
Module 1: Trigonometry
Discover
In previous math courses, the emphasis in trigonometry was single triangle problems. In Mathematics 20-2 you will be solving a variety of problems involving more than one triangle. In this section you will examine problems that involve more than one triangle and the strategies for solving for sides and angles.
Share 1
After a discussion with your teacher, you will decide how to connect with other students for Share activities. Follow your teacher’s instructions to complete this Share activity. Place a summary of your Share discussion in your course folder. For more information on Share discussions, refer to the Course Introduction.
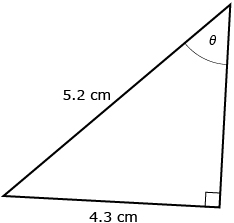
Eamon was asked to determine the length of side w in the following diagram.
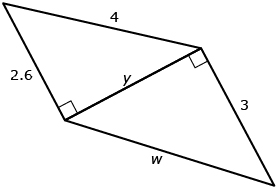
Eamon used the following steps to determine the length of side w:
Step 1: y2 + 2.62 = 42
Step 2: y2 + 6.76 = 16
Step 3: y2 = 16 − 6.76
Step 4: y2 = 9.24
Step 5:
Step 6: y = 3.0397...
Step 7: y = 3.0 |
Step 8: 32 + y2 = w2
Step 9: 9 + 9.24 = w2
Step 10: 18.24 = w2
Step 11:
Step 12: w = 4.2708...
Step 13: w = 4.3
|
With a partner, discuss and come to agreement on the following questions.
- The set of steps have been split into two groups. Describe what Eamon was doing in the left column, and describe what he was doing in the right column.
- Why did Eamon perform the steps in the left column?
Share 2
Nasreen was asked to determine the length of side p in the following diagram.
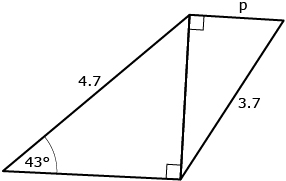
Nasreen used the following steps to determine the length of side p:
Step 1:
Step 2:
Step 3: 4.7(sin 43°) = y
Step 4: y = 2.6282...
Step 5: y = 2.6
Step 6: p2 + y2 = 3.72 |
Step 7: p2 + (2.6282...)2 = 3.72
Step 8: p2 − 13.69 − (2.6282...)2
Step 9: p2 = 10.4846...
Step 10:
Step 11: p = 3.2379...
Step 12: p = 3.2
|
Notice that Nasreen did not round her answers until she got to the final answer of the problem.
With a partner, discuss and come to agreement on the following questions.
- The set of steps have been split into two groups. Describe what Nasreen was doing in the left column, and describe what she was doing in the right column.
- Why did Nasreen perform the steps in the left column?
- Nasreen and Eamon both chose to group their solutions into two sets of steps. What is similar about their groupings?
1.5. Explore
Module 1: Trigonometry
Explore
Problems involving more than one triangle that share sides are very common. Using shared sides in triangles is, in fact, the core of triangulation used in map-making. If there is not enough information in a triangle to solve it, then a second triangle that shares one side is often used. Consider the following example.
Giovanni and Nakato work for a surveying company and they have been asked to survey the route for a new road. They need to determine the distance from point A to point D where the road will be constructed (marked as b on the following diagram). Unfortunately, this route goes through the middle of some marshland that is very wet, and they cannot directly measure between points A and D. Giovanni measured the distance between points C to B and ∠C and ∠ABD.

Giovanni has created a problem where two triangles share a side. ![]() can be used as a first step in solving for side b in
can be used as a first step in solving for side b in ![]() . Nakato decided to solve for the length of side AB and then used that to solve for the length of side b. Here is her solution for the length of AB:
. Nakato decided to solve for the length of side AB and then used that to solve for the length of side b. Here is her solution for the length of AB:
| Nakato chooses to use the tangent ratio. | |
| Multiply both sides by 86 as a first step in isolating AB. | |
| 86(tan 48°) = AB | The number 86 is cancelled on the right side. |
AB = 95.5126... |
Nakato has not rounded this number because it is not the final answer to this problem. |
Nakato continues, being sure to use her unrounded answer for the length of AB. The following is Nakato’s solution for the length of side b.
Nakato is writing AB instead of 95.5126... so she remembers to use the unrounded length of AB (see below). |
|
| Multiply both sides by AB in order to isolate b. | |
| AB(sin 51°) = b | AB is cancelled on the right side. |
| (95.5126...) (sin 51°) = b | Now Nakato replaces AB with the unrounded value calculated above.
Calculators often have an ANS key to signify the last calculated number. In this case, Nakato could enter ANS (sin 51°) in her calculator.
|
| b = 74.2272... | The unrounded value of b is 74.2272... |
| b = 74.2 m | Unless stated otherwise, round distances to the nearest tenth. |
Although these examples have concentrated on problems involving triangulation, multiple triangle problems show up in other areas where distances cannot be measured directly. You will work with some of these areas in the following Self-Check.
1.6. Explore 2
Module 1: Trigonometry
Self-Check 1
Be sure to check your answers to ensure that you understand the solution process.
- Now that you have looked at a number of examples involving two right triangles, Gerard’s problem from the beginning of this lesson can be solved. Recall that he wants to determine the height of an office building. Using the two triangles Gerard drew, calculate the height of the office building.
To view the solution, watch Gerard’s Solution.

- Complete “Practising” question 5 on page 161 of your textbook. Answer
- Complete “Practising” question 10 on page 168 of your textbook. Answer
1.7. Connect
Module 1: Trigonometry
Connect
Lesson Assignment
Go to the Lesson 1 Assignment that you saved to your course folder. Complete the questions.
As you complete this assignment, you may wish to answer electronically. To learn how to insert equations into a Word document, such as your lesson assignment, watch the video Inserting Equations in MS Word 2007. The video Inserting Shapes in MS Word 2007 shows how to insert shapes into a Word document.

1.8. Lesson 1 Summary
Module 1: Trigonometry
Lesson 1 Summary
When determining distances or angles in real-world problems, you often end up with diagrams that contain two right triangles that share a side. You can often use the primary trigonometric ratios to solve for the shared side in the first triangle; then use that side length to solve for a side or angle in the second triangle.
Remember that “primary trigonometric ratios” is the fancy way of referring to the following equations:
In the next lesson you will learn about trigonometry for oblique triangles (i.e., triangles that do not contain a 90° angle).