Training Room 2
| Site: | MoodleHUB.ca 🍁 |
| Course: | HCS3010: Workplace Safety Practices copy 1 |
| Book: | Training Room 2 |
| Printed by: | Guest user |
| Date: | Sunday, 14 December 2025, 9:40 PM |
Description
Created by IMSreader
1. Training Room 2
Training Room 2: Workplace Safety in Action
Introduction
Training Room 2 discusses five hazard topics:
- fire safety
- electrical safety
- ladder safety
- confined-spaces safety
- chemical safety
You will explore each of these five hazard topics and the practices that reduce the risks associated with them. You will demonstrate your ability to work with ladders and fire extinguishers.
You also will create one safety reference sheet for each hazard topic. In Training Room 2 Project, you will put the reference sheets together into your own Pocket Guide to Workplace Safety. Take a look at Training Room 2 Project now so that you know what information to collect as you work through the training room. Also remember to update your copy of Course Checklist as you work.
Keep the following guiding questions in mind as you work:
- What are the workplace safety practices for each of these hazards: fire, electrical, ladder use, confined spaces, and chemicals?
- How do you, as a worker, put these practices into use?
- What information would be helpful to include in your Pocket Guide for future use on the job site?
One last thing. You can work through the five topics in any order. Are you working with a ladder soon? Then start with Ladder Safety. Working with an electrician next week? Complete Electrical Safety this week.
1.1. Fire Safety
Training Room 2: Workplace Safety in Action
Fire Safety

iStockphoto/Thinkstock
On average, fires kill eight people each week in Canada (Fire Prevention Canada). You will learn the standards and practices that will help keep you safe from fire on your work site. You will focus on these questions:
- What workplace practices are required to prevent fires?
- How would you plan to address fire safety in your workplace?
- What are your employer’s and your responsibilites to manage fire hazards?
At the end of this section you will be able to
- justify the need for fire-safety legislation
- identify the fire classifications and compare the appropriate extinguishers
- identify the elements of fire
- develop a plan to safely address potential fire hazards
- identify fire-prevention methods
- use a portable fire extinguisher
You will demonstrate the use of a portable fire extinguisher to your teacher or to a qualified workplace safety instructor. At the end of this section, you will create a Fire Safety Reference Sheet as part of your Pocket Guide to Workplace Safety.
Fire safety is required by law. All businesses and buildings must follow the Alberta Fire Code (AFC). The AFC is a document that is designed to maintain adequate fire protection. Search the Internet to discover how the AFC is used.
What are your employer’s and your responsibilities to manage fire hazards? To learn your employer’s responsibilities, look at Section 2 of the Occupational Health and Safety Act (OHSA) (November 2010). Look up your responsibilities in Part 10 of the Occupational Health and Safety Code (OHSC) (2009).
![]()
With your classmates, discuss what you discovered about fire laws in Alberta and why fire legislation is need.
1.2. Page 2
Training Room 2: Workplace Safety in Action
Elements of a Fire
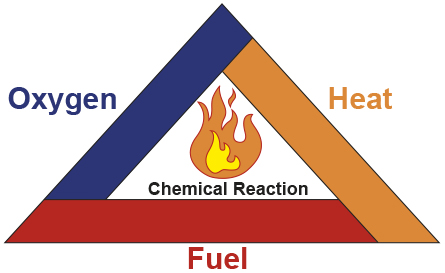
The elements of a fire are the three conditions that must be present in the right amount for fire to happen. The fire triangle (pictured) is a model used to show the required fire elements. Watch Smokey Bear’s “Fire Triangle” to learn about the three basic elements of a fire.

The best way to reduce the risks from fire is to prevent a fire from happening in the first place. How do you prevent a fire? “Fire prevention consists of making sure that the three elements are not present together in right amounts for a fire to occur.” (“Handling Flammable Materials at the Worksite,” Worksafe Alberta)
Fire Classifications and Fire Extinguisher Use
spells fire!
Fires can be classified into one of five groups based on the type of material involved. In Canada and the United States, the classification symbols are A, B, C, D, and K. This classification is also used to categorize the fire extinguishers that are used to effectively and safely put out the flames.
View Stop It Burning to review the components of fire and how to extinguish various types of fires with the correct type of fire extinguisher.

Search the Internet to learn about the four classes of fires and the type of fire extinguisher used for each class of fire. You can use the search term “fire classification Canada” to find the classifications used in Canadian workplaces.
You will need the following information to create your fire safety reference sheet:
- five classifications of fire
- type of portable fire extinguisher used for each type
Take notes of the information you find. Save your notes in your course folder. Remember to include your sources.
Check your knowledge of the ABCDs of portable fire extinguishers in “Matching Game: Fire Extinguishers and Fire Types.”

Learn How to P.A.S.S.
You will need to demonstrate to your teacher that you can use a fire extinguisher. The next two activities will teach you the four steps in using a fire extinguisher; in other words, P.A.S.S.
First, watch “How to Use a Portable Fire Extinguisher Training Video.”

Now you try! Practise what you learned by completing “How to Use a Fire Extinguisher.”
Portable Fire Extinguisher Use
Ready to demonstrate the use of a portable fire extinguisher to your teacher? Contact your teacher to demonstrate your new skill.
Your teacher may ask you to demonstrate your skill in a lab or in the field under the supervision of an individual with training in work-site/work-station safety. Depending on your situation, your teacher might ask you to demonstrate your skill in a virtual setting, such as by video or video conference.
1.3. Page 3
Training Room 2: Workplace Safety in Action
Fire Prevention and Plans
Following simple fire prevention practices can reduce the risk of fire happening at the workplace. When a fire does happen, there is no time to think. Having a plan in place to safely address a potential fire is required at the jobsite.
Watch how fast fire can spread in A Couch Fire. This video was four minutes long and was compressed to 17 seconds. Just think, in four minutes a smoldering fire can burst into a life-threatening blaze.

Use these questions to guide your search:
- What fire-safety practices can prevent fires from occuring at the workplace?
- Most workplaces have several practices in place to prevent fires. Try to list at least five of these practices.
- What do you do if a fire occurs at work?
- In case of fire, what should employers know? What should employees know?
![]()
Share what you found in your Internet search with your classmates. Discuss whether you agree or disagree with the strategies and plans found by each student.
![]()
Save your notes in your course folder. You can use the information you and your classmates gather to complete your Fire Safety Reference Sheet.
Fire Safety Reference Sheet
It is time to create your Fire Safety Reference Sheet, which you will include in your Pocket Guide to Workplace Safety in the Training Room 2 Project.
You can choose the format of your Fire Safety Reference Sheet. To decide which format to use, think about how you will use your Pocket Guide to Workplace Safety at work. For example, will you store your Pocket Guide on an iPod or cell phone, or will you carry a print-out to your worksite?
You might use a combination of text and pictures in a word-processed or presentation file, or you might create a graphic design or a video. Whatever format you choose, make sure your teacher is on board and that you include all necessary information and references.
You will organize your information into two sections: hazards and solutions.
Under hazards, include information about unsafe fire practices. Under solutions, include
- fire classification and extinguisher symbols
- a list of practices to prevent fires from occurring at the workplace
- a list of points in a plan to safely address potential fire hazards
Use Training Room 2 Project Rubric to make sure you have met all requirements.
Create a sub-folder called: “Pocket Guide to Workplace Safety.” Name the file that contains your work “Fire Safety Reference Sheet.”
Submit a draft of your completed Fire Safety Reference Sheet to your teacher for feedback. You will submit your final version for marks later in Training Room 2 Project.
Congratulations! You have finished the section on fire safety. You are now ready to go on to the next section of the Training Room 2. Are you remembering to keep your copy of Course Checklist up-to-date?
1.4. Electrical Safety
Training Room 2: Workplace Safety in Action
Electrical Safety

© Viorika Prikhodko/iStockphoto
Electrical hazards in the workplace can lead to injury of workers and risk of fire. In this section you will explore safe working practices for electrical safety. Use these questions as a guide:
- How can you identify electrical hazards where you live and work?
- What is the best strategy to ensure safe working conditions when working with electricity?
At the end of this section you will be able to
- identify potential electrical hazards at home, school, and in the workplace
- develop a plan to safely address potential electrical hazards
- create a personal strategy for establishing safe work conditions when working with electricity
- explain lockout/tagout procedures on electrical equipment
At the end of this section, you will create an Electrical Safety Reference Sheet as part of your Pocket Guide to Workplace Safety.
1.5. Page 2
Training Room 2: Workplace Safety in Action
Understanding Electrical Hazards
Electrical Injuries
Electrical contact can cause a large variety of injuries involving most organ systems. Most electrical injuries are classified as burns, electric-shock injuries, or eye injuries.
In addition to these injuries directly related to the electrical accident, the worker could be thrown or could fall. As a result, the worker may also suffer from fractures, spinal injuries, or internal injuries.
Watch Electrical Injuries to see some types of injuries from electricity.

Recognizing Electrical Hazards
Watch “electricity smarts wtih Shorty and Surge” to learn about the transmission and distribution of electricity, the danger of electrical hazards, and how to recognize electrical hazards in the home and outside. The “Home Smarts” and “Outside Smarts” sections of the cartoon will help you complete Discuss 3.

Look through “Electrical Incidents Can Be Avoided! Power Line Safety Tips” to learn about the hazards of overhead and underground power lines, how to work safely around them, and what to do in case of an accident involving a power line. You might need to expand your browser window to see the navigation controls.

Game time! Check your knowledge of electricity do’s and don’ts in Electricity Safety Game.

![]()
Now it is your turn to investigate potential electrical hazards where you work and live. Using your surroundings or scenarios from the Internet, find examples of possible electrical hazards from home, school, and/or work.
Remember, electricity can be extremely dangerous. If you find a real electrical hazard, do not touch it! Tell your teacher or workplace supervisor right away.
Share the examples you found with your teacher and classmates. Guide your discussion with these questions:
- What electrical hazards did you identify at home? at school? in the workplace?
- How would this knowledge be useful in developing a plan to safely address electrical hazards?
1.6. Page 3
Training Room 2: Workplace Safety in Action
Working with Electricity: Establishing Safe Working Conditions
In Discuss you started to think about what it means to develop a safety plan for working with electricity. When electricity is being used in a work environment, it is important to be aware of the hazards and to be prepared with a plan for safety. This can mean setting up rules and procedures for electrical safety that are communicated to everyone in the workplace.
Location Plan

iStockphoto/Thinkstock
Plans need to be in place at your workplace, school, and home to address electrical hazards. Specific plans need to be made for specific locations. A safety plan for your workplace may look very different than your home safety plan.To make a location plan for electrical safety,
- identify the electrical hazards found at the location
- idenfity practices that reduce risk of injury from those hazards
- make the safety practices easily available in writing to all workers
Personal Plan
You also need a personal plan to make sure that you are working in safe conditions when around electiricty either at home, school, or work. A personal plan is different from a location plan. A personal plan includes the steps you take to ensure your safety, wherever and whenever you are working with electricity.
Your personal plan for electrical safety should include the three keys of electrical safety. Learn about these three keys in “Working Safely Around Electricity.” Jump or scroll to page 44.
Lockout Procedures

Copyright 2006 Workers' Compensation Board of British Columbia
Richmond, B.C., Canada. All rights reserved.
Workers are required to use a lockout procedure when repairing or maintaining electrical equipment. This procedure may also be called a lockout/tagout procedure.
Watch “Lockout for woodworking” to find out why lockout procedures are required and how lockout procedures work. You will use the information in this presentation to develop your list of steps in lockout procedures as part of your Electrical Safety Reference Sheet.

Copyright 2006 Workers' Compensation Board of British Columbia Richmond, B.C., Canada. All rights reserved.
You will find that most provinces require that employers make lockout procedures easily available in writing to workers. Good practice is to post the lockout procedure beside electrical machinery. Find an example of a lockout procedure in the section “De-energization and Lockout” on page 7 of “Working Safely Around Electricity.”
Electrical Safety Reference Sheet
It is time to create your Electrical Safety Reference Sheet, which you will include in your Pocket Guide to Workplace Safety in the Training Room 2 Project.
Your Electrical Safety Reference Sheet must have three items:
- electrical safety plan for your choice of location, organized into two sections: hazards and solutions
- personal plan for establishing safe work conditions, incorporating the three keys of electrical safety
- steps in lockout procedures
You can choose the format of your Electrical Safety Reference Sheet. To decide which format to use, think about how you will use your Pocket Guide to Workplace Safety at work. For example, will you store your Pocket Guide on an iPod or cell phone, or will you carry a print-out to your worksite?
Be sure to include all necessary information and references. Use Training Room 2 Project Rubric to make sure you have met all requirements.
Name your file “Electrical Safety Reference Sheet” and save it in your Pocket Guide to Workplace Safety sub-folder.
Submit a draft of your completed Electrical Safety Reference Sheet to your teacher for feedback. You will submit your final version for marks later in Training Room 2 Project.
Pat yourself on the back! You have completed the electrical safety section. Update your copy of Course Checklist before you move on.
1.7. Ladder Safety
Training Room 2: Workplace Safety in Action
Ladder Safety
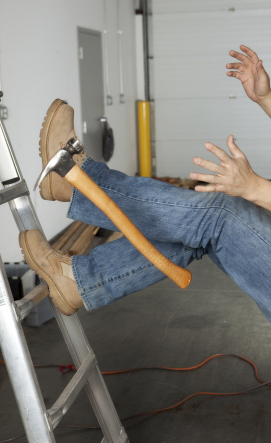
@ jabejon/iStockphoto
Improper use of ladders can lead to falls and serious injuries. In this section you will learn the standards and practices that will you keep you safe when using ladders on your work site. You will be guided by the following questions:
- What is the best ladder you can choose to safely work on your work site?
- How can you try to ensure the safety of workers using ladders in your workplace?
At the end of this section you will be able to
- identify what and when different ladders should be used
- diagram ladder-safety rules
- demonstrate the safe set-up and use of ladders
- demonstrate the proper inspection, care, and storage of ladders
You will demonstrate the safe set-up and use of a ladder to your teacher or to a qualified workplace safety instructor. At the end of this section, you will create a Ladder Safety Reference Sheet as part of your Pocket Guide to Workplace Safety.
1.8. Page 2
Training Room 2: Workplace Safety in Action
Choosing the Right Ladder for the Job

Courtesy of Gordon Coulthart and The Canadian
Agricultural Safety Association
The right ladder needs to be used for specific jobs, and safety precautions need to be taken. Proper procedures for ladder maintenance, set-up, and use also need to be followed to ensure worker safety.
There is a lot to learn about working at heights safely. Work through “Working at Heights” to get started.
Ladder Types and Uses
John Foxx/Stockbyte/
Thinkstock
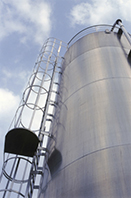
There are two types of ladders: permanently mounted ladders and portable ladders.
In some environments, ladders are fixed in place. They can be permanently mounted to large equipment, such as heavy machinery, or built on to the sides of structures, such as silos and large bins.
Brand X Pictures/Thinkstock
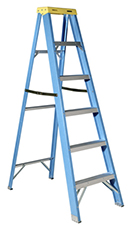
Most often, you will be using a portable ladder. Your first step in ladder use on the job site is to choose the right portable ladder for the job.
Portable ladders are used to gain access to higher areas and for performance work, such as painting an area at height. There are three classes of portable ladders. Ladders are classified based on their ability to withstand weight.
A portable ladder certified or rated as meeting the requirements of the CSA or ANSI standards is classified into one of the following categories.
| Intended Use | Load Rating | Ladder Grade/Type | Agency |
| Construction, Utilities, and Industrial | Heavy duty |
1 |
CSA |
| Light Maintenance, Office, or Farm | Medium duty |
2 |
CSA |
| Household Only | Light duty |
3 |
CSA |
Only CSA Grade 1 or ANSI Ladder Type 1A or Type 1 ladders should be used to support ladder jacks and scaffold planks.
It is important to choose the correct ladder for the job and worker involved. Each ladder type is designed with a specific purpose in mind. The ladder type you choose for a job depends on
- the height that needs to be reached (length of ladder)
- the work environment, including what the ladder will be exposed to (e.g., a wood ladder is best used near electricity)
- whether the surface that the ladder must stand on is uneven or even
- the duty rating, or the weight the ladder must hold including, for example, the worker, clothing, and equipment
- the type of work being done with the help of the ladder (e.g., Is scafolding needed?)
Go to LadderSafety.org, and click on “choose the right ladder.” Explore the different kinds of ladders you might use on the job site.
1.9. Page 3
Training Room 2: Workplace Safety in Action
Ladder Inspection
After choosing the right type of ladder for the job, your next step is to inspect the ladder. A ladder must be in proper working condition to be safe for use. Checklists are often used on the job site to make sure that a ladder is fit for use. Review this sample Checklist for Inspecting Ladder Before Use.
You will need to include a ladder inspection checklist as part of your Ladder Safety Reference Sheet.
Find a ladder inspection checklist on the Internet using the search words “ladder inspection checklist.” Compare the checklist you find to Checklist for Inspecting Ladder Before Use. Does the checklist you found have similar points? Is the checklist you found from a reliable source?
Save your checklist in a file called “Ladder Safety Reference Sheet” in your Pocket Guide to Workplace Safety sub-folder.
Ladder Set-up
Hemera/Thinkstock
A ladder must be set up correctly to be safe. You will need to demonstrate safe ladder set-up to your teacher or to a qualified workplace safety instructor. Follow these procedures for ladder set-up:
- Ladders should be placed so that each side rail is on level and firm footing and the ladder is rigid, stable, and secure.
- Boxes, loose bricks, or other loose packing should not support the side rails.
- No ladder should be placed in front of a door opening towards the ladder.
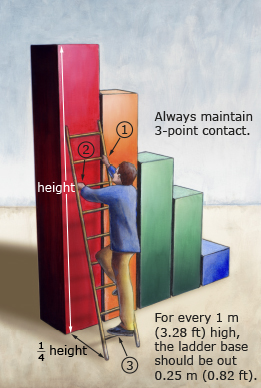
- The correct angle for a freestanding ladder is 4 to 1. For every four lengths up, the ladder should stand one length away from the supporting structure.
- Ladders should rise to a height of at least three feet above any landing place for people using the ladder.
- Ladders should be securely fixed at the top and base so that they cannot move from either point of rest. If this is not possible, a person should stand at the base of the ladder and secure the ladder manually.
Ladder Use
Like any tool, safety depends on the user. How you use a ladder will be key to your safety and the safety of others around you.
Safe ladder use means following these rules:
- Carry tools and supplies in belts or pouches around the waist, never in your hands.
- Do not use the top step of the ladder for standing or stepping.
- If you have a fear of heights, stop. Don't climb the ladder; let someone else do it.
- Read and follow the manufacturer’s warning stickers attached to the ladder.
- Only one person at a time may work from a single ladder.
- Always face the ladder when ascending or descending.
- Don’t use a ladder if it is missing or has a weakened, broken, or otherwise defective rung or tread.
- No metal ladder or ladder reinforced with wire should be used in the vicinity of any electrical conductor or any electrical equipment.
- Always maintain three points of contact with the ladder (two feet and one hand or two hands and one foot should be in contact with the ladder at all times).
- A ladder should not be used for any use other than its correct use as a ladder. For example, do not use a ladder in place of scaffolding.
Source: “Tips on Ladder Safety,” Alberta Construction Safety Association
Watch “Ladder Safety” to see the correct set-up, use, and storage of ladders.

© 2001, 2002, 2008, 2009 Workers’ Compensation Board of British Columbia. All rights reserved.
View Introduction: Ladder Safety to review the safe operation of various types of ladders and scaffolds.

Check your knowledge of safe ladder set-up and use by playing the “The Ladder Challenge.” Compare your score with the scores of your classmates and your teacher!

1.10. Page 4
Training Room 2: Workplace Safety in Action
Safe Ladder Use
Demonstrate two ladder-safety skills to your teacher:
- safe set-up and use of ladders
- ladder inspection, care, and storage
Your teacher may ask you to demonstrate your skill in a lab or in the field under the supervision of an individual with training in worksite/workstation safety. Depending on your situation, your teacher might ask you to demonstrate your skill in a virtual setting, such as by video or video conference.
Ladder Safety Reference Sheet
Create your Ladder Safety Reference Sheet, which you will include in your Pocket Guide to Workplace Safety in the Training Room 2 Project.
Organize your information into two sections: hazards and solutions.
Under hazards, include information about unsafe ladder practices.
Under solutions, include the following:
- diagrams of ladder-safety rules
- your ladder inspection checklist
- information about proper ladder care and storage
You can choose the format of your Ladder Safety Reference Sheet. To decide which format to use, think about how you will use your Pocket Guide to Workplace Safety at work. For example, will you store your Pocket Guide on an iPod or cell phone, or will you carry a print-out to your worksite?
You might use a combination of text and pictures in a word-processed or presentation file, or you might create a graphic design or a video. Whatever format you choose, make sure your teacher is on board and that you include all necessary information and references. Use Training Room 2 Project Rubric to make sure you have met all requirements.
Save your work in the file you created and named “Ladder Safety Reference Sheet” in your Pocket Guide to Workplace Safety sub-folder.
Submit a draft of your completed Ladder Safety Reference Sheet to your teacher for feedback. You will submit your final version for marks later in Training Room 2 Project.
1.11. Confined-Spaces Safety
Training Room 2: Workplace Safety in Action
Confined-Spaces Safety
© 2001, 2002, 2008, 2009 Workers’ Compensation Board of British
Columbia. All rights reserved.
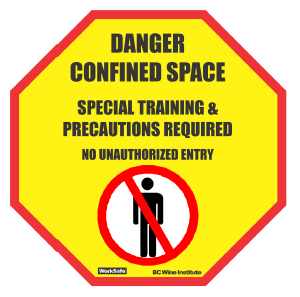
This warning sign lets you know that a confined-space danger exists. But there are many examples of dangerous confined spaces that are not identified with this label. This section will help you identify confined spaces. You will learn the standards and practices for confined-space safety. You need special training, outside of this course, to work in confined spaces.
The hazards of a confined space can cause severe injury or death. WorkSafeBC provides the following guidance: “You must follow special precautions and procedures before you enter. Even if you just put your head through the opening, you are entering a confined space. NEVER enter a confined space unless you have the training and knowledge to work safely.” (© 2001, 2002, 2008, 2009 Workers’ Compensation Board of British Columbia. All rights reserved.)
You will be guided by the following questions:
- How do you assess the hazards that may be present in a confined space?
- What additional training do workers need before working in a confined space?
- How can you try to ensure the safety of workers entering a confined space in your workplace?
At the end of this section you will be able to
- identify a confined space and the risks of a confined space
- identify what tests should be completed before entering a confined space
- create a plan to be used before entering a confined space
- discuss the need for a rescue plan, what should be included, and what training rescuers should have
You will create a Confined-Spaces Safety Reference Sheet as part of your Pocket Guide to Workplace Safety.
![]()
If your job involves confined spaces, your employer is required to train you to recognize enclosed spaces and to work in them safely. Read “Part 5: Confined Spaces” of the Occupational Health and Safety Code to learn what training you must have if you are asked to work in a confined space. The Occupational Health and Safety Code is in place to keep you safe. This law only keeps you safe if both you and your employer know and follow the rules.
What are your employer’s responsibilities to keep you safe around confined spaces? What are your responsibilities as a worker? With your classmates, discuss what you found out about the confined-spaces laws in Alberta and why the laws are need.
This course is not designed to train you to work in confined spaces. As you read in Discuss 1, you need a qualified person to train you to work in confined spaces. This section will give you awareness about confined spaces that could save your life.
1.12. Page 2
Training Room 2: Workplace Safety in Action
Identifying Confined Spaces and the Risks

iStockphoto/Thinkstock
Some day you may be at your job site, perhaps standing in front of a shed, thinking back to this course and the questions you came across. Sometimes knowing the questions to ask is the most important part of keeping safe. You may be asking yourself
- What exactly is a confined space? Is a shed a confined space?
- Which confined spaces are risky? Can a simple shed be dangerous?
Work through the following activities to answer these questions.
- Watch “Safe Yesterday, Deadly Today: Confined Spaces Part 1” to learn what a confined space is and which confined spaces are dangerous.

© 2001, 2002, 2008, 2009 Worker's
Compensation Board of British Columbia.
All rights reserved.
- Find further information on what a confined space is and what the risks are in “Hazards of Confined Spaces.” Look for the section called “What is a confined space?” beginning on page 1.
- Think about the risks the following confined spaces could pose:
|
|
|
Testing Confined Spaces
You can now identify a confined space. This is important knowledge! Now, how do you know whether a confined space is safe to enter?
The safety of a confined space depends on the potential hazards of the particular confined space. Before entering a confined space, you need a plan for the space. As part of your assignment for this section, you will create a confined-space entry plan. Watch “Test to Live: Confined Spaces Part 2” to learn about testing a confined space and examples of some confined-space entry plans.

© 2001, 2002, 2008, 2009 Worker's Compensation Board of British Columbia. All rights reserved.
Confined-Space Rescue

iStockphoto/Thinkstock
Imagine you are looking into a storage bin and you see your best friend has collapsed. You call out, but she doesn’t answer. Your first thought is to run into the bin to save her. Are you likely to be able to save her?
Six out of ten people killed in confined spaces are rescuers.
Watch “Rescue: Just Calling 911 Doesn’t Cut It—Confined Spaces Part 3” to learn about rescue from a confined space.

© 2001, 2002, 2008, 2009 Worker's Compensation Board of British Columbia. All rights reserved.
![]()
Using the scenarios and expert opinions you heard in the video, discuss confined-space rescue with your classmates and teacher. Use these questions to guide your discussion:
- What should be included in a rescue plan?
- What steps should be followed when entering a confined space, including when you enter to rescue?
- What training should rescuers have and why?
Confined-Spaces Safety Reference Sheet
It is time to create your Confined Spaces Safety Reference Sheet, which you will include in your Pocket Guide to Workplace Safety in the Training Room 2 Project.
For your Confined Spaces Safety Reference Sheet, create a plan to be used before entering a given confined space. Search the Internet for examples of confined-space entry plans. Use the resources from this section and the ideas you shared with your classmates in the development of your plan.
You can choose the format of your Confined Spaces Safety Reference Sheet. To decide which format to use, think about how you will use your Pocket Guide to Workplace Safety at work. For example, will you store your Pocket Guide on an iPod or cell phone, or will you carry a print-out to your worksite?
You might use a combination of text and pictures in a word-processed or presentation file, or you might create a graphic design or a video. Whatever format you choose, make sure your teacher is on board and that you include all necessary information and references. Use Training Room 2 Project Rubric to make sure you have met all requirements.
Name your file “Confined Spaces Safety Reference Sheet” and save it in your Pocket Guide to Workplace Safety sub-folder.
Submit a draft of your completed Confined Spaces Safety Reference Sheet to your teacher for feedback. You will submit your final version for marks later in Training Room 2 Project.
1.13. Chemical Safety
Training Room 2: Workplace Safety in Action
Chemical Safety
© rnl/38337727/Fotolia
In Training Room 1 you began to learn about safety controls for working with hazardous materials. In this section you will learn more about WHMIS, the system used to regulate the use of these controlled products. You will learn the standards and practices that will you keep you safe around hazardous chemicals on your work site by answering these questions:
- What are controlled products?
- What safety systems do I follow when working with hazardous chemicals?
- When working with hazardous chemicals, what are the responsibilites of suppliers of chemicals, employers, and workers?
At the end of this section you will be able to
- identify the classes of WHMIS-controlled products
- describe the role of labels on containers of controlled products
- describe the type of information found on supplier labels and user labels
- describe the role of Materials Safety Data Sheets (MSDS) and the type of information found on them
- explain what you as a worker, your employer, and the chemical-supply company are each responsible for in the safe handling of chemicals
1.14. Page 2
Training Room 2: Workplace Safety in Action
Chemicals are present in every part of your work and home life. Watch "Dealing with Chemical Safety" to learn more about the risks and hazards of chemicals and what control measures can be instituted for the safe storage and transportation of chemicals.
The dangers of hazardous materials can come from an explosion, fire, skin contact, breathing in, or swallowing the chemicals. The level of risk usually depends on one or more of six factors.
![]()
As you learned in HCS3000, employers are required to instruct all workers who work with or are in the proximity of controlled products (hazardous materials). Controlled products is the term given to hazardous chemicals that are regulated by law.
Explore the laws that state the responsibilites of employers and you, the worker, when you are working around controlled products in Part 4 of the Alberta Occupational Health and Safety Code.
With your classmates, discuss what you discovered about chemical-hazard laws in Alberta and why this legislation is needed.
-
how much pressure there is
- how easily the material burns or explodes
- how much of the material there is
- how toxic the material is
- how the material enters your body
- how concentrated the material is
1.15. Page 3
Training Room 2: Workplace Safety in Action

Dynamic Graphics/liquidlibrary/Thinkstock
As you learned in Training Room 1, WHMIS is part of the administrative controls put in place to reduce risks that come with using controlled materials, or chemicals, in your workplace. You also learned that other controls, such as using the correct personal protective equipment, is important when using controlled substances.
Can you think of other controls of chemical hazards that you identified while completing Training Room 1?
Workplace Hazardous Materials Information System (WHMIS)
You will recall from Training Room 1 that WHMIS is organized into three areas:
- labels
- Materials Safety Data Sheets
- worker education
It is time to learn a little more about each area.
Labels

How do you identify a controlled product? Labels are the key. WHMIS labels provide information a worker needs in order to handle a product safely. At your workplace you will need to know about the WHMIS symbols used on labels and the six classes of controlled products.
There are two types of labels used to identify hazardous chemicals: supplier labels and workplace labels.

Hemera/Thinkstock
Supplier labels are put on controlled products by the suppliers of hazardous materials. Supplier labels are easy to recognize because they have a slash-marked border.There are seven pieces of information on supplier labels.
Workplace labels are used only by employers and workers. Workplace labels must give workers the information they need to handle the product safely. There is no standard form for workplace labels. There are three pieces of information on workplace labels.
Discover the WHMIS symbols and their meanings in "Introduction to WHMIS Terms".
Materials Safety Data Sheets

book: iStockphoto/Thinkstock
Materials Safety Data Sheets are also known on the job site as MSDS. Does this sound uninteresting and like something other people will take care of on the job? In fact, MSDS are used by workers like you, often as part of their daily work life. MSDS can be a key resource for you on the job, especially if you are handling hazardous chemicals that are controlled products.
MSDS must be
- completed for each controlled product at the work site
- kept in a place that is easily accessible for the workers
There are nine pieces of information that should be on a MSDS.
View “Appendix 5A—The 9-section MSDS” to see a sample format for a MSDS. A completed generic MSDS can also be viewed at “Appendix 5C—Example of a Completed Generic MSDS.” Note that all of a work site’s MSDS are usually kept in a binder labelled “MSDS.” You should be familiar with the format of the MSDS that your workplace uses.
Education

Purestock/Thinkstock
By law, it is your employer’s duty to provide training when you work directly with or in the proximity of controlled products. There are six components of WHMIS worker-education training.
Keep these five actions in mind to protect yourself around hazardous products.
Now you know a lot about WHMIS and how is it used in the workplace. View the last six minutes of this video “Making WHMIS Work (Part 2).” You will need information from this video to complete Training Room 2 Project.

© 2001, 2002, 2008, 2009 Worker's Compensation Board of British Columbia. All rights reserved.
You can also watch WHMIS (Series: SafetyCare) to learn more about the classes of controlled products, hazard symbols, labeling, and MSDS.

Need even more information about WHMIS? The “WHMIS at Work” booklet from WorkSafe BC contains the basics of WHMIS. The booklet also includes responsibilities of suppliers, employers, and workers, and plans for how to use WHMIS at work. This booklet might be a big help when you are creating your Chemical Safety Reference Sheet.
1.16. Page 4
Training Room 2: Workplace Safety in Action
Because you may have to deal with hazards in the workplace, your employer will want you to know something about WHMIS even before you come in on the first day of work. Being able to show your employer that you have studied about WHMIS and even passed a WHMIS awareness test would be a great asset for you.
Search the Internet for a WHMIS quiz. There are many available. Pick one, and complete the quiz. Record your results by taking a screen shot of your completed quiz and the results.
Save your results in a file called “WHMIS Quiz.” You will submit this file to your instructor later as part of your Training Room 2 Project.
Chemical Safety Reference Sheet
It is time to create your Chemical Safety Reference Sheet that will become part of your Pocket Guide to Workplace Safety.
You will organize your information into two sections: hazards and solutions.
Under hazards, include the six classes of WHMIS-controlled products and their symbols.
Under solutions, include the following components:
- labels
How do you recognize a supplier label? What information is found on the supplier label? How do you recognize a workplace label? What information is found on the workplace label? - chemical-safety responsibilities
What do you need to do? What must your employer do? What must the supplier do? - personal plan
Where do you find the precautionary measures you need to read before working with a controlled product? Where will you find this information? In case of an accident, where do you find first-aid information for a controlled product?
Use the resources provided in this section to make your plan, describe the labels, and list the chemical-safety responsibilites in the workplace.
You can choose the format of your Chemical Safety Reference Sheet. To decide which format to use, think about how you will use your Pocket Guide to Workplace Safety at work. For example, will you store your Pocket Guide on an iPod or cell phone, or will you carry a print-out to your worksite?
You might use a combination of text and pictures in a word-processed or presentation file, or you might create a graphic design or a video. Whatever format you choose, make sure your teacher is on board and that you include all necessary information and references.
Use Training Room 2 Project Rubric to make sure you have met all requirements.
Name the file that contains your work “Chemical Safety Reference Sheet.” Save the file in your Pocket Guide to Workplace Safety sub-folder.
Submit a draft of your completed Chemical Safety Reference Sheet to your teacher for feedback. You will submit your final version for marks later in Training Room 2 Project.
Another section is complete. Congratulations! How are you doing with your Course Checklist?
1.17. Project
Training Room 2: Workplace Safety in Action
Project
In Training Room 2 you are asked to demontrate the following skills to your teacher:
- use of portable fire extinguishers
- safe set-up and use of ladders
You will also be asked to create a safety reference sheet for each of the five hazard topics covered:
- fire safety
- electrical safety
- ladder safety
- confined-spaces safety
- chemical safety
Together, your five safety reference sheets will make up a Pocket Guide to Workplace Safety, which you will submit for assessment. You will be able to take your Pocket Guide with you to use at your work site. The kind of information to include in each reference sheet will be outlined for you in each section of the training room.
You can choose the format of your reference sheets and, ultimately, your Pocket Guidet. To decide which format to use, think about how you will use your Pocket Guide to Workplace Safety at work. For example, will you store your Pocket Guide on an iPod or cell phone, or will you carry a print-out to your worksite?
You might use a combination of text and pictures in a word-processed or presentation file, or you might create a graphic design or a video. Whatever format you choose, make sure your teacher is on board and that you include all necessary information and references.
Preparation
What Is Required?
To demonstrate your skill with ladders and fire extinguishers, you must have access to a materials work centre and to instruction from an individual with specialized training in work-site and/or work-station safety.You will need the supplies and/or software necessary to create your Pocket Guide.
What Do I Need To Do?
In the training room you will be told when and how to demonstrate your skills to your teacher. You will also be given specific instructions on what must be included in your five safety reference sheets.
Keep the guiding questions for this training room in mind as you work:
- What are the workplace safety practices for each of these hazards: fire, electrical, ladder use, confined spaces, and chemicals?
- How do you, as a worker, put these practices into use?
- What information would be helpful to include in your Pocket Guide for future use on your job site?
How Do I Do It?
- Complete Training Room 2: Workplace Safety in Action.
- Collect and organize information on the five hazard topics covered in the training room. You will be given the requirements for each of your five safety reference sheets in the training room.
- Create your own safety reference sheet for each hazard topic using text and pictures to reveal your knowledge of the safety principles and practices that exist to keep you safe on the job site.
- Combine your five safety reference sheets into one file and name this file “Pocket Guide to Workplace Safety.” Make any changes recommended by your teacher.
What Do I Already Know?
From Training Room 1, you know the three main types of controls used to reduce or elliminate risks associated with the main workplace hazards. You also know the five steps you can use to put safety principles into practice at the work site.
Demonstration
In Training Room 2 you are asked to demontrate the following skills to your teacher:
- use of portable fire extinguishers
- safe set-up and use of ladders
You might demonstrate your skill in a lab or in the field under the supervision of an individual with training in work-site and/or work-station safety. Depending on your situation, you might demonstrate your skill in a virtual setting, such as by video or video conference.
Assessment
Summative Assessment (Project)
When marking project assignments, your teacher will consider the extent to which you do the following:
- Follow the directions given for the project.
- Collect, analyze, and interpret information appropriately with supporting details.
- Organize information in an appropriate way that allows information to be easily located and read.
- Communicate ideas clearly and correctly, including citing references.
- Present your ideas in a clear and appealing format, using appropriate supporting information.
Your teacher will assess your work using the Training Room 2 Project Rubric.
Formative Self-Assessment (Reflection)
Respond to the Formative Self-Assessment Reflection Questions once you have completed the project.
![]() Remember to save all of your work in your course folder.
Remember to save all of your work in your course folder.
Project Summary
Once you have completed this project, submit your completed Formative Self-Assessment Reflection Questions and your Pocket Guide to Workplace Safety to your teacher.
Your teacher may ask you to present your reflection and your Pocket Guide.
Next Steps
You are so close to finishing this course. Move forward to Wrapping Up.