Training Room 3
| Site: | MoodleHUB.ca 🍁 |
| Course: | INF2050 |
| Book: | Training Room 3 |
| Printed by: | Guest user |
| Date: | Friday, 26 December 2025, 9:51 AM |
Description
Created by IMSreader
1. Training Room 3
Project 3: Documents for Personal and Business Use
Training Room 3: Graphics
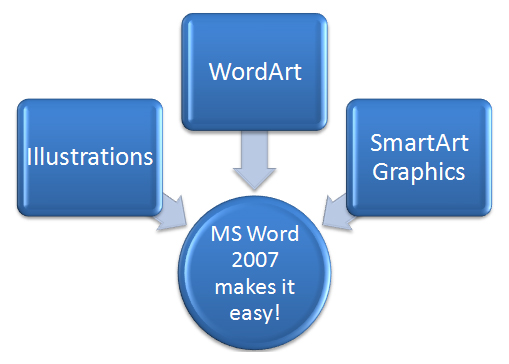
You have probably already used word-processing software to create posters and title pages for your school projects and community activities. Now it’s time to bring your documents to life by enhancing them with graphics, WordArt and Microsoft Word’s SmartArt. With Microsoft Word 2007 it is easy to create eye-catching, visually appealing, professional-looking documents that get great results.
Microsoft product screen shot(s) reprinted with permission from Microsoft Corporation.
In this training room you will
- learn how to modify bullets to create checklists 
- create eye-catching SmartArt graphics
- create custom letterheads and stationery templates that stand out
- create professional-looking newsletters
- practise creating stunning displays
- read and watch demonstrations to learn about using graphics
- use the software to complete four practice activities
- use Help menus and online references for software assistance when you need it
- save practice activities in your INF2050: WP 2: Graphics folder
- check your work using provided exemplars and answer keys
1.1. Page 2
Project 3: Documents for Personal and Business Use
Bullets and Numbering
Microsoft product screen shot(s) reprinted with permission from Microsoft Corporation.
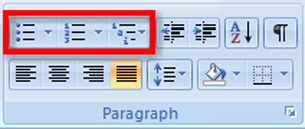
Bullets and numbers help you organize your thoughts and make information easier for your readers to follow. Using the Bullets, Numbering, and Multilevel List buttons found on the Home tab of your Microsoft Word 2007 ribbon, you can easily create bulleted, numbered, and multilevel lists. There are a few ways you can add bullets and numbers to your document:
- You can start bullets by typing an asterisk (*) and then the Tab key or the spacebar. Each time you press Enter, the next bullet will be added. Or, you can simply click the Bullets button on the Home tab before you type the text.
- You can start numbering by typing “1.” and then hitting the Tab key or the spacebar. Each time you press Enter, the next number will be added. Or, you can simply click the Numbers button on the Home tab before you type the text.
- You can also select text you have already entered into your document and then click the Bullets or Numbering buttons and choose your preferred formatting.
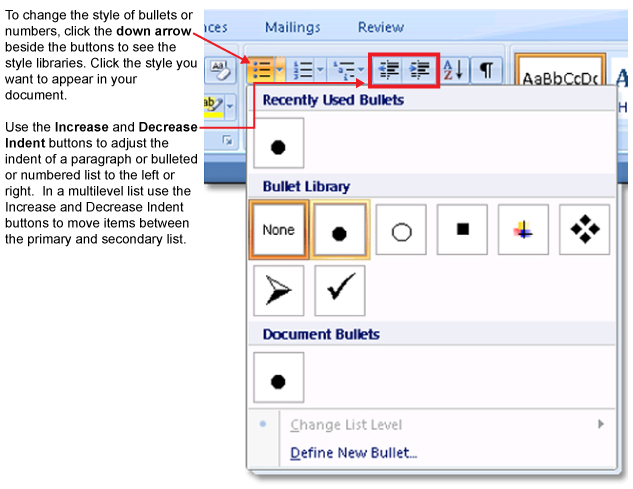
You can change the bullets or numbers by clicking the down arrow beside each button to access a library of different bullet symbols or number formats. Options include changing your list to a checklist that you can then put into action.
Microsoft product screen shot(s) reprinted with permission from Microsoft Corporation.
Go to the Instructional Videos and watch “The Multilevel List Feature” and “The Bulleted and Numbered List Feature” to learn or review how to create bulleted and numbered lists.
Go to the Instructional Videos and watch “Bullets” to see how to quickly change bullet characters into different symbols to create a printable checklist to keep yourself organized.
Microsoft product screen shot(s) reprinted with permission from Microsoft Corporation.
Want to make more quick changes to the look of the text in your document? Use the Font dialog box in the Home tab to bring up the Font menu. Here you can change the font, size, style, and colour of your text, and even add effects. When you click on Character Spacing, you can adjust the spacing of characters to expand and condense, or use Scale to stretch or compress characters. Go to the Instructional Videos and watch “Scale/Spacing” to see how to access and modify the font and character settings.
1.2. Page 3
Project 3: Documents for Personal and Business Use
Creating SmartArt Graphics
Graphics and illustrations draw your audience into your work, helping them to understand and remember important facts. SmartArt graphics in Microsoft Office 2007 allow you to focus readers’ attention on your ideas and information by directing their eyes to your visually appealing, professional-looking graphics.
Go to the Instructional Videos and watch “SmartArt” to learn how to create simple yet effective SmartArt graphics, like this pathway to becoming Microsoft Word Certified, to express your ideas and intrigue your audience.

Microsoft product screen shot(s) reprinted with permission from Microsoft Corporation.
Take some time to experiment with and explore SmartArt graphics, and open your mind to their possible uses in all of your documents. Be sure to check your Help menu for more tips and demonstrations on how to use SmartArt graphics.
1.3. Page 4
Project 3: Documents for Personal and Business Use
Creating Custom Letterheads and Stationery Templates
You don’t need to be a graphic artist to design good-looking letterheads ‚Äî you have all the tools you need right in Microsoft Word. Let’s learn how to use text boxes, graphics, watermarks, and backgrounds to create professional-looking stationery. You will also learn how you can save your stationery as a template so you can reuse your creations again and again to save time and money.

© svetlin rusev/shutterstock
Go to the Instructional Videos and watch “Creating a Letterhead” to learn how to create a custom letterhead you and your boss will be proud of.
It is important to explore all the features and options in the Tools menus that appear when you select text boxes, graphics, and illustrations. The Picture tools, Drawing tools, and Text Box tools allow you to modify and manipulate your objects until they are perfect for your document. Take some time to experiment after you go to the Instructional Videos and watch “Picture Tools, Text Tools, Formatting Tools on the Ribbon.” You’ll be surprised by how quickly you can customize your work.
Microsoft product screen shot(s) reprinted with permission from Microsoft Corporation.

Microsoft product screen shot(s) reprinted with permission from Microsoft Corporation.
Watermarks and backgrounds can add colour and dimension to your documents. A watermark is washed-out text or graphic elements that appear faintly behind a document‚Äôs text. Watermarks are used to enhance the look of a document, or to provide information about the document, such as that it is a “Draft Copy.” Go to the Instructional Videos and watch “Creating a Watermark” to learn how to add a watermark to your document. To see how a watermark will appear on the printed page, use the Print Layout view.
When you have created a custom document, you can save it as a template so that the document can be reused without having to recreate it or edit out unwanted content each time. Saving a document as a template creates a copy of that document, allowing you to edit the new copy without changing the original. Templates save time if you use a certain type of document frequently. In business, companies increase productivity by using templates to generate common business correspondence with their corporate letterhead, such as monthly billing statements.
Go to the Instructional Videos and watch “Word Template” and “Opening a Saved Template” to learn how to save your document as a template that you can reuse.
1.4. Page 5
Project 3: Documents for Personal and Business Use
Create Professional-Looking Newsletters

© Dimitar Bosakov/shutterstock
You are learning so many skills to make your work look great. Now let’s look at how you can use Microsoft Word to create professional-looking newsletters. It’s easy—format your running text into columns, insert some graphics and pictures, make a cool title, and you’re done.
Go to the Instructional Videos and watch “Newsletter” to see how you can convert plain text into an eye-catching newsletter using the Columns and Breaks functions on the Page Layout tab in the ribbon.

Microsoft product screen shot(s) reprinted with permission from Microsoft Corporation.
1.5. Time to Practice 3
Training Room 3: Graphics
Time to Practise 3
Instructions
Don’t forget to do the following as you work through this Time to Practise:
- Study the content, exemplars, graphics, and demonstrations presented in this training session, and review previous training sessions if necessary.
- Keyword-search the Help menu and online Help references, such as Microsoft Office Online Help and How-to, for additional software tips and training.
Practice 1
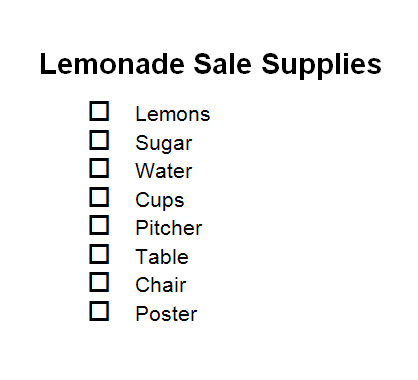
Organized people know the value of a checklist. In this practice, you can choose to create either a personal to-do checklist OR a shopping list that you can print. Creating this list will help you practise the personal management skills that you examined when you looked at basic competencies.
Step 1: Open a new, blank Microsoft Word document.
Step 2: Save the file as “List” in your INF2050: WP 2: Graphics folder.
Step 3: Create the following shopping list, OR create a personal to-do list containing a minimum of five items of your choosing.
SHOPPING LIST
- Milk
- Cheese
- Yogurt
- Carrots
- Broccoli
- Celery
- Apples
- Oranges
- Bananas
Step 4: Use checkboxes ( ) rather than bullets.
Step 5: Format the title for your checklist by opening the Font dialog box and experimenting with commands in the Font and Character Spacing tabs.
Step 6: Save the document.
Practice 2
Explore and have fun designing your own SmartArt Graphics.
Step 1: Open a new, blank Microsoft Word document.
Step 2: Save the file as “SmartArt” in your INF2050: WP 2: Graphics folder.
Step 3: Create a SmartArt graphic. Here are some ideas:
- your family tree
- a “how-to” diagram
- discography of your favorite musician or band
- a movie list that makes connections between actors, genre, or director
Step 4: Save your document when you are happy with its final look.
Practice 3
Do you really want to get a potential employer’s attention? Create your own personalized letterhead that you will save as a template so you can reuse it for all of your letter-writing needs.
 
Step 1: Open a new, blank Microsoft Word document.
Step 2: Custom-design a personal letterhead using graphics and text boxes.
Step 3: Make sure the letterhead is no larger than 1" in height so that you have room for the body of any letter.
Step 4: Include a watermark.
Step 5: Save as a template called “Letterhead” in your INF 2050: WP 2: Graphics folder.
Practice 4
Does your text look dull and boring? Want to liven it up by creating more visual interest? Why not turn your document into an eye-catching newsletter?
Step 1: Open the file “News Text.”
Step 2: Save the file as “Newsletter” in your INF2050: WP 2: Graphics folder.
Step 3: In the Home tab, under the Paragraph group, turn on Show/Hide (¶) to reveal the non-printing formatting codes.
Step 4: Select the body of the text. Format the text into three columns.
Step 5: Change the line spacing to single.
Step 6: Set the alignment to Full Justify.
Step 7: Using the Insert tab, do the following:
- Select the “W” of in the first word of the body and make it a Drop Cap.
- Using the Internet or Clip Art, search for graphics or a picture of Calgary, Alberta, and tradespeople similar to those below.
(Hint: Be sure to text-wrap the graphics and size them appropriately so that the document fits on one page.)

© Jeff Whyte/shutterstock

© Gelpi/shutterstock
Include a symbol of your choice at the end of the text.
Step 8: Create an attractive title for the newsletter.
Step 9: Add any other graphics to enhance the look of your document.
Step 10: Make sure the newsletter is only one page in length.
Step 11: Make any necessary final adjustments to the document.
Step 12: Save the document.
Ready?
Take time to assess your skills and your understanding of the concepts presented in this training room.
- Can you modify bullets and customize lists?
- How did you use SmartArt graphics to transform information into an interesting visual?
- Show your teacher the personal letterhead you created and ask for feedback.
- What is the benefit of saving your letterhead as a template?
- Compare your newsletter to the Newsletter Exemplar1. Did you make any improvements that made your document better than the exemplar?
Check Point
Use the Software Skills Checklist and check off those skills you are confident in demonstrating.
If you had difficulty with the learning concepts or software features, go back and review the information as you will use these skills in the next training sessions and in the final project. Be sure to speak to your teacher if you need help.
1 Photos: skyline © Jeff Whyte/shutterstock; people © Gelpi/shutterstock