Training Room 4
| Site: | MoodleHUB.ca 🍁 |
| Course: | INF2050 |
| Book: | Training Room 4 |
| Printed by: | Guest user |
| Date: | Friday, 26 December 2025, 8:24 AM |
Description
Created by IMSreader
1. Training Room 4
Project 3: Documents for Personal and Business Use
Training Room 4: Reports

© Linda Macpherson/shutterstock
Does the thought of your teacher assigning a research project stress you out? Don’t worry—after you complete this training room, you will know how to transform your research into an A+ paper. You‚Äôll learn skills that you can use in all of your high school and post-secondary classes, and as you enter the workforce.
In this training room you will
- learn how to plan a report and identify different report styles and formats
- learn how to reveal document formatting
- learn how to use the Outlining feature in the View menu
- learn how to apply and change styles in a document
- learn how to manage content in a document
- learn how to insert and format references
- learn how to create a title page for a report
- learn how to create a table of contents and an index
- learn how to paginate your document using headers and footers
- learn how to view your document before printing
- learn how to use Find, Replace, and Go To to navigate your document
- learn how to insert bookmarks and hyperlinks
- read and watch demonstrations to learn about report creation
- use the software to complete practice activities
- use Help menus and online references for software assistance when you need it
- save activities in your INF2050: WP 2: Reports folder
- check your practice activities against provided exemplars and answer keys
1.1. Page 2
Project 3: Documents for Personal and Business Use
Reports
Reports are widely used documents in business and education. A report is an organized document used to communicate ideas and facts about a specific topic. There are different styles of reports, and the report’s purpose and intended audience will determine its length and format.
When you are writing a report, the first step is to create a plan:
- Define the purpose of the report.
- What is the topic?
- How long does the report have to be?
- What do you want your reader to know?
- When is it due?
- Determine the audience.
- How much experience or knowledge does the reader have of the topic?
- How much detail does your reader need in order to understand the topic?
- Is the audience internal or external to your organization?
- Determine ideas to be included to focus your research.
- Collect necessary material, information, and data.
- Organize the data into the main ideas and subtopics.
- Prepare an outline of headings and subheadings.
A report typically has three sections:
- The Front Matter
- Title Page
- Table of Contents
- The Report
- The introduction explains the purpose of the report.
- The body provides facts and details that support the main idea. (The body can be organized by headings or subheadings to make it easier for the reader to follow.)
- The conclusion summarizes the report and may provide recommendations.
- The introduction explains the purpose of the report.
- The End Matter
- Index
- Bibliography
You may encounter the following types of reports:
Informal reports give information, tell a story, or present an opinion.
Formal reports give information about the study of a particular topic and are written according to a specific style guide, such as:
- MLA (Modern Language Association)
- APA (American Psychological Association)
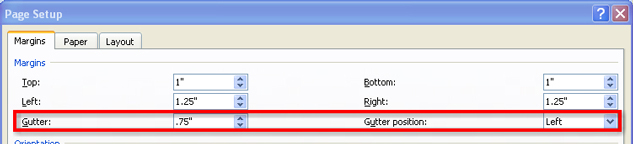
Bound reports include a .75" gutter on the left-hand side for binding the final publication. In Microsoft Word 2007, you can adjust the gutter setting by selecting the Page Layout tab on the ribbon, then, in the Page Setup group, clicking on Custom Margins in the Margins command.
 
Unbound reports require no extra gutter for binding.
Microsoft product screen shot(s) reprinted with permission from Microsoft Corporation.
Review the following examples of different reports and their formatting:
- Basic Reports for School or Business
- Reports for Humanities (English and Social Studies) Using MLA Style (most widely used for high school)
- Reports for Social Sciences (Psychology) Using APA Style
Study the following Example of a Basic Business Report to learn the basic format and structure of a report.
As you see in the examples, the reports look very different depending on which style of formatting is used. It is important to always check with your teacher as to his or her preferred style.
To learn more about researching, writing, and formatting reports, you can use the Internet to visit the online Writing Lab at Purdue University. Do an Internet search using the keywords “OWL Purdue.”
1.2. Page 3
Project 3: Documents for Personal and Business Use
Reveal Formatting
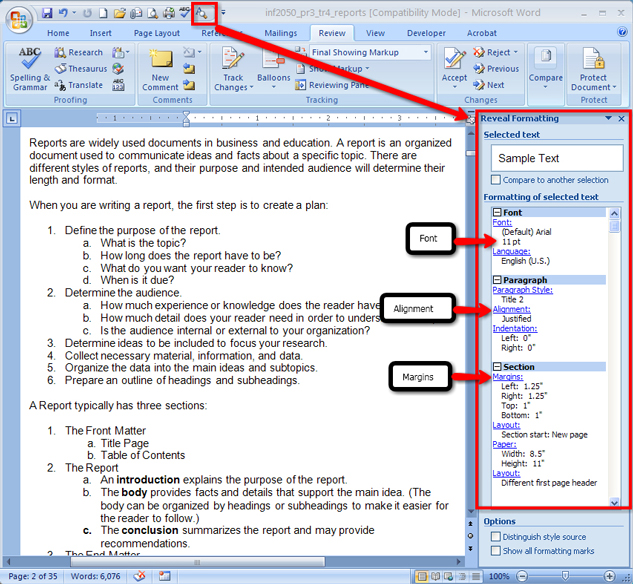
As you have seen, different report styles use different formatting guidelines. For example, MLA- and APA-style reports are formatted with one-inch margins and double spacing. The Reveal Formatting feature of Microsoft Word 2007 will show you the formatting codes used in a document. Use this feature to check that the formatting for your report is done correctly according the specific style guide used.
To use Reveal Formatting, you must add it to your Quick Access Toolbar, use the Customize Quick Access Toolbar button, and select All Commands to find the Reveal Formatting command as shown in the diagram below.
Go to the Instructional Videos and watch “Reveal Formatting” to see how to add Reveal Formatting to your Quick Access Toolbar.
When you have added Reveal Formatting to your Quick Access Toolbar, click the command button to see the Reveal Formatting task pane. Notice the formatting of the font, paragraph, and page set up used to create this document.
Microsoft product screen shot(s) reprinted with permission from Microsoft Corporation.
1.3. Page 4
Project 3: Documents for Personal and Business Use
The Report
Headings and Subheadings
Well-placed, descriptive headings and subheadings help organize the body or content of a report in a logical manner, making the document easier to read. Headings highlight particular sections of the report, while subheadings are more specific to the individual ideas or topics covered in those sections. Using headings and subheadings in your report not only helps you focus your writing, but will also make your reports easier for your audience to read and understand.
Outlines and Document Maps
Use headings and subheadings to create an outline of your report. You can use the Outline view to organize your thoughts when you are ready to start the writing process, or you can use this view to manage content you have already written. It is important to note that the Outline View function is different from the Numbered or Multilevel list functions we learned about previously, and that these two functions serve different purposes and are not designed to work together.
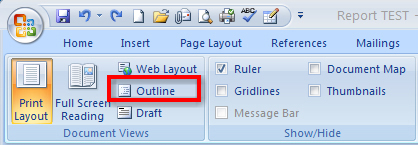
You can access the Outline view in two ways:
- Using the Views buttons at the bottom right-hand corner of your screen, beside the Zoom bar.

Microsoft product screen shot(s) reprinted with permission from Microsoft Corporation.
- In the View tab on the ribbon in Word 2007.
Microsoft product screen shot(s) reprinted with permission from Microsoft Corporation.
When you are in the Outline view, you have access to the Outlining tab to help you control the structure of content. Headings and subheadings in your report are shown as Levels. In the Outlining tab, you can change the level of importance of your headings by using the Promote and Demote arrow buttons. There are nine levels of headings you can use. Level 1 is used for main topics or headings. Use level 2 for subheadings.

Microsoft product screen shot(s) reprinted with permission from Microsoft Corporation.
The content of your report is called the Body Text. You can show or hide the content of your report by clicking the + button in the margin to expand or collapse the body text.

Microsoft product screen shot(s) reprinted with permission from Microsoft Corporation.
Go to the Instructional Videos and watch “The Outline View” to see how the Outline view works.
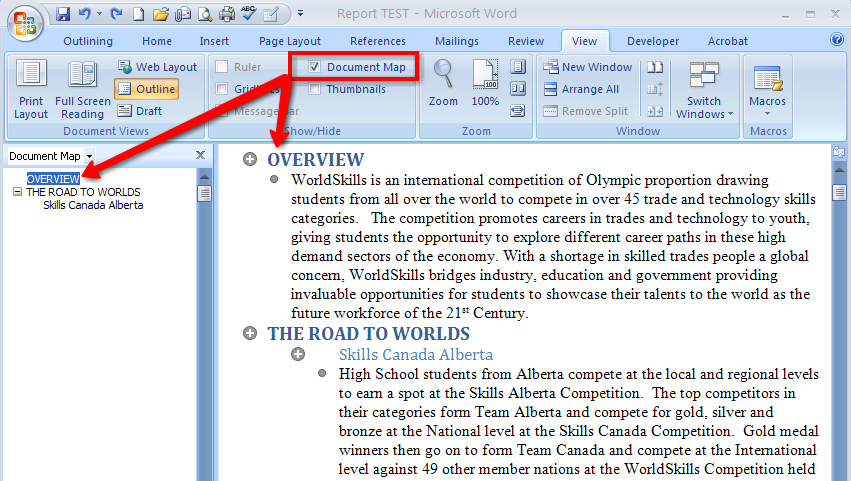
When you are in the View tab on the ribbon, you can also access the Document Map. This tool helps you navigate lengthy documents by displaying an outline of the headings used in a document in a separate window pane. When you click on a heading in the Document Map window, Microsoft Word jumps to that heading in your document.
Microsoft product screen shot(s) reprinted with permission from Microsoft Corporation.
You can use the Outline view and the Document Map to easily move and rearrange the content in your report to really speed up document editing: simply select the heading and drag it to a new location in the report.
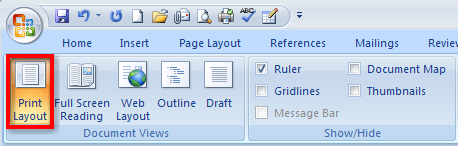
When your document is in the Print Layout view, you can manage and format the content of your report quickly and easily using Styles. The Print Layout View button is in the bottom right-hand corner of the screen, or in the Document Views in the View tab on the ribbon.
![]()
Microsoft product screen shot(s) reprinted with permission from Microsoft Corporation.
Microsoft product screen shot(s) reprinted with permission from Microsoft Corporation.
Located in the Home tab, the Styles group helps you build your documents quickly with galleries of coordinating Titles, Headings, and Subheadings designed with document structure and formatting in mind.

Microsoft product screen shot(s) reprinted with permission from Microsoft Corporation.
Each Quick Style found in the Style Gallery is a preset collection of formatting settings, such as font, colour, and size, that you can apply with one click. Quick Styles help you build reports using the proper components, such titles and headings, while making formatting faster, easier, and more consistent (the same formatting characteristics are applied each time you apply the style). You can even create your own style and save it to the Quick Style gallery.
 
Go to the Instructional Videos and watch “Styles Group” to see how easy it is to use the Styles feature to create a properly structured and professionally formatted report.
Now go to the Instructional Videos and watch “Style Set, Colour, and Font Changes” to see how quickly you can change the entire look of a document using Styles.
If you need more information about the styles used in your document, you can use the Styles dialog box launcher to bring up the Style pane. Go to the Instructional Videos and watch “Style Pane” to see how to access and use the Style pane to see the formatting in a document.
Now that you have done your writing and applied styles to your document, it is time to adjust the layout of the report and add items such as references, title pages, and page numbering to complete your project.
1.4. Page 5
Project 3: Documents for Personal and Business Use
Page Breaks

Microsoft product screen shot(s) reprinted with permission from Microsoft Corporation.
Word will automatically insert a new page when there is enough text for more than one page, but sometimes you will need to control where Word positions page breaks in order to create a professional-looking document that is easy for the reader to follow. There are several options for controlling when and where page breaks occur.
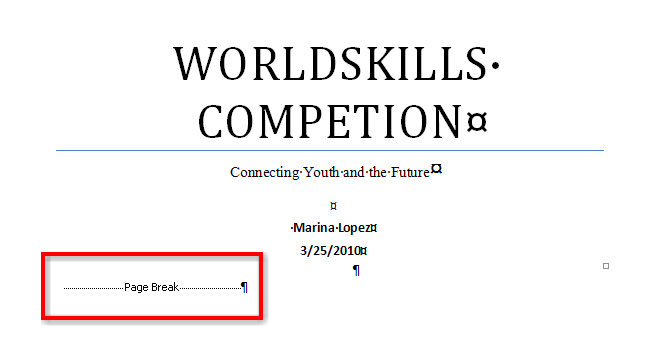
You can insert a page break when you want to break pages in a particular location, or when you want to insert additional pages to include items such as a bibliography or a title page. Before inserting a page break, it is important to position your cursor where you want the break to occur. To insert the page break, you can either use the Control + Enter command on the keyboard, or you can use the Pages group in the Insert tab.
When you insert a page break and turn on the Show/Hide (¶) function in the Home tab, you will see the non-printing symbol.
Microsoft product screen shot(s) reprinted with permission from Microsoft Corporation.
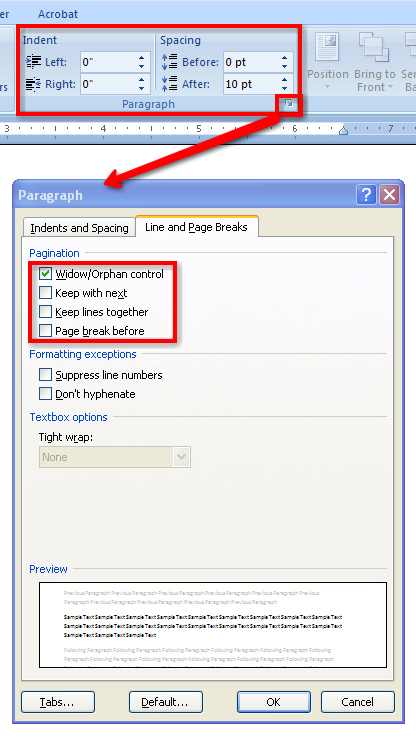
Sometimes page breaks will occur in bad locations in a document, which can be confusing for your reader. When a break happens within a paragraph and leaves a single line of text at either the top or the bottom of the page, this is known as widows and orphans. A widow occurs when the last line of a paragraph appears by itself at the top of the next page; an orphan occurs when the first line of a paragraph appears by itself at the bottom of a page. To control the way Word paginates a document, you can use the dialog box launcher in the Paragraph group in the Home tab to access the Line and Page Breaks menu. Use this menu to Control widows and orphans, or to keep lines and paragraphs from separating.
Microsoft product screen shot(s) reprinted with permission from Microsoft Corporation.
Page Setup
To create a 2" margin on the first page of the report and a 1" margin on the second and succeeding pages of the report, go to the Page Layout tab, Page Setup group, Margins command; and, on the second page of the report, change the margin to 1" and select Apply: from this point forward.
Now that you know how to create, format, and manage the content flow of a report, let’s move on to adding references to validate your research.
1.5. Page 6
Project 3: Documents for Personal and Business Use
References
Often, it is necessary for a writer to use information, data, or ideas originating with other sources. In fact, you are required by law to provide the source of this information and acknowledge the original author(s) to avoid accusations of plagiarism. The References tab in Microsoft Word 2007 has all the tools you need to help you create and manage references in your report.

Microsoft product screen shot(s) reprinted with permission from Microsoft Corporation.
Citing references is done in several ways:
- Using in-text citations
- Using footnotes or endnotes
- Using bibliographies or works cited pages and reference pages
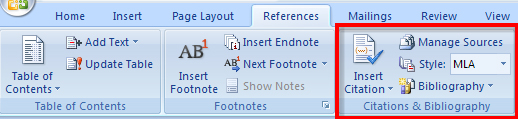
MLA format uses in-text citations to reference source information, and Microsoft Word 2007 makes it easy to insert properly formatted references. Simply choose the Style (MLA, APA, Chicago) in the Reference tab, Citations & Bibliography group, and click Insert Citation after your quotation. The Create Source window appears for you to include as much information as you can to build your entry. When you click OK, Word 2007 will automatically create and format the citation for you according to the style you have chosen. If you change the style of the report, Word 2007 will automatically reformat the citations and the bibliography for you.
Microsoft product screen shot(s) reprinted with permission from Microsoft Corporation.

Microsoft product screen shot(s) reprinted with permission from Microsoft Corporation.
This is an example of MLA style citation. Notice that quotations longer than four lines need to be indented and single-spaced.

You can control the line spacing and the indentation in the Paragraph group in the Page Layout tab, and you can also access the Paragraph group in the Home tab. This is the only group to appear twice on the ribbon.
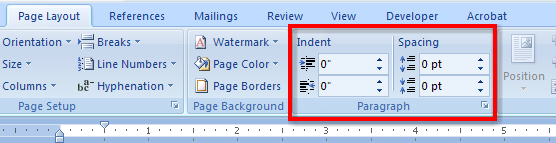
Microsoft product screen shot(s) reprinted with permission from Microsoft Corporation.

Microsoft product screen shot(s) reprinted with permission from Microsoft Corporation.
The dialog box launcher accesses the Paragraph window for even more control options.
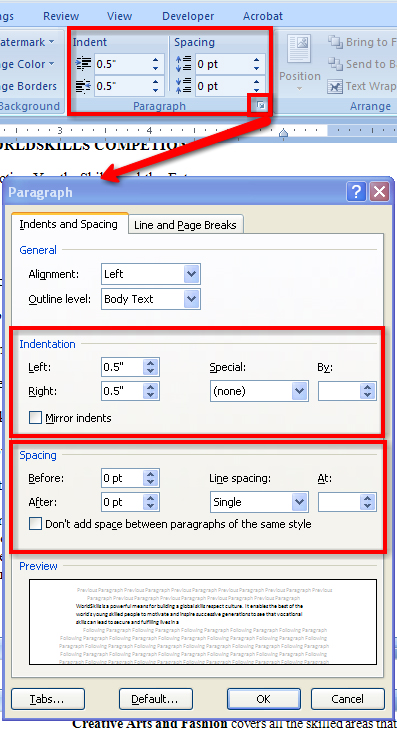
Microsoft product screen shot(s) reprinted with permission from Microsoft Corporation.
Footnotes appear at the bottom of a page to provide additional information about the source of your quotations, or explanatory information about diagrams, figures, or statistics.

Microsoft product screen shot(s) reprinted with permission from Microsoft Corporation.
Endnotes are similar to footnotes, but they appear on a separate page titled “Notes” at the end of the report, before the works cited page. Endnotes are the publication recommended for MLA-style reports.
When footnotes and endnotes are used to reference print resources in business reports, they include the name of author(s), the title of the publication’s name, the publisher, date, and relevant page number. When referencing online resources, include the title of the web page, the date accessed, and the web address.
Use the Footnotes group in the References tab to insert footnotes or endnotes. The Next Footnote command in the ribbon navigates between footnotes in a document, and Show Notes scrolls the document so you can see where the footnotes or endnotes are located. You can also use the Footnote and Endnotes dialog box to format your notes, and easily convert footnotes to endnotes and vice versa.
Go to the Instructional Videos and watch “Citations and Footnotes in a Report” to learn how to insert citations and footnotes in Microsoft Word 2007.
A bibliography comes at the end of the report and lists all of the reference materials used in the report’s development. MLA format uses a “Works Cited” page; APA format uses a “References” page. When you use the Insert Citation command to reference your sources, Microsoft Word can automatically build your bibliography from the information you included when you created the source. To view a list of the sources cited in the document, click on the Manage Sources button. You can use the Style button to choose the most common style formats, such as MLA or APA, and have Microsoft Word 2007 properly format the citation according to that style. Finally, click the Bibliography button and choose a built-in, preformatted template to have Microsoft Word automatically create your bibliography for you.
Go to the Instructional Videos and watch “Creating a Bibliography” to see how easy it is to create a bibliography using Microsoft Word 2007.
Now that you have included all your reference information, let’s see how easy it is to use the software features in Microsoft Word to automatically add a title page, a table of contents, and an index.
1.6. Page 7
Project 3: Documents for Personal and Business Use
Report Title Pages
The title page comes at the very beginning of a report and is meant to create interest, generate a first impression of the report, and provide information, such as:
- the report’s title (and subtitle if there is one)
- the author’s name
- the name of the course for which the report has been prepared, and the name of the teacher if prepared for a particular class
- the preparation date of the report
- complimentary graphics relating to the report
You can use the Insert tab to have Microsoft Word 2007 create a cover page for you. Simply position your cursor at the beginning of your report and click the Cover Page button in the Pages group for a built-in library of preformatted cover pages. You can also design your own cover page using formatted text and graphics.
This is a sample title page available in the built-in library. Just click the placeholders and insert information pertinent to your report.
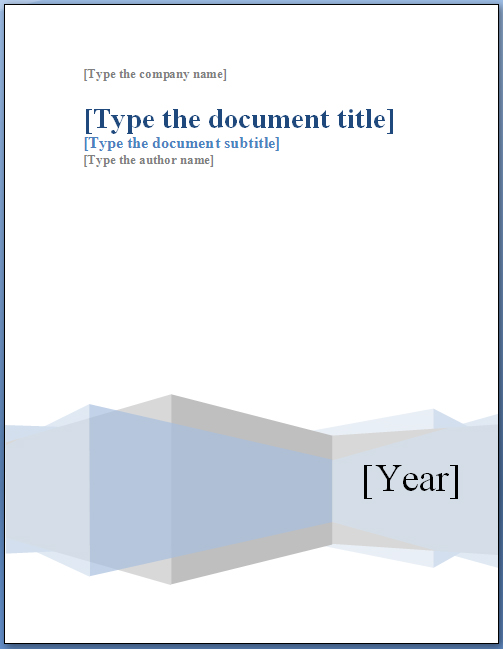
Microsoft product screen shot(s) reprinted with permission from Microsoft Corporation.
Table of Contents
The table of contents, also known as the TOC, comes before the report and provides an overview of the topics included. It helps the reader locate information in the report by listing the headings and their corresponding page numbers. If you created your report using Styles for your headings and subheadings, Microsoft Word can save you time and automatically create a table of contents. You can also use the Add Text command to insert additional items in the TOC. To create a TOC, simply place your cursor at the beginning of the report, insert a new page for the table of contents and click the Table of Contents button to choose from a variety of built-in templates. If you make any changes to your document, you must update your Table of Contents to reflect your most recent changes using the Update Table button.
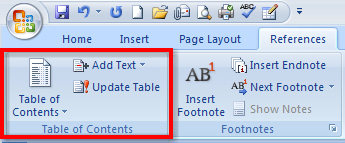
Microsoft product screen shot(s) reprinted with permission from Microsoft Corporation.
Go to the Instructional Videos and watch “Create and Update a Table of Contents” to see how to create and update a table of contents by using the References tab on the ribbon. Remember, it is important to position your cursor and insert a new page for your table of contents.
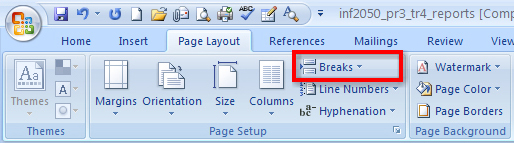
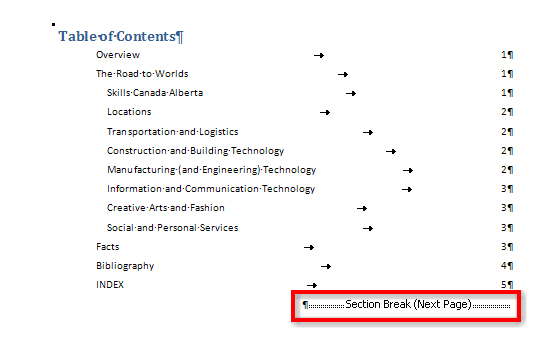
Section Breaks
In Microsoft Word, you can use section breaks to separate your report into different sections. It is important to separate the front matter (the title page and the TOC) from the report in order to paginate and format the different sections of the report properly. After creating the table of contents, always insert a Next Page Section Break as shown in the diagram below. You can access different types of breaks, including the Next Page Section Break in the Page Layout tab, in the Page Setup group. Notice the Section Break (Next Page) on the Table of Contents when you turn on the Show/Hide (¶) function, which indicates that a new section and a new page has been created. When the report is broken down by sections, you can customize settings, such as page numbering and margins, for each section.
Microsoft product screen shot(s) reprinted with permission from Microsoft Corporation.
Microsoft product screen shot(s) reprinted with permission from Microsoft Corporation.
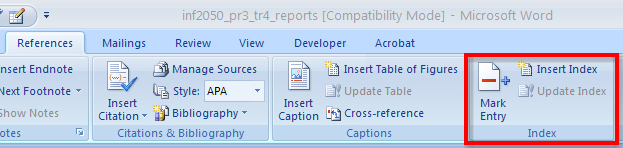
Index
Another useful tool that you can utilize in creating your report is the Index feature, which is also located in the Reference tab. An index is found at the end of a document and lists terms and topics used in the report, as well as the page that they appear on. To create an index, simply select the desired text and then click the Mark Entry command, which will bring up the Mark Index Entry window. Select Mark or Mark All if the same text is repeated throughout the document. Complete this step for all of the text you would like to include in the index. Insert a new page for the index, and click the Insert Index command. Select a style you like best and then click OK. Remember, if you add additional sources after you insert the index, always update your index by clicking the Update Index button.
Microsoft product screen shot(s) reprinted with permission from Microsoft Corporation.
Go to the Instructional Videos and watch “Creating an Index” to see how easy it is to use the Index group to mark entries and insert an index.
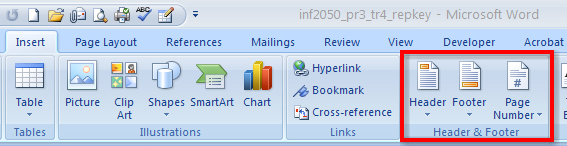
Headers, Footers, and Page Numbers
Headers contain information that is repeated at the top of each page in a document; footers contain information that is repeated at the bottom of each page. Headers and footers are important in multi-page reports because they often include information such as page numbering, the report‚Äôs submission date, the author’s name, and the report‚Äôs title.
You can add headers, footers, and page numbers from the Header and Footer group in the Insert tab on the ribbon.
Microsoft product screen shot(s) reprinted with permission from Microsoft Corporation.
Number the pages of a report following the diagram below. Remember, you used a section break after the TOC, separating the report into sections, allowing you to number each section differently.
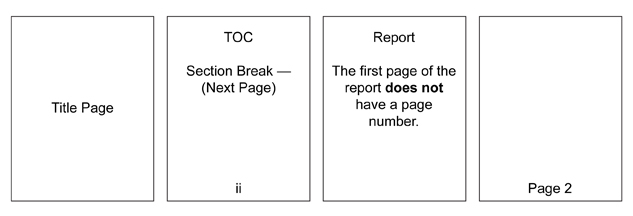
Look at the diagram below to see how to remove page numbers from the title page and the first page of the report, and how to change the number format to roman numerals on the table of contents.
Go to the Instructional Videos and watch “Paginating a Report” to learn how to apply, format, and remove page numbers to different sections of the report.
When you have inserted the page numbers properly, you can add additional information to the header or footer, such as the date or the name of the author. Click the Close Header and Footer button when you are finished adding the header and footer information.
Previewing the Document
The last thing you should do before you print any document is preview it. Click the Office button and select Print. This will bring up the Print Preview tab and allow you to print, adjust the page setup, zoom, and preview the document.
Go to the Instructional Videos and watch “Previewing Document Options” to learn how to preview a document using scroll, zoom, and Print Preview.
1.7. Page 8
Project 3: Documents for Personal and Business Use
More Helpful Tools
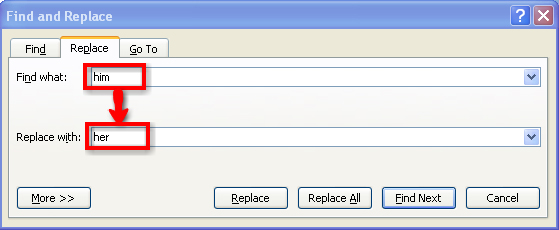
The Find, Replace, and Go To options in the Editing group on the Home tab in the ribbon are helpful features that allow you to quickly search and find information in your document. Use Find to search for word or a phrase (if necessary, you can then Replace your text with another word).
Microsoft product screen shot(s) reprinted with permission from Microsoft Corporation.
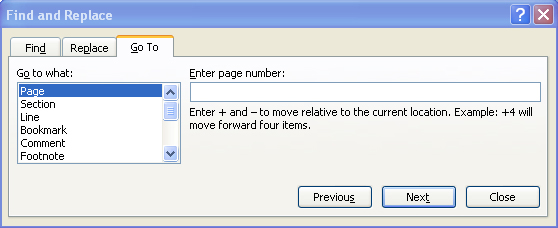
The Go To feature is a useful command for navigating long documents quickly in a variety of ways.
Microsoft product screen shot(s) reprinted with permission from Microsoft Corporation.
Bookmarks and Hyperlinks
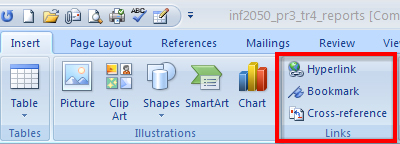
Have you ever started a document but knew you had to come back and make some edits or revisions? Or have you ever wanted to link your report directly to a Web site to provide more information for your reader? You can insert bookmarks and hyperlinks from the Links group of the Insert tab on the ribbon.
Microsoft product screen shot(s) reprinted with permission from Microsoft Corporation.
Microsoft product screen shot(s) reprinted with permission from Microsoft Corporation.
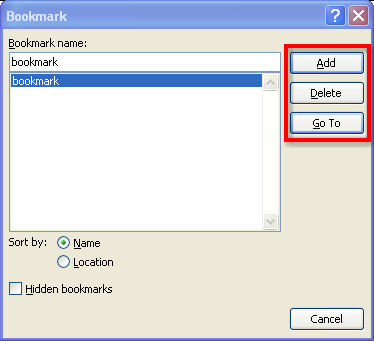
A bookmark allows you to “mark” a location or a section of text, and name the selection for future reference. This is helpful when you have a long document and want to find your marked location quickly. Simply select the text or item you want to bookmark, or position your cursor, click Bookmark in the Links group on the Insert tab, and in the Bookmark Name field, enter a name and click Add. Bookmark Names must begin with a letter character and may not include any spaces. Use the underscore to separate names (e.g., training_room). To go to a specific bookmark, click the name or click Go To. You can delete a bookmark here as well. You can also use Go To in the Find feature of the Editing Group.
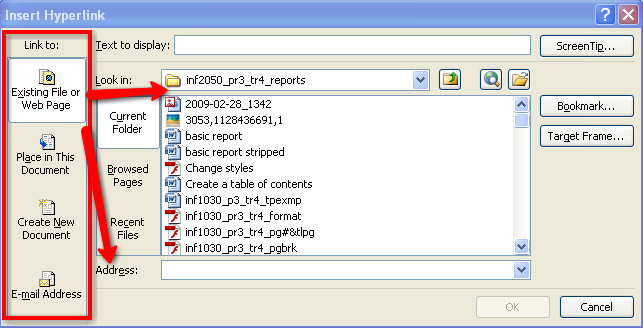
Also in the Links group is the Hyperlink button, which allows you to link to another document or a Web address. Select the text or a picture to be linked, click Hyperlink, and link within the file, to another file, to a Web address, or to a new document.
Microsoft product screen shot(s) reprinted with permission from Microsoft Corporation.
1.8. Time to Practice 4
Training Room 4: Reports
Time to Practise
Practice 1
In this Practice you will transform a basic report into a complete, professional-looking document. Practise the software features you learned in this training room to apply styles, format the document, add references and support pages, and properly number the pages of the report. You may refer to the training room and sample reports for help.
Step 1: Open the file Report.
Step 2: Activate the Reveal Formatting task pane to help you format the report.
Step 3: Format the titles, headings, and subheadings using Quick Styles or Outlining.
Step 4: Use the Find feature to find the fourth occurrence of WorldSkills. This is the start of a long quotation.
Step 5: Single-space and indent the long quotation (.5" left and right). Remove the quotation marks.
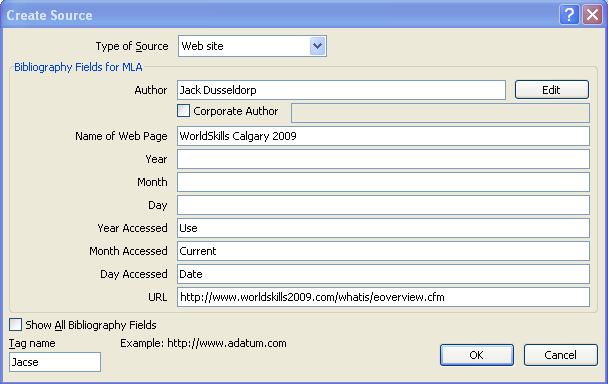
Step 6: In the References Tab, Citations & Bibliography group, choose MLA Style formatting. Click the Insert Citation button, and Add New Source to create a reference at the end of the long quotation. Use the information in the Create Source window below:
Microsoft product screen shot(s) reprinted with permission from Microsoft Corporation.
Step 7: Use the Find feature to find the word SAIT on the second page of the report.
Step 8: Insert a footnote after the word Sait and type “Southern Alberta Institute of Technology” in the footnote.
Step 9: Insert a Works Cited page. Format as necessary. Here is a summary of references, unformatted, included in the report:
Alberta Education
Alberta Education
November 7, 2008<http://www.education.alberta.ca/department/news/events/worldskills2009.aspx>;
Jack Dusseldorp
WorldSkills 2009
January 31, 2009 <<http://www.worldskills2009.com/whatis/eoverview.cfm>>;
WorldSkills
WorldSkills 2009
November 7, 2008
<http://www.worldskillls2009.com/schedule/skillcategories>;
Step 10: Insert an Index. Mark five entries of your choice, position your cursor at the end of the document, and Insert an Index Page.
Step 11: On the index page, type the title INDEX and make it a Heading 1 style so it appears in the TOC.
Step 12: Insert a Cover Page (title page) of your choice, and fill in the appropriate information.
Step 13: Insert a Table of Contents page after the title page (remember to use a Next Page section break on this page).
Step 14: Add page numbers in the footer. Remember, no page numbers on the title page or the first page of the report; use Roman numerals on the TOC, and regular numbers in the rest of the report.
Step 15: Save your document as “Report” in your INF2050: WP 2: Reports folder.
Ready?
Take time to assess your skills and understanding of the concepts presented in this training room.
- What are the benefits of using styles in a document?
- What kinds of references can you include easily using Word?
- How do a TOC and an index help your audience?
- How are bookmarks or hyperlinks helpful in a document?
Check your report against Report Exemplar.
Does your report look similar to the example?
Could you make any improvements to the basic style that would make it more professional or more visually appealing? Make the changes and save the final copy in your Reports folder.
Check Point
Use the Software Skills Checklist and check off those skills you are confident in demonstrating.
If you had difficulty with the learning concepts or software features, go back and review the information as you will use these skills in the next training sessions and in the final project. Be sure to speak to your teacher if you need help.
Going Beyond
To learn more about researching, writing, and style guides to format reports, use the Internet to visit the online Writing Lab at Purdue University.