Training Room 5
| Site: | MoodleHUB.ca 🍁 |
| Course: | INF2050 |
| Book: | Training Room 5 |
| Printed by: | Guest user |
| Date: | Friday, 26 December 2025, 8:01 AM |
Description
Created by IMSreader
1. Training Room 5
Project 3: Documents for Personal and Business Use
Training Room 5: Tables
Tables organize information into rows and columns to display data in an easy-to-read format. Tables are excellent for presenting essential facts and figures from your work so that your readers can quickly focus on the information you wish to emphasize. You may have used a table to create a personal phone list, or to record your science lab results for school. In the work world, businesses use tables to analyze budgets, compare sales figures, and report results to stakeholders.

Microsoft product screen shot(s) reprinted with permission from Microsoft Corporation.
In INF1030: Word Processing 1 you learned how to create a basic table. In INF2050: Word Processing 2 you will expand those skills so that you can build more complex tables with more functionality. Developing your skills will increase your productivity and versatility, and help you create professional-looking documents that get results.
In this training room you will
- learn how to convert text to a table and a table to text
- learn how to modify the structure of a table
- learn how to sort data in a table
- learn how to modify data in a table
- read and watch demonstrations to learn about creating tables
- use the software to complete three practice activities
- use Help menus and online references for software assistance when you need it
- save practice activities in your INF2050: WP 2: Tables folder
- check your work against exemplars and answer keys
1.1. Page 2
Project 3: Documents for Personal and Business Use
Tables
Remember that there are two ways to create a table in Microsoft Word: by using tabs, and by using the Table feature.
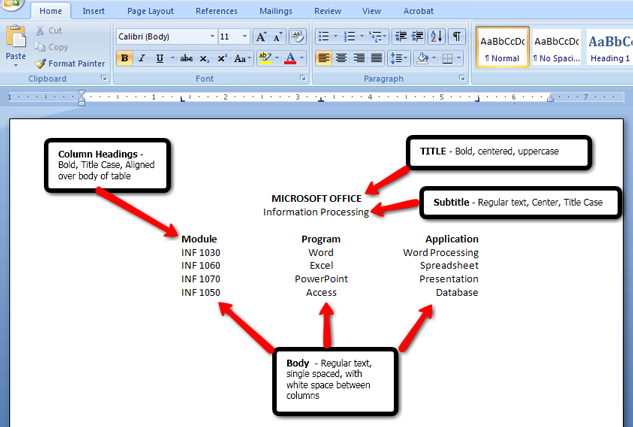
Let’s review the basic table structure by studying the following diagram:
Microsoft product screen shot(s) reprinted with permission from Microsoft Corporation.
This diagram shows the different tab stops you can use to create a basic table.

Microsoft product screen shot(s) reprinted with permission from Microsoft Corporation.
You can set tabs in two ways: by using the Tab button on the ruler to select the appropriate tab (left, right, center, decimal, bar):
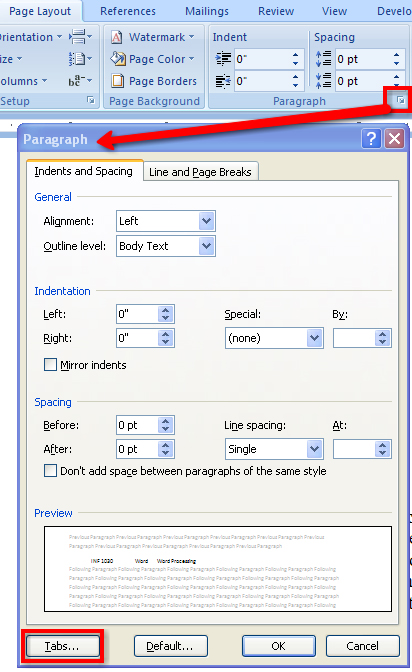
Or by using the Paragraph dialog box to access the Tab window. Remember that the Paragraph tab is located on the Home tab inside the Page Layout tab.
Microsoft product screen shot(s) reprinted with permission from Microsoft Corporation.
Now let’s see how easy it is to convert text that has been set up with tabs to a table. Go to the Instructional Videos and watch “Text to Table.”
After you convert text to a table, you may need to make some modifications. Go to the Instructional Videos and watch “Modifications to Tables.” You will see how to merge cells and delete extra cells.
Sometimes you want to do the opposite and convert a table to text. Go to the Instructional Videos and watch “Table to Text” to learn how to convert a table to text using the Table Tools, Layout tab, Data group, and selecting Convert to Text.
You may also need to adjust the size of the cells and the table. Go to the Instructional Videos and watch “Resizing Your Table” to see how to adjust the table manually using your mouse, as well as by using the Table Tools menu. You can access Table Properties in the Table Tools menu as shown in the diagram, or you can right-click on the table to bring up another menu of available options.

Microsoft product screen shot(s) reprinted with permission from Microsoft Corporation.
You can also change the position of the text in the cell by using the Alignment group in the Layout tab. This diagram shows the options available in the alignment group in the Layout menu.

Microsoft product screen shot(s) reprinted with permission from Microsoft Corporation.
Go to the Instructional Videos and watch “Text Alignment” to see how easy it is to align text to make your table look more balanced.
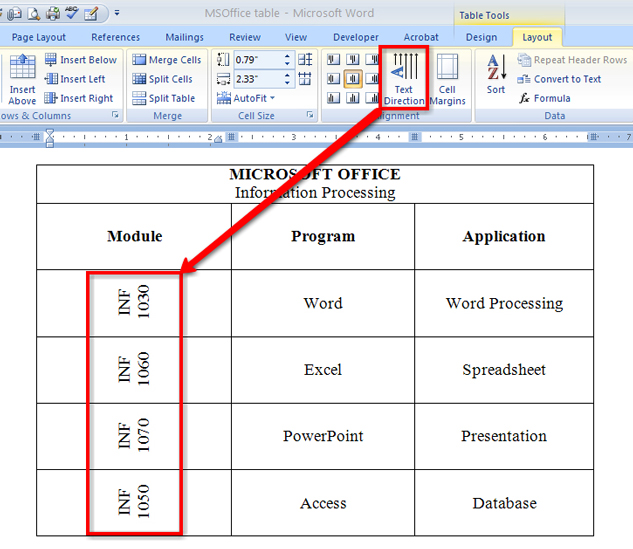
Want to totally change the look of your table? Change the direction of the text in the cell using the Text Alignment button in the Alignment group in the Layout tab.
Microsoft product screen shot(s) reprinted with permission from Microsoft Corporation.
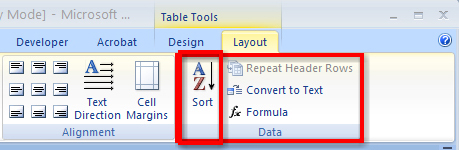
A very helpful feature available in the Table function is the Sort command, which is located in the Data group in the Layout tab in Table Tools. You can use the command to sort the contents in a table by column, or by text, number, or date. Look at the diagram to see the location of the Sort command. Then go to the Instructional Videos and watch “Sorting Data in Your Table” to see how the Sort functions will reorganize the contents of your cell. Be sure when you sort cells to carefully select the data you want to include in the sort.
Microsoft product screen shot(s) reprinted with permission from Microsoft Corporation.
Designing good-looking tables quickly is very easy in Microsoft Word 2007. In the Design menu, there are many different built-in Table Styles with automatic formatting for you to choose from. You can also adjust the Table Style options to change where shading is applied.
Go to the Instructional Videos and watch “Adding Shading and Styles to Your Table” to learn how to use the Tables Design tab tools to automatically apply built-in Table Styles that allow you to add borders and shading to your document, and to see how selecting different Table Style Options changes how the shading is applied.
You can also create your own custom look for your table by applying Borders and Shading. Have fun exploring the different border and shading options.
There is one more way to create a Table in Microsoft Word. Go to the Instructional Videos and watch “Creating Tables” to learn how to create a table using the Draw Table feature.
For more help using this feature, use Microsoft Word’s built-in Help menus, or visit Microsoft Office Online Help and How-to and keyword search “Draw Table.”
1.2. Time to Practice 5
Training Room 5: Tables
Time to Practise
Practice 1
In this Practice you will create a table with borders and shading from text.
Step 1: Open Practice 1.
Step 2: Covert the text to a table (remember to separate text at tabs).
Step 3: Save the document as “Table 1” in your INF2050: WP 2: Tables folder.
Step 4: Merge the Title and Subtitle into one cell spanning the width of the table.
Step 5: Change the alignment of all the cells to vertical and horizontal centre.
Step 6: Increase the cell height of all rows.
Step 7: Select the body of the table by course, starting with the INF numbers. Sort the table in numerical order.
Step 8: Apply Borders and Shading to your table.
Step 9: Centre the table in the vertical and horizontal centres of the page.
Step 10: Make any necessary final adjustments to your table.
Step 11: Save your document.
Practice 2
Now practice your skills by recreating the following table.
Step 1: Open a new, blank Microsoft Word document.
Step 2: Reproduce the following table. You can experiment with different border and shading features.

Microsoft product screen shot(s) reprinted with permission from Microsoft Corporation.
Step 3: Centre the table vertically on the page.
Step 4: Save the document as “Table 2” in your INF2050: WP 2: Tables folder.
Practice 3
Step 1: Use the Table feature to create a calendar page for the month of your choice.
Step 2: Include the name of the month, the days of the week, and the dates.
Step 3: Include five events pertinent to you in your calendar (birthdays, due dates, practices).
Step 4: Format the table in an attractive way.
Step 5: Save the table as “Table 3” in your INF2050: WP 2: Tables folder.
Ready?
Self-check each practice session against the provided answer key. Your work may look different from the answer key because you have applied different styles or formatting features. The most important thing to think about is the visual appeal of the document.
Check your work against the Table 1 Exemplar.
Check your work against the Table 2 Exemplar1.
Compare the monthly calendar you created in Practice 3 to a calendar you have in your home, in your agenda, or in your classroom.
How do your documents compare to the answer keys and exemplars? Open your documents and make any changes that will improve your work. You can also practise making your own tables to organize information if you need extra practice.
Check Point
Use the Software Skills Checklist and check off those skills you are confident in demonstrating.
Did you have difficulty with any of the learning concepts or software features? If so, go back and review the information as you will use these skills in the final project. If you need extra help, talk to your teacher.
1 Microsoft product screen shot(s) reprinted with permission from Microsoft Corporation.