Project 2
| Site: | MoodleHUB.ca 🍁 |
| Course: | Financial Management LearnEveryware Modules |
| Book: | Project 2 |
| Printed by: | Guest user |
| Date: | Wednesday, 24 December 2025, 8:22 AM |
Description
Created by IMSreader
1. Project 2
Project 2: Financial Statements
Project Introduction
In Project 1 you used the amounts from the ledger to complete a worksheet. In Project 2 you will use the information that was prepared on the worksheet to complete financial statements for the company. Financial statements summarize data and provide financial information about the business to the owners, management, creditors, and the government. Rather than looking at the books and records of the business, it is more efficient to look at these summarized statements. Go to the Interactive Accounting Cycle and click on “Step 6. Financial Statements.”
In this project there will be three training rooms in which you will complete the following financial statements using the data from the worksheet you prepared in Project 1:
- the income statement
- the balance sheet
- the statement of owner’s equity
Continue on to Training Room 1, where Sakineh will step you through how to do a formal income statement.
1.1. Training Room 1
Project 2: Financial Statements

© RobertR/11033221/Fotolia
Training Room 1: The Income Statement
Suggested Time: 80 minutes
Training Room Introduction

A business needs to present all of its financial information in an orderly fashion. Otherwise, there would be quite a stack of paper to sort through to determine how successful the business is.
The worksheet is really a summary of a company’s books all on one page for easy reference. It is the working copy that is needed to prepare the financial statements for the business. This training room will concentrate on preparing the financial statement called the income statement. It focuses on just what you would expect, the income of a business.
1.2. Page 2
Project 2: Financial Statements
What Do I Need to Know?
Have you ever heard the expression, “It takes money to earn money”?
If a business wants to earn money, it has to spend money. A business may need to buy a computer, rent office space, or invest in equipment so that it can operate. Depending on the type of business, there will be other expenses that will have to be paid out before money comes in. For example, Gurpreet had to shovel a sidewalk for a customer before the customer would pay him. To do that, he had to buy a shovel, pay for the gas to travel to the customer’s home, and have the right clothes for the weather.
Money is put into a business or invested with the intention of being able to earn more money.

© 2009 Jupiterimages Corporation
Revenue refers to the earnings that a business will make from activities, while expenses are costs incurred by a business for the purpose of generating revenue. Both are shown on the income statement. The accounts that appear on the income statement are considered temporary accounts because they are only open for the fiscal period, and then they are closed. Closing out accounts will be discussed in detail in Project 3.
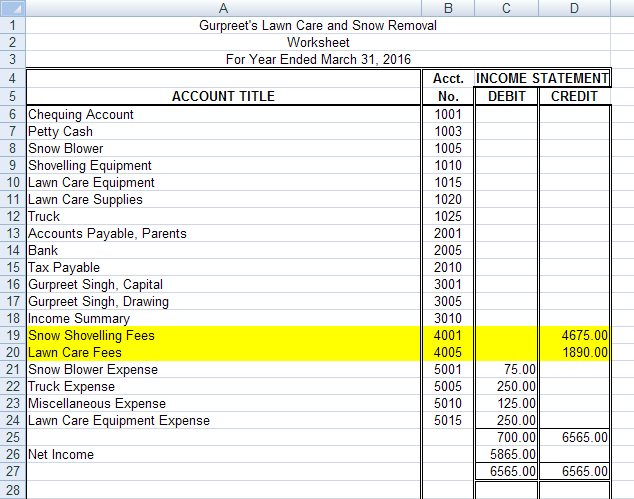
The completed worksheet for Gurpreet’s Lawn Care and Snow Removal prepared in Project 1 is shown below. The shaded portion of the worksheet is the section used to prepare the income statement and is the section that we will concentrate on in this training room.

Microsoft product screen shot(s) reprinted with permission from Microsoft Corporation.
Why Is This Important?
The income statement columns of the worksheet are the rough work needed to complete a formal income statement or a statement showing the amount of net income (profit) or net loss that a business has had during the time period indicated in the heading portion of the worksheet.
Two Generally Accepted Accounting Principles are in effect here. Do you know what they are?
6. The Time Period Concept
The Time Period Concept says that accounting takes place over specific time periods known as fiscal periods. These fiscal periods are of equal length and are used when measuring the financial progress of a business.
7. The Matching Principle
The Matching Principle states that each expense item related to revenue earned must be recorded in the same accounting period as the revenue it helped to earn. If this is not done, the financial statements will not measure the results of the company’s operations fairly.
What Do I Need to Do?
To complete the income statement, you need to complete the following steps.
1. Heading
The heading of the income statement follows the same format as for the other financial statements you have studied so far.
- who: the name of the business
- what: the name of the document
- when: the date of the fiscal period
Note that the date of an income statement must cover a period of time, such as “For the Month Ended September 30, 20xx,” or “For the Quarter Ended March 31, 20xx,” or “For the Year Ended December 31, 20xx.” (Note: The word the does not appear in all of the financial statements in this course, but you should add the word when you do your work.) This is important information. If the net income for a company is $12 000, it is vital to know if that income was earned over one month, three months, or twelve months. The heading of Gurpreet’s income statement would look as follows:

Microsoft product screen shot(s) reprinted with permission from Microsoft Corporation.
2. The Revenue Section
The amounts for the revenue section of the income statement are taken from the income statement credit column of the worksheet.
Microsoft product screen shot(s) reprinted with permission from Microsoft Corporation.
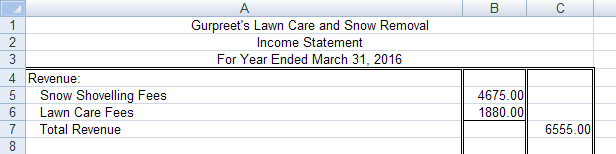
Simply title the section Revenue, and on the next line write the name of the revenue account(s) followed by the amount(s). Note how the account names are indented from the revenue title. The amounts of the revenue accounts are listed in the first column (the sub-total column) with a total line after the last amount. The words Total Revenue are written on the line beneath the last revenue account title and the amount of the total revenue is written in the second column. The second column is for totals only.
Microsoft product screen shot(s) reprinted with permission from Microsoft Corporation.
3. The Expenses Section
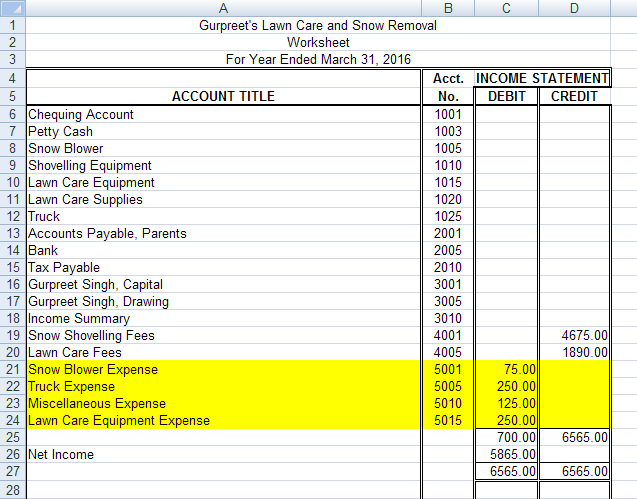
The amounts for the expenses section of the income statement are taken from the income statement debit column of the worksheet. Title the section Expenses, and on the next line list the expenses in the same order that they appeared in the worksheet. Note how the expense account names are indented from the expense title. The amounts of the expense items are listed in the first column (the sub-total column). The words Total Expenses are written on the line beneath the last expense account title and the amount of the total expenses is written in the second column.
Microsoft product screen shot(s) reprinted with permission from Microsoft Corporation.

Microsoft product screen shot(s) reprinted with permission from Microsoft Corporation.
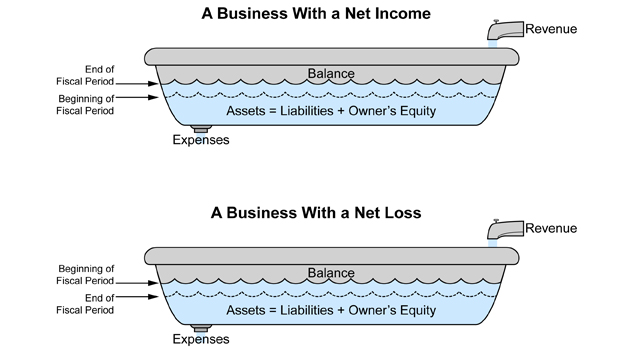
The Net Income (or Net Loss) Section
The net income or net loss section is used to calculate the net income or net loss by subtracting the expenses from the revenue. If more revenue is coming into a business than expenses being paid out, there is a net income. If more expenses are being paid out than revenue coming in, there is a net loss.
Important Note: The amount of the net income shown on the income statement should agree with the amount of the net income recorded on the worksheet. To see an example, view Gurpreet’s Net Income Section on Income Statement.

Microsoft product screen shot(s) reprinted with permission from Microsoft Corporation.
Notice that in the second column (the total column) there are only three numbers: total revenue, total expenses, and the difference between the two, in this case the net income. These are the most important numbers in this statement, and, by having them all in the same column, they are easy to find. These three numbers will indicate whether there was a net income or a net loss.
There are references available for you below to assist with the Time to Practise and the Time to Work sections of this training room.
To review how to complete an income statement using Excel®, watch the video Income Statement. This item is also available in the Toolkit for your reference.
Use the current year for all of the practices and assignments.
You may also refer to the following Income Statement Rubric, which includes a checklist of what belongs in the income statement.
An Income Statement Exemplar is also available for your reference.
These tools are also available in the Toolkit.
1.3. Page 3
Project 2: Financial Statements
Time to Practise
There are three practices available for you to complete to improve your skills. Some will show a net income and some a net loss. Do as many as you need to feel confident in completing an income statement before continuing on to the assignment in Time to Work, which will be submitted for assessment.
If, after completing all three practices, you are still not confident that you know how to complete an income statement, you may redo these practices or see your teacher for help.
Practice 1
Step 1: Open Income Statement Template, and save it in your course folder.
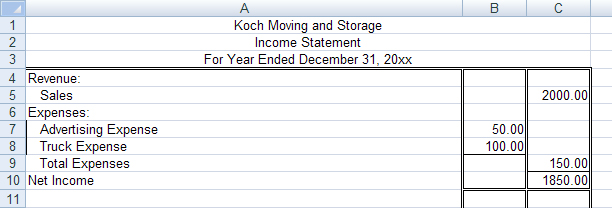
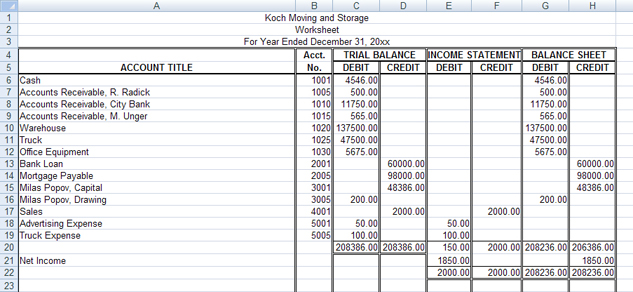
Step 2: Using the worksheet for Koch Moving and Storage below, complete an income statement.

Microsoft product screen shot(s) reprinted with permission from Microsoft Corporation.
Microsoft product screen shot(s) reprinted with permission from Microsoft Corporation.
If you need more practice, continue on to Practice 2 or Practice 3.
If you are ready to do the assignments for this training room, continue on to Time to Work.
Practice 2
Step 1: Open Income Statement Template, and save it in your course folder.
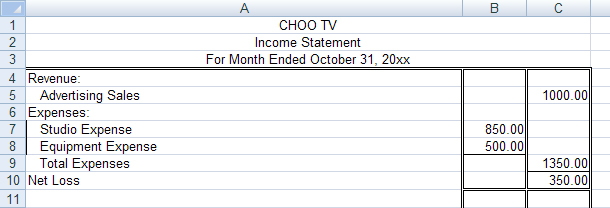
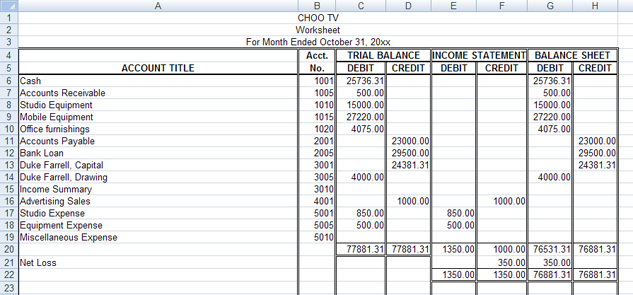
Step 2: Using the worksheet for CHOO TV below, complete an income statement.

Microsoft product screen shot(s) reprinted with permission from Microsoft Corporation.
Microsoft product screen shot(s) reprinted with permission from Microsoft Corporation.
If you need more practice, continue on to Practice 3.
If you are ready to do the assignments for this training room, continue on to Time to Work.
Practice 3
Step 1: Open Income Statement Template, and save it in your course folder.
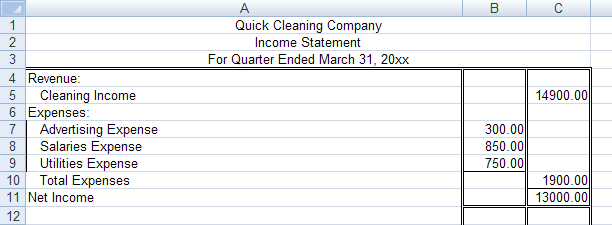
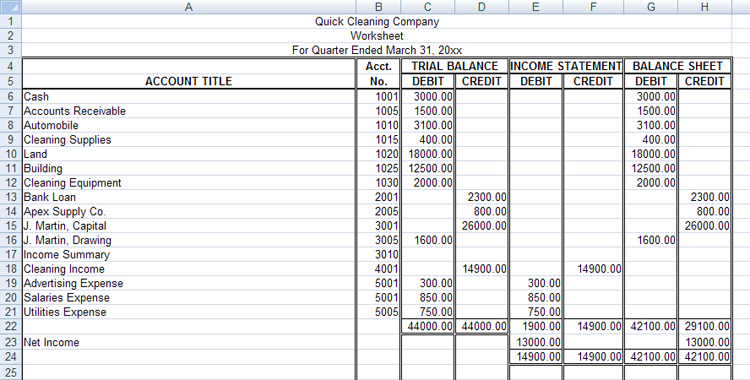
Step 2: Using the worksheet for Quick Cleaning Company below, complete an income statement.

Microsoft product screen shot(s) reprinted with permission from Microsoft Corporation.
Microsoft product screen shot(s) reprinted with permission from Microsoft Corporation.
1.4. Page 4
Project 2: Financial Statements
Time to Work
Continue on to Assignment 1, which must be submitted to your teacher for assessment. There are also two optional assignments for this training room. Check with your teacher to see if it is necessary for you to complete them.
Create a new folder in your FIN1030 Course Folder called Project 2 Training Room 1. All of the answers to the following questions must be saved in this folder for your teacher to mark.
Assignment 1
- Open Income Statement Template, and save it in your course folder as “Project 2: Training Room 1: Assignment 1.”
- Using the following worksheet for Jerry’s Steam-Cleaning Service, complete the income statement.

Microsoft product screen shot(s) reprinted with permission from Microsoft Corporation.
- Save the completed income statement, and submit it to your teacher for assessment.
The following are two optional assignments. Check with your teacher to see if you need to complete them.
Assignment 2 (optional)
- Open Income Statement Template, and save it as “Project 2: Training Room 1: Assignment 2.”
- Using the following worksheet for Gershwyn’s Driving School, complete the income statement.
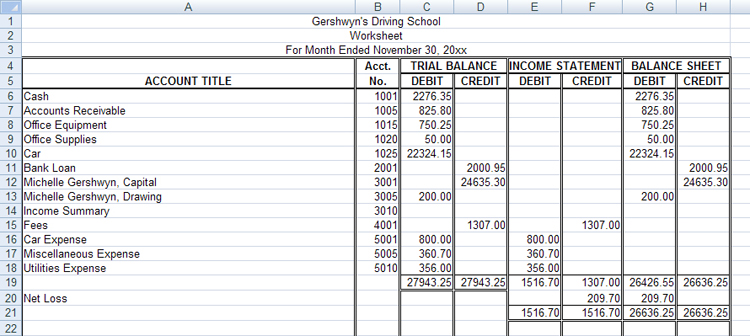
Microsoft product screen shot(s) reprinted with permission from Microsoft Corporation.
- Save and submit it to your teacher for assessment.
Assignment 3 (optional)
- Open Income Statement Template, and save it as “Project 2: Training Room 1: Assignment 3.”
- Using the following worksheet for O’Leary’s Training Service, complete the income statement.

Microsoft product screen shot(s) reprinted with permission from Microsoft Corporation.
- Save and submit it to your teacher for assessment.
1.5. Training Room Summary
Project 2: Financial Statements

© Christos Georghiou/11309728/Fotolia
Training Room Summary
All businesses need to make money to be successful and grow. In order to be assured that any expenditures being made are not exceeding revenue, people who run businesses need to be aware of the total expenses, total revenue, and the difference between the two for a fiscal period. That difference will be a net income, if positive, or a net loss, if negative. The formal statement used to record this information is called an income statement. This is one of the three financial statements you are going to prepare for this project using information from the worksheet.
Now that you have practised preparing income statements, continue on to Training Room 2 to prepare the end of the fiscal period balance sheet, the second financial statement in this project.
1.6. Training Room 2
Project 2: Financial Statements
Training Room 2: The Balance Sheet
Suggested Time: 80 minutes
Training Room Introduction

© 2009 Jupiterimages Corporation
This training room will concentrate on using the worksheet to prepare a balance sheet at the end of the fiscal period.
The balance sheet for October 31, 20xx, may be quite different from the one prepared for November 30, 20xx. Can you think why this might be?
Some reasons a balance sheet changes from day to day:
- Money was received.
- Money was paid.
- Assets were bought.
- Assets were sold.
- Liabilities were paid.
- Liabilities were increased.
- Owner invested money in the business.
- Owner withdrew money from the business.
A formal balance sheet is prepared and written in a standard format. The balance sheet for a large business may have different accounts than the balance sheet for a small business, but the content will be similar: assets, liabilities, and owner’s equity.
How often are balance sheets prepared? Most businesses prepare statements monthly, quarterly, or semi-annually (every six months), even though they are only required by law to prepare them once a year.
1.7. Page 2
Project 2: Financial Statements
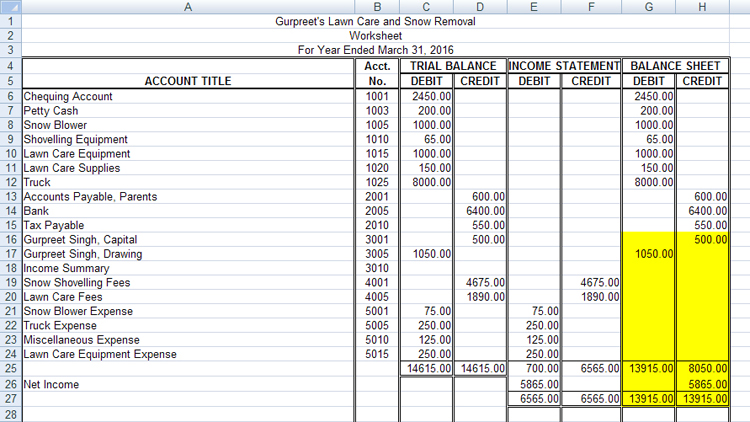
What Do I Need to Know?
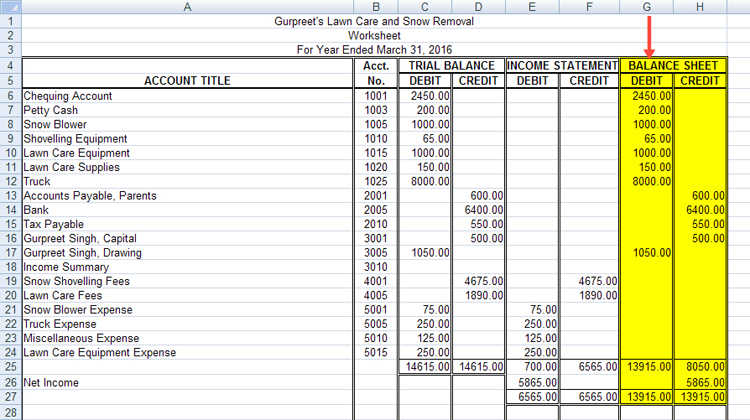
The shaded portion of the worksheet is the section used to prepare the balance sheet, as shown here in this sample completed worksheet for Gurpreet’s Lawn Care and Snow Removal.

Microsoft product screen shot(s) reprinted with permission from Microsoft Corporation.
Why Is This Important?
The balance sheet columns of the worksheet are the rough work needed to complete a formal balance sheet or a statement showing the financial position on a specific date. They indicate the account balances at the end of the fiscal period.
© James Steidl/shutterstock
What Do I Need to Do?
You are already familiar with how to do a balance sheet from your work in FIN1020, so this part will be review.
To complete the balance sheet, you need to complete the following steps.
1. Heading
The name of the company is written first, then the name of the statement, and finally the date the statement is prepared. This follows the same format as for the income statement.
- who: the name of the business
- what: the name of the statement
- when: date of the statement (as of a specific day)
Remember that the statement date on the balance sheet is for a point in time (one date only) and does not cover a period of time like the income statement. You may use “As at…” in the date line or simply the date alone.

Microsoft product screen shot(s) reprinted with permission from Microsoft Corporation.
Keep in mind that the date must be written in full as this is a formal statement. To refresh how to do this, view Changing the Date. This resource is also available in the Toolkit if you need it for review.
2. Assets Section
The figures for the assets section are obtained from the balance sheet debit column of the worksheet.
Microsoft product screen shot(s) reprinted with permission from Microsoft Corporation.
The account titles are listed in the same order as they appear on the worksheet. The total of the left side of the balance sheet must be written on the same line as the total of the right side of the balance sheet. Don’t calculate or write the total assets line until the totals for the liabilities and owner’s equity lines have been determined.
Microsoft product screen shot(s) reprinted with permission from Microsoft Corporation.
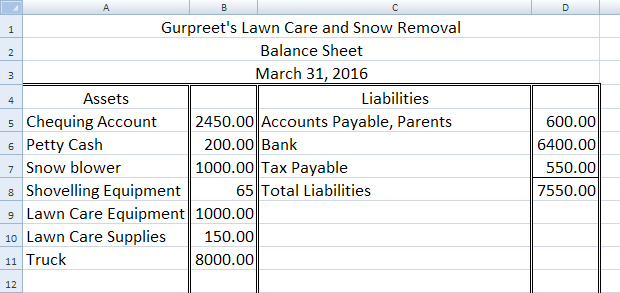
3. Liabilities Section
The amounts for the liabilities section of the balance sheet are taken from the balance sheet credit column of the worksheet.

Microsoft product screen shot(s) reprinted with permission from Microsoft Corporation.
The liability accounts are written on the right-hand side of the balance sheet in the same order as shown on the worksheet. A single rule is drawn across the amount column under the amount of the last liability. The amount of the total and the words Total Liabilities complete this section.
Microsoft product screen shot(s) reprinted with permission from Microsoft Corporation.
4. Owner’s Equity Section
The amount for the owner’s equity section of the balance sheet, or the owner’s capital, must be calculated and is not simply copied as in the asset and liability sections.
Recall from FIN1020 that assets – liabilities = capital.
What would Gurpreet’s total capital be?
![]()
12865.00 – 7550.00 = 5315.00
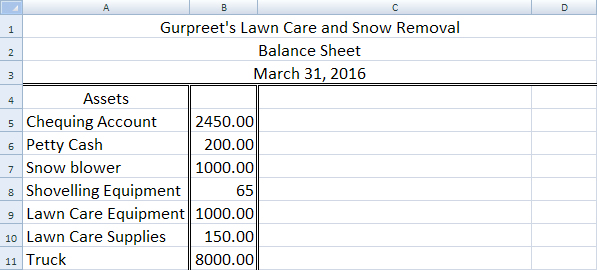
Gurpreet’s completed balance sheet would be:
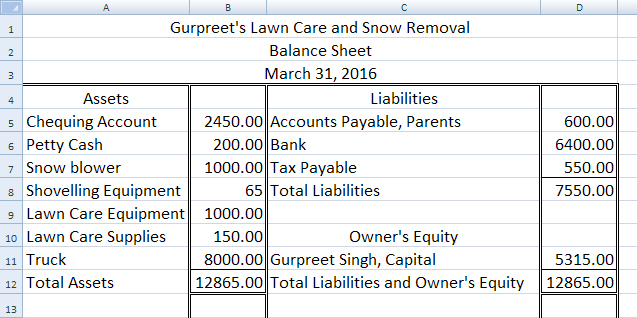
Microsoft product screen shot(s) reprinted with permission from Microsoft Corporation.
Arrange it so that the final line Total Liabilities and Owner’s Equity is on the same line as Total Assets.
Remember to put a total line above all totals and a double rule under the last numbers to show that the statement is in balance and completed.
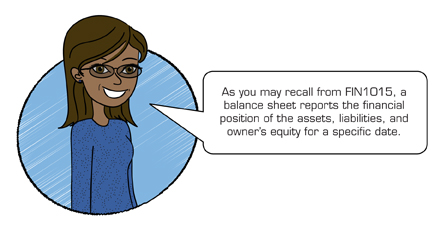
Some businesses prefer to use the report form to format the balance sheet, as you may recall when you were searching the Internet to compare balance sheets of various businesses in FIN1015. The report form presents the same information except that it lists the assets first and the liabilities and owner’s equity next in vertical arrangement as in the example below.
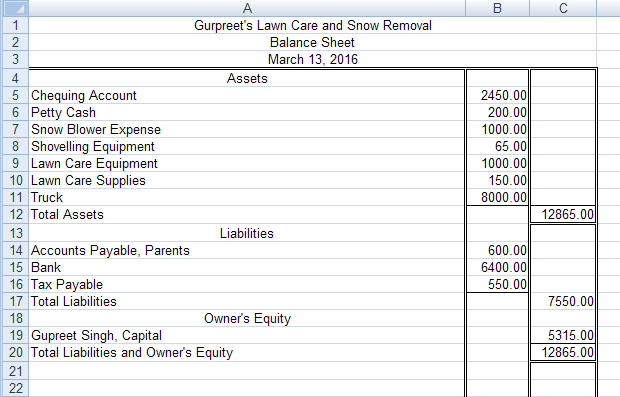
Microsoft product screen shot(s) reprinted with permission from Microsoft Corporation.
Why Is This Capital Different from the Capital on the Worksheet?
The amount of the capital on the worksheet is the capital from the beginning of the year. You need to add the net income and subtract any drawing that the owner withdrew to update the capital at the end of the year. The capital account will be updated in Project 3 to reflect these changes.
Let’s use the information from owner’s equity to calculate capital another way. Use the information from the balance sheet section of the worksheet below.
Microsoft product screen shot(s) reprinted with permission from Microsoft Corporation.
| Owner’s Capital March 31, 2015 | 500.00 |
| Add: Net Income | 5865.00 6365.00 |
| Subtract: Drawing | 1050.00 |
| Owner’s Capital March 31, 2016 | 5315.00 |
Important Note: Notice that this number is the same as when you subtracted liabilities from assets. This is a good way to double check that you have calculated the correct capital. Some businesses prefer to show all of these details on a balance sheet as follows:

Microsoft product screen shot(s) reprinted with permission from Microsoft Corporation.
The important thing is to have the correct capital amount. We will be doing a statement of owner’s equity to show these details in the next training room, so it is only necessary to show the ending capital on one line of the balance sheet in this training room.
You may want to refer to the Balance Sheet Rubric, which includes a checklist of what belongs in the balance sheet to help you complete your Time to Practise and Time to Work.
A Balance Sheet Exemplar is also available for your reference. These two items are also available for you to access in the Toolkit.
1.8. Page 3
Project 2: Financial Statements
Time to Practise
Complete as many of the following three practices as you need in order to feel confident in extending the worksheet before you continue on to the assignment in Time to Work, which will be submitted for assessment.
If, after completing all three practices, you are still not confident that you know how to complete an income statement, you may redo these practices or see your teacher for help.
Practice 1
Step 1: Open Balance Sheet Template, and save it in your course folder.
Step 2: Use the following worksheet to complete the balance sheet.

Microsoft product screen shot(s) reprinted with permission from Microsoft Corporation.
You can check your answers using Koch Moving and Storage Completed Worksheet.
If you need more practice, continue on to Practice 2 or Practice 3.
If you are ready to do the assignments for this training room, continue on to Time to Work.
Practice 2
Step 1: Open Balance Sheet Template, and save it in your course folder.
Step 2: Using the following worksheet for CHOO TV, complete a balance sheet.
Microsoft product screen shot(s) reprinted with permission from Microsoft Corporation.
You can check your answers using CHOO TV Completed Worksheet.
If you need more practice, continue on to Practice 3.
If you are ready to do the assignments for this training room, continue on to Time to Work.
Practice 3
Step 1: Open Balance Sheet Template, and save it in your course folder.
Step 2: Using the following worksheet for Quick Cleaning Company, complete a balance sheet.

Microsoft product screen shot(s) reprinted with permission from Microsoft Corporation.
You can check your answers using Quick Cleaning Company Completed Worksheet.
1.9. Page 4
Project 2: Financial Statements
Time to Work
Continue on to Assignment 1, which must be submitted to your teacher for assessment. There are also two optional assignments for this training room. Check with your teacher to see if it is necessary for you to complete them.
Create a new folder in your Fin1030 Course Folder called “Project 2 Training Room 2.” All of the answers to the following questions must be saved in this folder for your teacher to mark.
Assignment 1
Step 1: Open Balance Sheet Template, and save it in your course folder as “Project 2: Training Room 2: Assignment 1.”
Step 2: Using the following worksheet for Hardisty Dental Service, complete the balance sheet.
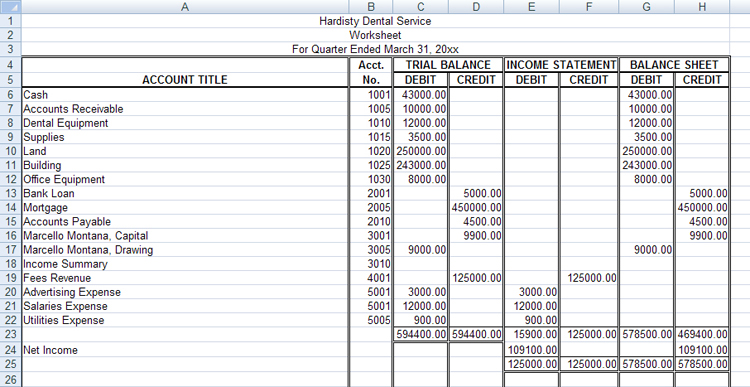
Microsoft product screen shot(s) reprinted with permission from Microsoft Corporation.
Save the completed balance sheet, and submit it to your teacher for assessment.
Check with your teacher to see if you need to complete the following two optional assignments.
Assignment 2 (optional)
Step 1: Open Balance Sheet Template, and save it in your course folder as “Project 2: Training Room 2: Assignment 2.”
Step 2: Using the following worksheet for Ben’s Landscaping, complete the balance sheet.
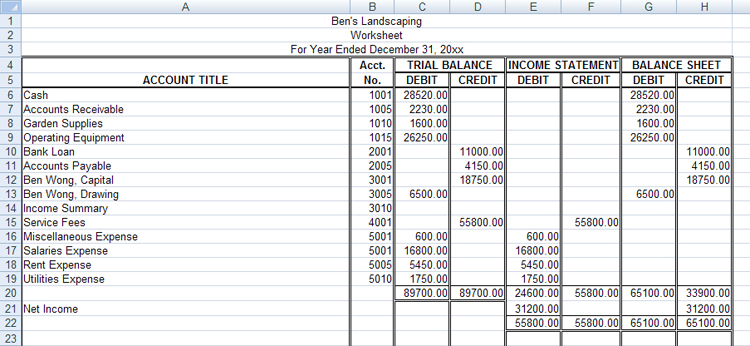
Microsoft product screen shot(s) reprinted with permission from Microsoft Corporation.
Save and submit it to your teacher for assessment.
Assignment 3 (optional)
Step 1: Open Balance Sheet Template, and save it in your course folder as “Project 2: Training Room 2: Assignment 3.”
Step 2: Using the following worksheet for Complete Moving and Storage, complete the balance sheet.
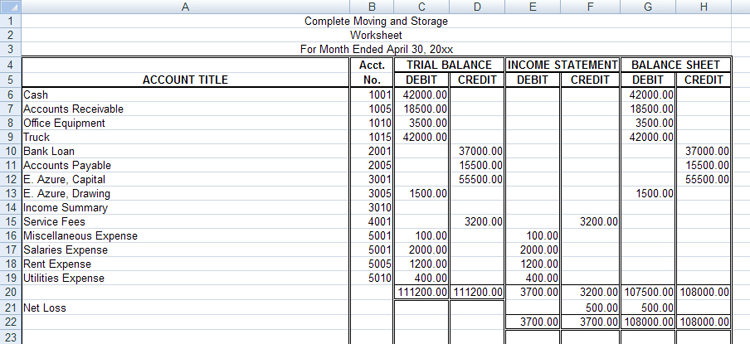
Microsoft product screen shot(s) reprinted with permission from Microsoft Corporation.
Save and submit it to your teacher for assessment.
1.10. Training Room Summary
Project 2: Financial Statements

© air/8427988/Fotolia
Training Room Summary
This training room reviewed the format of the balance sheet financial statement, in which you calculated the capital at the end of the fiscal period. The important thing to remember is to always calculate capital, never just copy it from the worksheet. If you copy the capital total from the worksheet, your balance sheet will not balance, or the left side will not equal the right side. The accounting equation must always be in balance.
Do you remember what the accounting equation is?
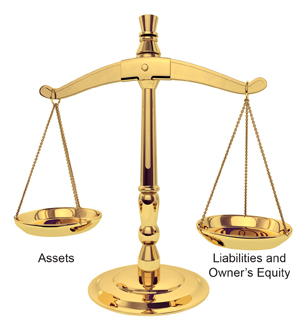
ASSETS = LIABILITIES + OWNER’S EQUITY
Continue on to the next training room, where you will complete the last financial statement to be completed in this project, a statement of owner’s equity. This statement will detail the changes in owner’s equity from the beginning of the fiscal period.
1.11. Training Room 3
Project 2: Financial Statements
Training Room 3: Statement of Owner's Equity
Suggested Time: 80 minutes
Training Room Introduction

© 2009 Jupiterimages Corporation
The statement of owner’s equity shows the change in owner's equity during a given time period. Recall that owner’s equity is the worth of the business after subtracting liabilities from assets. This statement lists the owner’s equity balance at the beginning of the period, additions and subtractions to the balance, and the ending balance. Additions come from owner investments and net income; subtractions come from owner withdrawals and net losses.
1.12. Page 2
Project 2: Financial Statements
What Do I Need to Know?
Look at this worksheet for Gurpreet’s Lawn Care and Snow Removal. The shaded portion of the worksheet is the section used to prepare the statement of owner’s equity.

Microsoft product screen shot(s) reprinted with permission from Microsoft Corporation.
Why Is This Important?
The balance sheet columns of the worksheet are the rough work needed to complete a formal statement of owner’s equity detailing the worth of the business. A business may have high profits or a high net income and still be in trouble financially. For example, if a business has excess debt, or higher liabilities than assets, the actual worth of the business would be decreasing. This statement allows a business to compare the worth of the business from one fiscal period to another with the expectation that owner’s equity or the worth of the business will increase over time. If a business was in trouble and declared bankruptcy, all of the assets would be liquidated and the creditors would have to be paid off before any money could be realized for the owner (or the shareholders, if a corporation).
What Do I Need to Do?
To complete the statement of owner’s equity you need to complete the following steps:
1. Heading
The name of the company is written first, then the name of the statement, and the date the statement is prepared appears last. This follows the same format as other financial statements you have completed.
- who: the name of the business
- what: the name of the statement
- when: the fiscal period of the statement
Remember that the date for this statement is for a period of time, not a single date.

Microsoft product screen shot(s) reprinted with permission from Microsoft Corporation.
Keep in mind that the date must be written in full as this is a formal statement. To review how to do this, view the Changing the Date video. This item is also available in the Toolkit.
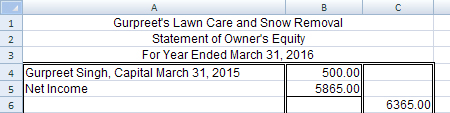
2. Adding Section
The form for the statement of owner’s equity is similar to the income statement form in that it has two columns. The first column is for the subtotals of the different sections, and the second column is for the totals only.
This section begins with the balance of the capital account at the beginning of the fiscal period and adds in any money that would increase the capital over the length of the fiscal period. In this case, Gurpreet Singh’s capital on March 31, 2015, was $500.00. This is the amount of the capital from the worksheet.
There are only two things that would increase capital: net income for the fiscal period and/or money that the owner has invested into the business (money from the owner’s personal money transferred into his or her business).
Gurpreet did not invest any money into his business during this year, but he did have a net income of $5,865.00 that needs to be added as shown below. The net income can be taken from the worksheet or from the income statement, as this is the same number. Notice that there is a total line before the total and that the total addition is placed in the second column.
Microsoft product screen shot(s) reprinted with permission from Microsoft Corporation.
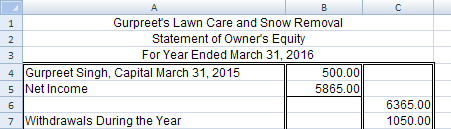
3. Subtracting Section
There are only two things that would decrease capital: a net loss for the fiscal period and/or money that the owner has withdrawn from the business.
Gurpreet did not have a net loss, but he did withdraw $1050.00, which is shown on his worksheet. Remember that when the owner withdraws money from the business, it is entered into the drawing account. Again, the total amount to be subtracted is placed in the second column.
Microsoft product screen shot(s) reprinted with permission from Microsoft Corporation.
Important Note: Notice that there is never a negative sign in accounting. Negative amounts are indicated by words, such as loss or withdrawal.
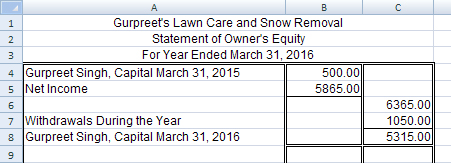
4. Ending Balance
To calculate the ending capital balance, the total in the subtract section is subtracted from the total in the add section. This amount must be the same as in the balance sheet prepared at the end of the fiscal period; therefore, the ending balance provides a good way to double-check your work.
Microsoft product screen shot(s) reprinted with permission from Microsoft Corporation.
Notice that, as in the income statement, there is a single rule before every total and a double rule to indicate that the numbers are believed to be correct and that everything is complete. Only three totals are placed in the second column:
- total additions
- total subtractions
- ending capital
You may want to refer to the Statement of Owner’s Equity Rubric, which includes a checklist of what belongs in the statement of owner’s equity when completing your practice and assignments.
There is also a Statement of Owner’s Equity Exemplar for your reference. The rubric and the exemplar are also available in the Toolkit.
1.13. Page 3
Project 2: Financial Statements
Time to Practise
The practice in the training room includes a game with topics on debits or credits as well as financial statements. Now would be a good time to view Tetraccounting1. Begin the practice game. Then choose financial statements and see how many points you can achieve by correctly identifying which financial statement would be used for the accounts. Note that if the account belongs on the balance sheet, you will have to identify it as an asset, liability, or shareholder’s equity. Shareholder’s equity is the same as owner’s equity. This game is also available in the Toolkit whenever you would like to play it.
Do as many of the following three practice questions as you need to feel confident in completing a statement of owner’s equity before continuing on to Time to Work, which will be submitted for assessment.
If, after completing all three practices, you are still not confident that you know how to complete a statement of owner’s equity, you may redo these practices or see your teacher for help.
1 Version 1.1 Developed for NAIT and McGraw-Hill, 2002 by Rebecca Marcil under a Creative Commons licence. Reproduced with permission. (http://digilearn.nait.ab.ca/careo/Accounting/PCgame/)
Practice 1
Step 1: Open Statement of Owner’s Equity Template, and save it in your course folder.
Step 2: Use the following worksheet to complete the statement of owner’s equity.
Microsoft product screen shot(s) reprinted with permission from Microsoft Corporation.
To check your work, go to Koch Moving and Storage Owner’s Equity Answer.
If you need more practice, continue on to Practice 2 or Practice 3.
If you are ready to do the assignments for this training room, continue on to Time to Work.
Practice 2
Step 1: Open Statement of Owner’s Equity Template, and save it in your course folder.
Step 2: Using the worksheet for CHOO TV below, complete a statement of owner’s equity.

Microsoft product screen shot(s) reprinted with permission from Microsoft Corporation.
To check your work, go to CHOO TV Owner’s Equity Answer.
If you need more practice, continue on to Practice 3.
If you are ready to do the assignments for this training room continue on to Time to Work.
Practice 3: Quick Cleaning Company
Step 1: Open Statement of Owner’s Equity Template, and save it in your course folder.
Step 2: Using the worksheet for Quick Cleaning Company below, complete a statement of owner’s equity.
Microsoft product screen shot(s) reprinted with permission from Microsoft Corporation.
To check your work, go to Quick Cleaning Company Owner’s Equity Answer.
If you are ready to do the assignments for this training room continue on to Time to Work.
Time to Work
As this is the last training room working with financial statements, the following assignments will require you to complete all three of the financial statements covered.
You may want to refer to the rubrics for all of the statements:
These rubrics are also accessible in the Toolkit.
Create a new folder in your FIN1030 Course Folder called “Project 2: Training Room 3.” All of the answers to the following questions must be saved in this folder for your teacher to mark.
Continue on to Assignment 1, which must be submitted to your teacher for assessment. There are also two optional assignments for this training room. Check with your teacher to see if it is necessary for you to complete them.
Assignment 1
Use the worksheet below to complete an income statement, balance sheet, and statement of owner’s equity. The capital on the balance sheet will be the same as the ending capital on the statement of owner’s equity.
Links to the blank forms as well as suggested file names are below the worksheet. Be sure to save the completed financial statements and submit them to your teacher for assessment.
Microsoft product screen shot(s) reprinted with permission from Microsoft Corporation.
Step 1: Open Income Statement Template, and save it in your course folder as “Project 2: Training Room 3: Assignment 1 Income Statement.”
Step 2: Open Balance Sheet Template, and save it in your course folder as “Project 2: Training Room 3: Assignment 1 Balance Sheet.”
Step 3: Open Statement of Owner’s Equity Template, and save it in your course folder as “Project 2: Training Room 3: Assignment 1 Owner’s Equity.”
The following are optional assignments. Check with your teacher to see if you need to complete them.
Assignment 2 (optional)
Use the worksheet below to complete an income statement, balance sheet, and statement of owner’s equity. The capital on the balance sheet will be the same as the ending capital on the statement of owner’s equity.
Links to the blank forms as well as suggested file names are below the worksheet. Be sure to save the completed financial statements and submit them to your teacher for assessment.

Microsoft product screen shot(s) reprinted with permission from Microsoft Corporation.
Step 1: Open an Income Statement Template, and save it in your course folder as “Project 2: Training Room 3: Assignment 2 Income Statement.”
Step 2: Open a Balance Sheet Template, and save it in your course folder as “Project 2: Training Room 3: Assignment 2 Balance Sheet.”
Step 3: Open a Statement of Owner’s Equity Template, and save it in your course folder as “Project 2: Training Room 3: Assignment 2 Owner’s Equity.”
Assignment 3 (optional)
Use the worksheet below to complete an income statement, balance sheet, and statement of owner’s equity. The capital on the balance sheet will be the same as the ending capital on the statement of owner’s equity.
Links to the blank forms as well as suggested file names are below the worksheet. Be sure to save the completed financial statements and submit them to your teacher for assessment.

Microsoft product screen shot(s) reprinted with permission from Microsoft Corporation.
Step 1: Open an Income Statement Template, and save it in your course folder as “Project 2: Training Room 3: Assignment 3 Income Statement.”
Step 2: Open a Balance Sheet Template, and save it in your course folder as “Project 2: Training Room 3: Assignment 3 Balance Sheet.”
Step 3: Open a Statement of Owner’s Equity Template, and save it in your course folder as “Project 2: Training Room 3: Assignment 3 Owner’s Equity.”
1.14. Page 4
Project 2: Financial Statements
Time to Work
As this is the last training room working with financial statements, the following assignments will require you to complete all three of the financial statements covered.
You may want to refer to the rubrics for all of the statements:
These rubrics are also accessible in the Toolkit.
Create a new folder in your FIN1030 Course Folder called “Project 2: Training Room 3.” All of the answers to the following questions must be saved in this folder for your teacher to mark.
Continue on to Assignment 1, which must be submitted to your teacher for assessment. There are also two optional assignments for this training room. Check with your teacher to see if it is necessary for you to complete them.
Assignment 1
Use the worksheet below to complete an income statement, balance sheet, and statement of owner’s equity. The capital on the balance sheet will be the same as the ending capital on the statement of owner’s equity.
Links to the blank forms as well as suggested file names are below the worksheet. Be sure to save the completed financial statements and submit them to your teacher for assessment.

Microsoft product screen shot(s) reprinted with permission from Microsoft Corporation.
Step 1: Open Income Statement Template, and save it in your course folder as “Project 2: Training Room 3: Assignment 1 Income Statement.”
Step 2: Open Balance Sheet Template, and save it in your course folder as “Project 2: Training Room 3: Assignment 1 Balance Sheet.”
Step 3: Open Statement of Owner’s Equity Template, and save it in your course folder as “Project 2: Training Room 3: Assignment 1 Owner’s Equity.”
The following are optional assignments. Check with your teacher to see if you need to complete them.
Assignment 2 (optional)
Use the worksheet below to complete an income statement, balance sheet, and statement of owner’s equity. The capital on the balance sheet will be the same as the ending capital on the statement of owner’s equity.
Links to the blank forms as well as suggested file names are below the worksheet. Be sure to save the completed financial statements and submit them to your teacher for assessment.
Microsoft product screen shot(s) reprinted with permission from Microsoft Corporation.
Step 1: Open an Income Statement Template, and save it in your course folder as “Project 2: Training Room 3: Assignment 2 Income Statement.”
Step 2: Open a Balance Sheet Template, and save it in your course folder as “Project 2: Training Room 3: Assignment 2 Balance Sheet.”
Step 3: Open a Statement of Owner’s Equity Template, and save it in your course folder as “Project 2: Training Room 3: Assignment 2 Owner’s Equity.”
Assignment 3 (optional)
Use the worksheet below to complete an income statement, balance sheet, and statement of owner’s equity. The capital on the balance sheet will be the same as the ending capital on the statement of owner’s equity.
Links to the blank forms as well as suggested file names are below the worksheet. Be sure to save the completed financial statements and submit them to your teacher for assessment.

Microsoft product screen shot(s) reprinted with permission from Microsoft Corporation.
Step 1: Open an Income Statement Template, and save it in your course folder as “Project 2: Training Room 3: Assignment 3 Income Statement.”
Step 2: Open a Balance Sheet Template, and save it in your course folder as “Project 2: Training Room 3: Assignment 3 Balance Sheet.”
Step 3: Open a Statement of Owner’s Equity Template, and save it in your course folder as “Project 2: Training Room 3: Assignment 3 Owner’s Equity.”
1.15. Training Room Summary
Project 2: Financial Statements

© 2009 Jupiterimages Corporation
Training Room Summary
The most common financial statements that a business creates are an income statement, a balance sheet, and a statement of owner’s equity. These statements all report different financial information and together create a complete financial picture of a business.
The format of these statements is the same for any company and allows auditors, investors, bankers, or whoever is reviewing the statements to understand the business’s financial information.
An income statement reports the net income or the net loss for the fiscal period and would help reveal if the money a business is spending is more or less than the money it is making in revenue.
The balance sheet contains all of the balances in assets, liabilities, and owner’s equity accounts and allows the business to see its financial position on a specific date for all of the accounts on one piece of paper.
The statement of owner’s equity is a detailed report of the worth of the business, including the money from investments and net income, as well as the money subtracted because of withdrawals by the owner or net loss.
Now that you have completed the financial statements at the end of the fiscal period, it is time to close the temporary capital accounts of revenue and expenses to prepare these accounts for the next fiscal period.
Continue to Project 3 to learn how to journalize closing entries and post these amounts to update the ledger.