2. Online Tools
| Site: | MoodleHUB.ca 🍁 |
| Course: | Introduction to Online Learning |
| Book: | 2. Online Tools |
| Printed by: | Guest user |
| Date: | Wednesday, 3 December 2025, 4:10 PM |
How to Create a Google Doc
There are a variety of different programs that you can use to create a word document (eg. microsoft word, pages, open office). A program that everyone has access to in Rocky View is google docs.
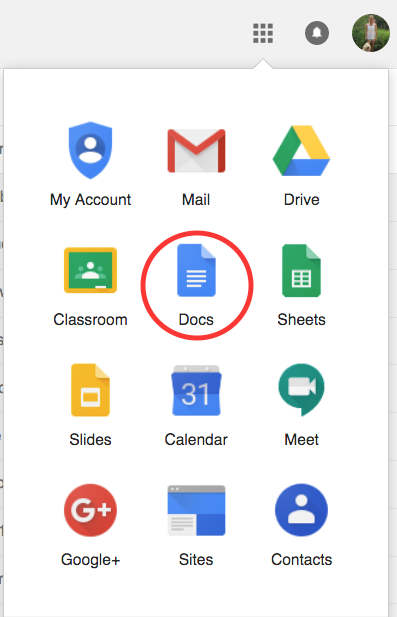
To create a Google Doc, sign into your rvschools email account. When logged into your email account, click on the square icon on the top right side of your screen.
![]()
Clicking on this icon will bring down the dropdown menu of the Google Apps. Click on the Docs App.
![]() Video: How to open a document in Google Docs.
Video: How to open a document in Google Docs.
Saving a Google Doc as a PDF
 Unless your teacher requests otherwise, please submit your assignments in the format of a PDF. This will allow your teacher to open files created using a variety of different programs and it will save formatting on posters, infographics etc.
If you have created a google doc or google slides etc, to save the file as a PDF, open your file, and from the "File" dropdown menu, select "Download as", then select PDF, click OK.

![]() Video: How to convert a Google Doc into a PDF.
Video: How to convert a Google Doc into a PDF.
How to take a Screen Shot
A screenshot is when you take a picture of your computer screen. This is a helpful tool if you want to show someone what is on your screen without having to grab a camera. This skill will be used throughout your time in online education. You will often be asked by your teacher to take a screenshot, so make sure to follow along below.
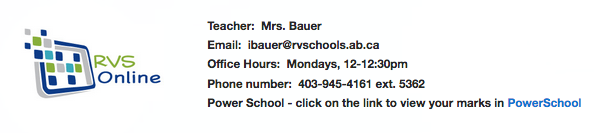
Here is an example of a screenshot of my course contact information from a course homepage:
You can take a screenshot on every computer. Here are the ways to take a screenshot on Windows, Macs, Chromebooks and iPads.
On a Windows computer
1. Hit Print Screen on your keyboard (it looks like PRTSC and is generally below END in the top right of your keyboard). This will take a picture of your whole screen.
2. Open the program Paint by clicking the start menu and choosing the Paint program.
3. Hit CTRL-V (Paste) to paste the screenshot into Paint.
4. You can edit the picture in Paint, and crop or adjust as necessary.
5. Save the picture.
If you are on a Mac computer,
1. All you have to do is press Command-Shift-4. A little crosshair will appear and you can click and drag where you want the picture taken. The image will save automatically on your desktop.
If you are on a Chromebook
1. Press CTRL and then the button that looks like a square with two vertical lines next to it.
2. A box will open. Click View in folder. You will see the screenshot in your Google Drive.
If you are on an iPad
1. Press the home button and On/Off button at the same time. It should flash and take a picture.
2. Open up Pictures, and the screenshot will be there.
You will be asked to take a screenshot for your assignment at the end of this lesson.
Read & Write for Google
Read & Write for Google can be helpful in any course that you take online.
You must be using the internet browser Chrome for it to work. That means you should not be using Internet Explorer, Firefox, Safari, or any other type of browser. If you're not on Chrome, look for this icon: ![]() and if your computer doesn't have it, you can download it for free here. All right, are you on Chrome? Good, let's continue.
and if your computer doesn't have it, you can download it for free here. All right, are you on Chrome? Good, let's continue.

To get Read & Write for Google, click here and press the blue "Add to Chrome" button.This tool is very helpful if you struggle at reading. It has many accessories such as highlighting, translating, and fact finding, but it's greatest feature is the speech reading. If you press this button ![]() in a Google Doc, and then the play button
in a Google Doc, and then the play button ![]() , the program will read out whatever text you are looking at. If you work better listening to words instead of reading them, this tool will help quite a bit.
, the program will read out whatever text you are looking at. If you work better listening to words instead of reading them, this tool will help quite a bit.
Speech Recognition

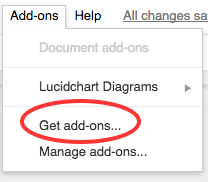
To get Speech Recognition for Google Docs, you can use a tool called Google Translate. This tool allows you to read out your thoughts and the computer will type them out for you. To use it, open a Google Doc, click ![]() in the top menu, click on Speech Recognition and then click Start.
in the top menu, click on Speech Recognition and then click Start.

From the dropdown menu, click on Get add-ons.
Select Google Translate and download it. Speak at your computer and the program will convert it to text! Just hit Stop when you are done and the program will insert your spoken words into the document. Be aware that you have to speak your punctuation i.e. you would say, "Hi comma my name is Michael period".
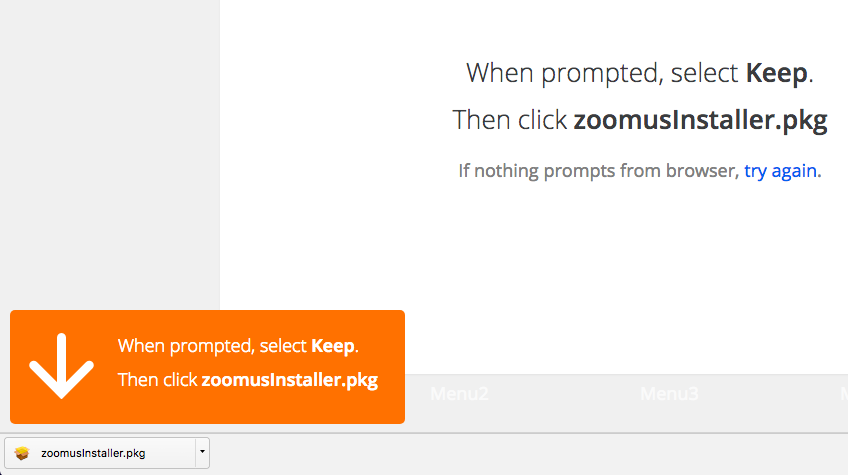
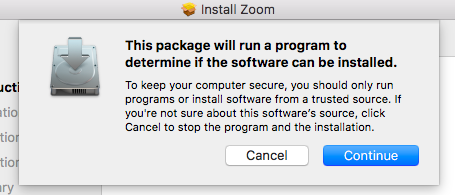
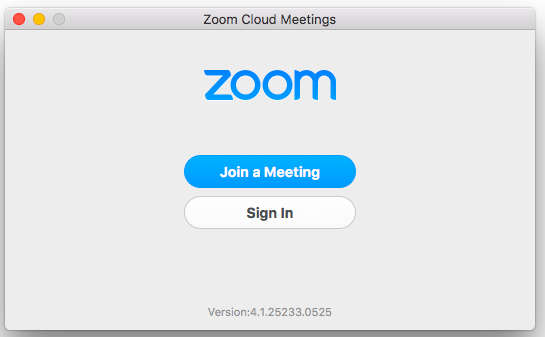
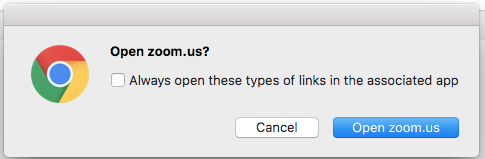
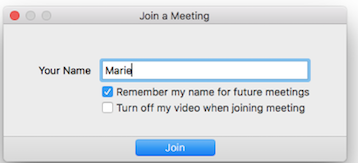
How to access Zoom
![]()
Zoom is an interactive program that will allow you to talk to your teacher and classmates and to interact and learn in a way similar to a classroom. If your teacher has regular help or tutorial sessions, you will be informed and provided with a classroom link.
The first time that you try to access Zoom on your computer, you will be required to download it.

What are Analytics?
Analytics are the data we, as teachers, have available to us to examine and analyze.
When you take an online course, we have a variety of data to check.
Every time you sign into Moodle, Moodle tracks your presence. Every time you click into a course, view a page, watch a video, submit an assignment, Moodle tracks this information. This is not meant to scare you, just to let you know that we can see the work you are doing, just like in a classroom. If you skip to an assignment without reading the lesson, we can track that. Sometimes this data is shared with parents if students are not completing their assigned work.

This logs every person to enter the course, where they viewed, and when. This can be tracked by the whole course, or by individuals.

This shows how often the student worked on the course per week.
Any attempts to cyberbully, or to change the course, can be tracked immediately. It is an important rule about the internet - you are never anonymous, everything you do can be tracked!
Assignment
1. Open a new folder for this course in your documents on your computer. (On a Mac, right click and select New Folder. Then right click on the folder and select rename. Label your folder "IntroOnline".)
2. Open up a blank document in Google Docs. In a paragraph, include the following information:
-
introduce yourself (what is your name)
-
your school name
-
a hobby (something you like to do with your free time)
-
what differences you see between taking courses online (eg. RVS online) and taking classes at a traditional school (Eg. Your WE Connect school)?
-
what you are planning on getting out of an online school experience
When you have completed your paragraph, proof read it to edit for errors, and save your file as follows: OnlineU1L1(your surname) Note, your surname is your lat name. Eg. OnlineU1L3Bauer.
3. Take a screen shot of your teacher's contact information on the course homepage. Open the screen shot (if you have a Mac, your will find your screenshot on your course homepage and rename it "TeacherInfo" by right clicking on the file). Move this screen shot into your IntroOnline folder by dragging it over.
4. Open the Google Doc that you created in step 2. Below your introductory paragraph, you are going to insert the screen capture that you just took of your teacher's contact information. To do this, click on the insert icon.

From the dropdown menu, select "upload from computer".
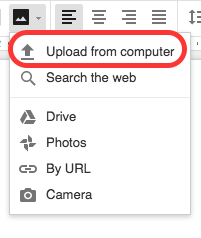
Browse to your "TeacherInfo" screen shot and select it. Click "Open". You will see your screen shot on your Google Doc. Save it.
5. Download the document that you just created as a PDF. Save this file in your IntroOnline folder.
*Hold onto the PDF document that you just completed. You will learn how to submit this in the assignment folder in Moodle in the next lesson.
Evaluation:
Paragraph including the following: (5 marks)
1. In a paragraph, include the following information:
-
introduce yourself (what is your name)
-
your school name
-
a hobby (something you like to do with your free time)
-
what differences you see between this and a traditional school
- what you are planning on getting out of an online school experience
2. Screen shot of teacher contact information (2 marks)
3. Assignment labeled correctly ie. OnlineU1L1(your surname) (1 mark)
4. Assignment saved as a pdf. (1 mark)
5. Assignment submitted into the designated assignment folder. (1 mark)
Total = 10 marks