Module 6
| Site: | MoodleHUB.ca 🍁 |
| Course: | Biology 30 [5 cr] - AB Ed copy 1 |
| Book: | Module 6 |
| Printed by: | Guest user |
| Date: | Thursday, 18 September 2025, 7:19 PM |
Description
Created by IMSreader
Table of contents
- 1. Module 6
- 1.1. Lesson 1
- 1.2. Page 2
- 1.3. Page 3
- 1.4. Page 4
- 1.5. Page 5
- 1.6. Lesson 2
- 1.7. Page 2
- 1.8. Page 3
- 1.9. Page 4
- 1.10. Page 5
- 1.11. Lesson 3
- 1.12. Page 2
- 1.13. Page 3
- 1.14. Page 4
- 1.15. Page 5
- 1.16. Lesson 4
- 1.17. Page 2
- 1.18. Page 3
- 1.19. Page 4
- 1.20. Page 5
- 1.21. Lesson 5
- 1.22. Page 2
- 1.23. Page 3
- 1.24. Page 4
- 1.25. Page 5
- 1.26. Lesson 6
- 1.27. Page 2
- 1.28. Page 3
- 1.29. Page 4
- 1.30. Page 5
- 1.31. Module 6 Summary
1. Module 6
Module 6: Triangles and Other Polygons
Module 6 Introduction
© Elena Schweitzer/10651880/Fotolia
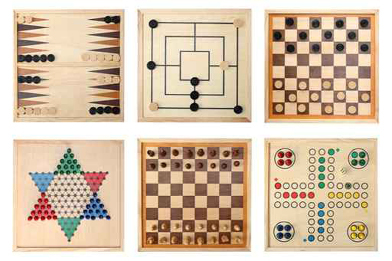
Board games are popular among all peoples of the world. Some of the games in the photograph have a long history. Backgammon, the first game board shown in the photograph, originated from the Royal Game of Ur and was played in Mesopotamia 5000 years ago. Chess originated in India in the sixth century and became popular in Europe 1000 years ago.
A common feature of these board games is geometry, which is an integral part of the play. On the boards you can see repeated patterns of triangles, squares, and hexagons, just to name a few. There is no escape from mathematics!
In this module you will explore the geometry of the triangle and other polygons. You will begin by examining similar polygons and how their sides and angles are related. Then your focus will turn to the triangle. You will examine how the relationships among similar triangles can be used to model and solve a variety of practical problem situations.
The module concludes with an exploration of the right triangle and the Pythagorean Theorem. In every lesson there will be references to sports and art. You will be asked to relate each new geometric concept to your Unit 3 Project topic, and you will consider the following Module 6 question:
- How can the Pythagorean Theorem and the relationships among similar polygons be used to solve practical problems?
Save a copy of the Module 6 Glossary in your course folder now.
1.1. Lesson 1
Module 6: Triangles and Other Polygons
Lesson 1: Similar Polygons
Focus

© shadow216/shutterstock
Have you ever tried to draw a picture of a favourite cartoon character? For most people it is a difficult task, especially if the final drawing is to be larger or smaller than the original. Your goal is to end up with a shape that is as similar as possible to the original.
Geometry is the study of shapes and their relationships. An important class of shapes is similar polygons. This lesson deals with similar polygons and the relationships among their angles and among their sides.
Lesson Questions
In this lesson you will explore the following questions:
-
What techniques can be used to draw similar polygons?
-
What are the relationships among the sides of similar polygons?
-
What are the relationships among angles of similar polygons?
Assessment
You will complete the Lesson 1 Assignment Booklet for assessment. Download the Lesson 1 Assignment Booklet and save it in your course folder now. You will receive instructions on how to complete the Assignment Booklet later in the lesson. You will also be prompted to start working on the Unit 3 Project.
There are other activities that you will complete throughout this lesson. It is important to complete all activities and save them in your course folder. Your teacher may ask to see your work at any time.
The lesson provides you with opportunities to investigate, review examples, and practise the knowledge and skills you are learning. In Self-Check activities you can compare your answers to see if you are on track. If you are having difficulty with concepts or calculations, contact your teacher.
Did You Know?
BC, a popular comic, has been run daily since 1958. That’s over 50 years, or 18 250 comics.
Required Materials and Equipment
For this lesson you will need the following supplies:
-
a protractor
-
an SI ruler
-
several blank sheets of paper
-
a calculator
-
sheets of Eighth-Inch Grid Paper
-
sheets of Quarter-Inch Grid Paper
-
sheets of Half-Inch Grid Paper
-
scissors
-
a glue stick
-
two rubber bands
1.2. Page 2
Module 6: Triangles and Other Polygons
Get Started

© MisterElements/shutterstock
In this next activity you will draw a favourite cartoon character. Your final drawing will be larger than the original but geometrically similar in shape.
The activity is described using a cartoon of a happy cow; however, you may search the Internet or magazines for a cartoon character or art design you prefer to enlarge.
 Try This
Work with a partner, if possible.
Step 1: Locate or print out a small cartoon character or art design that you wish to enlarge. You may use the Happy Cow image or you may choose another image. Cut around the figure and recycle the waste.
© MisterElements/shutterstock
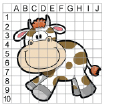
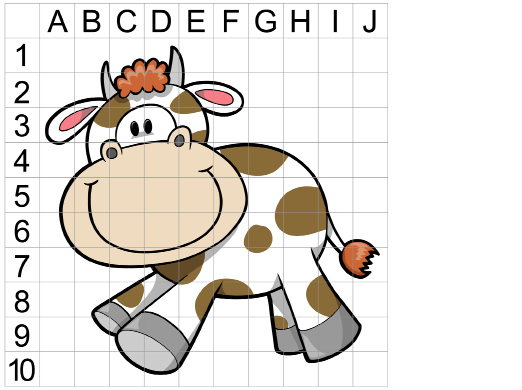
Step 2: Download one sheet each of Eighth-Inch Grid Paper, Quarter-Inch Grid Paper, and Half-Inch Grid Paper. Paste the figure on the eighth-inch grid paper, and extend the grid lines over the cartoon figure, as in the example. As in the example, label the grid to identify each square of the figure to be enlarged.
Step 3: Label the quarter-inch and the half-inch grid paper the same way you did for the eighth-inch grid. In each square, draw what you see. In square A3, you would draw what you see on the figure.
This is a sample of what you see in A3 on the eighth-inch grid.
![]()
© MisterElements/shutterstock
This is a sample of what you draw in A3 on the quarter-inch grid.
![]()
© MisterElements/shutterstock
This is a sample of what you draw in A3 on the half-inch grid.
© MisterElements/shutterstock
When you are done, you will have two enlargements. The following is the half-inch grid enlargement of the happy cow.
© MisterElements/shutterstock
When you have completed your enlargements, answer the Self-Check questions. Save your answers in your course folder.
scale factor: the number by which the length and the width of a figure are multiplied to form a larger or smaller similar figure
Recall that the number of times the length and the width is increased or decreased is called the scale factor. If both the length and the width are tripled in size, the scale factor is three.
 Self-Check
SC 1. What is the scale factor by which the length and the width were increased from the original figure on the eighth-inch grid to your first enlargement on the quarter-inch grid? How do you know?
SC 2. How many times larger in area is the enlargement on the quarter-inch grid than the original on the eighth-inch grid? How do you know?
SC 3. What is the scale factor by which the length and the width were increased from the original figure on the eighth-inch grid to your second enlargement on the half-inch grid? How do you know?
SC 4. How many times larger in area is the enlargement on the half-inch grid than the original on the eighth-inch grid? How do you know?
SC 5. Suggest how you could reduce an image to one-half its length and one-half its width?
The figures on the three sizes of grid paper are similar figures, geometrically speaking.
In the following activity, you are going to investigate similar polygons.
similar figures: figures with the same shape but not necessarily the same size
A figure similar to another may be larger or smaller than the other.
polygon: a many-sided figure
A triangle is a polygon with three sides, a quadrilateral is a polygon with four sides, and so on.
1.3. Page 3
Module 6: Triangles and Other Polygons
Explore
You have just drawn geometrically similar cartoon figures or geometrically similar designs. In the past, you have also probably made enlargements and reductions on your computer screen by using the zoom control in a web browser, a drawing program, or other programs.
Sometimes size is selected automatically, as when you see this message on your screen: “This computer game has been adjusted to fit your screen.”
When zooming in or out from one size to another on your screen, an original figure and its enlargement are geometrically similar. It does not matter how complicated the figure is.
Polygons are not very complicated compared to some images you come across on your computer screen. So, to draw polygons, you can still use the grid technique you used at the beginning of this lesson. By drawing similar polygons, you can explore these questions:
-
What relationships exist among the sides of similar polygons?
-
What relationships exist among the angles of similar polygons?
 Try This
In this activity you will draw similar polygons on grid paper, and you will compare their characteristics.
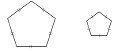
Step 1: Draw a pentagon—a five-sided polygon—on quarter-inch grid paper. One possibility is given. Label the vertices A, B, C, D, and E going clockwise around the pentagon.
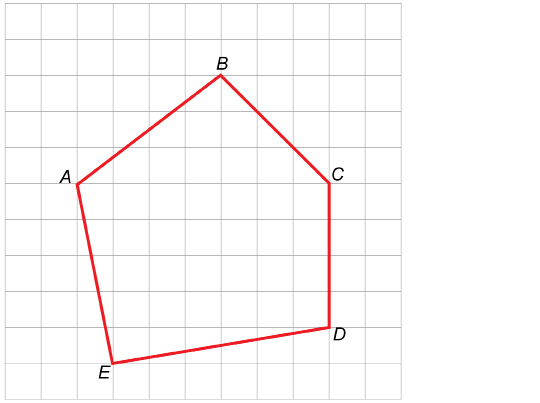
Step 2: Draw a similar pentagon on eighth-inch grid paper. For instance, for the given pentagon, start at point A. Then move four squares to the right and three squares up to locate B (shown on the previous grid). Then go three squares to the right and three squares down to C, and so on.
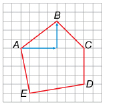
Step 3: Draw a similar pentagon on half-inch grid paper. Again, for the sample pentagon, start at point A. Then move four squares to the right and three squares up to locate B. Then go three squares to the right and three squares down to C, and so on.

Step 4: Measure the angles of each pentagon. Record these measures on each diagram.
Step 5: Measure, to the nearest millimetre, the sides of each pentagon. Record these lengths on each diagram.
Answer the following questions.
TT 1. How do the corresponding angles of the three pentagons compare?
TT 2. Find the following ratios for each pair of corresponding sides. Express your answers to one decimal place.
TT 3. Find the following ratios for each pair of corresponding sides. Arrows are drawn showing that vertex B is four squares to the right and three squares above vertex A. Divide to one decimal place.
TT 4. What do you notice about the ratios in TT 2? Think about the squares on the two grids. Why did you get the ratios you did in TT 2?
TT 5. What do you notice about the ratios in TT 3? Think about the squares on the two grids. Why did you get the ratios you did in TT 3?
 Share
Share
Use the discussion area for your class, or another method indicated by your teacher, to post your answers to TT 1 to TT 5, and to view the work of the people you are sharing with. Compare the answers for TT 1 to TT 5. Identify where you have similar answers and where your answers are different. Discuss all differences between your answers until you have agreement. If necessary, you may wish to involve your teacher in your discussion.
Summarize what you learned from these Try This and Share sections by forming two general statements as follows:
-
one statement to describe the corresponding angles of enlarged/reduced similar polygons
-
one statement to describe the ratios of corresponding sides of enlarged/reduced similar polygons
Save these statements and your grid diagrams in your course folder.
1.4. Page 4
Module 6: Triangles and Other Polygons
Bringing Ideas Together
In the Explore section, you investigated similar polygons by changing the grid size upon which the polygons were drawn. You discovered that for those polygons, the corresponding angles were congruent—equal in measure. You also observed that the ratios of the corresponding sides are all equal and determined by the scale factor. Now it is time to see how these similar polygon relationships can be useful in solving problems.
Example 1
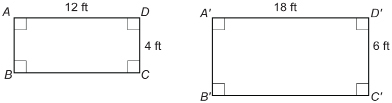
Jasmine is designing a rectangular patio for her neighbour. She has shown her neighbour two sketches. The sketches ABCD and  are similar in shape but differ in size.
- Are the corresponding angles congruent?
- Determine the ratios of the lengths of the corresponding sides. Are the ratios equal?
- What scale factor did Jasmine use to draw

- How are the answers to question parts b and c related?
Solution
-
All angles in the rectangles are right angles and are equal in measure.

The corresponding angles are congruent.
- Note: Use AB as the symbol for the length of side AB.
All the ratios are equal to 1.5.
- Jasmine used the scale factor 1.5 to draw
 She multiplied both the length and width of ABCD by 1.5 to draw
The length of rectangle ABCD is 12 ft.
The width of rectangle ABCD is 4 ft.
- The scale factor is equal to the ratios of the corresponding sides of the similar figures.
Proportional Reasoning
In the previous example, the ratios of corresponding sides are equal.
proportion: a statement showing two ratios are equal
![]()
If the ratios of the sides of two polygons are equal, the sides of the two polygons are said to be proportional.
In the next example and in the follow-up question in the Lesson 1 Assignment, you will investigate another method of drawing similar polygons. You will also determine if the sides are proportional and if the corresponding angles are congruent—equal in measure.
You will need two sheets of blank paper, two elastic bands, tape, a ruler, a protractor, and your calculator. Work with a partner, if possible.
Example 2
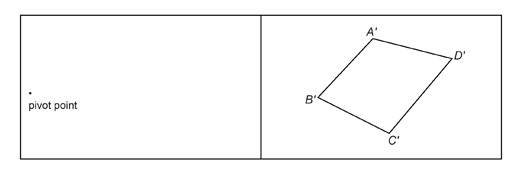
Use two elastic bands to draw a figure similar to quadrilateral ABCD.
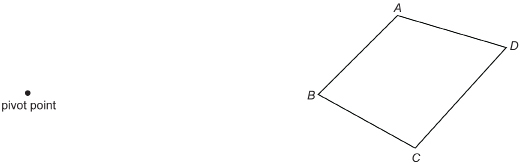
Or you can print “Quad ABCD Diagram” for a copy of the quadrilateral ABCD and pivot point shown above.
Solution
Step 1: Tape the diagram you printed and a blank sheet of paper beside each other, as shown, on the top of a desk or table. Use masking tape so you do not damage the surface of the table or desk.
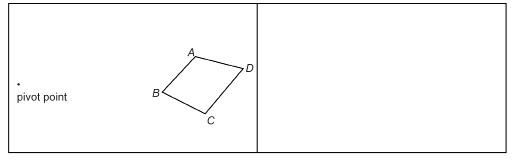
Step 2: Tie two elastic bands together. If the bands are the same size, each must be shorter than the distance from the pivot point to the nearest point on ABCD. If the elastics are different sizes, one must be shorter than the distance from the pivot to ABCD.

Step 3: If you are working with a partner, have your partner hold the end of one elastic band on the pivot point. One method is to ask your partner to insert a pen in the loop of that band and place the tip of the pen on the pivot point. Place the tip of your pen in the other loop and stretch the bands so that the knot is on point A. Mark the point on the second sheet where your pen tip is. Call that point, point  In a similar fashion, locate points
  on the second sheet. Join the four points to form
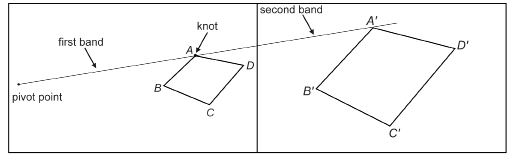

Save your work in the course folder. You will need your work to answer questions from this example in the Lesson 1 Assignment.
 Mastering Concepts
Suppose you wanted to draw a polygon similar to, but smaller than, a given polygon. How might you use the elastic bands?
Consider a quadrilateral ABCD placed on the right-hand sheet and the pivot point on the left-hand sheet.
1.5. Page 5
Module 6: Triangles and Other Polygons
Lesson Summary

© Baloncici/shutterstock
If you have played foosball or a table-top hockey game, the fields look similar to the real game. If you took the measurements of the length and the width, are they in fact proportional to an actual soccer pitch or hockey rink?
Did You Know?
Foosball was invented in 1922 in Britain. Today foosball is a highly competitive sport. However, unlike ping-pong, foosball is not yet an Olympic sport.
This lesson dealt with similar figures, including how similar figures are constructed and the relationships among the sides and angles of similar figures.
In this lesson you explored the following questions:
-
What techniques can be used to draw similar polygons?
-
What are the relationships among the sides of similar polygons?
-
What are the relationships among the angles of similar polygons?
Check your level of understanding of the materials covered in this lesson by completing “Lesson 1 Traffic Lights.” If you select an amber or red traffic light in the multimedia piece, you will receive information about additional work you can complete to improve your understanding of the topics. Complete the suggested work before you proceed to the Lesson 1 Assignment. If you experience difficulty, contact your teacher before starting the Lesson 1 Assignment.
 Assignment
Retrieve the Lesson 1 Assignment Booklet you saved in your course folder at the start of this lesson. Complete the Assignment. Resave your Assignment Booklet in your course folder and submit a copy to your teacher for assessment.
Unit 3 Project
© Infinity2/shutterstock

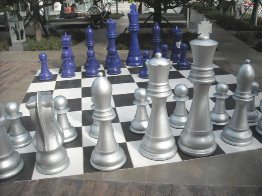
© Helder Almeida/shutterstock
Have you ever seen one of these massive garden chess games? It is quite obvious that these garden games are enlargements of a typical chess board and are, therefore, similar polygons. Can you see the less obvious similar polygons in these games?
Before you move on to the next lesson, look at the topic you have chosen for your Unit 3 Project. Do you see similar polygons that are obvious in the design of the game or art you chose as your topic? Are there similar polygons that are less obvious with respect to your topic? Take some time to explore your topic in detail. Keep a record of all your ideas and any sketches you make in your course folder for use in your Unit 3 Project presentation. For more information about this step, and later steps of the unit project, refer to the Unit 3 Project.
There are similar polygons in the board shape and in a black or white square; and there are similar polygons in the L-shapes formed when a rook (the horse) moves on the big and small boards.
1.6. Lesson 2
Module 6: Triangles and Other Polygons
Lesson 2: Ratios and Similar Polygons
Focus

© Fotonium/shutterstock
Matryoshka dolls, or Russian nesting dolls, are a series of hollow wooden dolls that fit one inside the other. This artistic tradition is over 120 years old. Similar Japanese dolls inspired artists in the 1890s. What makes this art form so appealing is the painted figures. Sometimes the painted figures are all geometrically similar, as in this set, and sometimes the figures may portray different characters, often ending with a baby as the smallest figurine.
Similarity in art is a common feature. As you work through the activities of this lesson, you may be interested in exploring this aspect further as part of your Unit 3 Project.
Lesson Questions
In this lesson you will explore these questions:
-
How can you determine if two polygons are similar?
-
How are the relationships among the sides and angles of similar polygons used to help solve problems?
Assessment
You will complete the Lesson 2 Assignment Booklet for assessment. Download the Lesson 2 Assignment Booklet and save it in your course folder now. You will receive instructions on how to complete the Assignment Booklet later in the lesson. You will also be prompted to start working on the Unit 3 Project.
Remember to save all activities, including those that are not part of the Assignment, in your course folder.
Required Materials and Equipment
For this lesson you will need the following supplies:
-
a protractor
-
a straightedge or ruler
-
several blank sheets of paper
-
a calculator
1.7. Page 2
Module 6: Triangles and Other Polygons
Get Started
In this activity you will review proportional reasoning—an essential skill in solving problems involving similar polygons.
 Try This
Work with a partner, if possible.
TT 1. Angus is online looking for stamps to buy as a gift for his uncle, who is a keen collector. One stamp that has caught Angus’s attention is a 2002 issue celebrating First Nations and Inuit art.

© Canada Post Corporation (2002). Reproduced with permission.
Angus is wondering what the dimensions of the stamp are. The illustration says the stamp is 32 mm wide, but there is no mention of the stamp’s height. Angus knows the picture of the stamp online is similar to the actual stamp. Help Angus determine the height of the actual stamp.
Step 1: Print a copy of the 2002 “Aboriginal Art Christmas Stamp.”
Step 2: Measure the width and height of the stamp. Knowing that the width of the real stamp is 32 mm, use the dimensions of the stamp you printed to find the actual height of the stamp.
Step 3: Watch how Angus determined the height of the stamp in “Finding Stamp Height.”
Step 4: The method Angus used is an example of using a proportion—that is, a statement equating two ratios. Compare the method you used to answer this question with the method Angus used. Did you get the same stamp dimension Angus did?
 Self-Check
Use the method shown in TT 1 to solve each proportion. If you are working with a partner, do the questions independently, and then check each other’s work.
SC 1.
![]()
SC 2.
![]()
SC 3.
![]()
SC 4.
![]()
1.8. Page 3
Module 6: Triangles and Other Polygons
Explore
In the previous lesson you used grids and elastic bands to draw similar polygons. In this activity you will explore another method of sketching similar polygons. You will also review the relationships between similar polygons.
 Try This
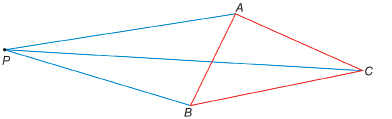
Step 1: Print the “Pivot Point and Triangle ABC” diagram.
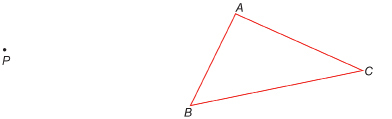
Step 2: You may be reminded of the approach with elastics. However, instead of using elastics, join point P to each vertex of the polygon ![]() as shown here.
as shown here.
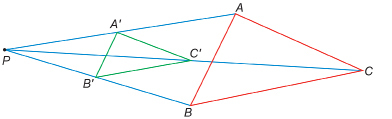
Step 3: Measure out halfway from P to A. Call this point ![]() Measure out halfway from P to B. Call this point
Measure out halfway from P to B. Call this point![]() Measure out halfway from P to C. Call this point
Measure out halfway from P to C. Call this point ![]() Join these points to form
Join these points to form![]()
In the last lesson you learned two things that are true for all similar polygons. What are those truths?
TT 2. How can you prove that the two triangles you just drew are similar triangles? Record your work to prove your results.
 Share
Share
Share and compare your work from TT 2 with a partner or group. Take note of the similarities and differences between the ways used to prove the triangles are similar. Discuss the following questions and summarize your discussion in a paragraph.
-
Is there one method that will work in all cases?
-
Did any of the methods use a scale factor or ratios to prove the triangles are similar?
-
How could a scale factor or ratio indicate the size of the similar polygon?
Save a copy of your summary paragraph in your course folder.
1.9. Page 4
Module 6: Triangles and Other Polygons
Bringing Ideas Together
In the Explore section you investigated another method of sketching similar polygons. You also reviewed the relationships among angles and among sides of similar polygons.
For two similar polygons, the angles are equal in measure, and the sides are proportional—that is, the ratios of corresponding sides are equal.
 Self-Check
SC 5. How does the side proportion change for a similar polygon that is larger or smaller in size? Look at the similar polygons below.
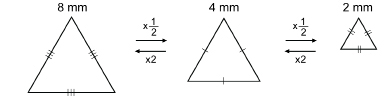
SC 6. The side proportion, or scale factor, moving between these triangles is shown. What do you notice about scale factor when you move from a large polygon to a small polygon? What does the scale factor look like as you move from a small polygon to a large polygon?
The following example determines if two figures are similar by comparing angle measurements and finding side ratios and scale factor.
Example 1
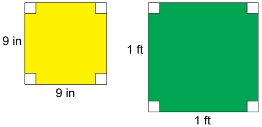
Are square floor tiles measuring 9 in on a side similar to square floor tiles measuring 1 ft on a side?
Solution
The corresponding angles are all right angles. So, the corresponding angles are equal in measure (congruent). A ratio is a comparison of two numbers. Make sure the units of all measurements are the same. If they are not the same, you will have to convert to a common unit. You have to use the same unit in both parts of the ratio.
Remember 1 ft = 12 in. So, the ratio of each pair of corresponding sides ![]()
Reduced to lowest terms, this ratio ![]()
Because corresponding angles are equal in measure and the sides are proportional, the squares are similar polygons.
Note that the scale factor describing the change from a 9-in square into a 12-in (1-ft) square is ![]()
![]()
Regular Polygons
regular polygon: a polygon with all its angles equal in measure and all its sides equal in measure
Did you know that some shapes are always similar to each other? All squares are similar. Squares are examples of regular polygons.
Equilateral triangles are another example of regular polygons. Each angle of an equilateral triangle is 60°, because 3 × 60° = 180°.

Can you think of another example of a shape that is always similar?
Self-Check
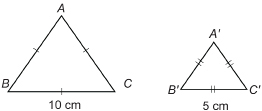
SC 7. By what scale factor would you have to multiply the sides of an equilateral ![]() to obtain
to obtain ![]()
SC 8. The kitchen in Jasper’s home is rectangular in shape and is 12 ft by 9 ft. Jasper’s bedroom is also rectangular and is 8 ft by 10 ft. Are the two rooms similar polygons?
Similarity
In the next example, you will investigate whether the given pentagons are similar.
Example 2
Determine the ratios of the pairs of sides of the pentagons ABCDE and ![]() Are the pentagons similar? Why or why not?
Are the pentagons similar? Why or why not?
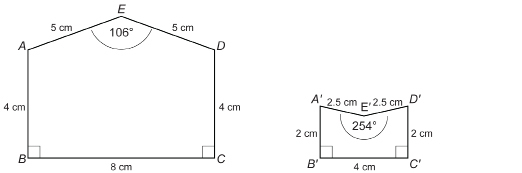
Solution
Find the ratios of the sides.
The ratios of the sides are equal, but the figures are not similar. The corresponding angles are not equal, since 106° is not equal to 254°.
In the next examples you will find the missing sides of two similar figures by solving proportions.
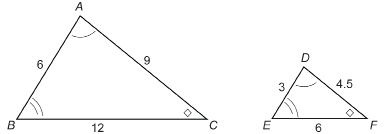
Example 3
In the diagram ![]() the measurements of side lengths are shown in units. For example,
the measurements of side lengths are shown in units. For example, ![]() has a measure of 2 units.
has a measure of 2 units.
Is ![]() Give reasons for your answer to this question.
Give reasons for your answer to this question.
View “Example 3 Solution: Similar Triangles.”
Example 4
Two similar triangular city lots are pictured below. Find the missing measures x and y.
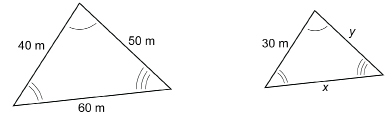
View “Example 4 Solution: Finding Lengths in Similar Triangles.”
Example 5
The outlines of two kites are similar polygons. Determine x.
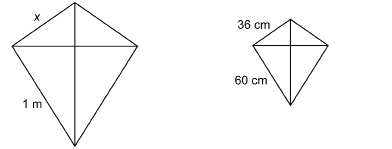
Solution
Did You Know?

The Chinese were making kites from silk and bamboo 2800 years ago!
Remember that 1 m = 100 cm. Set up the proportion.
So, x = 60 cm.
Now it’s your turn.
Self-Check
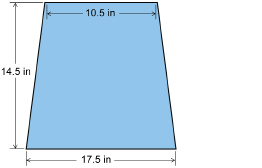
SC 9. Dorothy is preparing to sew an outfit for her toddler. She wants to adapt the following pattern.
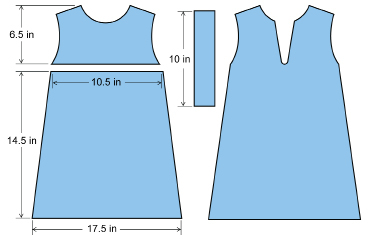
To fit her child, Dorothy plans to reduce the dimensions of the pattern by 10%. What is the scale factor? What will the dimensions of this section be if Dorothy decides to round each measurement to the nearest quarter inch?
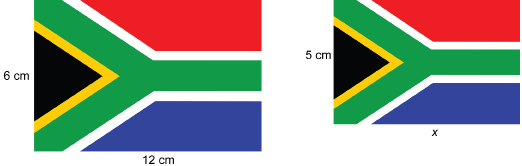
SC 10. Shawn was writing a report about the World Cup held in South Africa in 2010. Shawn had to decide between two sizes of the South African flag for his report.
The length of the smaller flag is missing. Calculate the length to one decimal place.
© Gino Santa Maria/1215500/Fotolia
SC 11. Maxine is interested in model aircraft. She wants to build a ![]() scale model of the Silver Dart, the first powered airplane to fly in Canada.
scale model of the Silver Dart, the first powered airplane to fly in Canada.
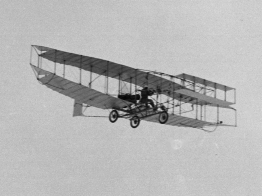
<http://www.airforce.forces.gc.ca/v2/equip/hst/silverdart-eng.asp>; National Defence. Reproduced with the permission of the Minister of Public Works and Government Services, 2010
If the wingspan of the Silver Dart is 15 m, what will the wingspan of Maxine’s model be? Round to two decimal places.
Did You Know?
The original Silver Dart was made of steel tubing, bamboo, wire, and wood.
SC 12. The following polygons are similar. Find the missing measures (x, y, and z). Round to one decimal point.

 Mastering Concepts
Answer this question. When you are finished, check your answer.
One rectangle that often appears in art and architecture is the golden rectangle. The proportions of the golden rectangle are considered pleasing to the eye. The length of the golden rectangle is approximately 1.618 times as long as it is wide. So, if the width is 1 m, the length would be 1.618 m.
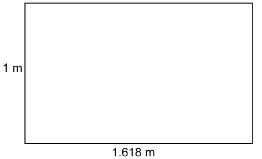
One of the interesting properties of the golden rectangle is that if you draw a square inside with the width as one side, the rectangle remaining would also be a golden rectangle.
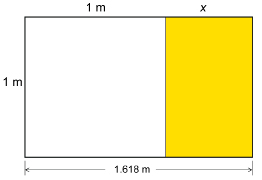
Assuming the large golden rectangle is similar to the smaller golden rectangle on the right, use a proportion to find x, correct to 3 decimal places. Does this value of x make sense in the diagram? Why?
Like squares, all equilateral triangles are similar; all regular pentagons are similar, and so on. You may also have thought of all regular octagons, hexagons, heptagons, and so on.
1.10. Page 5
Module 6: Triangles and Other Polygons
Lesson Summary
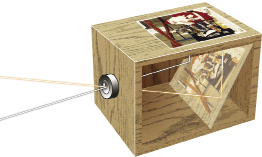
The camera obscura was a forerunner to the photographic camera. This device consisted of a lens and mirror that projected an image onto a plate, which could then be used to sketch or paint a realistic picture. The proportions of the objects displayed on the screen are preserved. This is another example of similar figures—the focus of this lesson.
In this lesson you explored these questions:
-
How can you determine if two polygons are similar?
-
How are the relationships among the sides and angles of similar polygons used in problem situations?
Check your level of understanding of the materials covered in this lesson by completing “Lesson 2 Traffic Lights.” If you select an amber or red traffic light in the multimedia piece, you will receive information about additional work you can complete to improve your understanding of the topics. Complete the suggested work before you proceed to the Lesson 2 Assignment. If you experience difficulty, contact your teacher before starting the Lesson 2 Assignment.
To answer these questions, you applied the principles that, for similar polygons, corresponding angles are equal in measure and ratios of corresponding sides are equal. Equal ratios are proportions, and you used proportional reasoning to solve a variety of practical problem situations.
 Assignment
Retrieve the Lesson 2 Assignment Booklet you saved in your course folder at the start of this lesson. Complete the Assignment. Resave your Assignment Booklet in your course folder and submit a copy to your teacher for assessment.
Unit 3 Project
© ASP Inc/14172617/Fotolia
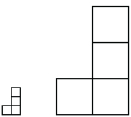
© eboss6/2776142/Fotolia
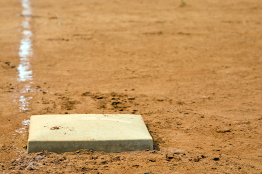
In Lesson 1 you found similar polygons in your Unit 3 Project topic. Another example of similar polygons in games can be seen in baseball. The shape of first base is the same as the shape made by all four bases in the baseball diamond. How could you prove they are similar polygons?
Use what you have learned in this lesson to prove the similar polygons you identified for your topic are actually similar. Save a copy of all your work in your course folder to use in your project presentation. For more information about this step and later steps of the Unit 3 Project, refer to the Unit 3 Project.
1.11. Lesson 3
Module 6: Triangles and Other Polygons
Lesson 3: Similar Triangles
Focus
© NicolasMcComber/shutterstock
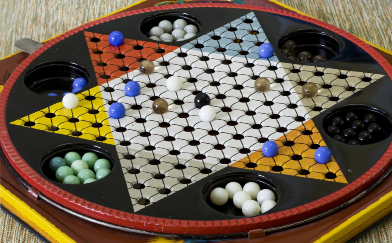
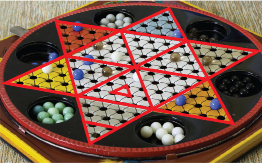
Many board games, such as chess and Chinese checkers, involve a variety of geometric shapes that play an important part of the game. In Chinese checkers, each player places ten pieces in a coloured triangle. The object of the game is to transfer these pieces by jumps or moves to the triangle opposite. The first player to reach this goal is the winner.
© NicolasMcComber/shutterstock
If you look at the board, there are numerous triangles. Can you see some of these triangles? Look at the Chinese checkers board again. The smallest triangle has one unit per side. Are all of these triangles similar?
In previous lessons you explored a variety of similar polygons. In this lesson your focus is the triangle.
Lesson Questions
In this lesson you will explore these questions:
-
How can you identify similar triangles and apply the relationships among them to solve everyday problem situations?
-
Why are two right triangles with a shared acute angle similar?
Assessment
You will complete the Lesson 3 Assignment Booklet for assessment. Download the Lesson 3 Assignment Booklet and save it in your course folder now. You will receive instructions on how to complete the Assignment Booklet later in the lesson. You will also be prompted to work on the Unit 3 Project.
Remember to save all activities, including those that are not part of the Assignment, in your course folder.
Required Materials and Equipment
For this lesson you will need
-
a protractor
-
a straightedge or ruler
-
several blank sheets of paper
-
a calculator
-
a compass
1.12. Page 2
Module 6: Triangles and Other Polygons
Get Started
In this activity you will review the relationships among the corresponding sides and angles of similar triangles.
 Try This
Work with a partner, if possible.
TT 1. With your partner, identify at least three pairs of similar triangles in your surroundings.
Save your answer in your course folder, as you will be asked to copy your response into the Assignment Booklet later in the lesson.
TT 2. Consider the following two triangles.
The two triangles are similar. Write down the side ratios you could use to help prove the triangles are similar. What does the size of the ratio indicate about the two triangles?
TT 3. Take the side ratios you used in TT 2 and flip each fraction over. What do you notice about the new ratios? What does the size of the ratio tell you about the triangles?
Flipping Over
The previous example illustrates the important idea that flipping ratios can be used to help solve equations. The next example shows how useful flipping ratios can be.
Example 1
Solve ![]()
Solution
Many people prefer to see the variable in the numerator (on top of the fraction) rather than in the denominator, where the variable is in this case. Whenever you have a proportion (two equal ratios), you can flip the ratios in the equation.
So,

Check by substituting for x in the original equation. Check ![]() It works!
It works!
 Self-Check
Practise this technique. Solve each equation.
SC 1.
![]()
SC 2.
![]()
SC 3.
![]()
1.13. Page 3
Module 6: Triangles and Other Polygons
Explore
In the previous lessons you explored a variety of methods for drawing similar polygons. Now you will explore three additional methods for drawing similar triangles.
 Try This
Work with a partner, if possible.
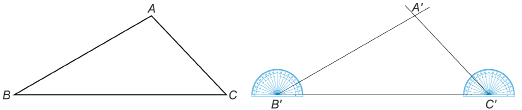
Method 1: Constructing Congruent Angles
Step 1: Draw any ![]()
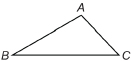
Step 2: Use your ruler to draw the base ![]() of
of ![]() This base can be any length. If you want the sides of
This base can be any length. If you want the sides of ![]() to be twice as long as those of
to be twice as long as those of ![]() you would make
you would make ![]() But any length will do.
But any length will do.
Note: Using the names ![]() (instead of completely different letters) to label the new triangle makes it easy to see the pairs of corresponding angles that are the same size. In addition, this way of labelling makes it clear which sides correspond to one another.
(instead of completely different letters) to label the new triangle makes it easy to see the pairs of corresponding angles that are the same size. In addition, this way of labelling makes it clear which sides correspond to one another.
Step 3: Use your protractor to draw angles at ![]() congruent to
congruent to ![]() Call the point where these angles’ arms cross point
Call the point where these angles’ arms cross point ![]() Join
Join ![]()
Now you will check whether the two triangles are similar.
TT 4. You used your protractor to make the corresponding angles congruent. That is, you made ![]() Now listen to “How to Read a Symbolic Geometric Statement.”
Now listen to “How to Read a Symbolic Geometric Statement.”
Why must ![]() Check
Check ![]() with your protractor to see if
with your protractor to see if ![]() Record those measures on your diagram.
Record those measures on your diagram.
TT 5. Now you will check to see if the ratios of the corresponding sides are equal. Measure, and then record on your diagram, the lengths, to the nearest millimetre, of the sides of both triangles.
Calculate and compare ![]() Are the triangles similar?
Are the triangles similar?
Method 2: Constructing Proportional Sides
Step 1: Draw any ![]()
Step 2: Decide what ratio you wish to use. If you want a similar triangle with sides twice as long, begin by measuring the base BC. Then draw base ![]() twice as long as BC.
twice as long as BC.

Step 3: Measure AB. Then set your compass to a radius twice as large. With ![]() as centre, draw an arc where
as centre, draw an arc where ![]() is likely to be.
is likely to be.
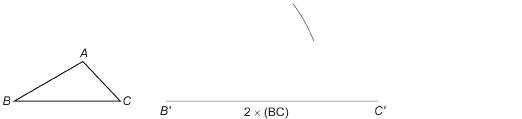
Step 4: Measure AC. Then set your compass to a radius twice as large. With ![]() as centre, draw an arc intersecting the first arc. Call this point
as centre, draw an arc intersecting the first arc. Call this point ![]() Join
Join ![]()

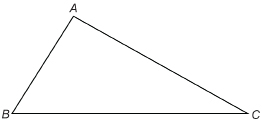
TT 6. You decided to make the sides twice as long, but you could have used any ratio—three times, one-half, or any value of your choosing. You know the sides are proportional, but are the corresponding angles congruent? Measure the angle pairs. Record their measures on your diagram. Are the triangles similar? Explain your answer.
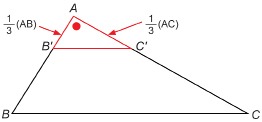
Method 3: Constructing One Pair of Congruent Angles and Two Pairs of Proportional Sides Forming That Angle
This method is often used if the two triangles share an angle.
Step 1: Draw any triangle ABC.
Suppose you want the second triangle to share ![]() Also suppose that you want the sides of the second triangle to be one-third as long as the sides of
Also suppose that you want the sides of the second triangle to be one-third as long as the sides of ![]()
Step 2: Measure AB. Divide that length by 3. Measure out that distance from point A along AB. Call that point ![]() So,
So, ![]()
Step 3: Measure AC. Divide that length by 3. Measure out that distance from point A along AC. Call that point ![]() So,
So, ![]()
Step 4: Join ![]()
![]()

But are ![]() similar? To find out, answer these questions.
similar? To find out, answer these questions.
TT 7. ![]()
TT 8. ![]()
TT 9. ![]()
TT 10. Are ![]() and BC parallel? Justify your answer.
and BC parallel? Justify your answer.
TT 11. Which method of drawing similar triangles makes the most sense to you? Why?
 Share
Share
It is time to share your answers to TT 4 to TT 11. Remember that sharing work is an important part of learning. To make the most of your sharing opportunity, be sure that you do the following:
-
Check that you have completed TT 4 to TT 11 to the best of your ability and have the answers in a form that you can easily share with another student, or with your teacher, if so directed.
-
Use the discussion area for your class, or another method indicated by your teacher, to post your answers to TT 4 to TT 11 and to view the work of the people with whom you are sharing.
-
Compare answers for TT 4 to TT 11. Identify where you have similar answers and where your answers are different. Discuss all differences between your answers until you have an agreement. If necessary, you may wish to involve your teacher in your discussion.
-
Revise your answers to TT 4 to TT 11 where necessary.
Save the revised copy of your work, including your diagrams, in your course folder. Ask your teacher whether you are to save a transcript of your discussion in your course folder as well.
1.14. Page 4
Module 6: Triangles and Other Polygons
Bringing Ideas Together
In the Explore section, you investigated three methods for drawing similar triangles. These methods are based on the three conditions listed in the following table.
TRIANGLE CONDITIONS FOR SIMILARITY
|
Graphic Representation |
Description in Words |
Symbolic Description |
Nickname |
|
Condition 1
|
If the corresponding angles of two triangles are equal in measure, then the triangles are similar. |
|
e.g., AAA Similarity |
Condition 2
|
If the corresponding sides of two triangles are proportional, the triangles are similar. |
|
|
Condition 3
|
If two pairs of sides of two triangles are proportional, and the angles between those pairs of sides are congruent, the triangles are similar. |
|
|

Nicknames for the conditions may help you keep the three conditions straight. A possible nickname is provided in the table for Condition 1.
On a copy of “Triangle Conditions for Similarity,” fill in your own nicknames for the conditions.
Place your completed table in your course folder.
Note: When two figures are similar, you can use the symbol ~ to replace the words “is similar to.”
The following examples show how these conditions can be used to solve problems involving similar triangles.
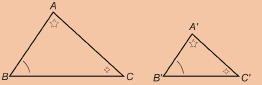
Example 2: Using Condition 1
A 3-m pole and a 4-m pole are leaning against a vertical wall. Each pole makes an angle of 80° with the ground.
- Are the triangles formed by the poles similar? Why?
- If the 4-m pole reaches 3.94 m up the wall, how far up the wall does the 3-m pole reach?
Solution
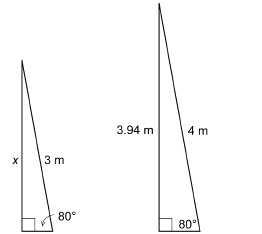
Assume the vertical wall is perpendicular to the ground. All of the corresponding angles are equal.
The two 80° angles are equal in measure. The two right angles are equal in measure. So, the third angle in each triangle must be 10°, since 10° + 80° + 90° = 180°.
Note: This example confirms the fact that if two pairs of angles are equal in measure (congruent), so too is the third pair.
As the three pairs of corresponding angles are congruent, these triangles are similar.
- As the triangles are similar, the sides are proportional.
Let x be the height up the wall the 3-m pole reaches.
The 3-m pole reaches approximately 2.96 m up the wall.
Example 3: Using Condition 2
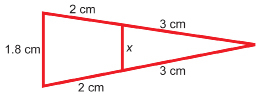
Two triangular sails from a model ship have the following dimensions.
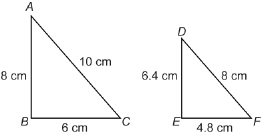
Are the corresponding angles congruent?
Solution
Use the indicated lengths of the sides to see if corresponding sides are proportional.
Because the ratios are equal, the triangles are similar.
Since ![]() the corresponding angles are congruent.
the corresponding angles are congruent.
Example 4: Using Condition 3
In the following figure there are two triangles—one triangle is inside the other.
Is ![]()
View the animated “Example 4 Solution: Finding Lengths in Similar Triangles.”
Similar Right Triangles
From a couple of the examples involving right angles, you may have noticed this condition—if just one pair of corresponding acute angles are equal in measure, the triangles are similar.
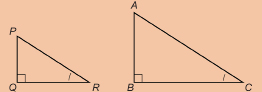
More generally, for any two triangles, if two pairs of corresponding angles are equal in measure, the triangles are similar.
This general statement can be represented this way.
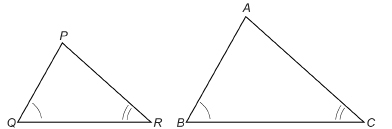
The general statement follows from Condition 1. Why?
![]()
The reasoning is this: If triangles PQR and ABC have two pairs of angles that are equal, the other pair of angles must also be equal because the angles in each triangle must add up to 180°.
 Self-Check
SC 4. Jill said to her partner, “For any two triangles, if two pairs of corresponding angles are equal in measure, the triangles are similar.”
Harlon said that, from Jill’s statement, he could then conclude the following about right triangles:
For right triangles, if just one pair of corresponding acute angles are equal in measure, the right triangles are similar.
How could Harlon make this conclusion about right triangles?
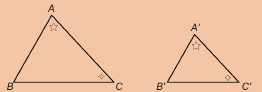
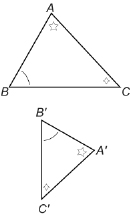
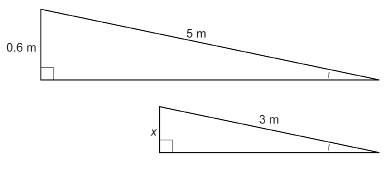
SC 5. Look at ![]() in the following diagram.
in the following diagram.
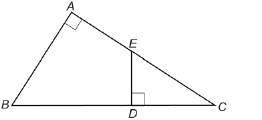
Are ![]() similar? Why or why not?
similar? Why or why not?
SC 6. Name the equal ratios in SC 5. If there are none, explain why there are none.
SC 7. In the following diagram, ![]()
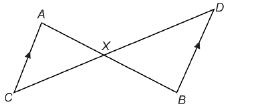
Are ![]() similar? Why or why not?
similar? Why or why not?
SC 8. Look at the following triangles.
Are ![]() similar? If they are, explain why they are. If they are not, what change could you make in one or more of the measures given so that the triangles would be similar?
similar? If they are, explain why they are. If they are not, what change could you make in one or more of the measures given so that the triangles would be similar?
SC 9. Identify ![]() in the diagram.
in the diagram.
Suppose ![]() Are
Are ![]() similar triangles? Why or why not?
similar triangles? Why or why not?
SC 10. Expand your copy of the table “Triangle Conditions for Similarity,” presented near the beginning of this lesson, to include the two new conditions explored in this Self-Check activity. You should have a copy of this table in your course folder; if not, go to “Triangle Conditions for Similarity” for another copy.
|
Graphic Representation |
Description in Words |
Symbolic Description |
Nickname |
|
Condition 4
|
|
|
|
|
Condition 5
|
|
|
|

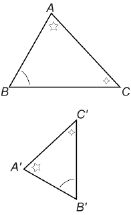
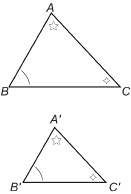
SC 11. Which diagram makes it easier to see the corresponding parts of the two triangles? Explain your answer.
 Mastering Concepts
Try this question. When you are finished, check your answer.
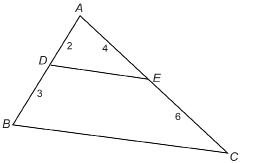
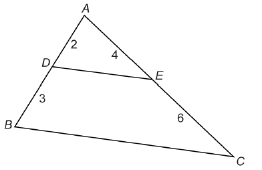
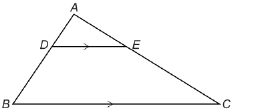
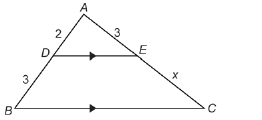
The diagram shows ![]() .
. ![]() joins point D on side AB with point E on side AC.
joins point D on side AB with point E on side AC.

- In the diagram, is
 Why or why not?
 - What is the length of

1.15. Page 5
Module 6: Triangles and Other Polygons
Lesson Summary
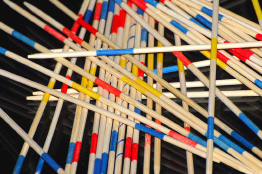
© Marcel Jancovic/shutterstock
Have you ever played pickup sticks? The sticks in the photograph, scattered on the dark surface, form a variety of geometric shapes. These shapes include various triangles. Can you identify any similar triangles, the focus of this lesson?
In this lesson you explored thee following questions:
- How can you identify similar triangles and apply the relationships among them to solve everyday problem situations?
-
Why are two right triangles with a shared acute angle similar?
Check your level of understanding of the materials covered in this lesson by completing “Lesson 3 Traffic Lights.” If you select an amber or red traffic light in the multimedia piece, you will receive information about additional work you can complete to improve your understanding of the topics. Complete the suggested work before you proceed to the Lesson 3 Assignment. If you experience difficulty, contact your teacher before starting the Lesson 3 Assignment.
To answer these questions, you explored three methods for assessing whether or not two triangles are similar. Two triangles are similar if
-
the corresponding angles are congruent
-
the corresponding sides are proportional
-
one pair of angles are congruent and the two pairs of corresponding sides, which form those angles, are proportional
 Assignment
Retrieve the Lesson 3 Assignment Booklet you saved in your course folder at the start of this lesson. Complete the Assignment. Resave your Assignment Booklet in your course folder and submit a copy to your teacher for assessment.
Unit 3 Project
In the first two lessons you found similar polygons as you looked at your Unit 3 Project topic. Are any of these polygons triangles? Are you able to find the angles of these triangles? Could you build side ratios for any similar triangles in your topic? Save any sketches and notes to your course folder for use in your project presentation. For more information about this step and later steps of the Unit 3 Project, refer to the Unit 3 Project.
1.16. Lesson 4
Module 6: Triangles and Other Polygons
Lesson 4: Applying Similar Triangles
Focus
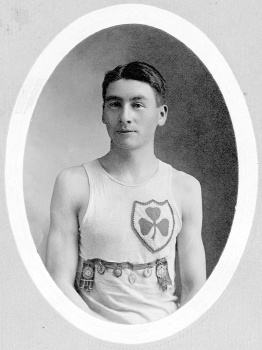
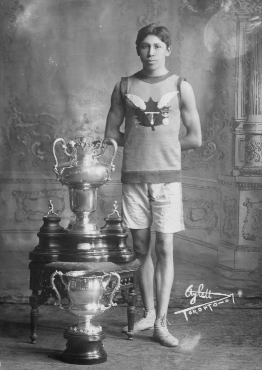
City of Edmonton Archives, EA-10-2733.
Alexander Wuttunee Decoteau was a man of many firsts. Born on the Red Pheasant Reserve and educated in Battleford, Saskatchewan, Decoteau distinguished himself as a good student and an excellent athlete.
Decoteau joined the Edmonton Police as the first Aboriginal police officer in Canada. As a police officer, Decoteau continued to compete in athletics. In 1910, for example, he entered four races in the Alberta Championships—from the half-mile race to the five-mile race—and came first in every one! Also that year, he set a new Western Canadian record of 27 min 45 s for the five-mile race. Decoteau even represented Canada in the 1912 Stockholm Olympics.
In 1916 Alexander Decoteau joined the army, and the following year he was killed in the Battle of Passchendaele.
Today, Alexander Decoteau’s memory is celebrated every year through the Alex Decoteau Run in which Edmonton students participate in 3-km and 5-km races. As you can imagine, there is a relation between the length of a race and the record times set at a race. The longer the race, the greater the time needed to complete the race.
There are also relations among corresponding parts of similar triangles. In this lesson you will apply these geometric relations. As you work through this lesson, also think of the accomplishments of Canada’s athletes and how the sports in which they participate may apply to your Unit 3 Project.
Lesson Question
In this lesson you will explore this question:
-
How are the relationships among similar right triangles used in problem solving?
Assessment
You will complete the Lesson 4 Assignment Booklet for assessment. Download the Lesson 4 Assignment Booklet and save it in your course folder now. You will receive instructions on how to complete the Assignment Booklet later in the lesson. You will also be prompted to start working on the Unit 3 Project.
Remember to save all activities, including those that are not part of the Assignment, in your course folder.
Required Materials and Equipment
For this lesson you will need
-
a measuring tape or ruler
-
a calculator
1.17. Page 2
Module 6: Triangles and Other Polygons
Get Started
In this activity you will review how to handle proportions involving more than one measurement unit.
 Self-Check
Work with a partner, if possible.
© Walter Quirtmair/21324926/Fotolia
Consider the following two similar triangles. A shed of unknown height, x, casts a shadow measuring 12 ft 6 in. At the same time, a 2-ft vertical post casts a shadow measuring 3 ft 3 in.
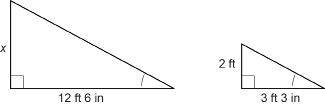
How would you set up and solve a proportion to determine the height of the shed?
Method 1
First convert all measures to feet. Recall that 1 ft = 12 in.
Set up the proportion.

The height is approximately 7.7 ft.
Method 2
First convert all measures to inches. Then solve for x by answering SC 1 through SC 3.
SC 1. What are the measures in inches?
SC 2. Set up a proportion and solve for x in inches.
SC 3. Convert your SC 2 answer from inches to feet. Round to one decimal place.
1.18. Page 3
Module 6: Triangles and Other Polygons
Explore
In the previous lesson you explored the principles behind similar triangles. In particular, you investigated similar right triangles. In this activity you will explore how those principles are applied to solve a practical problem.
 Try This
Work with a partner, if possible.
iStockphoto/Thinkstock
You will use the same technique from the Get Started section to find the height of an object. Use a measuring tape for required measurements.
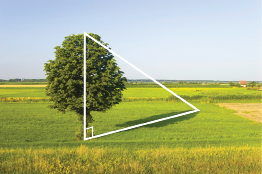
Step 1: Go outside when the sun is shining and, along a flat horizontal stretch of ground, measure the length of the shadow of a tall tree, a building, a vertical pole, or some other similar object the height of which is unknown.
Step 2: Measure the height of a short vertical object, such as a fence post, that casts a shadow along a level stretch of ground. Also, measure the length of this object’s shadow along the ground.
Next, answer these questions to determine the height of the object in Step 1.
TT 1. Draw a diagram consisting of two similar right triangles, much like the diagram in Get Started.
TT 2. How do you know the two right triangles in your diagram are similar?
TT 3. Set up a proportion, and then solve for x.
TT 4. Is your answer to TT 3 reasonable? Explain your answer.
 Share
Share
In the Get Started and Explore sections, you saw two examples of right triangles that are similar. Are all right triangles similar? Try drawing a pair of right triangles that are not similar. Can you actually draw two right triangles that are not similar? Why or why not?
Share your ideas and any drawings with a partner, a group, or a facilitator.
Summarize your answers to these Share questions, and place a copy in your course folder. Also include your answers to TT 1 to TT 4.
1.19. Page 4
Module 6: Triangles and Other Polygons
Bringing Ideas Together
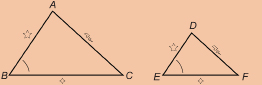
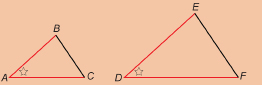
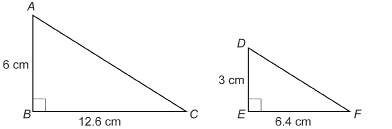
In the Explore section you investigated a practical problem involving similar right triangles. Remember, two right triangles are similar if there is a pair of congruent, corresponding acute angles.

ΔABC is similar to ΔDEF since ∠C is congruent to ∠F.
Of course, not all similar triangles are right triangles. In the previous lesson, you explored the following requirements, or conditions, for stating that any pair of triangles are similar:
-
The corresponding angles are congruent.
-
The corresponding sides are proportional.
-
One pair of angles is congruent and the two pairs of corresponding sides that form those angles are proportional.
The following examples and Self-Check questions involve identifying similar triangles in problem-solving contexts, and then applying proportional reasoning to solve these problems.
Example 1
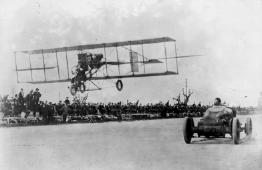
Topical Press Agency/Hulton Archive/Getty Images
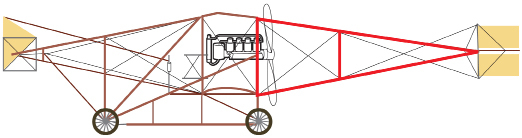
Petranella is building a scale model of a 1910 Curtiss biplane. She is working on the tail section and has taken measurements from an online graphic, but she forgot to measure x. What is the measure of x correct to one decimal place?
Solution
Separate the triangles. Are the triangles similar?
The two triangles share an angle at the tail section.
The ratios of the sides forming the shared angle are equal, ![]()
As a pair of angles is congruent and the two pairs of corresponding sides that form those angles are proportional, the triangles are similar.
Set up a proportion.
The missing measure is approximately 1.1 cm.
Example 2

© prism68/shutterstock
A wheelchair ramp is 5 m in length. The bottom of the ramp is 0.6 m below the top of the ramp. When a wheelchair is moved 2 m down the ramp, how far is the wheelchair above the foot of the ramp?
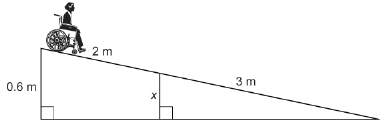
Solution
Separate the triangles.
Are the triangles similar?
Observe that the two right triangles share an acute angle. So, you can apply Condition 4 for congruence of right triangles.
You may remember Condition 4 from the following diagram.
Condition 4: For right triangles, if one pair of acute angles is equal in measure, the triangles are similar.
In the separated triangles describing the ramp, the marked angles are acute and congruent. So, Condition 4 is met. Therefore, these right triangles are similar, and the ratios of the corresponding sides of these right triangles are proportional.
Set up a proportion.
The wheelchair is 0.36 m above the foot of the ramp.
 Self-Check
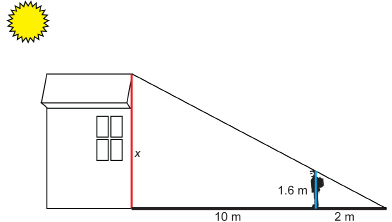
SC 4. Jon walked 10 m away from a wall outside of his school. At that point, he noticed that his shadow reached the same point on the ground as the school’s shadow. If Jon is 1.6 m tall and his shadow is 2 m long, how high is the school? Round to one decimal place.
SC 5. Dace is standing on the shore of the North Saskatchewan River. She sees a fisherman, F, on the opposite bank.
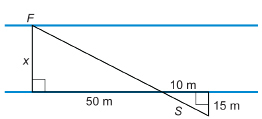
She would like to know how wide the river is at this point. Dace walks 50 m downstream along the riverbank. She stops and pushes a stick, S, into the bank. Dace walks another 10 m downstream, and then turns 90°. She now walks 15 m away from the river until she sees that the stick she pushed into the bank lines up with the fisherman across the river. Calculate the width, x, of the river.
SC 6. A chalet in the mountains has a triangular profile.
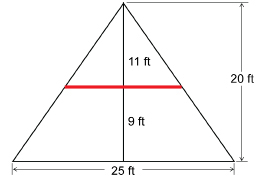
There is a balcony 9 ft above the ground. If the chalet is 25 ft across the base and 20 ft high, what is the width of the balcony?
SC 7. The crossed legs of an ironing board are illustrated.

© Lane V. Erickson/shutterstock

-
If the top of the ironing board is parallel to the floor, is ΔABE similar to ΔDCE? Justify your answer.
-
Determine the value of x to the nearest tenth of an inch.
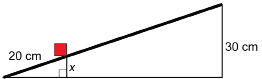
SC 8. A 2-m pry bar is placed under a timber 20 cm from the end of the bar. The free end of the bar is lifted 30 cm. How high off the ground is the timber?
 Mastering Concepts
Try this question. When you are finished, check your answer.
![]()
-
Why are
 similar?
-
Determine the value of x.
1.20. Page 5
Module 6: Triangles and Other Polygons
Lesson Summary
Charles A. Aylett/Library and Archives Canada/C-014090
Cogwagee (Thomas Charles Longboat) was born in 1887 on the Six Nations reserve near Brantford, Ontario. He began racing in 1905, and just two years later set a course record of 2 h 24 min 24 s for the Boston Marathon of 1907!
He participated in the 1908 Olympics and, in 1909, Cogwagee turned professional and won the title of Professional Champion of the World. Since 1951, the Tom Longboat Awards have honoured First Nations athletes from each province. From these provincial award recipients, a male and a female national champion is chosen.
Note that Tom Longboat’s Boston Marathon record time was much longer than the record time of 27 min 45 s set by Alexander Wuttunee Decoteau for the five-mile race. Keep in mind that a marathon is more than five times the distance of a five-mile race.
These historical races demonstrate a relation between the distance of a race and the time needed to run that distance. As you worked through this lesson, did you also find relations between corresponding parts of similar right triangles?
Maybe the stories of the First Nations athletes helped you identify geometric relations. The stories may also have helped you select a sports-related item for your Unit 3 Project.
In this lesson you explored this question: How are the relationships among similar triangles used in problem solving?
Check your level of understanding of the materials covered in this lesson by completing “Lesson 4 Traffic Lights.” If you select an amber or red traffic light in the multimedia piece, you will receive information about additional work you can complete to improve your understanding of the topics. Complete the suggested work before you proceed to the Lesson 4 Assignment. If you experience difficulty, contact your teacher before starting the Lesson 4 Assignment.
To answer this question you explored a variety of real-world contexts involving similar triangles and proportional reasoning.
 Assignment
Retrieve the Lesson 4 Assignment Booklet you saved in your course folder at the start of this lesson. Complete the Assignment Booklet. Resave your Assignment Booklet in your course folder and submit a copy to your teacher for assessment.
1.21. Lesson 5
Module 6: Triangles and Other Polygons
Lesson 5: Pythagorean Theorem
Focus

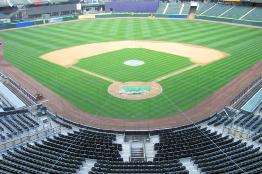
© Shawn Zhang/shutterstock
A baseball diamond is a square measuring 30 yd on each side. If you were on second base and you wanted to throw the ball to the catcher standing at home plate, how far would you have to throw the ball?
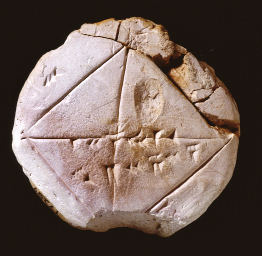
Yale Babylonian Collection
A similar problem was outlined on a clay tablet from ancient Babylon over 3600 years ago. Cuneiform tablets, found in present-day Iraq and Iran, reveal that ancient mathematicians had knowledge of the Pythagorean relationship and employed sophisticated methods for solving problems involving square roots.
The Cuneiform tablet photographed is from the Yale Babylonian Collection. The solution on the tablet, for the length of the diagonal of a square 30 units on a side, uses base-60 Babylonian symbols and is correct to five decimal places. And the solution was determined without a calculator! With the skills you acquire in this lesson and your calculator, you too will be able to solve this problem to five decimal places.
Lesson Questions
In this lesson you will explore the following questions:
-
What is the “Pythagorean Theorem,” and how can the theorem be verified?
-
What are the current and historical applications of the Pythagorean Theorem?
Assessment
You will complete the Lesson 5 Assignment Booklet for assessment. Download the Lesson 5 Assignment Booklet and save it in your course folder now. You will receive instructions on how to complete the Assignment Booklet later in the lesson. You will also be prompted to continue working on the Unit 3 Project.
Remember to save all activities, including those that are not part of the Assignment, in your course folder.
Required Materials and Equipment
For this lesson you will need the following supplies:
-
a protractor
-
one sheet of half-inch graph paper
-
a calculator
-
scissors
-
a glue stick
-
a marker
-
a carpenter’s square (if possible)
1.22. Page 2
Module 6: Triangles and Other Polygons
Get Started
Courtesy of Ken Allred
In the next part of the lesson you will examine a method for determining a right angle. Also, you will review solving simple equations involving squares and square roots.
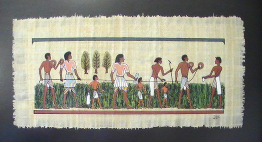
Five thousand years ago or more, the annual flooding of the Nile made it necessary to resurvey property lines and replace boundary markers. Early Egyptian surveyors were called rope stretchers because of their use of knotted ropes to measure distance and determine angles.
One method these surveyors used was to stretch a looped rope with 12 equally spaced knots. You will be an Egyptian rope stretcher after you complete the following Try This activity.
 Try This
Work with a partner, if possible.
Instead of using a rope, it will be easier to use paper strips. Print a copy of “Half-Inch Grid Paper.”
Step 1: Cut 12 strips from the grid paper. The strips should be cut lengthwise from the page and measure one square in width. Each strip will be 11 in long and ![]() in wide. Glue the strips end-to-end, overlapping each strip approximately
in wide. Glue the strips end-to-end, overlapping each strip approximately ![]() in. Continue taping the strips until you have formed a loop. Be careful not to have any twists in the loop.
in. Continue taping the strips until you have formed a loop. Be careful not to have any twists in the loop.
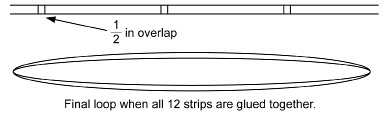
Step 2: With your marker, carefully mark a vertical line down the middle of each overlap.
![]()
When finished, you will have created a loop with 12 equally spaced vertical lines—similar to the Egyptian looped rope with 12 equally spaced knots. Think of your loop as 12 units in circumference with the distance between two consecutive marks being 1 unit.
Step 3: With your partner, stretch the loop on the floor to form a triangle measuring 3 units on one side, 4 units on a second side, and 5 units on the third side. You will be able to do this, because 3 units + 4 units + 5 units = 12 units.
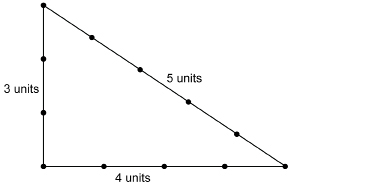
If you have a carpenter’s square, check to see how close the angle formed by the 3-unit and 4-unit sides is to a right angle.
Pythagorean triple: three whole numbers that represent the lengths of the sides of a right triangle
There are an infinite number of such triples.
The ancient Egyptians, as well as the Babylonians and Chinese, among others, knew that a 3-4-5 triangle formed a right angle. Today, such a triple is called a Pythagorean triple.
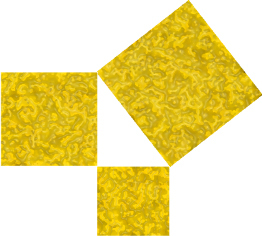
Another fact the Egyptians and others knew was that if squares were constructed on the sides of a right triangle, the area of the largest square would be exactly equal to the areas of the two smaller squares added together.
Look at the following squares constructed on the sides of a 3-4-5 right triangle.
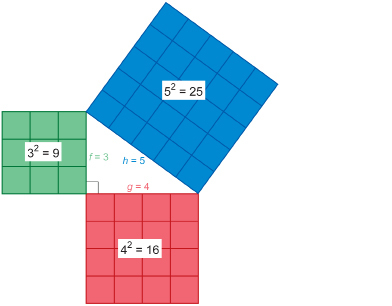
As you can see,

Pythagorean Theorem: For any right triangle, the square on the hypotenuse is equal to the sum of the squares on the two legs.
hypotenuse: in a right triangle, the side opposite the right angle; the longest side in a right triangle
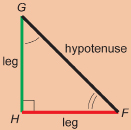
leg: one of the two sides of a right triangle that forms the right angle
As you saw above, the 3-4-5 right triangle side relationship can be represented by 32 + 42 = 52. That is just one instance of the Pythagorean Theorem.
Try This
In the “Pythagorean Theorem Demonstration Applet,” change the leg lengths by pulling the corners of the triangle. Use the “hide areas” and “show areas” buttons to help fill in the following table for any three different triangles you make.
INVESTIGATING RIGHT TRIANGLES
|
Lengths |
Area of Squares |
Sum of Squares of Legs |
||||
|
Leg (f) |
Leg (g) |
Hypotenuse (longest side) (h) |
Leg (f 2) |
Leg (g2) |
Hypotenuse (h2) |
f 2 + g2 |
TT 1. Do the squares of the leg sides always add up to equal the square of the hypotenuse side—is f 2 + g2 = h2 true in each case?
TT 2. Hand draw a triangle where the Pythagorean Theorem would NOT apply. Add the measurements of this triangle and the calculations to the chart too. Is this a right triangle? Is f 2 + g2 = h2 true for this triangle?
 Share
Share
It’s time to share your data from the “Investigating Right Triangles” table and your answers to TT 1 and TT 2 with others. Compare your answers and revise them if necessary. If you still need help, ask your teacher. Save the revised copy of your work in your course folder.
You may have noticed that the applet only let you make right triangles. This is because the Pythagorean Theorem only applies to right triangles, making it a great technique for checking to see if you have a right triangle!
In the applet “Pythagorean Theorem,” you examined many possibilities for the right triangle. For some, the sides were whole numbers, as in the 3-4-5 right triangle. In others, the sides were decimal approximations. In all cases, the calculations were done automatically for you. However, you will be required to perform the calculations yourself. The following example will help you remember a few basics about equations and using your calculator.
Example 1
If the legs of a right triangle are 6 cm and 8 cm, what is the length of the hypotenuse?
Solution

![]()
To evaluate ![]() on your calculator, strike these keys.
on your calculator, strike these keys.
![]()

![]()
To evaluate ![]() on your calculator, strike these keys.
on your calculator, strike these keys.
![]()
![]()
Your calculator will tell you that ![]() .
.
If you had difficulties following the solution on your calculator, ask your teacher for help.
 Self-Check
Try these questions.
SC 1.
Solve ![]()
SC 2.
Solve ![]()
1.23. Page 3
Module 6: Triangles and Other Polygons
Explore

Photos.com/Thinkstock
In the Get Started section, you reviewed the essentials of the Pythagorean Theorem. This theorem is named after Pythagoras of Samos, a Greek philosopher and mathematician who lived from about 570 BCE to 490 BCE.
Even though Pythagoras spent a great deal of his life on the Greek island of Samos, he did study in Egypt and would have been familiar with the work of the rope stretchers. Pythagoras is credited with deriving formal proof for the relationship among the sides of the right triangle.
In spite of the fact that this theorem bears his name, you should remember that mathematicians in China, India, and Babylon applied this relationship almost two thousand years earlier. Ideas flowed from culture to culture. Mathematics is not unique to a specific people or time; rather, mathematics is a human endeavour.
In this activity you will explore a proof from China that was known at least 500 years before Pythagoras.
 Try This
Work with a partner, if possible.
Print a copy of “Pythagorean Theorem Master.”
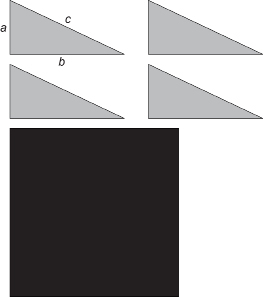
Step 1: Cut out the four identical, grey right triangles and the black square. Place the four triangles on top of the black square as shown below.
Step 2: Pencil a, b, and c along the sides of each triangle to help answer the following questions. Notice that the lengths of the sides of the original big black square equals a + b, the sum of the legs of each triangle.
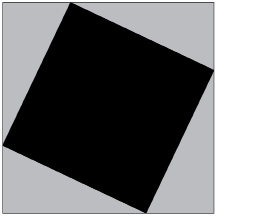
TT 3. The black figure in the middle of the triangle arrangement appears to be a square. Without measuring, explain how you know that each of the four angles of the black figure is a right angle and how you know the sides are all equal.
TT 4. What is the area of the black square showing in the middle of the arrangement? Is it a2, b2, or c2? Why?
After recording your responses, continue to Step 3.
Step 3: Rearrange the four grey right triangles on the original, larger black square as shown.
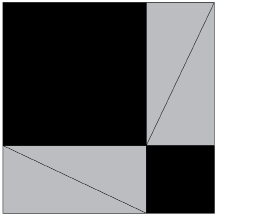
TT 5. Why must the total area of the black areas showing in this arrangement be the same as the black area showing in the first arrangement?
TT 6. The two black figures shown in this arrangement look like squares. However, how do you know that the two black figures are actually squares?
TT 7. What is the area of the larger black square? Is it a2, b2, or c2? Why?
TT 8. What is the area of the smaller black square? Is it a2, b2, or c2? Why?
TT 9. What is the total of the areas of the two black squares?
TT 10. How is your answer to TT 9 related to your answer to TT 4? Write out the relationship. Where have you seen this relationship before?
You have just proven the Pythagorean Theorem.
 Share
Share
In Explore you investigated an ancient proof of the Pythagorean Theorem. There are many proofs of the Pythagorean Theorem that involve cutting out pieces and rearranging them as you did in Explore.
Find another such physical proof by doing an Internet search. Share the link to the proof and a quick summary with other students in your class. Read through the proofs found by other students, and choose a proof to try.
Save your work in your course folder. You will be asked to include an outline of the physical proof and a description of any pieces you cut out and rearranged in the Lesson Assignment. Include diagrams or photos to show your proof.
1.24. Page 4
Module 6: Triangles and Other Polygons
Bringing Ideas Together
In the Explore section you proved the Pythagorean Theorem. The statement of the theorem applied to a right triangle is labelled below. The length of the hypotenuse is c. The lengths of the legs are a and b.
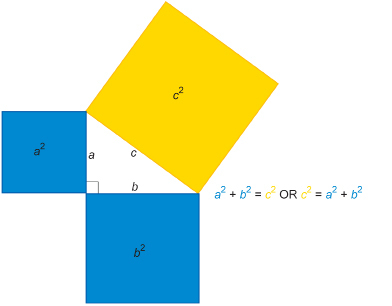
Remember, the Pythagorean Theorem only applies to right triangles, as you discovered in the Get Started section. It states that for any right triangle, the square on the hypotenuse equals the sum of the squares on the two legs.
The letters used in the statement depend on the labels on the sides of the triangle.
Example 2
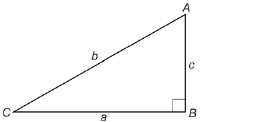
Write the statement of the Pythagorean Theorem for each right triangle.
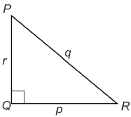
Solution
- Notice that, here, the lengths of the sides of the triangle are named using lowercase (small) letters. The letter used depends on the opposite angle.
The length of side QR is p, because this side lies opposite ∠P.
The length of side PR is q, because this side lies opposite ∠Q.
The length of side PQ is r, because this side lies opposite ∠R.
Because q is the length of the hypotenuse, q2 = p2 + r2, or p2 + r2 = q2.
- Once again, the lengths of the sides of the triangle are named using lowercase (small) letters. Again, the letter used depends on the opposite angle.
The length of side BC is a, because this side lies opposite ∠A.
The length of side AC is b, because this side lies opposite ∠B.
The length of side AB is c, because this side lies opposite ∠C.
Because b is the length of the hypotenuse, b2 = a2 + c2, or a2 + c2 = b2.
The Carpenters’ Corner
In Get Started, you stretched a paper loop to form a 3-4-5 right triangle. This Pythagorean triple is used by carpenters to check that corners are square. Carpenters will mark points 3 ft and 4 ft from the corner.
If the distance between the marks is 5 ft, the corner is square.
Because triangles with proportional sides are similar, the following side-length ratios will all be Pythagorean triples!
3:4:5
6:8:10
9:12:15
12:16:20
Do you see the pattern here? How would you find another Pythagorean triple with this same ratio?
 Self-Check
SC 3.
- Show that 5, 12, 13 is a Pythagorean triple.
- Sketch a triangle with these sides.
- From 5, 12, 13, write three more Pythagorean triples.
SC 4.
- Is 4, 7, 9 a Pythagorean triple?
- Sketch a triangle with these sides.
- Is the triangle a right triangle? Why or why not?
Example 3
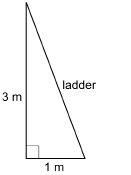
A ladder is leaning against a vertical wall. The foot of the ladder is 1 m from the wall, and the ladder reaches 3 m up the wall. How long is the ladder? Round to 1 decimal place.
Solution
Let the length of the ladder be x.
The ladder is about 3.2 m in length.
Self-Check
SC 5. Kale walked 300 m north, turned, and then walked 200 m east. How far is Kale from his starting point? Round your answer to the nearest metre.
 Mastering Concepts
Try this question. When you are finished, check your answer.
The numbers 3, 4, and 5 form a Pythagorean triple. Prove that the triplet 3n, 4n, 5n, where n is any positive whole number (n = 1, 2, 3, or 4, and so on), is also a Pythagorean triple.

1.25. Page 5
Module 6: Triangles and Other Polygons
Lesson Summary
In his book 5000 BC and Other Philosophical Fantasies, the mathematician Raymond Smullyan describes a puzzle he would put to his students. Squares of beaten gold are placed on the three sides of a right triangle as shown in the illustration. You can either choose the large square or you can choose both of the two smaller squares. Which would you choose?
In this lesson, you explored the following questions.
-
What is the Pythagorean Theorem, and how can the theorem be verified?
-
What are the current and historical applications of the Pythagorean Theorem?
To answer these questions, you investigated the 3-4-5 right triangle, its application as a surveyor’s tool in Ancient Egypt, and its use today in modern carpentry. You discovered that this triangle is a special instance of the Pythagorean theorem. You explored one proof attributed to the Chinese over three thousand years ago! In the next lesson you will explore this theorem further in its application to a variety of everyday problems.
Check your level of understanding of the materials covered in this lesson by completing “Lesson 5 Traffic Lights.” If you select an amber or red traffic light in the multimedia piece, you will receive information about additional work you can complete to improve your understanding of the topics. Complete the suggested work before you proceed to the Lesson 5 Assignment. If you experience difficulty, contact your teacher before starting the Lesson 5 Assignment.
 Assignment
Retrieve the Lesson 5 Assignment Booklet you saved in your course folder at the start of this lesson. Complete the Assignment Booklet. Resave your Assignment Booklet in your course folder and submit a copy to your teacher for assessment.
1.26. Lesson 6
Module 6: Triangles and Other Polygons
Lesson 6: Applying the Pythagorean Theorem
Focus

© Galina Barskaya/shutterstock
Snowboarding is a popular winter sport in Canada. Skilled boarders will argue that snowboarding is both a sport and an art. Part of the thrill is becoming airborne.
The time in the air and the distance travelled down the slope depends on the boarder’s speed and technique. If the snowboarder in the photograph jumped 5 m horizontally and landed 1.5 m lower vertically from the point where she became airborne, how far down slope did she travel?
This problem can be solved by applying the Pythagorean Theorem you explored in the previous lesson.
Lesson Questions
In this lesson you will explore this question:
-
How is the Pythagorean Theorem applied to solve a variety of practical problem situations?
Assessment
You will complete the Lesson 6 Assignment Booklet for assessment. Download the Lesson 6 Assignment Booklet and save it in your course folder now. You will receive instructions on how to complete the Assignment Booklet later in the lesson. You will also be prompted to work on the Unit 3 Project.
Remember to save all activities, including those that are not part of the Assignment, in your course folder.
Required Materials and Equipment
For this lesson you will need the following supplies:
-
a protractor
-
a ruler
-
a compass
-
a calculator
1.27. Page 2
Module 6: Triangles and Other Polygons
Get Started
In this activity you will examine a method of drawing a triangle if given the lengths of its three sides.
 Try This
Work with a partner, if possible. Complete this construction as outlined below.
Suppose you were asked to construct a triangle with sides 13 cm, 12 cm, and 5 cm.
Step 1: With your ruler, draw a line segment, ![]() 13 cm long. You could also have drawn the segment 12 cm or 5 cm long but, generally, it is easier in subsequent steps if you choose the longest side.
13 cm long. You could also have drawn the segment 12 cm or 5 cm long but, generally, it is easier in subsequent steps if you choose the longest side.
![]()
Step 2: Open your compass to a radius of 12 cm. Note: You could use 5 cm in this step but, again, to simplify the procedure, the longer of the two remaining sides is chosen. With centre A and the radius of 12 cm, draw an arc where you judge the third vertex of the triangle to be.
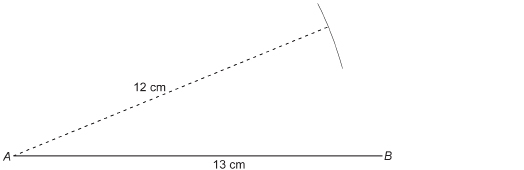
Step 3: Open your compass to a radius of 5 cm. With centre B and the radius of 5 cm, draw an arc intersecting the first arc. Call this point C.
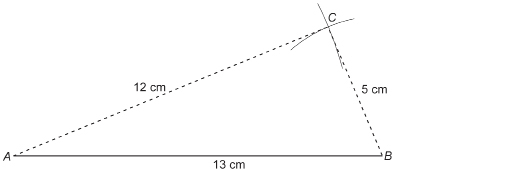
Step 4: Join A, B, and C.
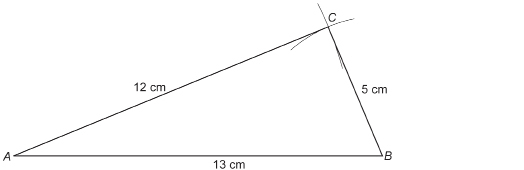
Now answer the following questions.
 Self-Check
SC 1. The angle at C looks like it is a right angle. Use your protractor to measure ![]() What is its measure?
What is its measure?
SC 2. Suppose you didn’t have a protractor. How could you prove that ![]() is a right angle? Show your steps.
is a right angle? Show your steps.
SC 3. What is the term for the three numbers 5, 12, and 13 that proves  is a right triangle?
1.28. Page 3
Module 6: Triangles and Other Polygons
Explore
In the Get Started section you examined how to draw a triangle if given the lengths of its sides. In the next activity you will explore further how the Pythagorean Theorem is used to determine whether or not a triangle is a right triangle given the lengths of its sides.
 Try This
Work with a partner, if possible.
Follow these steps to complete the table in TT 1.
Step 1: Use the method outlined in Get Started to draw the triangles in the table. It will probably be easier to draw the sides, a, b, and c, in centimetres rather than in inches. However, any unit would do.
Step 2: After you draw each triangle, estimate, measure, and record the size of ![]() Round angle measures to the nearest degree.
Round angle measures to the nearest degree.
Step 3: Complete each row of the table to see which values of a, b, and c form Pythagorean triples.
TT 1. Complete this table.
|
Triangle |
a |
b |
c |
a2 |
b2 |
c2 |
a2 + b2 |
Estimate ∠C |
Measured ∠C |
|
#1 |
3 |
4 |
5 |
|
|
|
|
|
|
|
#2 |
4 |
5 |
6 |
|
|
|
|
|
|
|
#3 |
5 |
6 |
7 |
|
|
|
|
|
|
|
#4 |
6 |
8 |
10 |
|
|
|
|
|
|
|
#5 |
8 |
15 |
17 |
|
|
|
|
|
|
|
#6 |
6 |
16 |
17 |
|
|
|
|
|
|
TT 2. How do you know that ![]() would be the right angle in these triangles? Why didn’t you measure
would be the right angle in these triangles? Why didn’t you measure ![]() or
or ![]() to see if they were the right angle in the triangle?
to see if they were the right angle in the triangle?
TT 3. Which triangles were right triangles? Why?
TT 4. Which values of a, b, and c form Pythagorean triples?
TT 5. Using the ratio 8, 15, 17, form four more sets of Pythagorean triples.
 Share
Share
Share and compare your answers to TT 1 to TT 5 with a partner or group. Place your final answers in your course folder.
Did anyone you shared with not draw the six triangles but still have data in her or his table and answers to the questions? How would it be possible to complete the previous Try This questions without ever drawing any triangles? How does having an image of the triangles help you?
Summarize your discussion and your responses to the Share questions in a short paragraph. Save this in your course folder.
1.29. Page 4
Module 6: Triangles and Other Polygons
Bringing Ideas Together
In the Explore section you investigated how the Pythagorean Theorem may be used to verify whether a given triangle is a right triangle.
The Pythagorean Theorem states that, for any right triangle, the square on the hypotenuse is equal to the sum of the squares on the two legs.

The Pythagorean Theorem also states that if the square on the longest side of a triangle is equal to the sum of the squares on the other two sides, then the triangle is a right triangle. The longest side will be the hypotenuse. The angle opposite the longest side will be a right angle. So, the following are both true and useful when problem solving.
![]()
![]()
You are now ready to apply the Pythagorean Theorem to problem situations.
Example 1
The sides of ![]() are a = 5 cm, b = 8 cm, and c = 7 cm.
are a = 5 cm, b = 8 cm, and c = 7 cm.
- If
 were a right triangle, which side would be the hypotenuse? Why?
 - Is
 a right triangle? Why or why not?
Solution
- The hypotenuse would be the longest side, b.


Since the square on the longest side is not equal to the sum of the squares on the two other sides, is not a right triangle.
Example 2

© Westfield. Reproduced with permission.
A 51-ft grain auger is backed up to a 30-ft-tall grain bin as shown in the illustration.
How far from the bin is the foot of the auger? Round your answer to the nearest foot.
Solution
Let the distance to the bin be x.
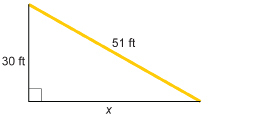
The foot of the auger is approximately 41 ft from the bin.
Example 3
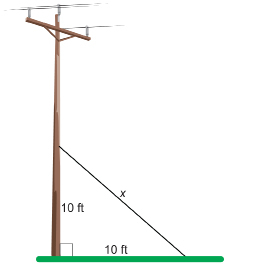
A guy wire supporting a power pole is anchored 10 ft up the pole and, at the ground, 10 ft from the pole.
Correct to one decimal point, what is the length of the guy wire?
Solution
Let x be the length of the guy wire.
The guy wire is approximately 14.1 ft in length.
 Self-Check
Try these questions.
SC 4. What is the longest metal rod that will lie flat on the bottom of a rectangular box 20 cm wide and 30 cm long? Express your answer to the nearest centimetre.
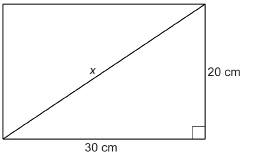
SC 5. Maxim is cycling in the country. He travels 2 mi north along a range road and then 1 mi west along a township road.
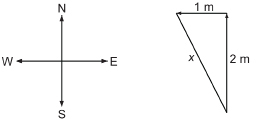
To the nearest tenth of a mile, how far is Maxim from his starting point?
SC 6. A kite is being flown over a school 100 m away.
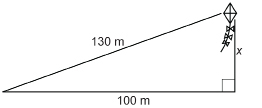
In reaching this position, 130 m of string has been let out. How high above the ground is the kite? Round to the nearest metre.
SC 7. The interior of a rectangular sewing box is 15 cm wide, 20 cm long, and 16 cm high. Can a knitting needle
28 cm long be placed in the box without sticking out of the top?
Mastering Concepts

iStockphoto/Thinkstock
Try this question. When you are finished, check your answer.
Anya is helping her father build a garage. They have seen W-trusses used in the construction of several garages in the neighbourhood. They also plan to use W-trusses to support the roof. Such trusses are shown here against the open sky before the roof is attached.
Anya wants to calculate the length the rafters (the sloping beams of the trusses) will have to be. Each truss must span 24 ft—the width of the garage—and have an 18-in overhang beyond each wall, as shown in the diagram.
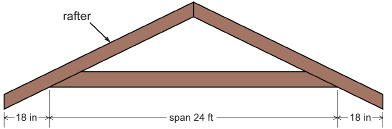
The roof has a slope of 4 in for a horizontal run of 12 in. This slope is represented by the triangle in the following diagram.
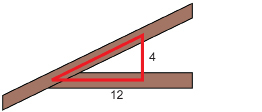
Help Anya find the length of each truss to the nearest sixteenth of an inch.
1.30. Page 5
Module 6: Triangles and Other Polygons
Lesson Summary
Fractal art is based on similarity. The “trees” in the illustrations were created by drawing similar Pythagorean relationships on progressively smaller scales. As you can see, each square on the legs of a right triangle becomes the square on the hypotenuse of a smaller but similar right triangle, and so on, and so on!
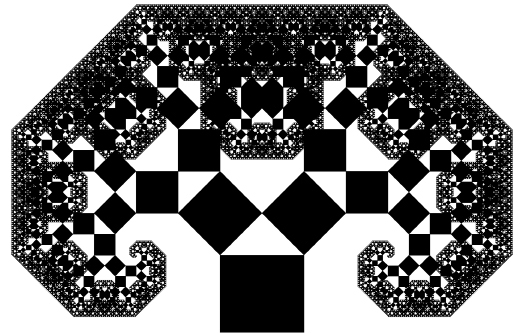
You can see how these trees were created in the applet “Grand Pythagorean Tree” To make the tree grow, press “More.” To start over, press “Reset.” For a variety of trees, adjust the “Slant” slider.
The Pythagoras tree is just one of many applications of the Pythagorean Theorem.
In this lesson you explored the following question:
-
How is the Pythagorean Theorem applied to solve a variety of practical problem situations?
Check your level of understanding of the materials covered in this lesson by completing “Lesson 6 Traffic Lights.” If you select an amber or red traffic light in the multimedia piece, you will receive information about additional work you can complete to improve your understanding of the topics. Complete the suggested work before you proceed to the Lesson 6 Assignment. If you experience difficulty, contact your teacher before starting the Lesson 6 Assignment.
In this lesson you used the Pythagorean Theorem in various situations to find the missing side of a right triangle from the other two sides. You also applied the Pythagorean Theorem to check if the lengths of three sides could form a right triangle. In every case, you applied the fact that the area of the square constructed on the longest side of a right triangle equals the sum of the areas of the squares on the two remaining sides.
 Assignment
Retrieve the Lesson 6 Assignment Booklet you saved in your course folder at the start of this lesson. Complete the Assignment Booklet. Resave your Assignment Booklet in your course folder and submit a copy to your teacher for assessment.
Unit 3 Project
In Lesson 3 of this unit, you were asked to identify similar triangles in your Unit 3 Project topic. Were any of those triangles right triangles? Would using the Pythagorean theorem help you to identify whether they are right triangles? Could the theorem help you find the length of one of the sides in a right triangle?
Take some time to explore the possible connections between your topic and the Pythagorean Theorem. Save any sketches and calculations in your course folder for use in your project presentation. For more information about this step and later steps of the Unit 3 Project, refer to the Unit 3 Project.
1.31. Module 6 Summary
Module 6: Triangles and Other Polygons
Module 6 Summary
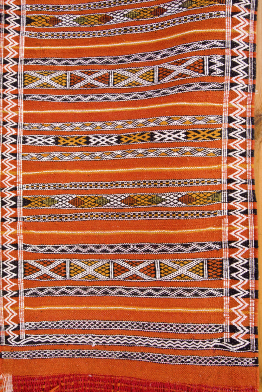
iStockphoto/Thinkstock
The beadwork in the blanket shows a traditional African pattern. The use of geometric patterns in art and on artifacts, such as pottery or rugs, is common to peoples around the globe. Whether you look at Navajo rugs, Cree beadwork, Scottish tartans, or Persian weaving, you will see the repetition of similar shapes, symmetry, right angles, and a celebration of colour. There is something in the geometry of repeated patterns and similarity that pleases the human soul.
The focus of this module was the geometry of similar figures and the triangle. Throughout this module you examined how the concepts from these lessons applied to games or art for your Unit 3 Project.
In this module you developed your skills as you investigated the following question:
- How can the Pythagorean Theorem and the relationships among similar polygons be used to solve practical problems?
A picture can tell a story. The “Module 6 Lessons Summary” is a collection of images from each lesson that describes the math you explored. What do you remember about each image? Can you relate each image to something new that you learned in this module? Watch the “Module 6 Lessons Summary” now.