Module 7
| Site: | MoodleHUB.ca 🍁 |
| Course: | Biology 30 [5 cr] - AB Ed copy 1 |
| Book: | Module 7 |
| Printed by: | Guest user |
| Date: | Thursday, 18 December 2025, 8:01 PM |
Description
Created by IMSreader
Table of contents
- 1. Module 7
- 1.1. Lesson 1
- 1.2. Page 2
- 1.3. Page 3
- 1.4. Page 4
- 1.5. Page 5
- 1.6. Lesson 2
- 1.7. Page 2
- 1.8. Page 3
- 1.9. Page 4
- 1.10. Page 5
- 1.11. Lesson 3
- 1.12. Page 2
- 1.13. Page 3
- 1.14. Page 4
- 1.15. Page 5
- 1.16. Page 6
- 1.17. Page 7
- 1.18. Lesson 4
- 1.19. Page 2
- 1.20. Page 3
- 1.21. Page 4
- 1.22. Page 5
- 1.23. Lesson 5
- 1.24. Page 2
- 1.25. Page 3
- 1.26. Page 4
- 1.27. Page 5
- 1.28. Page 6
- 1.29. Lesson 6
- 1.30. Page 2
- 1.31. Page 3
- 1.32. Page 4
- 1.33. Page 5
- 1.34. Lesson 7
- 1.35. Page 2
- 1.36. Page 3
- 1.37. Page 4
- 1.38. Page 5
- 1.39. Lesson 8
- 1.40. Page 2
- 1.41. Page 3
- 1.42. Page 4
- 1.43. Page 5
- 1.44. Module 7 Summary
1. Module 7
Module 7: Trigonometry
Module 7 Introduction

MARK RALSTON/AFP/Getty Images
Imagine the excitement of carrying the Olympic torch! More than 12 000 torchbearers from all parts of Canada carried the flame during the 106-day relay that started in Victoria, British Columbia. The torch route went through all of the territories and provinces of Canada and ended in Vancouver, the host city of the 2010 Winter Olympic Games. Wayne Gretzky had the honour of lighting the outdoor cauldron—what a spectacular event!
Take a close look at that cauldron. The cauldron is made of angles and triangles! Math is everywhere! The Winter Olympics required many new facilities, and these buildings and structures were designed by architects who applied mathematics. One of their mathematical tools is trigonometry.
Trigonometry, as you will discover in this module, involves relationships arising from the sides and angles of right triangles.
In this module you will explore trigonometry by examining three special ratios. These ratios are the tangent, sine, and cosine. As you study each ratio, you will solve a variety of practical problems. Many of these problems will involve sports, games, the arts, and design—the main emphasis of the Unit 3 Project. In the last lesson you will investigate games and puzzles that involve geometric shapes—this is part and parcel of trigonometry and its applications. That is the shape of what’s to come!
In this module you will be further developing your skills as you actively investigate the following question:
-
How can the trigonometric ratios, which are based on side and angle relationships in right triangles, help to solve practical problems?
1.1. Lesson 1
Module 7: Trigonometry
Lesson 1: The Tangent Ratio
Focus
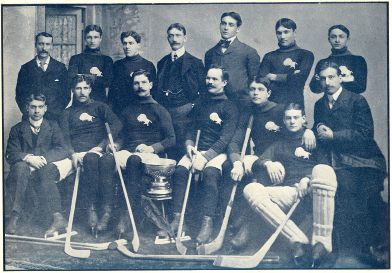
Manitoba Sports Hall of Fame & Museum.
On January 31, 1901, the Winnipeg Victorias beat the Montréal Shamrocks in overtime in the second and deciding game for the Stanley Cup. This game marked the first time the Stanley Cup had been decided in overtime. Another first was the participation of Antoine (Tony) Gingras (standing second from the right), a Métis man from St. Boniface, Manitoba.
Gingras played right wing and was a top scorer on the team. He became the first French-speaking player on a Stanley-Cup-winning team. Many credit his success and popularity in Québec with the formation of the Montréal Canadiens, for whom Gingras later became a team scout.
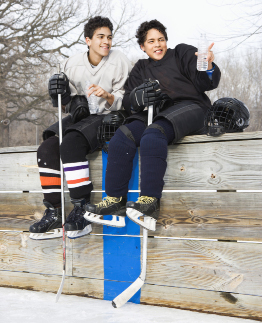
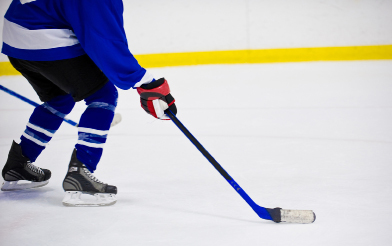
© iofoto/shutterstock
Look at the photograph of two of today’s young hockey players. When you compare their gear to that of the Winnipeg Victorias, you can see how hockey equipment has changed over the years. Some of the change started with Gingras, who designed his own hockey stick. Gingras’ design became a basis for the modern version of the hockey stick.
The two hockey-playing boys each hold a modern-day stick with the shaft vertical and the tip of the blade touching the ice. The blade and the surface of the ice form an angle. By the end of this lesson you will be able to find what angle the blade makes with the ice surface.
Lesson Questions
In this lesson you will explore these questions:
What is the tangent ratio?
How is the tangent ratio used to find unknown sides and angles in right triangles?
Assessment
You will complete the Lesson 1 Assignment Booklet for assessment. Download the Lesson 1 Assignment Booklet and save it in your course folder now. You will receive instructions on how to complete the Assignment Booklet later in the lesson. You will also be prompted to start working on the Unit Assessment.
There are other activities that you will complete throughout this lesson. It is important to complete all activities and save them in your course folder. Your teacher may ask to see your work at any time.
The lesson provides you with opportunities to investigate, review examples, and practise the knowledge and skills you are learning. In Self-Check activities you can compare your answers to see if you are on track. If you are having difficulty with concepts or calculations, contact your teacher.
Required Materials and Equipment
You will need a piece of cardboard the size of a sheet of printer paper, a drinking straw, tape, scissors, a glue stick, a weight (such as a bolt or penny), thread, a protractor, a metric ruler, and your calculator.
1.2. Page 2
Module 7: Trigonometry
Get Started
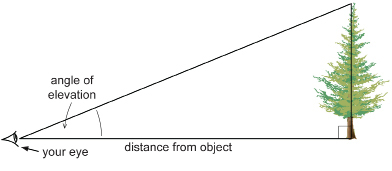
clinometer: a device for measuring angles to distant objects that are higher or lower than your position
In the following Try This Activity you will make a “Clinometer.”
 Try This
Work with a partner, if possible.
Step 1: Print a copy of Clinometer Template.

Step 2: Glue the template to a sheet of cardboard. Then cut out the semicircular protractor.
Step 3: Tape a drinking straw to the base of the protractor as shown.
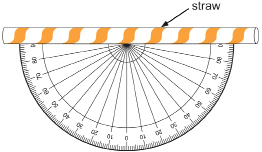
Step 4: Poke a small hole through the crosshairs at the centre of the protractor’s base. Pass one end of your thread through the hole. Knot and tape that end of the thread so it will not slip back through. Tie a weight (like a penny) to the free end of the thread.

Step 5: Let the weight swing free. When the straw is horizontal, the thread should lie along the 0° line, as shown in the diagram.
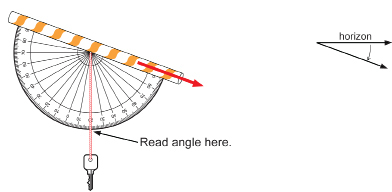
angle of elevation: an angle through which you must rotate the clinometer from the horizontal to see a higher object
When you look through the straw at an object higher than you are, your partner should be able to read the angle of elevation from the scale when the weight hangs down and is motionless.

angle of depression: an angle through which you must rotate the clinometer from the horizontal to see a lower object
When you look through the straw at an object lower than you are, your partner should be able to read the angle of depression from the scale when the weight hangs down motionless.
Practise looking through the straw and measuring angles of elevation and depression. You will use your clinometer skills throughout this module.
TT 1. What is the largest angle of elevation you can measure? In practice, angles will be significantly less.
TT 2. What is the largest angle of depression you can measure? In practice, angles will be significantly less.
Keep this clinometer somewhere safe, since you will need it in the next lesson.
Skill with Ratios
An important algebra skill you will use repeatedly throughout this module involves equal ratios. You will now review how to determine if ratios are equal.
Example 1
Are ![]() and
and ![]() equal ratios?
equal ratios?
Solution
Method 1: Reduce each fraction (ratio) to its simplest terms.


Since each ratio reduces to ![]() , the ratios are equal.
, the ratios are equal.
Method 2: Compare the cross products.
![]()
10 × 12 = 120
15 × 8 = 120
Because the cross products are equal, the ratios are equal.
The Principle
The previous example illustrates the following principle in algebra.
![]()
![]()
 Self-Check
In each of the following questions, use both methods from the example to compare each pair of ratios.
SC 1. Are ![]() equal ratios?
equal ratios?
SC 2. Are ![]() equal ratios?
equal ratios?
1.3. Page 3
Module 7: Trigonometry
Explore
In Module 6 you explored similar right triangles. You discovered that for two similar right triangles, the ratios of their corresponding sides were equal.
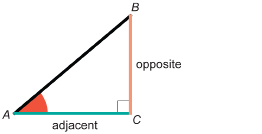
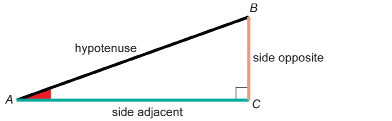
side adjacent: the side that forms the right angle with the side opposite
side opposite: the side across from the given angle
hypotenuse: the longest side in a right triangle
Before you move on in this module, you must be able to name the side adjacent and the side opposite to either one of the acute angles of a right triangle. The remaining side is called the hypotenuse of the right triangle.
For instance, look at the diagram of right triangle ABC. For ∠A, the side opposite is side BC. Note that, throughout this module, the side opposite will be coloured orange in many of the examples.
The side adjacent to ∠A is side AC. Note that, throughout this module, the side adjacent will be coloured green in many of the examples.
The hypotenuse of the triangle is side AB. Note that, throughout this module, the hypotenuse will be black boldface in many of the examples.

 Self-Check
Check your understanding of right triangles by going to “Right Triangle Side Names.”
 Try This
In this Try This activity you will explore the ratio of two sides within a right triangle. You will compare this ratio with ratios involving the same pair of sides from other right triangles. For this comparison you will use the skills for similar right triangles you mastered in Module 6.
You will need your ruler, protractor or square, and your calculator.
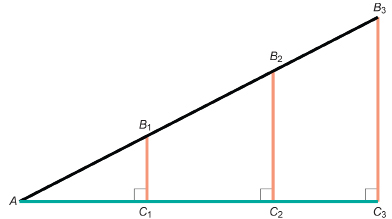
Consider the right triangles in the following diagram.

Step 1: Draw a similar diagram to work with.
Step 2: For right triangle AB1C1, measure to the nearest millimetre and record the length of sides B1C1 and AC1.
For right triangle AB2C2, measure to the nearest millimetre and record the length of sides B2C2 and AC2.
For right triangle AB3C3, measure to the nearest millimetre and record the length of sides B3C3 and AC3.
Step 3: Complete the following table, then answer the Try This questions.
|
Right Triangle |
Side Opposite ∠A (nearest mm) |
Side Adjacent to ∠A (nearest mm) |
(2 decimal places) |
|
ΔAB1C1 |
B1C1 = |
AC1 = |
|
|
ΔAB2C2 |
B2C2 = |
AC2 = |
|
|
ΔAB3C3 |
B3C3 = |
AC3 = |
|
TT 3. Explain why ΔAB1C1, ΔAB2C2, and ΔAB3C3 are similar triangles.
TT 4. Because the triangles are similar, the ratio  you calculated should be the same for each triangle. The following statements prove these ratios for ΔAB1C1 and ΔAB3C3 are equal. Supply a reason for each step in the proof.
|
Statement |
Reason |
|
|
|
|
|
|
|
Therefore, |
 Share
Share
Share you answers from the Step 3 table in the Try This activity with as many other students as possible. You may find that the ratios for your triangles were different from the ratios other students obtained. Why might this be? Measure ∠A in your triangles and compare this angle measurement with other students. Can you identify a pattern between the ratio ![]() calculated for the different angle measures?
calculated for the different angle measures?
Summarize the patterns you noticed during this Share, and save a copy of your summary in your course folder.
1.4. Page 4
Module 7: Trigonometry
Bringing Ideas Together
trigonometry: the branch of mathematics based originally on determining sides and angles of triangles, particularly right triangles
In Explore you examined the ratio in a right triangle of the side opposite to the side adjacent for a given acute angle. This ratio is an example of a trigonometric ratio. Trigonometry comes from two Greek words that mean “triangle measure.”
Did You Know?
More than 1000 years ago, Islamic mathematicians were using trigonometry to solve a variety of sophisticated problems.
In Explore, you saw that, for similar right triangles and a particular acute angle, the ratio ![]() was the same value regardless of the size of the right triangle.
was the same value regardless of the size of the right triangle.

tangent ratio: the ratio of the length of the side opposite to the length of the side adjacent in a right triangle
This ratio is called the tangent ratio.
The tangent ratio is always in relation to an acute angle (in this case, the angle is ∠A). You must identify the acute angle when you write the tangent ratio in a particular situation.
So, tangent ![]()
This equation is often written more simply as ![]() .
.
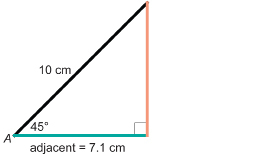
Example 2
Draw a right triangle with an acute angle of 45°. Determine tan 45°.
Solution
It does not matter how large you draw the triangle, as all right triangles with a 45° angle will be similar in shape.
Once you draw the triangle, measure the opposite side and adjacent side.
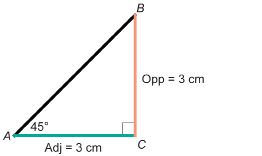
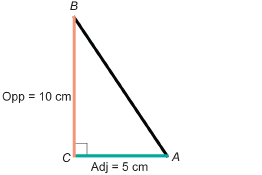
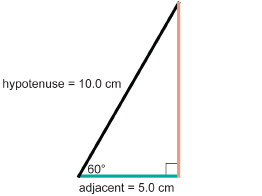
A ratio of 1 means that, in a right triangle with a 45° angle, the opposite side and the adjacent side are always equal. For instance, if the opposite side were 10 cm, the adjacent side would also be 10 cm long, and ![]() .
.
Example 3
Determine tan 30°, correct to two decimal places, by measuring the sides of a right triangle.
View the animated “Tangent 30° Solution.”
 Self-Check
SC 3. Use the method of the previous two examples to complete the following table. You may wish to use 10 cm for the adjacent side.
|
Angle |
Side Adjacent |
Side Opposite |
Tangent |
|
10° |
|
|
tan 10° = |
|
20° |
|
|
tan 20° = |
|
30° |
|
|
tan 30° = |
|
40° |
|
|
tan 40° = |
|
45° |
10 |
10 |
tan 45° = 1 |
|
50° |
|
|
|
Calculating the Tangent Ratio
Fortunately, it is possible to determine these ratios without actually having to draw a right triangle. You can also use your calculator. Yeah for technology!
Example 4
Find each tangent using your calculator.
- tan 45°
- tan 30°
Solution
There are several different ways in which angles may be expressed.
Be sure you have your calculator set to work in degrees.
- To find tan 45°, press this sequence of keys. If you do not obtain the answer shown, consult your calculator manual or ask your teacher for help.

You should see something like this.
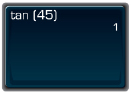
So, tan 45° = 1.
- To find tan 30°, press this sequence of keys. If you do not obtain the answer shown, consult your manual.

You should see something like this.
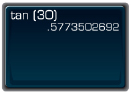
So, tan 30° = 0.577 350 269 2...
Self-Check
Use your calculator to complete the following table.
SC 4. Complete the following table. Round your answers to four decimal places.
|
Angle |
Tangent |
|
0 |
|
|
10° |
|
|
20° |
|
|
30° |
0.5774 |
|
40° |
|
|
45° |
|
|
50° |
|
|
60° |
|
|
70° |
|
|
80° |
Solving Problems with the Tangent Ratio
In the next example, you will apply your calculator skills to help you solve a problem involving the tangent ratio.
Example 5
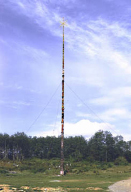
Photo copyright SFU Museum of
Archaeology & Ethnology. Used with permission.
The Kwakwaka’wakw totem pole at Alert Bay, British Columbia, is one of the world’s tallest totem poles. The pole casts a shadow of 44.33 m in length along the ground when the angle of elevation of the sun is 50°, measured by using a clinometer. Calculate the height of the pole to the nearest metre.
Solution
Draw a diagram.
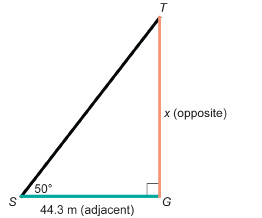
Let x be the height of the totem pole.
The totem pole is perpendicular to the ground at G.
∠S at the tip of the shadow is 50°. This is the angle through which an observer would have to look up to see the sun just over the top, T, of the pole.
To calculate x, press these keys.
![]()
The totem pole is approximately 53 m high.
Self-Check
Use the method outlined in Example 5 to solve this question.
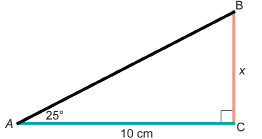
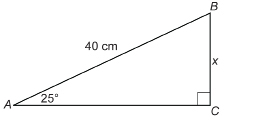
SC 5. Solve for x. Round to one decimal place.
Finding an Unknown Angle with the Tangent Ratio
You have just seen how an unknown side in a right triangle can be determined using the tangent ratio if you know the measure of an acute angle in that triangle. Can you solve problems going in the other direction? How could you find an unknown angle using the tangent ratio?
For instance, suppose you were told that the tangent of an angle in a right triangle were equal to 1. What would that angle be?
If tan A = 1, then ![]() then the opposite and adjacent sides must be equal so the ratio equals 1. Draw a right triangle with equal adjacent and opposite sides. Measure the angle and you will see that ∠A = 45°.
then the opposite and adjacent sides must be equal so the ratio equals 1. Draw a right triangle with equal adjacent and opposite sides. Measure the angle and you will see that ∠A = 45°.
But if tan A = 2, what would ∠A be?
Example 6
If tan A = 2, determine ∠A to the nearest degree.
Solution
Method 1: Draw a right triangle, and measure the angle using a protractor.
Since ![]() and tan A = 2, then
and tan A = 2, then ![]() .
.
This means
opposite side = 2 × adjacent side
The size of the triangle will not matter, since all triangles for which tan = 2 will be similar triangles.
So, draw any right triangle with the opposite side half as long as the adjacent side. For instance, if the adjacent side = 5 cm, then the opposite side = 10 cm.
Measure ∠A with your protractor.
The measure of ∠A is approximately 63°. That is ∠A ![]() 63°.
63°.
This answer makes sense, knowing that tan 45° = 1. Because tan A = 2, ∠A must be larger than 45°.
Method 2: Use your calculator.
To find an angle from its tangent, strike these keys.
![]()
Your display should show 63.434 948 82 . . ..
So, ∠A ![]() 63°.
63°.
Note: The symbol tan−1 means you are working backwards from the ratio to find the angle. It is read “inverse tangent.”
You should write out your solution as follows.

Self-Check
Practise finding angles given the tangent ratio.
SC 6. Find ∠A given tan A = 0.5.
Use both methods as shown in Examples 4 to 6 to find the angle.
SC 7. Use your calculator to find each angle from its tangent. Round your answers to the nearest tenth.
|
tan A |
∠A |
|
0. 3456 |
|
|
4 |
|
|
0.827 |
|
|
2.5678 |
|
|
|
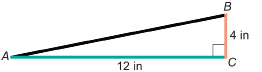
SC 8. A garage roof rises 4 in for a run of 12 in. To the nearest degree, what is the angle of the roof?
 Mastering Concepts
Try this question. When you are finished, check your answer.
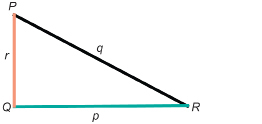
- For ΔPQR, write the ratios for tan P and tan R.
- How are ∠P and ∠R related?
- How are tan P and tan R related?
1.5. Page 5
Module 7: Trigonometry
Lesson 1 Summary
In the introduction to this lesson, you were asked to think about the mathematics behind hockey-stick design.
Jupiterimages/Photos.com/Thinkstock
Did you know the Mi’kmaq of Nova Scotia played a game on ice with a wooden puck in the 1700s? The Mi’kmaq played an important role in the evolution of the modern game of hockey. Mi’kmaq carvers were the first to make what is now known as a hockey stick.
In this lesson, you explored these questions:
What is the tangent ratio?
How is the tangent ratio used to find unknown sides and angles in right triangles?
Check your level of understanding of the materials covered in this lesson by completing “Lesson 1 Traffic Lights.” If you select an amber or red traffic light in the multimedia piece, you will receive information about additional work you can complete to improve your understanding of the topics. Complete the suggested work before you proceed to the Lesson 1 Assignment. If you experience difficulty, contact your teacher before starting the Lesson 1 Assignment.
To answer these questions, you explored the definition of the tangent as the ratio of the side opposite to the side adjacent for a given acute angle in a right triangle. You used this ratio to find missing sides and missing angles.
 Assignment
Retrieve the Lesson 1 Assignment Booklet you saved in your course folder at the start of this lesson. Complete the Assignment.
Resave your Assignment Booklet in your course folder and submit a copy to your teacher for assessment.
1.6. Lesson 2
Module 7: Trigonometry
Lesson 2: Using Tangents to Solve Problems
Focus

© gary718/shutterstock
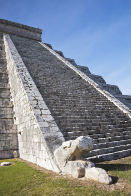
The Mayan pyramid of Kukulkan, at Chichen-Itza on the Yucatán Peninsula in Mexico, is a UNESCO world heritage site. The pyramid was built over a thousand years ago, and its architecture is a mix of both art and mathematics. The temple faces the four directions, representing the seasons. The 91 steps on each side and the platform at the top total 365—the number of days in the year.
The temple is famous for the shadows that slowly ascend and descend the staircases during the spring and fall equinoxes. These shadows represent mythical feathered snakes with their stone-carved heads at the bottom of the stairs. The shadows also signal the time to plant and harvest the crops.
Did you know that the stairs on each face are inclined at 45° to the horizontal? During this lesson you will see how this bit of information and knowledge of the tangent ratio can help you find the height of this pyramid.
Lesson Questions
In this lesson you will explore this question:
How is the tangent ratio used to solve a variety of practical problems?
Assessment
You will complete the Lesson 2 Assignment Booklet for assessment. Download the Lesson 2 Assignment Booklet and save it in your course folder now. You will receive instructions on how to complete the Assignment Booklet later in the lesson. You will also be prompted to start working on the Unit 3 Project.
Remember to save all activities, including those that are not part of the Assignment, in your course folder.
Required Materials and Equipment
You will need your clinometer, a measuring tape, and your calculator.
1.7. Page 2
Module 7: Trigonometry
Get Started
When you use the tangent ratio to solve problems, many times you will set up equal ratios that include the tangent ratio. Sometimes the unknown variable will end up as the denominator in one of those ratios. In this activity you will review the algebra you will need to solve equations where the unknown, or variable, appears in the denominator of one of those ratios.
Example 1
Solve for x.
![]()
Solution
You can check your answer by substituting back into the original equation.
|
Left Side |
Right Side |
|
|
|
|
LS = RS |
|
Practise this skill.
 Self-Check
SC 1. Solve for x.
![]()
SC 2. Solve for x.
![]()
1.8. Page 3
Module 7: Trigonometry
Explore
In the Try This activity you will determine the height of an object, such as a building or a power pole, indirectly by using the tangent ratio.
But, first, review how the sides of a right triangle are identified by going to the applet titled “Right Triangle Side Names.”
 Try This
In this Try This activity you will need your clinometer, a tape measure, and your calculator or square. If possible, work with a partner.
Step 1: Go outside and select an object that you would like to determine the height of. Examples include a power pole, a tall tree, or a building. The object should be on a flat, level stretch of ground because you will need to take measurements with your tape measure along the ground.
Step 2: From the base of the object, measure out a convenient distance. For a tree that might be 10 m tall, try not to be farther then 29 m from the object. Use your judgment.
Step 3: At the distance you selected, with the help of your partner, use your clinometer to determine the angle of elevation of the object’s top. You may wish to measure the angle several times and average your result to ensure accuracy. Then answer the questions that follow these steps.
Step 4: Also, measure the height your eye was above the ground when you used your clinometer.
TT 1. Draw a diagram similar to the following that describes your situation.
TT 2. Use the tangent ratio to calculate the height of the object. Show all steps.
TT 3. Why did you need the height of your eye above the ground?
TT 4. How accurate is your calculated answer? What could you have done to improve the accuracy?
TT 5. Set up the identical situation in the “Exploring Trig Ratios” multimedia piece. Use this applet to check your calculation for TT 2. The following are hints to help set up your multimedia:
Use “Explore It” mode.
Choose “tan R.”
Determine if your unknown is the “Opposite” or “Adjacent” side.
Choose the “Reference Angle” (the angle you measured with the clinometer).
1.9. Page 4
Module 7: Trigonometry
Bringing Ideas Together
In the Explore section you explored indirect measurement using the tangent ratio. This means you used one measurement (the angle of elevation) to find another measurement (the height of the object). You used the following relationship to find the height of the object you selected.

![]()
This relationship can be used, as it was in Explore, to find the side opposite. The relationship can also be used to determine the adjacent side or the reference acute angle in problem situations. Study the following examples to see how the tangent ratio can be used in a variety of ways.
Example 2
From a school window 5 m above the ground, a student measures the angle of depression to a fire hydrant located across the schoolyard. If the angle of depression is 10°, how far is the fire hydrant from the school? Round to the nearest metre.
Solution
Draw a diagram.
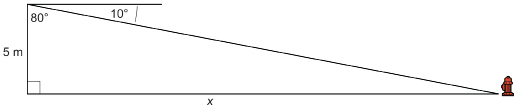
Method 1: Use the adjacent angle.
The angle of depression is the angle through which the observer must look down from the horizontal to see an object below. The angle adjacent to it in the right triangle is 80°, since the two angles must add up to 90°.
Substitute into the formula.
The fire hydrant is approximately 28 m from the school.
Method 2: Use the angle of elevation at the fire hydrant.

The angle of elevation and the angle of depression are always equal because they are alternate interior angles.
Use the 10° angle as the reference angle. This time, the 5-m side is the side opposite.
Substitute into the formula.
![]()
Example 3
A flagpole casts a shadow 12 m long when the angle of elevation of the sun is 40°. How tall is the flagpole? Round to the nearest tenth.
View the animated “Flagpole Solution.”
Example 4
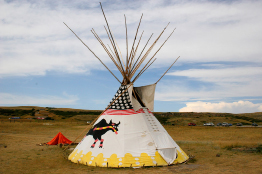
© V. J. Matthew/shutterstock
A teepee at Head-Smashed-In Buffalo Jump is 14 ft high and 16 ft in diameter. What angle does the conical surface of the teepee make with the ground? Round to the nearest degree.
Solution
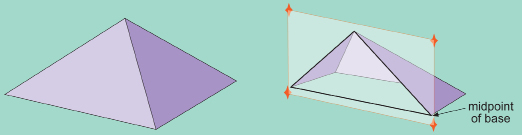
Draw a diagram of the side view of the teepee.
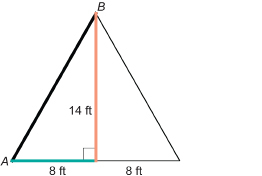
Let ∠A be the required angle. The side view of the teepee is made up of two right triangles. The base of each right triangle is 8 ft long, since 8 ft + 8 ft = 16 ft, the diameter of the tent.
Substitute into the formula.
The side of the teepee makes a 60° angle with the ground.
It is your turn!
 Self-Check
Apply the tangent ratios to find unknown sides and angles.
SC 3. A helicopter ambulance is dispatched from the airport to an accident scene 20 km north and 5 km east. What course should the helicopter fly to reach the accident scene directly?
SC 4. An airplane flying at an altitude of 1000 m is headed towards the North Battleford airport. If the angle of depression is 3°, how far, to the nearest 100 m measured along the ground, is the plane from the airport?
SC 5. Maxine is building a set of stairs with a ![]() -in riser and a 10-in tread. To the nearest tenth of a degree, what is the staircase angle? Regulations specify that the angle should not be more than 42°. Is Maxine within specifications?
-in riser and a 10-in tread. To the nearest tenth of a degree, what is the staircase angle? Regulations specify that the angle should not be more than 42°. Is Maxine within specifications?
SC 6. A ship’s navigator sights a lighthouse on the top of a vertical cliff. The light on the top of the lighthouse is 50 m above the sea. The navigator measures the angle of elevation of the light to be 1.5°. If the navigator’s charts say to stay at least 2 km from the foot of the cliff, is the ship safe?
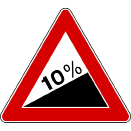
© Bersanelli/12789445/Fotolia
SC 7. A sign on a hill warns truckers to test their brakes because the slope is 10%. A slope of 10% means that the road rises 10 m for a horizontal distance of 100 m. To the nearest degree, what angle is the road surface inclined to the horizontal?
SC 8. An airplane takes off from a runway and climbs at a 3° angle to the horizontal. If it maintains this rate of climb, what is the plane’s altitude above the ground to the nearest 100 m when the aircraft is 30 km away, measured along the ground, from the point it took off?
 Mastering Concepts
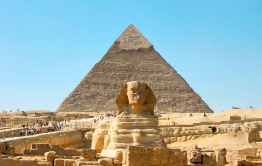
© ARCHITECTE®/shutterstock
The pyramid of Khafre and the other pyramids at Giza, near Cairo, have stood for over 4500 years as monuments to the genius of the ancient Egyptians. For centuries, these pyramids were the tallest human-made structures on the planet. Did you know that if you were to slice the Khafre pyramid in half vertically from the apex at the top to the base, the triangular cross-section is two 3-4-5 right triangles?
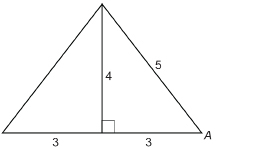
You will recall that the 3-4-5 right triangle was used by Egyptian surveyors. Do you remember the significance of these numbers? These numbers form a phythagorean triple and indicate a right triangle.
Determine ∠A to the nearest degree of the slant side of the Khafre pyramid.
1.10. Page 5
Module 7: Trigonometry
Lesson 2 Summary
© David Davis/shutterstock
This photograph is of the head of the feathered serpent at the foot of the Temple of Kukulkan, at the Mayan city of Chichen-Itza, Mexico. Because of the careful design of this monument, during the spring and fall equinoxes the shadow cast by the stone ramp along the stairs becomes the body of the serpent moving up and down the stairs.
The slope necessary to produce this effect is a reminder of the skill of the Mayan architects, stone masons, and artisans. The mathematics of the Mayans was also responsible for an accurate calendar.
In this lesson, you explored this question:
How is the tangent ratio used to solve a variety of practical problems?
Check your level of understanding of the materials covered in this lesson by completing “Lesson 2 Traffic Lights.” If you select an amber or red traffic light in the multimedia piece, you will receive information about additional work you can complete to improve your understanding of the topics. Complete the suggested work before you proceed to the Lesson 2 Assignment. If you experience difficulty, contact your teacher before starting the Lesson 2 Assignment.
To answer this question, you reviewed the definition of the tangent as the ratio of the side opposite to the side adjacent for a given acute angle in a right triangle. You used this ratio to find missing sides and missing angles in a variety of practical problems.
 Assignment
Retrieve the Lesson 2 Assignment Booklet you saved in your course folder at the start of this lesson. Complete the Assignment.
Resave your Assignment Booklet in your course folder and submit a copy to your teacher for assessment.
Unit 3 Project
Before you move on to Lesson 3, you should take a look at your Unit 3 Project topic. Look for right triangles and places where the tangent ratio could help you find a length measurement or angle measurement. Make sure you keep any sketches and calculations in your course folder for use in your presentation. For more information about this step and later steps, refer to the Unit 3 Project.
1.11. Lesson 3
Module 7: Trigonometry
Lesson 3: The Sine Ratio
Focus

© 2010 Sandra Post. Reproduced with permission.
Sandra Post, who was born in 1948 in Oakville, Ontario, is Canada’s most successful female golfer. She won her first Ladies’ Professional Golf Association (LPGA) championship at the age of 20, and Post was the youngest golfer to win an LPGA major title. This record held up until 2007. Before her retirement from the LPGA Tour in 1984, she won eight major championships, and she was a runner-up twenty times!
For the avid golfer, the game is a challenge. Not even the best golfers in the world always hit their shots on the fairway. Regardless of how often the player practises at the driving range, during the actual game the ball seems to have a mind of its own. Instead of going straight down the fairway, the ball will hook or slice wildly, travelling at a wicked angle to the desired path, and end up in the rough or bush, or nestled at the bottom of a sand trap.
Even a small angle off course can result in trouble. Suppose your average drive is 250 yd. If the ball ends up 5° off course, how many yards will it end up off the desired path? Surely it can’t be too far! After all, 5° is a small angle, isn’t it?
To answer this question, you will need to apply trigonometry and a new ratio called the sine function.
Lesson Questions
In this lesson you will explore these questions:
What is the sine ratio?
How is the sine ratio used to find unknown sides and angles in right triangles?
Assessment
You will complete the Lesson 3 Assignment Booklet for assessment. Download the Lesson 3 Assignment Booklet and save it in your course folder now. You will receive instructions on how to complete the Assignment Booklet later in the lesson. You will also be prompted to start working on the Unit 3 Assessment.
Remember to save all activities, including those that are not part of the Assignment, in your course folder.
Required Materials and Equipment
You will need your clinometer, a tape measure, a metric ruler, your protractor, and a calculator.
1.12. Page 2
Module 7: Trigonometry
Get Started
In this example you will review the names of the sides of a right triangle relative to one of its acute angles. When an acute angle is specified in a right triangle, the acute angle is referred to as the reference angle.
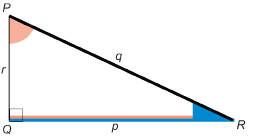
Example 1

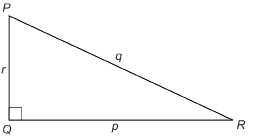
- Label the sides of ΔPQR using the letters p, q, and r.
- In relation to ∠R, which side is the side opposite? Which is the side adjacent? Which is the hypotenuse?
- In relation to ∠P, which side is the side opposite? Which is the side adjacent? Which is the hypotenuse?
- Regardless of which acute angle is the reference angle, which side always has the same name or label?
Solution
-
Side p is across from ∠P. Side r is across from ∠R. Side q is across from ∠Q.

-
In relation to ∠R, side r is the side opposite, side p is the side adjacent, and side q is the hypotenuse.
-
In relation to ∠P, side p is the side opposite, side r is the side adjacent, and side q is the hypotenuse.
-
Side q, the longest side, is always the hypotenuse.
 Self-Check
Try these questions. Use the following diagram.
SC 1. What single letter could be used to name side AC? Side BC? Side AB?
SC 2. What is the length of the side opposite ∠A? The side adjacent to ∠A?
SC 3. What is the length of the side opposite ∠C? The side adjacent to ∠C?
SC 4. What is the length of the hypotenuse?
1.13. Page 3
Module 7: Trigonometry
Explore
In the previous two lessons you explored the ratio of the side opposite to the side adjacent to a given acute angle in a right triangle. You discovered that this ratio, called the tangent ratio, is the same value in right triangles that are similar. It does not matter how large or small the right triangles are! For a particular angle, such as 20°, this ratio is fixed. So, if you know the angle, you can determine the ratio. And, if you know the ratio, you can determine the angle.
 Try This
In this activity you will explore another trigonometric ratio involving a different pair of sides within a right triangle. You will compare this ratio with ratios involving the same pair of sides from other right triangles. For this comparison you will use the skills for similar right triangles you mastered in Module 6.
You will need your ruler, a protractor or square, and a calculator. Work with a partner, if possible.
Consider the right triangles in the following diagram.
Step 1: Draw a similar diagram to work with.
Step 2: For right triangle AB1C1, measure to the nearest millimetre and record the length of sides B1C1 and AB1.
For right triangle AB2C2, measure to the nearest millimetre and record the length of sides B2C2 and AB2.
For right triangle AB3C3, measure to the nearest millimetre and record the length of sides B3C3 and AB3.
Step 3: Complete the following table. Then answer the Try This questions.
|
Right Triangle |
Side Opposite ∠A (nearest mm) |
Hypotenuse |
side opposite hypotenuse (2 decimal places) |
|
ΔAB1C1 |
B1C1= |
AB1= |
|
|
ΔAB2C2 |
B2C2= |
AB2= |
|
|
ΔAB3C3 |
B3C3= |
AB3= |
|
TT 1. Explain why ΔAB1C1, ΔAB2C2, and ΔAB3C3 are similar triangles.
TT 2. Because the triangles are similar, the ratio ![]() you calculated should be the same for each triangle. The following statements prove these ratios for ΔAB1C1 and ΔAB3C3 are equal. Supply a reason for each step in the proof.
you calculated should be the same for each triangle. The following statements prove these ratios for ΔAB1C1 and ΔAB3C3 are equal. Supply a reason for each step in the proof.
|
Statement |
Reason |
|
|
|
|
B2C2 × AB1 = B1C1 × AB2 |
|
|
Therefore, |
|
 Share
Share
Share your answers from the Step 3 table with as many other students as possible. You may find that the ratios for your triangles were different from the ratios other students obtained. Why might this be? Measure the ∠A in your triangles, and compare this angle measurement with other students. Can you identify a pattern between the ratio ![]() calculated for the different angle measures?
calculated for the different angle measures?
Summarize the patterns you noticed during this sharing session, and save a copy in your course folder.
1.14. Page 4
Module 7: Trigonometry
Bringing Ideas Together
In Explore you examined the ratio in a right triangle of the side opposite to the hypotenuse of a given acute angle. This ratio is another example of a trigonometric ratio. You saw that, for similar right triangles and a particular acute angle, the ratio ![]() was the same value regardless of the size of the right triangle.
was the same value regardless of the size of the right triangle.

This ratio is called the sine ratio.
The sine ratio is always in relation to an acute angle (in this case, it is ∠A). You must identify the acute angle when you write the sine ratio in a particular situation.
So, sine ∠A = ![]() .
.
It is often written more simply as sin A = ![]() where A = measure of ∠A.
where A = measure of ∠A.
Example 2
Draw a right triangle with an acute angle of 30°. Determine sin 30° to two decimal places.
Solution
It does not matter how large you draw the triangle, as all right triangles with a 30° angle will be similar in shape. However, a hypotenuse of 10 cm will make the calculation easier.
Once you draw the triangle, measure the opposite side and hypotenuse to the nearest millimetre.
A ratio of 0.5 means that, in a right triangle with a 30° angle, the opposite side will be one half the length of the hypotenuse. For instance, if the opposite side were 30 in, the hypotenuse would be 60 in long, and ![]()
Example 3
Determine sin 45°, correct to two decimal places, by measuring the sides of a right triangle.
Solution
Draw a suitable right triangle. You may wish to draw a right triangle with a hypotenuse of 10 cm to simplify the calculation. Then measure the opposite side.

Note that the answer is only approximate, since measurements were only correct to the nearest millimetre.
This ratio means the opposite side is shorter than the hypotenuse and is 0.71 times as long. So, if the hypotenuse were 20 cm long, the opposite side would be about 20 × 0.71 cm = 14.2 cm long.
 Self-Check
Use the method of the previous two examples to complete the following table. You may wish to use 10 cm for the hypotenuse.
SC 5. Complete the following table.
|
Angle |
Hypotenuse |
Side Opposite |
Sine |
|
10° |
|
|
sin 10° = |
|
20° |
|
|
sin 20° = |
|
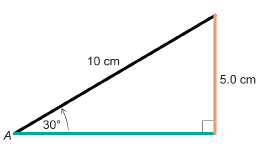
30° |
10 cm |
5.0 cm |
sin 30° = 0.50 |
|
40° |
|
|
sin 40° = |
|
45° |
|
|
sin 45° = 0.71 |
|
50° |
|
|
|
|
60° |
|
|
|
|
70° |
|
|
|
|
80° |
|
|
|
1.15. Page 5
Module 7: Trigonometry
The Sine Ratio
Look at the table of sine ratios you prepared. What do you notice about the value of the sine ratio? What happens to the sine ratio as you move from an angle of 0° to 80°?
You should remember two benchmarks: sin 30° = 0.50, and sin 45° = 0.71.
These benchmarks, or referents, will help you assess whether or not an answer is reasonable!
Did You Know?
People tend to think of mathematics as a modern way of looking at the world. Did you know that the ancient Babylonians, Egyptians, Indians, and Greeks used trigonometric tables, especially in astronomy? The word sine, in fact, is a mistranslation into Latin. The word sinus means “bay,” which is what the translators thought the Arabic word written as jb meant. In fact, jb was simply borrowed from the Sanscrit (Indian) word jya-ardha, which means “half chord.” Indian mathematicians from more than 1500 years ago calculated tables of sines from half chords of circles correct to 4 decimal places!
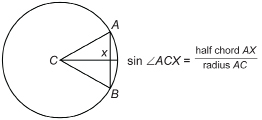
A chord is a line segment joining two points on a circle. Segment AB is a chord, and segment AX is a half chord. The ![]() . Fortunately, you don’t have to calculate sines using half chords as early mathematicians did. You can use a calculator!
. Fortunately, you don’t have to calculate sines using half chords as early mathematicians did. You can use a calculator!
Example 4
Find each sine, correct to 4 decimal places, using your calculator.
- sin 45°
- sin 30°
Solution
There are several different ways angles may be expressed. Make sure your calculator is set to degree mode.
- To find sin 45°, press this sequence of keys. If you don’t obtain the answer shown, consult your manual.

Your calculator should display something similar to what follows.
So, sin 30° 0.7071.
- To find sin 30°, press this sequence of keys. If you don’t obtain the answer shown, consult your manual.

Your calculator should display something similar to what follows.
So, sin 30° = 0.5.
 Self-Check
Use the calculator method of the previous examples to complete the following table.
SC 6. Complete the following table. Round to 4 decimal places.
|
Angle |
Sine |
|
10° |
|
|
20° |
|
|
30° |
0.5000 |
|
40° |
|
|
45° |
|
|
50° |
|
|
60° |
|
|
70° |
|
|
80° |
|
1.16. Page 6
Module 7: Trigonometry
Solving Problems Using the Sine Ratio
In the next example you will apply your calculator skills to help you solve a problem involving the sine ratio.
iStockphoto/Thinkstock
Example 5
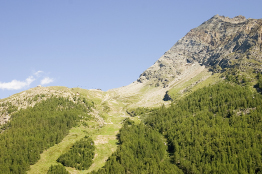
The photograph is of a mountain slope that often has avalanches.
Avalanches are triggered by human activity, such as snowmobiling, and most commonly occur on slopes between 35° and 45°.
Suppose the slope of a mountain slope is 38°, and the slope passes through a height of 800 m. What is the slope’s length? Round your answer to the nearest 100 m.
Solution
Draw a diagram.
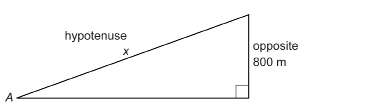
Let x be the length of the slope.
The mountain slope would be approximately 1300 m in length.
 Self-Check
Use the method outlined in Example 5 to solve this question.
SC 7. Solve for x. Round to two decimal places.
Finding Angles Using the Sine Ratio
You have just seen how an unknown side in a right triangle can be determined using the sine ratio, provided you know the measure of an acute angle in that triangle. Can you find an angle using the sine ratio?
For instance, suppose you are told that the sine of a given acute angle in a right triangle is 0.6. What is the angle?
Example 6
If sin A = 0.6, determine ∠A to the nearest degree.
View the animated “Sine Solution.”
Self-Check
Practise finding angles given the sine ratio.
SC 8. Find ∠A given sin A = 0.8.
Use both methods as shown in Example 6 to find the angle.
SC 9. Use your calculator to find each angle from its sine. Round your answers to the nearest tenth.
sin A |
∠A |
0.1257 |
|
0.7826 |
|
0.9000 |
|
|
|
|
|
SC 10. Find ∠A to the nearest tenth of a degree.

 Mastering Concepts
Try these questions. When you are finished, check your answer.
- For ΔPQR, write the ratios for sin P and sin R.
- How are ∠P and ∠R related?
- How are p and r related?
1.17. Page 7
Module 7: Trigonometry
Lesson 3 Summary

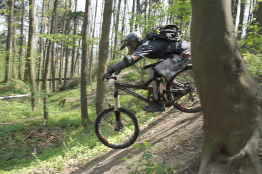
Ryan McVay/Digital Vision/Thinkstock
In the introduction to this lesson, you were asked to think about the mathematics behind a drive in golf. The distance the drive ends up from its intended path is a function of the sine ratio.
Did you know that the height of the incline track designed for cycling also depends on the sine of the incline’s angle? The angle is designed to maximize safety while allowing competitors to maintain speed.
Regardless of the sport you enjoy, it is impossible to escape the joy of trigonometry!
In this lesson you explored these questions.
What is the sine ratio?
How is the sine ratio used to find unknown sides and angles in right triangles?
Check your level of understanding of the materials covered in this lesson by completing “Lesson 3 Traffic Lights.” If you select an amber or red traffic light in the multimedia piece, you will receive information about additional work you can complete to improve your understanding of the topics. Complete the suggested work before you proceed to the Lesson 3 Assignment. If you experience difficulty, contact your teacher before starting the Lesson 3 Assignment.
To answer these questions, you explored the definition of the sine function as the ratio of the side opposite to the hypotenuse for a given acute angle in a right triangle. You used this ratio to find missing sides and missing angles.
 Assignment
Retrieve the Lesson 3 Assignment Booklet you saved in your course folder at the start of this lesson. Complete the Assignment.
Resave your Assignment Booklet in your course folder and submit a copy to your teacher for assessment.
1.18. Lesson 4
Module 7: Trigonometry
Lesson 4: Using Sines to Solve Problems
Focus
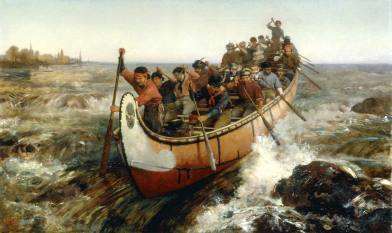
Frances Anne Hopkins/Library and Archives Canada, Acc. No. 1989-401-2
This painting, Shooting the Rapids, was completed in 1879 by the artist Francis Anne Hopkins. She married a Hudson’s Bay Company official and accompanied her husband on his travels. Hopkin’s work documents the fur trade, which marks an important period in Canada’s history.
The people who worked in the fur trade often travelled long distances by canoe. For example, a trip from Lake Athabasca to Montréal was more than 7000 km in length. On a trip like this, there were many portages to make and many dangerous rapids to paddle through.
The Montréal Canoe, of First-Nations design, used by the fur-trade workers (voyageurs), could exceed 10 m in length and 2 m in width at its widest point. These canoes were ingeniously crafted, constructed of bark, cedar splints, and pine tar, and were particularly well-suited for the job of transporting people and furs.
If you look at the painting shown, the men in the stern (back) of the canoe are riding well above those at the bow (front). Did you know that you could use the sine ratio to calculate this difference in height as the canoe tilts forward down the rapids?
Lesson Questions
In this lesson you will explore this question:
-
How is the sine ratio used to solve a variety of practical problems?
Assessment
You will complete the Lesson 4 Assignment Booklet for assessment. Download the Lesson 4 Assignment Booklet and save it in your course folder now. You will receive instructions on how to complete the Assignment Booklet later in the lesson. You will also be prompted to start working on the Unit 3 Project.
You will receive instructions on how to complete the Assignment Booklet later in the lesson. You will also be prompted to start working on the Unit 3 Project.
Remember to save all of your work in your course folder.
Required Materials and Equipment
You will need your clinometer, a measuring tape, and your calculator.
1.19. Page 2
Module 7: Trigonometry
Get Started
In this activity you will review how the sine ratio is used to find either the side opposite or hypotenuse if given the other side and an acute angle in a right triangle. Also, you will review how to find the acute angle if both the opposite side and hypotenuse of a right triangle are given.
 Try This
Work with a partner, if possible.
You will use the “Exploring Trig Ratios” math interactive to review how to apply the sine ratio to find a missing side or angle in a right triangle. Note these tips:
-
Make sure you are in “Explore It” mode.
-
Select the “sin R” function to explore.
-
Choose the “Unknown side or angle” in the right triangle.
-
Resize the triangle by using the “Scale slider” or by dragging the vertices.
TT 1. Examine the steps used to solve for the unknown. How do the steps for solving for an unknown angle differ from finding an unknown side?
Now you are ready to explore problem situations involving the sine ratio.
Share
With a partner or in a group, discuss your answers to TT 1. How does solving using the sine function to find an unknown side differ from finding an unknown angle? Are the steps different? How so? Explain.
Summarize your discussion, and save a copy of your summary in your course folder.
Explore
In this activity you will determine the height of a hill in your neighbourhood. The hill could be along a straight road in the countryside or along a valley near where you live.
Try This
In this Try This activity you will need your clinometer, a tape measure, and your calculator. Work with a partner, if possible.
Step 1: In your neighbourhood, select a hill along a straight stretch of road or overlooking a valley. You are going to determine the hill’s height by using the sine ratio! The hill you select should be as uniform in slope as possible (i.e., not too bumpy—one straight hill).
Step 2: From the base of the hill, measure the hill’s angle of elevation using your clinometer. You may wish to measure the angle several times and average your results to ensure accuracy.
Step 3: You will also need to measure the length of the hill’s slope. For a short slope you can use a measuring tape. For longer slopes you may have to pace off the distance or, if the hill is along a straight stretch of road, it may be possible to use the odometer of a car or truck. Then complete TT 2 to TT 4.
TT 2. Using your measurements, draw and label a diagram that describes your situation.
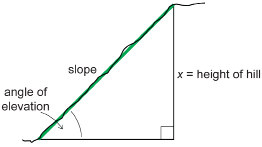
TT 3. Use the sine ratio to calculate the height of the hill (x). Show all steps.
TT 4. How accurate is your calculated answer? What could you have done to improve the accuracy? Contact your teacher to discuss the answers.
1.20. Page 3
Module 7: Trigonometry
Bringing Ideas Together
In Explore you looked at indirect measurement and the sine ratio. You used the following relationship to find the height of the selected hill.

![]()
This relationship can be used as you did in Explore to find the side opposite. This relationship can also be used to determine the hypotenuse or the reference acute angle in a variety of problem situations. Study these examples.
Example 1
A 25-ft-long wheelchair ramp is inclined at an angle of 4.6° to the horizontal. From the foot of the ramp to the top, what is the vertical rise? Round to the nearest tenth.
Solution
Draw a diagram.
![]()
Let x be the vertical rise.
Substitute into the formula.
The vertical rise of the ramp is approximately 2.0 ft.
Example 2
© BORTEL Pavel/shutterstock
A ladder leans against a vertical wall. The foot of the ladder is positioned for safety at an angle of 75° with the ground. The ladder reaches 14.5 ft up the wall. To the nearest foot, what is the length of the ladder?
View the animated “Ladder Solution.”
Example 3
A mountain trail used by cyclists to train on drops 235 m from the trail head to the bottom over a trail distance of 1.1 km. To the nearest degree, what is the average slope of this trail?
Solution
Do you remember how many metres are in a kilometre? Review “SI Length Conversion” if you need a refresher.
Draw a diagram.
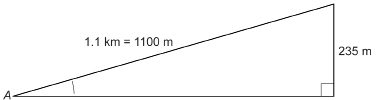
Let ∠A be the required angle.
All distances must be in the same units.
![]()
Substitute into the formula.
The average slope of the trail is approximately 12°.
Practise these skills!
1.21. Page 4
Module 7: Trigonometry
 Self-Check
Apply the sine ratio to find unknown sides and angles.
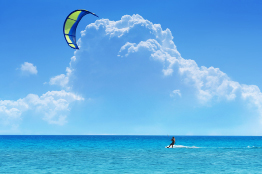
© Dmitry Kosterev/shutterstock
SC 1. Kiteboarding is gaining popularity as an extreme sport. Kiteboarders wear a harness attached to the kite by a line that is often 30 m in length. It is possible for the kiteboarder to reach speeds of nearly 100 km/h. If the kite’s angle of elevation in the photograph is 40°, and the line is 30 m long, how high above the water is the kite? Round to the nearest metre.
SC 2. If a javelin thrower’s toss is to count, the javelin must strike the ground with its point. The following diagram shows a javelin point embedded in the ground with 210 cm of the javelin’s length above ground.
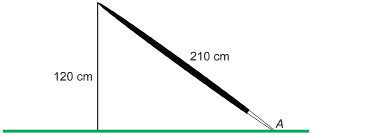
Did You Know?
The javelin is a modified spear. Spears were used throughout the world for hunting. Some of the finest stone spear points are from the Clovis period of early settlement in North America, approximately 13 500 years ago, when a land bridge joined Asia and North America.
SC 3. Electricians and plumbers must often offset pipes to go through openings or to go above or below obstacles.
Electricians sometimes work with metal conduits (pipes) that contain electrical cable. Electricians use a tool to bend the conduit, as shown in the illustration.
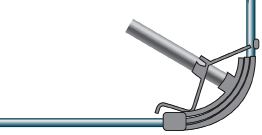
In the following figure, the conduit has been bent twice to offset the pipe vertically by 10 in. Electricians and plumbers call the hypotenuse of the resulting right triangle the travel and the horizontal displacement the run.
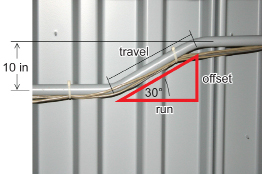
Electricians and plumbers use the sine ratio to calculate the travel. What is the travel in this diagram, if the offset is 10 in and the offset angle is 30°? Round to the nearest tenth of an inch.
SC 4. A guy wire will be used to support a vertical telephone pole. What must the length of the guy wire be if one end is to be attached to the pole at a point 10 ft above the ground and the other end, which is fastened to a stake, is to make a 45° angle with the ground? Express your answer to the nearest inch.
SC 5. A ramp 10 ft long is used to load items from the ground to a truck flatbed 3 ft above the ground. To the nearest degree, what angle does the ramp make with the ground?
 Mastering Concepts
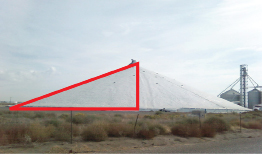
Photo courtesy of Inland Tarp & Liner, Inc
From time to time, when grain storage is limited, farmers will store grain in conical piles in their fields. Depending on how long the grain remains in these piles, the grain may be left uncovered or will be covered with a tarp.
Wheat will form a conical pile with an angle of 25° between the slant side and the horizontal (ground). This angle is called the angle of repose. The angle of repose varies from one kind of grain to another. Corn, for example, has a 22° angle of repose.
Suppose a conical pile of wheat is 3 m in height.
- What is the length of the slant side of the conical pile? Round your answer to one decimal place.
- What is the radius of the pile? Round your answer to one decimal place.
- What is the surface area of a tarp needed to cover the exposed wheat? Round your answer to the nearest square metre. Hints: Use
 (The cone-shaped tarp, geometrically speaking, has no bottom face.)
1.22. Page 5
Module 7: Trigonometry
Lesson Summary
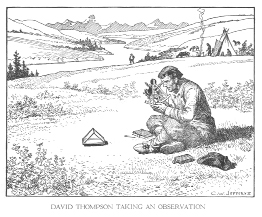
Jefferys, C. W. The Picture Gallery of Canadian History vol 2.
Toronto: Ryerson Press, 1942. p 146
David Thompson (1770–1857) was a man who had many jobs associated with the fur trade—explorer, surveyor, and map maker. Thompson showed he was good at mathematics from an early age. He studied trigonometry, algebra, geography, and astronomy. At the age of 14, David Thompson joined the Hudson’s Bay Company in Canada after leaving his home in England.
Over his lifetime, David Thompson mapped almost 4 million square kilometres of land that was later to become part of Canada and the United States. He is considered one of the best surveyors who ever lived! Do you see what a little trigonometry can do?
In this lesson you explored this question:
-
How is the sine ratio used to solve a variety of practical problems?
Check your level of understanding of the materials covered in this lesson by completing “Lesson 4 Traffic Lights.” If you select an amber or red traffic light in the multimedia piece, you will receive information about additional work you can complete to improve your understanding of the topics. Complete the suggested work before you proceed to the Lesson 4 Assignment. If you experience difficulty, contact your teacher before starting the Lesson 4 Assignment.
To answer this question, you reviewed the definition of the sine function as the ratio of the side opposite to the hypotenuse for a given acute angle in a right triangle. You used this ratio to find missing sides and missing angles in a variety of practical problems.
 Assignment
Retrieve the Lesson 4 Assignment Booklet you saved in your course folder at the start of this lesson. Complete the Assignment.
Resave your Assignment Booklet in your course folder and submit a copy to your teacher for assessment.
Unit 3 Project
Before you move on to Lesson 5, you should take a look at your Unit 3 Project topic. Look for right triangles and places where the sine ratio could help you find a length measurement or angle measurement. Make sure you keep any sketches and calculations in your course folder for use in your presentation. For more information about this step, and later steps, refer to the Unit 3 Project.
1.23. Lesson 5
Module 7: Trigonometry
Lesson 5: The Cosine Ratio
Focus
Clive Mason/Getty Images Sport/Getty Images
In the photograph, Mellisa Hollingsworth, from Eckville, Alberta, is shown competing in the women’s skeleton event at the 2006 Winter Olympics in Torino, Italy. She won a bronze medal at those games and a silver medal at the 2000 World Championships in Austria. In both the 2009-10 and 2005-06 seasons, she won the women’s World Cup overall skeleton title. Hollingsworth participated at the 2010 Vancouver Winter Olympics, where she finished in fifth place.
The 2010 Olympic bobsleigh and skeleton track at Whistler, British Columbia, is 1450 m in length with a vertical drop of 152 m and an average slope of 10.5°. In the Olympics women’s skeleton event, the combined mass of the competitor and sled cannot exceed 92 kg. Part of this combined weight pushes the runners against the track and part of the weight pushes the sled down the slope. On average, what percentage of the mass pushes the sled down the track? At the end of this lesson you will have the trigonometric skills to answer this question!
Lesson Questions
In this lesson you will explore these questions:
What is the cosine ratio?
How is the cosine ratio used to find unknown sides and angles in right triangles?
Assessment
You will complete the Lesson 5 Assignment Booklet for assessment. Download the Lesson 5 Assignment Booklet and save it in your course folder now. You will receive instructions on how to complete the Assignment Booklet later in the lesson. You will also be prompted to work on the Unit 3 Project.
Remember to save all of your work in your course folder.
Required Materials and Equipment
You will need a metric rule, your protractor, and a calculator.
1.24. Page 2
Module 7: Trigonometry
Get Started
In this activity you will review the relationship between the two acute angles of a right triangle.
 Self-Check
Work with a partner, if possible.
Step 1: Use your protractor and straight edge to draw a right triangle PQR of any size. An example is shown below.

Step 2: Measure ∠P and ∠R to the nearest degree.
Did You Know
The letters used to name triangles are usually placed alphabetically. But the letters really can be in any order. For example, the previous triangle could have been named any of the following: ΔQRP, ΔPRQ, or ΔRQP.
SC 1. Determine ∠P + ∠R.
SC 2. Will the sum of the two acute angles of a right triangle always be the same as the answer you obtained in SC 1? Explain.
SC 3. What name is given to a pair of angles with this sum?
SC 4. In right ΔABC, ∠A and ∠B are acute angles. If ∠B = 47°, what is the size of ∠A? Draw a diagram to support your answer.
SC 5. What is the complement of a 60° angle?
1.25. Page 3
Module 7: Trigonometry
Explore
In previous lessons you explored the sine and tangent ratios. For a given acute angle in a right triangle, the tangent ratio was defined as ![]() , and the sine ratio was defined as
, and the sine ratio was defined as ![]() .
.
You discovered that, for similar triangles, the values of the tangent ratios were the same regardless of how large or small the right triangles were. This was also true for the sine ratio. So, if you knew the angle, you could determine the ratio. And, if you knew the ratio, you could determine the angle.
 Try This
In this activity you will explore one more trigonometric ratio. This ratio involves a different pair of sides within a right triangle. You will explore this ratio for a variety of right triangles with the same angle. For this comparison you will use the skills for similar right triangles that you mastered in Module 6.
You will need your ruler, a protractor or square, and a calculator. Work with a partner, if possible.
Consider the right triangles in the following diagram.

Step 1: Draw a diagram like the previous one. Your diagram doesn’t have to be the same size, and ∠A can be of any measure.
Step 2: Record all of the following information in the table.
For right triangle AB1C1, measure to the nearest millimetre and record the length of sides AC1 and AB1.
For right triangle AB2C2, measure to the nearest millimetre and record the length of sides AC2 and AB2.
For right triangle AB3C3, measure to the nearest millimetre and record the length of sides AC3 and AB3.
|
Right Triangle |
Side Adjacent ∠A (nearest mm) |
Hypotenuse |
(2 decimal places) |
|
ΔAB1C1 |
AC1 = |
AB1 = |
|
|
ΔAB2C2 |
AC2 = |
AB2 = |
|
|
ΔAB3C3 |
AC3 = |
AB3 = |
|
TT 1. Explain why ΔAB1C1, ΔAB2C2, and ΔAB3C3 are similar triangles.
TT 2. Because the triangles are similar, the ratio ![]() you calculated should be the same for each triangle. The following statements prove these ratios for ΔAB1C1 and ΔAB3C3 are equal. Supply a reason for each step in the proof.
you calculated should be the same for each triangle. The following statements prove these ratios for ΔAB1C1 and ΔAB3C3 are equal. Supply a reason for each step in the proof.
|
Statement |
Reason |
|
|
|
|
|
|
|
|
|
 Share
Share
Share your answers from the Step 2 table in Try This with as many other students as possible. You may find that the ratios for your triangles were different from the ratios obtained by other students. Why? Measure ∠A in your triangles, and compare this angle measurement with other students. Can you identify a pattern between the ratio ![]() calculated for the different angle measures?
calculated for the different angle measures?
Summarize the patterns you noticed during this Share activity, and save a copy to your course folder.
1.26. Page 4
Module 7: Trigonometry
Bringing Ideas Together
In Explore you examined the ratio in right triangles of the side adjacent to the hypotenuse. This ratio is another example of a trigonometric function. You saw that, for similar right triangles and a particular acute angle, the ratio ![]() was the same value regardless of the size of the right triangle.
was the same value regardless of the size of the right triangle.
cosine ratio: the ratio of the length of the side adjacent to the length of the hypotenuse
This ratio is called the cosine ratio.
The cosine ratio is always in relation to an acute angle (in this case, ∠A). You must identify the acute angle when you write the cosine ratio in a particular situation.
So, cosine ![]() . It is often written more simply as
. It is often written more simply as ![]() .
.
Example 1
Draw a right triangle with an acute angle of 60°. Determine cosine 60° to two decimal places.
Solution
It does not matter how large you draw the triangle as all right triangles with a 60° angle will be similar in shape. However, a hypotenuse of 10 cm will make the calculation easier.
Once you draw the triangle, measure the adjacent side and hypotenuse to the nearest millimetre.
A ratio of 0.5 means that, in a right triangle with a 60° angle, the adjacent side will be one half the length of the hypotenuse. For instance, if the adjacent side were 30 in, the hypotenuse would be 60 in long, and ![]() .
.
Example 2
Determine cos 45°, correct to two decimal places, by measuring the sides of a right triangle.
Solution
Draw a suitable right triangle. You may wish to draw a right triangle with a hypotenuse of 10 cm to simplify the calculation. Then measure the adjacent side.
Note: This answer is only approximate since measurements were only correct to the nearest millimetre.
This ratio means the adjacent side is shorter than the hypotenuse and is 0.71 times as long. So, if the hypotenuse were 20 cm long, the adjacent side would be about 20 × 0.71 cm = 14.2 cm long.
 Self-Check
Use the method of the previous two examples to complete the following table. You may wish to use 10 cm for the hypotenuse.
SC 6. Complete the following table.
|
Angle |
Hypotenuse |
Side Opposite |
Cosine |
|
10° |
|
|
cos 10° = |
|
20° |
|
|
cos 20° = |
|
30° |
|
|
cos 30° = |
|
40° |
|
|
|
|
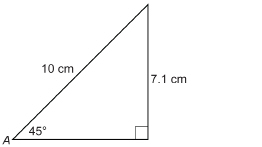
45° |
10 cm |
7.1 cm |
cos 45° = 0.71 |
|
50° |
|
|
|
|
60° |
10 cm |
5.0 cm |
cos 60° = 0.50 |
|
70° |
|
|
|
|
80° |
|
|
|
The Cosine Ratio
Look at the table of cosines you prepared. What do you notice about the value of the cosine ratio? When the angle is close to 0°, what happens to the cosine ratio as you move from 0° to 80°? How does this compare to what happens with the sine ratio?
As you have seen just seen and as their names suggest, cosine and sine ratios are related. You will now explore some other relationships that exist between the cosine and sine ratios.
Fill in the sine ratios in the table. What pattern can you see between the cosine and sine ratios?
|
Angle |
Cosine |
Angle |
Sine |
|
10° |
0.98 |
80° |
|
|
20° |
0.94 |
70° |
|
|
30° |
0.87 |
60° |
|
|
40° |
0.77 |
50° |
|
|
50° |
0.64 |
40° |
|
|
60° |
0.50 |
30° |
|
|
70° |
0.34 |
20° |
|
|
80° |
0.17 |
10° |
|
Consider the following right triangle.
So, cos R = sin P.
In Get Started you reviewed complementary angles. In the most recent triangle, ∠R and ∠P are complementary angles.
Therefore, the cosine of an angle is the sine of its complementary angle. In other words, the cosine of an angle and the sine of the angle’s complement match.
The cosine is just the sine of the complement angle. That’s where the name cosine comes from!
Just as for the sine ratio, you can use your calculator to determine the cosine ratio. Be sure your calculator is set to degree mode.
Example 3
Find the value of each of the following. Express each value so that the value is correct to 4 decimal places. Use your calculator.
- cos 45°
- Use your result from a. to find the sine ratio of the complement of 45°.
- cos 60°
- Use your result from c. to find the sine ratio of the complement of 60°.
Solution
- To find cos 45°, press this sequence of keys. If you do not obtain the same numbers in your calculator display, consult your manual. Calculators can vary in the order of key strokes.

You should see something like this.

So, cos 45° 0.7071.
- The complement of 45° is also 45°, since 45° + 45° = 90°.
So, sin 45° = cos 45° 0.7071.
- To find cos 60°, press this sequence of keys. If you do not obtain the answer shown, consult your manual.

You should see something like this.
So, cos 60° = 0.5.
- The complement of 60° is 30°, since 60° + 30° = 90°.
So, sin 30° = cos 60° = 0.5000.
Self-Check
Use your calculator to complete the following table.
SC 7. Complete this table. Round to four decimal places.
|
Angle |
Cosine |
|
10° |
|
|
20° |
|
|
30° |
|
|
40° |
|
|
45° |
0.7071 |
|
50° |
|
|
60° |
0.5000 |
|
70° |
|
|
80° |
|
1.27. Page 5
Module 7: Trigonometry
Working with the Cosine Ratio
In the next example you will apply your calculator skills to help you solve a problem involving the cosine ratio. There is not much difference between applying the cosine ratio and applying the sine ratio. All you have to remember is that, for the cosine ratio, the adjacent side is used rather than the opposite side.
Example 3
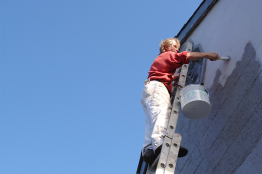
© EML/shutterstock
Angela is painting the exterior of her house. On one side, there is a 5-ft-wide flower garden along the wall. Angela does not want to place the foot of the ladder on her flowers. However, for safety, the ladder must be positioned at a 75° angle with the ground. The ladder is 15 ft in length. Can Angela avoid damaging her flowers if she places the ladder at the correct angle?
Solution
Draw a diagram.
Let x be the distance the foot of the ladder is away from the wall when the ladder leans at 75° to the ground.
Substitute into the formula.
To calculate x, press these keys.
![]()
![]()
The foot of the ladder must be 3.9 m from the wall. Angela will not be able to avoid her flowers. However, with a longer ladder she could avoid the flowers.
 Self-Check
Use the method outlined in Example 3 to solve this question.
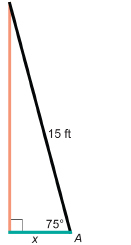
SC 8. Solve for x. Round to two decimal places.

Another Angle
You have just seen how an unknown side in a right triangle can be determined using the cosine ratio. You found the cosine ratio from the given measure of an angle. But can you go in the other direction? Can you find the measure of an angle from the cosine ratio?
For instance, suppose you were told that the cosine of an angle in a right triangle is 0.8. What would that angle be?
Example 4
If cos A = 0.8, determine ∠A to the nearest degree.
View the animated “Cosine Solution.”
Self-Check
Practise finding angles given the cosine ratio.
SC 9. Find ∠A given cos A = 0.6.
To find the angle, use both methods shown in Example 4.
SC 10. Use your calculator to find each angle from its cosine. Round your answers to the nearest tenth.
|
sin A |
∠A |
|
0.1257 |
|
|
0.7826 |
|
|
0.9000 |
|
|
|
|
|
|
|
SC 11. Find ∠A to the nearest tenth of a degree.
 Mastering Concepts
Try this question. When you are finished, check your answer.
MC 1. ΔPQR is a right triangle.

- For ΔPQR, write the ratios for sin P, cos P, sin R, and cos R.
- How are these ratios related?
- How are ∠P and ∠R related?
1.28. Page 6
Module 7: Trigonometry
Lesson 5 Summary

The skeleton track built for the Vancouver 2010 Winter Olympics is 1450 m in length, and the steepest section is at corner 2. This corner has a 20% grade—this means the angle of elevation for the track is 11.3°. Now that you have an understanding of trigonometry, you could have calculated this angle by measuring the height of the track and the distance along the ground. The engineers who built and designed this track would have to make sure their trigonometry skills were sharp!
In this lesson, you explored these questions:
What is the cosine ratio?
How is the cosine ratio used to find unknown sides and angles in right triangles?
Check your level of understanding of the materials covered in this lesson by completing “Lesson 5 Traffic Lights.” If you select an amber or red traffic light in the multimedia piece, you will receive information about additional work you can complete to improve your understanding of the topics. Complete the suggested work before you proceed to the Lesson 5 Assignment. If you experience difficulty, contact your teacher before starting the Lesson 5 Assignment.
To answer these questions, you explored the definition of the cosine function as the ratio of the side adjacent to the hypotenuse for a given acute angle in a right triangle. You used this ratio to find missing sides and missing angles.
 Assignment
Retrieve the Lesson 5 Assignment Booklet you saved in your course folder at the start of this lesson. Complete the Assignment.
Resave your Assignment Booklet in your course folder and submit a copy to your teacher for assessment.
1.29. Lesson 6
Module 7: Lesson 6
Lesson 6: Using Cosines to Solve Problems
Focus
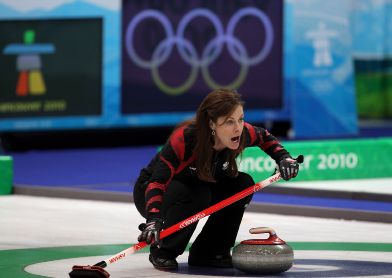
Alex Livesey/Getty Images Sport/Getty Images
In the photograph, skip Cheryl Bernard of Calgary is calling out instructions to her sweepers. Skip Bernard and her rink won the silver medal in women’s curling at the 2010 Winter Olympics in Vancouver.
Curling can be a game of inches. The difference between winning and losing can depend on the sweepers’ ability to determine at what pressure and speed to sweep the rock. Success can also depend on how accurate the curler was when she released the stone.
From the point where a curler must release her rock to the centre of the rings at the other end of the rink is 93 ft. Suppose the skip positions her broom along the T-line in the house at 2.5° to the right of the centre line, as seen from the curler who is throwing the stone.
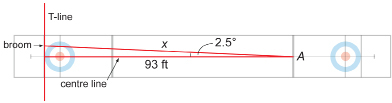
How far is the broom, to the nearest inch, away from the point where the curler must release the stone?
Lesson Questions
In this lesson you will explore this question:
How is the cosine ratio used to solve a variety of practical problems?
Assessment
You will complete the Lesson 6 Assignment Booklet for assessment. Download the Lesson 6 Assignment Booklet and save it in your course folder now. You will receive instructions on how to complete the Assignment Booklet later in the lesson.
Remember to save all of your work in your course folder.
Required Materials and Equipment
You will need your tape measure and your calculator.
1.30. Page 2
Module 7: Lesson 6
Get Started
In this activity you will review how the cosine ratio is used to find an unknown side or angle in a right triangle.
 Try This
Work with a partner, if possible.
You will use the math interactive “Exploring Trig Ratios—Explore It” to review how to apply the cosine ratio to find a missing side or angle in a right triangle. Follow these tips:
First make sure you are in “Explore It” mode and that Reference Angle is initially set to R.
Select cos R under Function to explore the cosine ratio.
Choose one of the options under Unknown to determine the unknown side or angle in the right triangle.
Resize the triangle by using the Scale slider, or drag the movable vertices.
Continue your exploration with S selected as the Reference Angle.
TT 1. Examine the steps used to solve for your unknown. How do the steps for solving for an unknown angle differ from those used to find an unknown side?
Save your work in your course folder. If you still have questions, ask your teacher.
Now you are ready to explore problem situations involving the cosine ratio.
Explore
In this activity you will determine the angle between the diagonal of a rectangular room and one of the room’s walls.
Try This
In this activity you will need an imperial tape measure and your calculator. Work with a partner, if possible.
Step 1: Choose a rectangular room in your home or school in which you will use your tape measure to take measurements.
Step 2: Measure the length of one of the walls to the nearest inch. Then measure the diagonal distance from one corner of the wall you measured, across the room, to the opposite corner. Again, measure to the nearest inch.
TT 2. Use your measurements to draw and label a diagram that describes your situation.
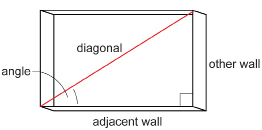
TT 3. Use the cosine ratio to calculate the angle between the adjacent wall and the diagonal. Show all steps.
TT 4. Because your measurements were in feet and inches, what did you have to do with these measurements before you could determine the angle?
 Share
Share
You are now going to share your answers to the TT 2 to TT 4 questions. Remember that sharing work is an important part of learning. To make the most of your sharing opportunity, be sure that you complete these tasks.
-
Complete TT 2 to TT 4 to the best of your ability. Have the answers in a form that you can easily share with another student or, if directed, with your teacher.
-
Use the discussion area for your class, or another method indicated by your teacher, to post your answers and to view the work of people you are sharing with.
-
Compare your answers. Identify where you have similar answers and where your answers are different. Discuss all differences between your answers until you have an agreement. If necessary, you may wish to involve your teacher in your discussion.
Revise your answers where necessary.
Save the revised copy of your work, including your diagram and measurements, in your course folder. Consult your teacher about whether you are to save a transcript of your discussion in your course folder as well..
1.31. Page 3
Module 7: Lesson 6
Bringing Ideas Together
In Explore you checked indirect measurement and the cosine ratio. You used the following relationship to find the angle between the adjacent side (the wall) and the hypotenuse (the diagonal).

![]()
As you did in Explore, this relationship can be used to find an angle. This relationship can also be used in a variety of problem situations to determine the hypotenuse or the adjacent side if you are given the angle and one of these two sides. Study the following examples.
Example 1
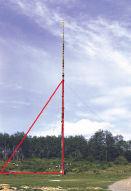
Photo copyright SFU Museum of Archaeology & Ethnology. Used with permission.
A radio transmission tower is supported by a series of guy wires. One such wire is attached to the ground 10 m away from the foot of the tower. How long is the guy wire if it makes a 50° angle with the ground? Round to one decimal place.
View the animated “Guy Wire Solution.”
Did You Know?
The ancient Greeks used the word theamata instead of the word wonders. Theamata means “things to be seen.” Like the Mayan pyramids or the Inca city of Machu Pichu, the pyramids are one of the world’s wonders to be seen!
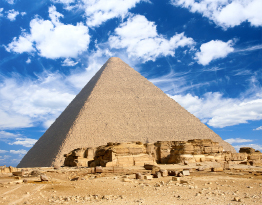
© Maksym Gorpenyuk/shutterstock
Example 2
The Great Pyramid of Khufu at Giza was built more than 4500 years ago. Of the seven wonders of the ancient world, this pyramid is the only one still standing. It stands on a square base with a side length of approximately 230 m. The shortest distance from the apex of the pyramid to the ground along a slanted face of the pyramid is 186 m. That is, the slant height of the pyramid as measured along the middle of a face is 186 m. At what angle is the slant face inclined to the horizontal? Round to the nearest tenth of a degree.
Solution
Draw a diagram.
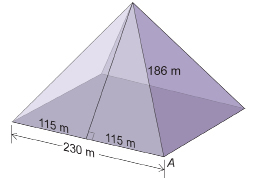
The cross-sectional view of the pyramid can be split into two right triangles, each with a base of 115 m. The base of the pyramid = 2 × base of each right triangle; 230 m = 2 × 115 m.
Let ∠A be the angle of elevation.
Substitute into the formula.
The slant side is inclined at 51.8° to the horizontal.
Example 3
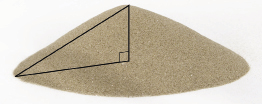
© vita khorzhevska/shutterstock
A conical pile of dry sand has a slant side 2 m in length. If the angle the conical surface makes with the ground is 31°, what is the radius of the pile? Round to one decimal place.
Solution
Draw a diagram.
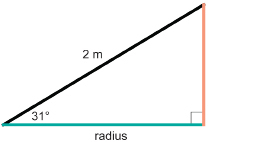
Let x be the length of the radius.
Substitute into the formula.
The radius of the sand pile is approximately 1.7 m.
It is your turn to practise these skills!
1.32. Page 4
Module 7: Lesson 6
 Self-Check
Apply the sine ratio to find unknown sides and angles.
SC 1. The Broadway Bridge in Portland, Oregon, was constructed in 1913 over the Willamette River. Two spans, each 42 m in length, may be raised to an angle of 89° to the horizontal.
© Charles Noble/shutterstock
In the photograph, one span is being raised. Suppose the span is raised to the full 89°. This situation is represented by this diagram.
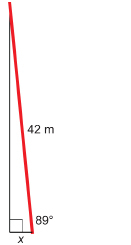
Use the diagram to determine how far the upper end of the span would extend towards the river beyond the lower end. Calculate this distance to one decimal place.
SC 2. Simon is framing his basement. To nail a vertical stud (2-by-4) to the horizontal bottom plate, Simon angles a ![]() -in nail 30° to the vertical stud and 2 in from the joint.
-in nail 30° to the vertical stud and 2 in from the joint.
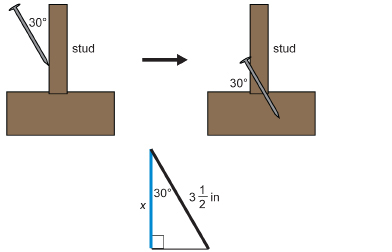
Simon says that when the nail is driven in at 30°, the tip will be at least 1 in below the surface of the bottom plate.
Is Simon correct?
SC 3. Jim and Angus are part of a painting crew preparing to work on the exterior of an apartment building. They have just unloaded a 4-m ladder and are placing the ladder against an exterior wall.
Jim says, “I know that safety experts recommend ladders be positioned at an angle of 75° with the ground. But how do I determine that angle?”
Angus laughs, “Well, we don’t have a clinometer in the truck, do we?”
Can you help Jim and Angus by telling them how far to place the foot of the ladder from the wall? Show your solution.
SC 4. If the foot of the ladder described in SC 3 were placed 1.5 m from the wall, what would the angle be between the ladder and the ground?
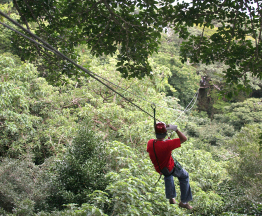
© Brandon Stein/shutterstock
SC 5. From the jungle canopy of Costa Rica to the Yukon Territory, zip lining is becoming a very popular activity. How long must a zip line be to carry people a horizontal distance of 250 m if the angle of depression from the upper platform to the end of the line is 5°? Round to the nearest metre.
Before you get started, review “Angle of Depression” as a refresher.

 Mastering Concepts
As shown in the photograph, a lean-to is built against one wall of a barn.

© Bellajay/shutterstock
The roof of the lean-to is 30 ft long. Its horizontal width is 12 ft. As shown in the diagram, the roof is inclined at 20° to the horizontal.
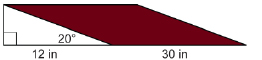
To the nearest square foot, what is the area of the lean-to’s roof?
1.33. Page 5
Module 7: Lesson 6
Lesson 6 Summary
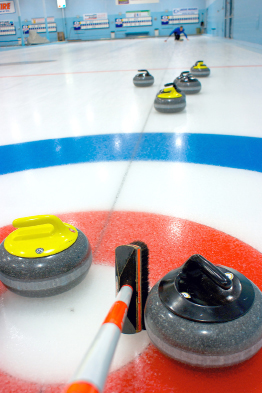
© Phillip Durand/shutterstock
Curling is a game of skill and strategy. Placing guards (putting rocks in the way of opposition rocks), deciding where to position stones in the house (the red, white, and blue circled area), or determining whether to remove an opponent’s stone are some decisions to make in every end.
A key to winning or losing in curling is the skill to carry out decisions. This includes placing the rocks accurately when they are thrown. Having an understanding of the physics and geometry of the path a rock will take may give players a deciding advantage.
In this lesson you explored this question:
How is the cosine ratio used to solve a variety of practical problems?
Check your level of understanding of the materials covered in this lesson by completing “Lesson 6 Traffic Lights.” If you select an amber or red traffic light in the multimedia piece, you will receive information about additional work you can complete to improve your understanding of the topics. Complete the suggested work before you proceed to the Lesson 6 Assignment. If you experience difficulty, contact your teacher before starting the Lesson 6 Assignment.
To answer this question, you reviewed the definition of the cosine function as the ratio of the side adjacent to the hypotenuse for a given acute angle in a right triangle. You used this ratio to find missing sides and missing angles in a variety of practical problems.
 Assignment
Retrieve the Lesson 6 Assignment Booklet you saved in your course folder at the start of this lesson. Complete the Assignment.
Resave your Assignment Booklet in your course folder and submit a copy to your teacher for assessment.
Unit 3 Project
Before you move on to Lesson 7, you should take a look at your Unit 3 Project topic. Look for right triangles and places where the cosine ratio could help you find a length measurement or angle measurement. Make sure you keep any sketches and calculations in your course folder for use in your presentation. For more information about this step and later steps, refer to the Unit 3 Project.
1.34. Lesson 7
Module 7: Trigonometry
Lesson 7: General Problems
Focus
Matt Hage/The Canadian Press
At the 2010 Winter Olympics in Vancouver, athletes from Canada’s Arctic demonstrated traditional Inuit and Dene games. In the past, these games involving strength and agility helped prepare Northerners to survive in a harsh environment.
In this photograph, the athlete is competing in the two-foot high kick (Akratcheak). The participant can either launch herself from a running or standing position with her legs no more than shoulder-width apart. With her legs parallel, the athlete must strike the suspended object with both feet. She must then land on both feet no more than a shoulder-width apart.
Through what angle from the vertical would you estimate this athlete has swung her legs to strike the suspended object? Would it be possible to draw a right triangle that contained this angle? Why or why not?
Lesson Questions
In this lesson you will explore this question:
-
How are the appropriate trigonometric ratios identified and applied to a variety of practical problems?
Assessment
You will complete the Lesson 7 Assignment Booklet for assessment. Download the Lesson 7 Assignment Booklet and save it in your course folder now. You will receive instructions on how to complete the Assignment Booklet later in the lesson. You will also be prompted to work on the Unit 3 Project.
Remember to save all of your work in your course folder.
Required Materials and Equipment
You will need your problem-solving skills and your calculator.
1.35. Page 2
Module 7: Trigonometry
Get Started
In this activity you will investigate memory aids to remember the definitions of sine, cosine, and tangent.
 Try This
Work with a partner, if possible.
Look at the following diagram.

Do you remember how the sides of the right triangle are identified in relation to ∠A? What are the definitions for sin A, cos A, and tan A?
![]()
![]()
![]()
The first letters from the definitions spell SOH-CAH-TOA. This word is pronounced Soak a Toe! Ahhh.
For some people, just the word SOH-CAH-TOA is enough to help them remember the trig ratios. Others find that attaching words to each letter of SOH-CAH-TOA helps them remember. No one method is best. You must find a method that works for you!
TT1. Randy remembers SOH-CAH-TOA this way.
SOH Saskatoon Our Home (Randy lives in Saskatoon.)
CAH Calgary Alberta Hockey (The Calgary Flames are Randy’s favourite team.)
TOA Toronto Ontario Aunt (Randy’s favourite aunt lives in Toronto.)
Randy’s choices aren’t the choices you will make, but use Randy’s method to pick words you will easily remember.
TT2. Jenn uses the first letter of each word in the following sentence to remember SOH-CAH-TOA.
Sweep Over Here, Cathy, Aunt Hazel’s Tossing Oatmeal Again!
Make a sentence you will easily remember.
 Share
Share
Share the memory aids you created for TT 1 and TT 2 with a partner or with a group. Explore some of the memory aids created by others. Which of these memory aids will help you most?
Save a copy of your favourite memory aid in your course folder.
Explore
In previous lessons, questions were grouped by trigonometric ratio. In Lessons 1 and 2, you examined the tangent ratio and its applications. Then in Lessons 3 and 4, you studied the sine ratio. And in Lessons 5 and 6, you dealt with the cosine ratio. But suppose you are given a general problem involving one or more trigonometric ratios. How do you decide which ratio to use?
In this activity you will use trigonometric ratios—sine, cosine, and tangent—in a game of mini golf.
Try This
Work with a partner, if possible.
You will play mini golf with “Exploring Trig Ratios—Use It.” In previous lessons you used the “Explore It” features of the “Exploring Trig Ratios” interactive. This time, select “Use It.” By answering each trigonometry question correctly, you will make your way from tee to green!
TT 3. Which ratio do you find easiest to remember? Why? Did your memory aid from Get Started help you remember the ratios?
TT 4. Which do you find easier, finding angles or finding sides? Why?
Discuss these answers with your teacher.
1.36. Page 3
Module 7: Trigonometry
Bringing Ideas Together
In Explore you applied the definitions of sine, cosine, and tangent to find missing sides and angles.

![]()
![]()
![]()
Did you use SOH-CAH-TOA to help you recall these definitions?
solve a right triangle: to find all the missing sides and angles in a right triangle
You will now apply these definitions in problem situations where you have to solve a right triangle.
In Example 1 you are given the measure of one side and one angle of a right triangle. From this information you will find the missing sides and angles.
Example 1
In ΔRST, ∠S = 90°, ∠T = 62°, and s = 8 cm. Solve ΔRST. Round to one decimal place when appropriate.
Solution
Draw a diagram.
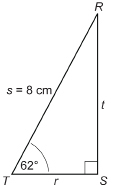
∠R |
|
∠T |
62° |
∠S |
90° |
Side s |
8 cm |
Side r |
|
Side t |
You must find ∠R and sides r and t.
Remember that all the angles in a triangle add up to 180°.
Next, find side r.
Side r is adjacent to the given angle, ∠T. You know the hypotenuse, s.
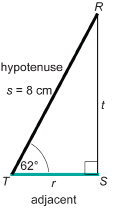
SOH-CAH-TOA
Side r is approximately 3.8 cm.
Lastly, find side t. Side t is opposite to the given angle, ∠T. You know the hypotenuse, s.
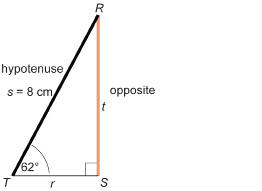
SOH-CAH-TOA
Side t is approximately 7.1 cm.
In Example 2 you are given the measure of two sides in a right triangle. From this information you will find the missing side and all the unknown angles.
Example 2
In ΔDEF, ∠F = 90°, d = 5 cm, and f = 8 cm. Solve ΔDEF. Round to one decimal place when appropriate.
View the animated “Solving a Triangle: Triangle DEF Solution”
As you may have noticed, there are many ways to solve these problems. Depending on the order you solved for the unknowns, you may have chosen different trigonometry ratios to find the unknowns. Ultimately, whatever methods are used, the final solutions for the unknowns will be the same.
1.37. Page 4
Module 7: Trigonometry
 Self-Check
Solve each right triangle.
SC 1. In ΔPQR, ∠Q = 90°, p = 5 cm, and r = 12 cm. Solve ΔPQR. Round to one decimal place when appropriate.
SC 2. In ΔABC, ∠C = ∠A = 30° cm, and a = 6 cm. Solve ΔABC. Round to one decimal place when appropriate.
Deciding on a Trigonometric Ratio
In most practical trigonometric problems you will not be trying to find all the missing side lengths and angle measures. You will usually have to decide which ratio is required to save yourself time.
Example 3
Eldon is watching a hot-air balloon drifting over a cellphone tower 200 m away. Using his clinometer, Eldon measures the angle of elevation of the balloon. Find the height, to the nearest metre, of the balloon if the angle of elevation is 27°.
Solution
Draw a diagram.
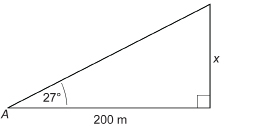
The side length of the triangle to be found is the height of the balloon, x, which is the length of the opposite side from the given angle of elevation, 27°.
The given side (the distance to the balloon) is the side adjacent to the angle of elevation.
Since the opposite side and the adjacent side will be used in this problem, you will need the tangent ratio.
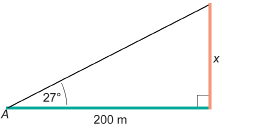
SOH-CAH-TOA
The balloon is approximately 100 m above the ground.
Self-Check
Solve each problem by first drawing a diagram.
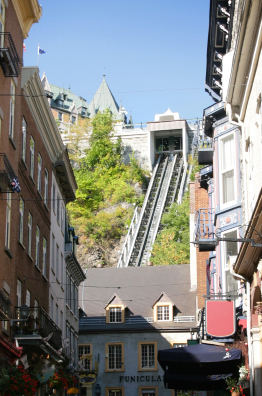
© pink candy/17199442/Fotolia
SC 3. The funicular railway (Funiculaire du Vieux-Québec) in Québec City, built in 1879, carries passengers from the historic district of the lower town to the upper town. It is 64 m in length with a vertical height of 59 m. To the nearest degree, what is the angle at which the tracks are inclined to the horizontal?
SC 4. A garden plot in the corner of Iris’ yard is in the shape of a right triangle, as illustrated. What is the plot’s area? Round your answer to the nearest square foot.
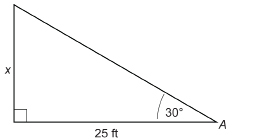
© MTomicic/19334317/Fotolia
SC 5. British Columbia joined Confederation in 1871 on the condition that a railroad would be built to join the province to the rest of Canada.
The transcontinental railroad was competed in 1885. However, the original line through the Kicking Horse Pass had a grade so steep it presented a danger to trains and their crews. Near Field, two spiral tunnels were completed in 1909. These tunnels were constructed inside the mountains to lengthen the track and reduce the grade’s steepness. The portals of the Upper Tunnel can be seen in the photograph.
A train travelling east and entering the Lower Tunnel travels 891 m before exiting the tunnel 15 m higher than when it entered. What is the Lower Tunnel’s average slope to the nearest tenth of a degree?
 Mastering Concepts
The spiral threads on a bolt may be modelled by wrapping a paper right triangle around a cylinder.


© Diego Cervo/shutterstock
A bolt with a 1-in diameter and a coarse thread, similar to the one in the photograph, must be turned all the way eight times around to advance the bolt 1 in onto the nut. What is the slope of the threads to the nearest tenth of a degree?
1.38. Page 5
Module 7: Trigonometry
Lesson 7 Summary
© Sol Neelman/Corbis/All rights reserved.
One of the events of the Arctic Winter Games is the sledge jump. For this event, ten sledges are arranged in a row. The athlete must first jump over each of the lined-up sledges and then, with one additional jumping motion, turn around to jump over the sledges again in the opposite direction.
If you have competed in similar events, either locally or nationally, you know the pride these athletes must feel in their accomplishments!
If you have selected a sport as the focus of your Unit 3 Project, and if you have chosen trigonometry as the mathematics concept you want to develop, now is the time to complete this part of your project.
Take pride in everything you do!
In this lesson you explored this question:
-
How are the appropriate trigonometric ratios identified and applied to a variety of practical problems?
Check your level of understanding of the materials covered in this lesson by completing “Lesson 7 Traffic Lights.” If you select an amber or red traffic light in the multimedia piece, you will receive information about additional work you can complete to improve your understanding of the topics. Complete the suggested work before you proceed to the Lesson 7 Assignment. If you experience difficulty, contact your teacher before starting the Lesson 7 Assignment.
To answer these questions, you reviewed the definition of the sine, cosine, and tangent functions. You used these ratios to solve for unknown sides and angles in right triangles and to investigate a variety of practical problems.
 Assignment
Retrieve the Lesson 7 Assignment Booklet you saved in your course folder at the start of this lesson. Complete the Assignment.
Resave your Assignment Booklet in your course folder and submit a copy to your teacher for assessment.
Unit 3 Project
By now you should have completed Part A of the Unit 3 Project. Throughout all the lessons in Unit 3, you have been instructed to find examples of the different geometric principles and to connect these to examples in your chosen topic.
It is now time to begin working on Part B of the Unit 3 Project. Think of one specific problem or challenge related to your topic that a knowledge of geometry can help to solve.
For more information about this step, refer to the Unit 3 Project.
1.39. Lesson 8
Module 7: Trigonometry
Lesson 8: Spatial Reasoning Puzzles and Games
Focus
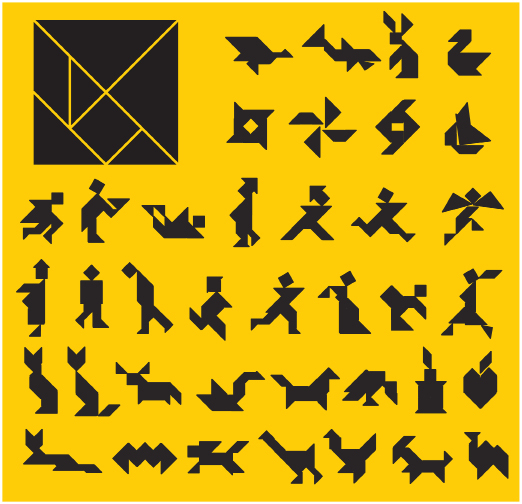
© KamiGami/shutterstock
The tangram is a popular puzzle thought to have originated in China well over two centuries ago. This type of puzzle was introduced to the Americas at the beginning of the nineteenth century. The tangram is still popular here in Canada and elsewhere!
Part of the tangram’s popularity is its union of geometry and art. The puzzle pieces that fit together to form a square can be rearranged to form countless shapes and figures, as shown in the image. What figures can you make using the same shapes?
In this lesson you will explore puzzles and games that involve geometric shapes. The tangram is one of these puzzles.
Lesson Questions
In this lesson you will explore these questions:
-
What are some strategies you can use to solve puzzles and win games?
-
How can you adapt a current puzzle or game to create your own puzzle or game?
Assessment
You will complete the Lesson 8 Assignment Booklet for assessment. Download the Lesson 8 Assignment Booklet and save it in your course folder now. You will receive instructions on how to complete the Assignment Booklet later in the lesson. You will also be prompted to continue working on the Unit 3 Project.
Remember to save all activities, including those that are not part of the Assignment, in your course folder.
Required Materials and Equipment
You will need half-inch grid paper, various puzzle templates, scissors, coloured markers, an old file folder or cardboard on which to glue the templates, and a glue stick.
1.40. Page 2
Module 7: Trigonometry
Get Started
In this activity you will investigate the tangram puzzle.
 Try This
Work with a partner, if possible.
Step 1: Print Tangram Template.
Step 2: Glue the printed Tangram Template to the back of an old file folder or heavy cardstock. Then, carefully cut out the seven pieces. You will end up with five triangles, one square, and one parallelogram.
Use a blue marker to colour the back of the parallelogram, since you may have to flip the parallelogram over to solve certain puzzles. You will not have to colour the backs of the other pieces, as they will not be flipped over.
Step 3: Now that you have cut the pieces apart, see if you can form the square or the other tangram shapes shown at the beginning of this lesson. You must use all seven pieces to form each shape. You must not overlap the pieces, but you can rotate pieces and even flip the parallelogram over. Are you totally stuck? If so, glance at the image Tangram Solutions shown at the end of this activity. Tangram Solutions show the lines separating the shapes so you can see how the shapes were made.
Step 4: Come up with your own shapes to challenge your partner. Draw an outline of your shape to show your partner, and then see if she or he can use the tangram pieces to solve your puzzle.
To design your own shapes, you can use the pieces you cut out or you can use an online tangram applet. You may find an applet by doing a search with the group of words “standard tangram puzzle.”
TANGRAM SOLUTIONS
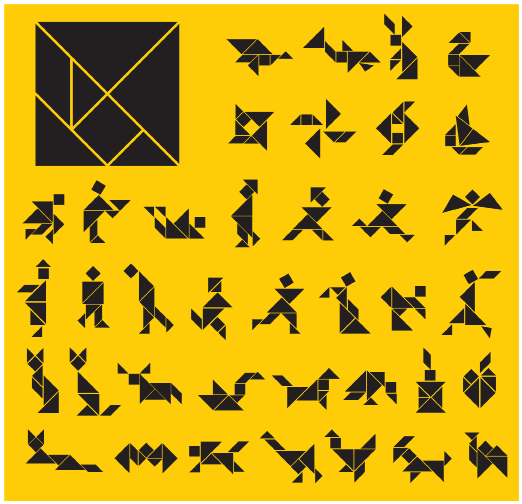
© KamiGami/shutterstock
 Self-Check
The areas of the seven tangram pieces are related. Assume that the original square from which you cut the seven pieces was 4 in on each side.
SC 1. What is the area of the original square?
SC 2. Together, what is the area of the large red triangle and the large yellow triangle? How do you know? What is the area of each of the large triangles?
SC 3. What is the area of the green triangle? How do you know?
SC 4. What is the area of each of the purple triangles? How do you know?
SC 5. How are the areas of the small square and the parallelogram related? What is the area of each?
1.41. Page 3
Module 7: Trigonometry
Explore
You have just investigated the tangram puzzle. That puzzle did not require numbers or equations. Rather, it involved spatial reasoning.
Another popular game and puzzle that involves spatial reasoning is pentominoes. The word pentominoes was coined by Solomon Golomb more than 50 years ago during a speech he delivered to a mathematics club at Harvard University. The word pentomino describes a shape formed by joining five identical squares. Each square in the set of five shares at least one side with another square. There are 12 such arrangements.

Because these pentominoes can be flipped over and rotated during play, the following arrangements, for example, would all be considered the same!
 Try This
In this activity you will play games and solve puzzles based on pentonimoes. You will also analyze your strategy. But first, you will need to construct the pieces and the board.
You have a choice. You can play an “Online Game of Pentominoes,” or you can download the Paper Version of Pentomino Game Pieces and Pentomino Game Board. If you choose to play an online game, try searching the Internet using the term “Scholastic Play Pentominoes.”
If you are using the paper version, follow these instructions to prepare the game pieces and board.
-
Glue the pentomino pieces onto a card, such as an old file folder, and then cut out the pieces.
-
Since the game pieces can be flipped over, you may wish to use your coloured markers to make the back of each piece match the front.
-
Draw the black grid lines on the back as well of the pieces as well.
-
Glue the game board to a cardboard file folder or other cardstock.
Rules of Play
This is a game for 2, 3, or 4 players.
-
Players take turns placing a piece of their choice anywhere on the game board. The pentonimoes may be rotated or flipped over, but they must be placed on unoccupied squares on the board.
-
Pieces may touch or be placed side-by-side. However, the pieces must not overlap!
-
If there are two players, the first player who cannot place a piece on the board loses.
-
If three or more players begin, the first player who cannot place a piece on the board is eliminated. The board is cleared, and the remaining players play a second round. Players are eliminated until a winner is declared!
Play several games until you are comfortable that you can share your game strategy with other students.
Now answer these questions.
TT 1. Look at these drawings.
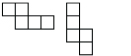
Do these drawings represent the same pentomino piece? Why or why not?
TT 2. Look at these drawings.
![]()
Do these drawings represent the same pentomino piece? Why or why not?
TT 3. If you were coaching a younger brother or sister to play the pentomino game, what strategies would you recommend your sibling use to win the game?
 Share
Share
Share the strategies you recommended in TT 3 with a partner or group.
What new strategies did you learn from others? Which strategies are most likely to help you win a game of pentonimoes? Which strategies do you think will have no effect on your success?
Summarize your favourite strategy and your least-favourite strategy in a paragraph, and save this information in your course folder.
1.42. Page 4
Module 7: Trigonometry
Bringing Ideas Together
In Explore, you investigated strategies for playing pentonimoes on a game board consisting of an 8 × 8 grid. There are 64 squares on the game board. Because each of the 12 pentominoes is made up of 5 squares, it is possible to place all 12 on the board with 4 squares left uncovered. This is because 12 × 5 = 60, and 64 – 60 = 4.
Variations of pentominoes are puzzles in which you are asked to completely cover a rectangle or square with pieces chosen from your set of 12 pentominoes. You can rotate the pieces you select, and you can flip them over, but you can’t overlap them.
For the next part of the lesson you will need to download a copy of ![]() -inch Grid Paper to make the square or rectangles on which to arrange your pentonimoes.
-inch Grid Paper to make the square or rectangles on which to arrange your pentonimoes.
Example 1
- How many pentonimoes are needed to completely cover a rectangle with an area of 15 squares?

- Find at least one solution to this puzzle.
Solution
- There are 15 squares to cover. You will need 3 pentominoes, since 3 × 5 = 15.
- Here is one solution.
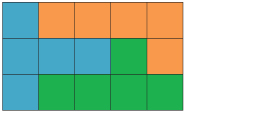
Now, puzzle these!
 Self-Check
To answer these questions you will have to print at least two copies of ![]() -inch Grid Paper from which to cut the rectangles.
-inch Grid Paper from which to cut the rectangles.
SC 6. Find one other way to cover the 15-square rectangle in Example 1.
SC 7. Find at least one way to cover a 4 × 5 grid completely.
SC 8.
- Could you create a puzzle in which you must cover a 4 × 7 grid completely with pentonimoes? Why or why not?
- List three sizes of grids you might be able to completely cover.
- What would the area of the largest grid be that could be completely covered with your 12 pentonimoes? List three possible grids with this area.
As you have seen in SC 1 and SC 2, you can only cover rectangles and squares with areas of multiples of 5. You might like to try a 5 × 5 grid, or a 5 × 6 grid, or even a 5 ×12 grid.
 Mastering Concepts
When you have a problem, what type of strategies do you use to solve the issue? Here are some more common problem-solving strategies:
-
identify knowns and unknowns
-
use trial and error
-
look ahead and anticipate
-
work backwards
-
apply similar processes
-
look for patterns
-
make a systematic list
-
draw or model
-
eliminate possibilities
-
simplify the problem—get rid of extraneous data
-
search the Internet for help
In Lesson 7 you used tables to identify knowns and unknowns to help organize your known and unknown information. This strategy can help to simplify a problem by getting rid of extraneous information.
Can you think of another time you have used one of the listed strategies to solve a problem either in math or anywhere in your life?
What strategies have been used during this lesson?
1.43. Page 5
Module 7: Trigonometry
Lesson 8 Summary
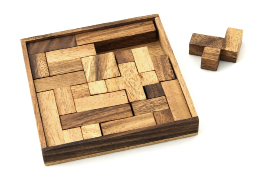
© Philip Date/shutterstock
At the beginning of this lesson, you were introduced to the tangram—a puzzle brought to North America from China. The tangram is an example of a spatial puzzle, which is a puzzle that involves the manipulation of two- or three-dimensional objects. As you discovered, the tangram puzzle brings geometry and art together. Did you create your own figures from the tangram shapes?
You also explored pentonimoes—shapes created from five squares! A wooden set of pentonimoes is shown in the photograph. Pentominoes can be used in games and puzzles. You can think up your own games and puzzles using pentominoes; the only limit is your imagination!
In this lesson you explored the following questions:
-
What are some strategies you can use to solve puzzles and win games?
-
How can you adapt a current puzzle or game to create your own puzzle or game?
Check your level of understanding of the materials covered in this lesson by completing “Lesson 8 Traffic Lights.” If you select an amber or red traffic light in the multimedia piece, you will receive information about additional work you can complete to improve your understanding of the topics.
Complete the suggested work before you proceed to the Lesson 8 Assignment. If you experience difficulty, contact your teacher before starting the Lesson 8 Assignment.
There are many examples of spatial puzzles and games on the Internet. If you enjoyed the activities in this lesson, you can always find more examples online. Remember to include “tangram” and “pentonimoes” as search terms. Often, websites featuring these two types of games have links to other types of puzzles and games. Good luck in your search!
 Assignment
Retrieve the Lesson 8 Assignment Booklet you saved in your course folder at the start of this lesson. Complete the Assignment Booklet. Resave your Assignment Booklet in your course folder and submit a copy to your teacher for assessment.
Unit 3 Project
This is the last lesson of this module. You should be working on Part B of your Unit 3 Project. For more information about this step, review the Unit 3 Project.
1.44. Module 7 Summary
Module 7: Trigonometry
Module 7 Summary
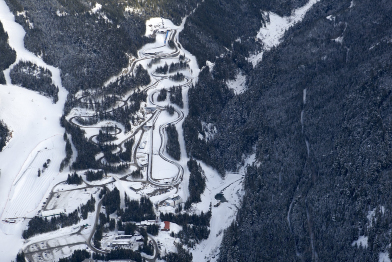
Simon Bruty/Sports Illustrated/Getty Images
The sliding centre built for the 2010 Winter Olympics at Vancouver and Whistler featured the sports skeleton, luge, and bobsled. The design of the sliding centre involved careful consideration of slope, vertical descent, and the track’s overall distance. You will recognize each of these terms from a number of problem situations solved using right-angle triangle trigonometry!
The trigonometry of right triangles and its application to sports, games, art, and design was the focus of this module. As you worked through this module you examined how the concepts from these lessons applied to games or art for your Unit 3 Project.
In this module you developed your skills as you investigated the following questions:
How can the trigonometric ratios, which are based on side and angle relationships found in right triangles, help to solve practical problems?
A picture can tell a story. The “Module 7 Lessons Summary” is a collection of images from each lesson that describe the math you explored. What do you remember about each image? Can you relate each image to something new you learned in this module?
Watch the “Module 7 Lessons Summary” now.