Lesson 2
| Site: | MoodleHUB.ca 🍁 |
| Course: | Math 30-1 SS |
| Book: | Lesson 2 |
| Printed by: | Guest user |
| Date: | Tuesday, 9 December 2025, 10:34 PM |
Description
Created by IMSreader
1. Lesson 2
Module 4: Foundations of Trigonometry
Lesson 2: Applications of Radians
Focus

iStockphoto/Thinkstock
The Reichstag dome is a glass dome built on top of the Reichstag building in Berlin, Germany. Inside the Reichstag dome are circular paths.
If you walked around one of these circular paths once, could you determine how far you had walked? How about three times? What would be different if you only hiked part of the circle? In each scenario, what would you need to know in order to determine how far you had walked?
In this lesson you will expand your knowledge of degrees and radians and determine how these units can be used in real-life situations.
Lesson Outcomes
At the end of this lesson you will be able to
- determine angles that are coterminal with a given angle
- determine the general form of all angles that are coterminal with a given angle
- explain the relationship between arc lengths, central angles, and the radius of a circle and solve problems using this relationship
Lesson Questions
You will investigate the following questions:
- How can angles with the same terminal arms be described?
- How can the relationship between the central angle, arc length, and radius in a circle be used to solve real-life problems?
Assessment
Your assessment may be based on a combination of the following tasks:
- completion of the Lesson 2 Assignment (Download the Lesson 2 Assignment and save it in your course folder now.)
- course folder submissions from Try This and Share activities
- additions to Glossary Terms and Formula Sheet
- work under Project Connection
1.1. Launch
Module 4: Foundations of Trigonometry
Launch
Do you have the background knowledge and skills you need to complete this lesson successfully? Launch will help you find out.
Before beginning this lesson you should be able to
- determine the circumference of a circle
- add and subtract fractions
1.2. Are You Ready?
Module 4: Foundations of Trigonometry
Are You Ready?
Complete these questions. If you experience difficulty and need help, visit Refresher or contact your teacher.
- A circle has a radius of 5 cm. Determine the circumference of the circle to the nearest tenth of a centimetre. Answer
- Add or subtract the following fractions.
- What is the difference between natural numbers and integers? Answer
If you answered the Are You Ready? questions without difficulty, move to Discover.
If you found the Are You Ready? questions difficult, complete Refresher.
1.3. Refresher
Module 4: Foundations of Trigonometry
Refresher
Review the circumference of a circle in Circumference.
Watch Fractions—Add and Subtract.
Review natural numbers and integers in Real Numbers.
Go back to the Are You Ready? section and try the questions again. If you are still having difficulty, contact your teacher.
1.4. Discover
Module 4: Foundations of Trigonometry
Discover
Try This 1
Open Coterminal Angles and answer the following questions.
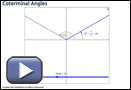
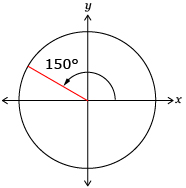
- Drag the slider at the bottom of the screen so that the blue terminal arm rotates counterclockwise to 150°. You can use the arrow keys on your keyboard to move the slider in smaller increments. The terminal arm should line up with the existing black terminal arm. This angle is recorded for you in the table that follows.
- From 150°, move the slider so that the blue terminal arm rotates counterclockwise until the blue terminal arm lines back up with the black terminal arm. Record this new angle, in degrees and radians, and sketch a diagram of the angle in the next row of a table like the one shown.
- Repeat the step you completed in question 2. Record the new angle and add a diagram to your table.
- Predict the next counterclockwise angle where the blue terminal arm would line up with the black terminal arm. Note this angle and add a diagram.
- Return the slider to 0°. Move the slider so that the blue terminal arm rotates clockwise until it lines up with the black terminal arm. Record this angle and add a diagram to your table (in the row marked Clockwise Angle).
- From this angle, move the slider so that the blue terminal arm rotates clockwise one more rotation to line up with the black terminal arm. Add the angle and diagram to your table.
- Predict the next counterclockwise angle where the blue terminal arm would line up with the black terminal arm. Record your prediction in your table.
Degrees Radians Diagram Counterclockwise Angle 150° 
Angle After One Counterclockwise Rotation Angle After Two Counterclockwise Rotations Angle Predicted After Three Counterclockwise Rotations Clockwise Angle Angle After One Clockwise Rotation Angle Predicted After Two Clockwise Rotations
![]() Save your responses in your course folder.
Save your responses in your course folder.
Share 1
Discuss your responses to Try This 1 with a classmate. In your discussion, respond to the following questions.
- What pattern do you see that could help determine the angle after multiple clockwise rotations? How is this different from the pattern for counterclockwise rotations?
- Coterminal Angles did not let you rotate the terminal arm more than 3 rotations. How could you determine the angle after 4 counterclockwise rotations? How about after 4 clockwise rotations?
- How is your process different depending on whether you are working in degrees or radians?
![]() If required, save a record of your discussion in your course folder.
If required, save a record of your discussion in your course folder.
1.5. Explore
Module 4: Foundations of Trigonometry
Explore
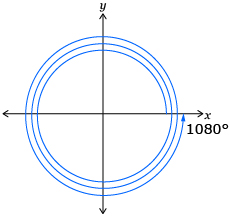
In Discover you saw that each counterclockwise rotation of the terminal arm increases the angle measurement by 2π, or 360°. For each clockwise rotation of the terminal arm, the angle measurement decreases by 2π, or 360°. In Try This 2 you will apply this understanding to determine the distance travelled by a horse.
Try This 2
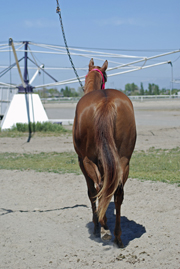
Sometimes a horse walker is used for horses that need rehabilitation. The horses are tied to a pole at the centre, and they walk at a constant rate around the circular horse walker.
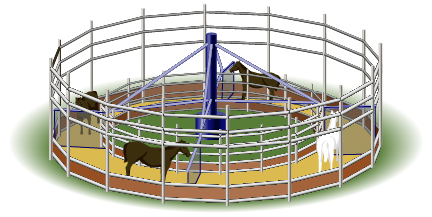
A horse walker has a radius of 6 m. The horses take 12 s to walk 1 revolution.
- What distance does a horse walk after 1 revolution? Place this information in a table similar to the one shown.

- What distance, and through what central angle, will the white horse travel after the times specified in the table?
- Complete the rest of the table.
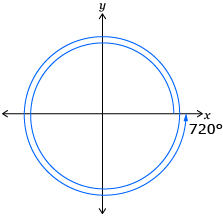
12 s 24 s 36 s Number of Revolutions 1 Distance Travelled by White Horse to the Nearest Tenth of a Metre 37.7 Diagram of Rotational Angle in Standard Position 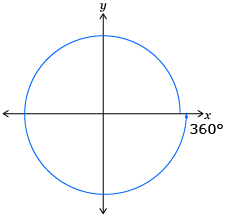
Angle of Rotation in Degrees 360° Angle of Rotation in Radians 2π -
How did you determine the distance travelled by the horse? Explain your process.
- Explain how you found the rotational angle.
- How do the terminal arms for each revolution compare?
![]() Save your responses in your course folder.
Save your responses in your course folder.
1.6. Explore 2
Module 4: Foundations of Trigonometry
All of the angles you used in Try This 1 and Try This 2 had terminal arms in the same position. Angles with the same terminal arm are called coterminal angles. The following angles are coterminal angles.
 |
 |
 |
Read “Coterminal Angles” and “Example 2” on pages 170 and 171 of the textbook. By the end of this reading you should understand the definition of coterminal angles, and you should know how coterminal angles are determined. As you read, think about the following questions:
- How are coterminal angles drawn?
- How are positive and negative coterminal angles determined?
- What are the differences between finding coterminal angles in degrees and finding coterminal angles in radians?
Self-Check 1
For each angle in standard position, determine one positive and one negative angle measure that is coterminal with the angle in standard position.1
1 Source: Pre-Calculus 12. Whitby, ON: McGraw-Hill Ryerson, 2011. Reproduced with permission.
1.7. Explore 3
Module 4: Foundations of Trigonometry
In Try This 1 you found patterns for coterminal angles. Since you can keep rotating the terminal arm counterclockwise or clockwise, there is an infinite number of coterminal angles. This means you can keep adding or subtracting multiples of 360° or 2π. You can use both of the following expressions to describe all possible coterminal angles.
θ ± (360°)n or θ ± 2πn, n ∈ N ![]()
θ + (360°)n or θ + 2πn, n ∈ I ![]()
Read “Example 3” on page 172 in the textbook. Notice the following as you read:
- All angles coterminal with a given angle can be expressed using the general form.
- When using the general form, it is important to explain what n represents by using n ∈ N. Otherwise, n is assumed to be all real numbers, which would then produce angles that are not coterminal with the original angle.
Self-Check 2
Complete questions 9.a., 9.b., 9.c., 11.a., 11.b., and 11.d. on page 176 of the textbook. Answer
1.8. Explore 4
Module 4: Foundations of Trigonometry
iStockphoto/Thinkstock
To this point in the lesson you have only been dealing with coterminal angles—angles where the terminal arms coincide. In Try This 3 you will explore angles formed by incomplete revolutions. You will explore how the distance a horse moves in a circle relates to the radian measure of the angle the horse travels.
Try This 3
In Try This 2 you looked at a horse walker with a radius of 6 m. The horses took 12 s to walk 1 revolution. You found the distance of 1 revolution to be


- What distance, and through what central angle, will the white horse travel after each specified amount of time that is less than 12 s? Complete a table similar to the one shown. The first column has been completed for you.
6 s 3 s 4 s Fraction of 1 Revolution of a revolutionDistance Travelled by White Horse to the Nearest Tenth of a Metre, or Arc Length
circumference × amount of a revolution
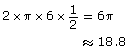 Diagram of Rotational Angle in Standard Position
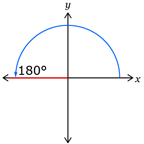 Angle of Rotation in Degrees
360° ×  = 180°Angle of Rotation in Radians
2π ×  = π
= π -
Explain how you determined the distance travelled by the horse.
- Explain how you determined the angle of rotation.
![]() Save your responses in your course folder.
Save your responses in your course folder.
Share 2
Discuss your responses to Try This 3 and the following questions with a classmate.
- How do your strategies compare for finding the distance travelled and the angle of rotation? What are the similarities and differences between your strategies and your partner’s strategies?
- What is the relationship between the distance around a circle (arc length) and the radian measure of the angle?
![]() If required, save a record of your discussion in your course folder.
If required, save a record of your discussion in your course folder.
1.9. Explore 5
Module 4: Foundations of Trigonometry
Different ways can be used to determine the distance the horse travelled in Try This 3. You may have seen that if you know what proportion of the circle was travelled and the circumference of the circle, you can calculate the distance travelled by the horse. A completed portion of the table from Try This 3 shows example calculations that could be used to find the distance and angle travelled.
| 4 s | |
| Fraction of 1 Revolution | |
| Distance Travelled by White Horse to the Nearest Tenth of a Metre, or Arc Length | circumference × amount of a revolution
|
| Diagram of Rotational Angle in Standard Position | 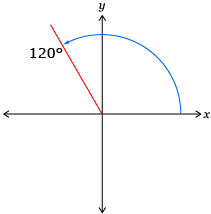 |
| Angle of Rotation in Degrees | |
| Angle of Rotation in Radians |
In Try This 4 you will see another way to look at the arc length around a circle. You will look at the relationship between arc length, radius, and central angle.
Try This 4
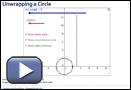
Step 1: Open Unwrapping a Circle and click on Show radius scale and Show radian measure.
Step 2: Change each arc length to match the value in the table that follows. Use your keyboard’s arrow keys to move the slider in smaller increments.
Step 3: Slide the Unwrap slider to the right to see the arc length of the circle stretched out, and then measure the length by the number of radii using the radius scale.
Complete a table like the one shown.
| Arc Length | Radian Measure of Angle (α) | Radius Scale |
| 2 | 1 | 1 r (radius) |
| 4 | ||
| 8 | ||
| 3.14 | ||
| 6.28 |
![]() Save a copy of your table in your course folder.
Save a copy of your table in your course folder.
Share 3
Discuss your responses with a classmate. In your discussion, address the following points.
- Based on the patterns you see in the table, how could you find the arc length if given the radian measure of the angle and the radius of the circle?
- What is the relationship between arc length, radius, and radian measure?
![]() If required, save a record of your discussion in your course folder.
If required, save a record of your discussion in your course folder.
1.10. Explore 6
Module 4: Foundations of Trigonometry
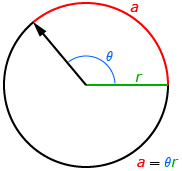
In Try This 4 you may have identified the relationship between arc length, radius, and central angle:
arc length = central angle in radians × radius of the circle
Using variables, this expression can be written as a = θr, where
- a is the arc length
- θ is the central angle in radians
- r is the radius (arc length and radius are measured in the same units)
Read “Arc Length of a Circle” on page 173 of the textbook to learn more about why arc length can be determined using the formula a = θr.
In Try This 3 you determined how far the horse walked, or the arc length for a partial rotation around a circle. In Try This 4 you found the relationship between the length of an arc, radius, and central angle. In Try This 5 you will try to calculate the length of an arc when you know the central angle and radius of the circle.
Try This 5
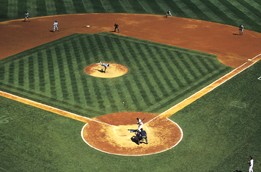
Comstock/Thinkstock
A baseball diamond can be thought of as part of a circle. At home plate, the central angle is 90° and the radius of the circle is 72 m, as shown in the diagram. Jane needs to build a fence around the outfield of a baseball diamond. The fence will follow the arc of the circle.
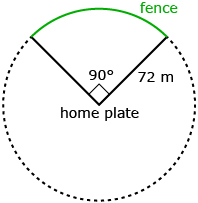
Determine the length of the fence Jane needs to build. Explain your process. ![]()
![]() Save your response in your course folder.
Save your response in your course folder.
1.11. Explore 7
Module 4: Foundations of Trigonometry
Read through “Example 4” on pages 173 and 174 of the textbook. As you read, compare the method you used to solve Try This 5 to the two methods used in “Example 4.” Note the two different methods used to find the solution:
- formula a = θr
- proportions
When using the formula a = θr, ensure θ is in radians rather than degrees.
Add the formula for determining arc length to your copy of Formula Sheet.
Self-Check 3
![]()
- Complete “Your Turn” on page 174 of the textbook. Answer
- Complete question 15 on page 177 of the textbook. Answer
- Complete questions 20.a. and b. on page 178 of the textbook. Answer
Add the following terms to your copy of Glossary Terms:
- coterminal angles
- general form
- arc length
1.12. Connect
Module 4: Foundations of Trigonometry
Complete the Lesson 2 Assignment that you saved in your course folder at the beginning of the lesson. Show work to support your answers.
![]() Save your responses in your course folder.
Save your responses in your course folder.
Project Connection
You are now ready to apply your understanding of the relationship between arc length and the central angle of a circle to the Ferris wheel. Go to Module 4 Project: The Ferris Wheel. Complete Part 1: Activity 2.
![]() Save your responses in your course folder.
Save your responses in your course folder.
Going Beyond
In this lesson arc length was determined using the formula a = θr. The central angle θ must be measured in radians in this formula. Is it possible to determine a formula in which central angle θ is in degrees?
Determine a formula to calculate arc length in which central angle θ is in degrees.
1.13. Lesson 2 Summary
Module 4: Foundations of Trigonometry
Lesson 2 Summary

Digital Vision/Thinkstock
In this lesson you looked at objects rotating over and over again. The time-lapse image shows stars rotating around and around, as seen from the North Pole.
You learned that coterminal angles have the same terminal arm in standard position. There are an infinite number of coterminal angles for any given angle θ. Coterminal angles can be expressed in general form as θ + (360°)n, n ∈ I or θ + 2πn, n ∈ I.
Arc length is related to the radius of the circle and the central angle in radians. You learned that you could use either proportion of the circumference or the formula a = θr to determine arc length.
You went around and around in circles in this lesson. In Lesson 3 you will continue to study some of the properties of circles and determine how this information can help you with trigonometry.