Lesson 3
| Site: | MoodleHUB.ca 🍁 |
| Course: | Math 30-1 SS |
| Book: | Lesson 3 |
| Printed by: | Guest user |
| Date: | Tuesday, 9 December 2025, 10:34 PM |
Description
Created by IMSreader
1. Lesson 3
Module 4: Foundations of Trigonometry
Lesson 3: The Unit Circle
Focus

Photos.com/Thinkstock
How many circles can you count in the water ripple shown in the photograph? The circles are different sizes. How can you describe their sizes?
So far in this module you have learned about radian angle measure and arc length. You used proportions to determine the radian measure of an angle when given the angle in degrees. You also learned how to determine the length of an arc on a circle.
Many trigonometric problems can be simplified by referencing a circle with a particular radius. What radius do you think would make both radians and arc lengths easiest to work with?
Lesson Outcomes
At the end of this lesson you will be able to
- derive the equation of the unit circle
- determine the coordinates of points of intersection of an angle’s terminal arm and the unit circle
- generalize the equation of a circle with centre (0, 0) and radius r
Lesson Questions
You will investigate the following questions:
- How is an equation of a unit circle derived?
- How are points on the unit circle determined?
Assessment
Your assessment may be based on a combination of the following tasks:
- completion of the Lesson 3 Assignment (Download the Lesson 3 Assignment and save it in your course folder now.)
- course folder submissions from Try This and Share activities
- additions to Glossary Terms and Formula Sheet
Materials and Equipment
You will need
- paper
- scissors
- tape
- can or other cylinder
- straight edge
1.1. Launch
Module 4: Foundations of Trigonometry
Launch
Do you have the background knowledge and skills you need to complete this lesson successfully? Launch will help you find out.
Before beginning this lesson you should be able to
- determine the sine, cosine, and tangent ratios for right triangles
- determine the exact values of the sides of reference triangles 30°-60°-90° and 45°-45°-90°
- rationalize denominators of rational numbers
1.2. Are You Ready?
Module 4: Foundations of Trigonometry
Are You Ready?
Complete these questions. If you experience difficulty and need help, visit Refresher or contact your teacher.
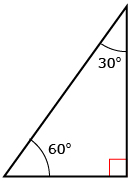
- Look at the triangle shown.

- A 30°-60°-90° triangle is shown.
- Rationalize the denominators in the following fractions.
If you answered the Are You Ready? questions without difficulty, move to Discover.
If you found the Are You Ready? questions difficult, complete Refresher.
1.3. Refresher
Module 4: Foundations of Trigonometry
Refresher
Read the Mathematics 20-1 Learn EveryWare Module 2: Lesson 1 Summary to review sine, cosine, and tangent ratios.
Read the Mathematics 20-1 Learn EveryWare Module 2: Lesson 3 Summary to review 30°-60°-90° and 45°-45°-90° triangles.
Watch Using a 30-60-90 Triangle for a 150° Angle to review using a 30°-60°-90° triangle to determine the exact values of sine and cosine ratio.
Read the definition and work with the applet in Pythagorean Theorem.
Watch Rationalizing the Denominator.
Go back to the Are You Ready? section and try the questions again. If you are still having difficulty, contact your teacher.
1.4. Discover
Module 4: Foundations of Trigonometry
Discover
Try This 1

iStockphoto/Thinkstock
You want to unwrap some information about the circumference of a tin can. You don’t want to cut the can, so you need to think of another way to unwrap the information. How does the circumference of a tin can relate to radian measures in a circle?
![]()
- Complete “Investigate Circular Number Lines” parts 1 to 7 on pages 180 and 181 of the textbook. Watch Investigate Circular Number Lines to see the steps explained.
- Since each number line shows the circumference of the can and the circle to be 2π units, what assumption is being made about the length of the radius?1
-
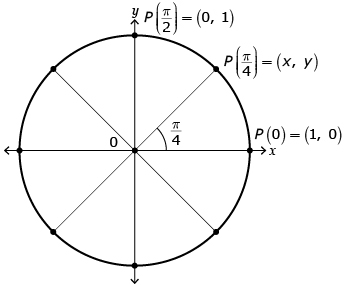
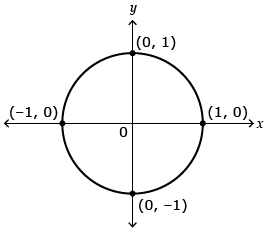
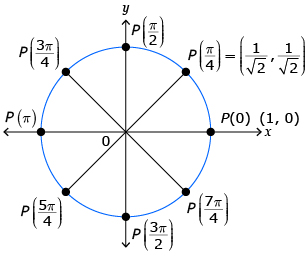
- Determine the coordinates for
 . Start by marking the coordinates for all the points on the circle that are midway between the axes.
Adapted from Pre-Calculus 12. Whitby, ON: McGraw-Hill Ryerson, 2011. Reproduced with permission. -
What is the only difference in the coordinates for these four points that are midway between the axes?
- Determine the coordinates for
![]() Save your responses in your course folder.
Save your responses in your course folder.
Share 1
With a partner or in a group, compare your responses from Try This 1 questions 2 and 3 and the methods you used to determine the coordinates for the eight points.
![]() If required, save a record of your discussion in your course folder.
If required, save a record of your discussion in your course folder.
1 Source: Pre-Calculus 12. Whitby, ON: McGraw-Hill Ryerson, 2011. Reproduced with permission.
1.5. Explore
Module 4: Foundations of Trigonometry
Explore
In Try This 1 you took a circle and divided it into sections that were multiples of ![]() and
and ![]() You may have determined that the radius of the circle you made is 1 unit, since the distance around the circle, or the circumference, was 2π.
You may have determined that the radius of the circle you made is 1 unit, since the distance around the circle, or the circumference, was 2π.

Source: Adapted from Pre-Calculus 12. Whitby, ON: McGraw-Hill
Ryerson, 2011. Reproduced with permission.
A circle with a radius of 1 and the centre at the origin can be called a unit circle.
Now that you have found some values for points on a unit circle, you can derive an equation to represent all points on a unit circle. You will use the Pythagorean theorem.
Try This 2
Step 1: Draw a unit circle on an x- and y-axis. This means that you will draw a circle with a radius of 1 and the centre of the circle at the origin (0, 0).
Step 2: Label the centre of the circle O.
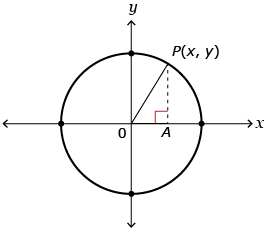
Step 3: Pick any point in quadrant 1 of the unit circle. Label the point P(x, y).
Step 4: Draw a line from point O to point P. What is the length of this line segment? ![]()
Step 5: Label OP on the diagram.
Step 6: Create a right-angle triangle by drawing a vertical line from point P to the x-axis. Label the point on the x-axis A. ![]()
- What is the length of line segment PA? Label this length.

- What is the length of line segment OA? Label this length.
- Since this is a right-angle triangle, use the Pythagorean theorem to write an equation that relates the lengths of OP, PA, and OA.
![]() Save your responses in your course folder.
Save your responses in your course folder.
Share 2
With a partner or in a group, discuss the following questions.
- Share the equation you wrote in Try This 2 question 3.
- Would your equation change if you chose a different point P?
- What would happen if point P were in quadrant 3? Would this change the lengths of PA and OA?
![]() If required, save a record of your discussion in your course folder.
If required, save a record of your discussion in your course folder.
Your diagram should look something like this:
Source: Pre-Calculus 12.
Whitby, ON: McGraw-Hill
Ryerson, 2011.
Reproduced with permission.
1.6. Explore 2
Module 4: Foundations of Trigonometry
In Try This 2 you derived the equation for the unit circle, x2 + y2 = 1. Any point that is on the unit circle will satisfy this equation.
Compare what you did in Try This 2 with the derivation of the equation for the unit circle on page 182 of the textbook. Note any differences and similarities you see.
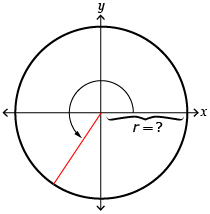
The equation x2 + y2 = 1 only describes a circle that has a radius of 1; but you have seen that circles can have different radii, such as the circles in an archery target or the water ripples you saw in Focus. How can you write equations for circles with different radii?
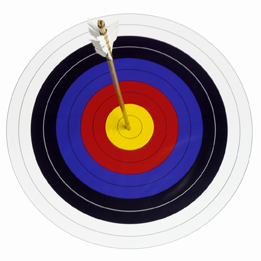
Stockbyte/Thinkstock
Read “Example 1” on page 182 of the textbook. Notice how the Pythagorean theorem is used to write the equation for a circle with a radius of 2.
Watch Equation of a Unit Circle to see how the Pythagorean theorem can be used to write the equation of a circle with centre (0, 0) at the origin and any radius length represented by r.
Self-Check 1
Complete question 1.b. on page 186 of the textbook. Answer
1.7. Explore 3
Module 4: Foundations of Trigonometry
When you are working with the unit circle, you know the equation for the circle is always x2 + y2 = 1. This is because the radius of the circle is 1. Could you determine if a point were on the unit circle if you knew both coordinates? Could you determine the x-coordinate if you knew the y-coordinate and that the point was on the unit circle?
Try This 3
- Is the point
 on the unit circle?
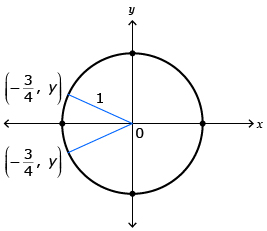
- You will determine the y-coordinate for all points on the unit circle if the x-coordinate of the point is
 .
.
- Draw a diagram indicating where this point could be located on the unit circle.
- Use the equation of the unit circle to help determine the y-coordinate.
- Draw a diagram indicating where this point could be located on the unit circle.
![]() Save your responses in your course folder.
Save your responses in your course folder.
There is more than one point on the unit circle where the x-coordinate is ![]() . It's important that you get this answer correct. Check to see if your image matches the image shown here.
. It's important that you get this answer correct. Check to see if your image matches the image shown here.
Source: Pre-Calculus 12. Whitby, ON: McGraw-Hill Ryerson, 2011.
Reproduced with permission.
1.8. Explore 4
Module 4: Foundations of Trigonometry
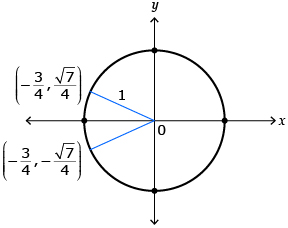
In Try This 3 you looked at how the equation of the unit circle, x2 + y2 = 1, could be used to determine if points were on the unit circle. You may have substituted both the x- and y-coordinates into the equation for the unit circle and determined if the two sides of the equation were equal.
In Try This 3 question 2 you were asked to determine the y-coordinate when given the x-coordinate. Your answer should have looked something like the solution shown here. There are two solutions because the x-coordinate can be negative in both quadrants 2 and 3.
Read “Example 2” on page 183 of the textbook. Note the following as you read:
- The equation of the unit circle is used to determine the other coordinate.
- Remember that when you take the square root of a number, the answer could be positive or negative.
- Unless the quadrant is given in the question, it is important to determine the quadrants the coordinate could be in.
-
 becomes
  at the end of the example. This is sometimes done so there are no radicals in the denominator. See the information on rationalizing denominators in Refresher if you need to review how this change is completed.
Self-Check 2
Complete questions 2.a., 2.f., 3.b., and 3.f. on pages 186 to 187 in the textbook. Answer
In Try This 1 you created two number lines that formed two circles. One circle divided into 8 equal parts, and one circle divided into 12 equal parts. In Share 1 you were asked to determine the coordinates for ![]() . You will use your answer to Try This 1 in Try This 4.
. You will use your answer to Try This 1 in Try This 4.
Try This 4
You will use Unit Circle Template to help organize the intersection points of terminal arms of angles and the unit circle. Print Unit Circle Template now.
- Fill in the central angle measurements for each terminal arm in the template using the circles you created in Try This 1. Remember that these circles were created by using a number line from 0 to 2π and then dividing the number line into 8 or 12 equal parts. Place each angle in the terminal-arm spaces on the template. The first quadrant has been completed for you.
- Fill in the x- and y-coordinates of the point of intersection of the terminal arm for the central angle
 and the unit circle. Watch Finding Coordinates Example for help in determining the coordinate ( ___, ___ ) on your template.
![]()
- Use your knowledge of angles in all four quadrants to fill in all of the spaces in Unit Circle Template. Think about when x- and y-coordinates should be positive or negative.

While answering question 3, read “Example 3” on pages 184 and 185 in the textbook. Notice that the angle
 can be placed in all four quadrants and then the coordinates determined.
![]() Save your responses in your course folder.
Save your responses in your course folder.
You will use your unit circle in future lessons of this module.
Share 3
With a partner or in a group, discuss the following questions.
- Examine the angles on your unit circle. Describe any patterns you see.
![]()
- Examine the coordinates on your unit circle. Complete question 11 on page 188 in your textbook.
![]() If required, save a record of your discussion in your course folder.
If required, save a record of your discussion in your course folder.
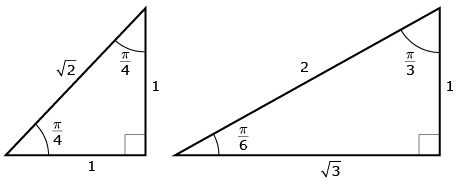
These are the two triangles that you can work with to help determine the coordinates. The given reference triangles have angles written as radians instead of degrees and have hypotenuses of ![]() and 2, but the unit circle has a radius of 1. Using similar triangles you can create reference triangles with a hypotenuse of 1 to match the radius of the unit circle.
and 2, but the unit circle has a radius of 1. Using similar triangles you can create reference triangles with a hypotenuse of 1 to match the radius of the unit circle.
1.9. Explore 5
Module 4: Foundations of Trigonometry
In Try This 4 you created your own unit circle. Compare your unit circle to the one provided in The Unit Circle. Click on the 4, 8, and 12 buttons to see all of the values you completed in Try This 4.
The applet can be used to determine the coordinates of a point on the circle given an angle of rotation. The applet can also be used to determine the angles of rotation in standard position when given the coordinates of the point on the unit circle.
Self-Check 3
Use your unit circle from Try This 4 to answer the following questions.
![]()
- Complete questions 4.b., 4.c., 4.g., 5.a., 5.e., and 6 on page 187 of the textbook. Answer
You will want to keep the unit circle you created to use in upcoming lessons.
A copy of the unit circle will not be provided with the Diploma Exam. If you want to use the unit circle on the exam, you will need to remember a way to determine the angles and corresponding coordinates for the points on the unit circle. There are different strategies to do this. It is best to develop your own way to remember the patterns. You can search the Internet using the keywords “remembering the unit circle” for some ideas.
Add unit circle to your copy of Glossary Terms.
Add the formula for the unit circle, x2 + y2 = 1, to your copy of Formula Sheet.
1.10. Connect
Module 4: Foundations of Trigonometry
Complete the Lesson 3 Assignment that you saved in your course folder at the beginning of the lesson. Show work to support your answers.
![]() Save your responses in your course folder.
Save your responses in your course folder.
Project Connection
There is no Project Connection in this lesson.
Going Beyond
In this lesson you learned a lot about the unit circle. Your new understanding will be valuable as you continue your study of trigonometry. Another way to look at the unit circle is to unwrap the circle to form the graphs of the sine, cosine, and tangent functions. Try this out for yourself in ExploreLearning’s “Unit Circle.”
Screenshot reprinted with
permission of ExploreLearning
1.11. Lesson 3 Summary
Module 4: Foundations of Trigonometry
Lesson 3 Summary

© 3d_kot/35917383/Fotolia
The equation of the unit circle is x2 + y2 = 1 with its centre at (0, 0) and radius of 1. This equation can be derived from the Pythagorean theorem. This equation can be used to determine if a point is on the unit circle or to determine the value of the x- or y-coordinate when given one of the values.
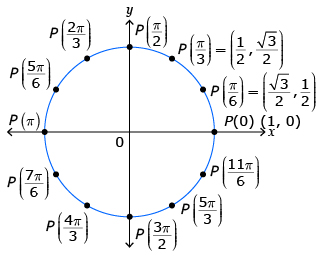
You looked at specific points on the unit circle that correspond to eight or twelve equal parts of the circle. You wrote the coordinates of the specific points as exact values. Patterns can be used to help determine these points on the unit circle. The unit circle can be used to determine specific rotational angles when given the coordinates of a point and vice versa.
Source: Pre-Calculus 12. Whitby, ON: McGraw-Hill Ryerson, 2011. Reproduced with permission. |
Source: Pre-Calculus 12. Whitby, ON: McGraw-Hill Ryerson, 2011. Reproduced with permission. |
In the next lessons you will see how the unit circle can be used to determine both angles and trigonometric ratios.