Project 3
| Site: | MoodleHUB.ca 🍁 |
| Course: | INF1030 |
| Book: | Project 3 |
| Printed by: | Guest user |
| Date: | Friday, 26 December 2025, 11:34 AM |
Description
Created by IMSreader
1. Project 3
Project 3—Documents for Personal Use
Creating professional-looking documents is a basic skill that will help you in your personal life and as you enter the workforce. In your personal life, you may need to write application letters, personal letters, or perhaps customer complaint letters. For school you need to write term papers, research projects, or even create school newspapers. In the work world, businesses communicate using documents such as letters, reports, tables, brochures, and newsletters, and expect employees entering the workforce to have the skills to quickly prepare these documents and produce professional results.
What Do I Need to Complete This Project?
In order to be successful, you will need
- access to a computer with word-processing software—all examples for this module are based on Microsoft Office Word 2007
- a place to create an INF1030: WP1 folder to save your work (discuss with your instructor as to where to store this folder; e.g., on a network, in a folder, on a flash drive, on your personal desktop)
What Do I Already Know?
- You have written and received letters, and can determine the differences between personal and business communication.
- You have seen or created posters.
- You have created reports for school or extracurricular activities.
- You have looked at information presented in tables.
What Do I Need To Do?
This project is made up of five training rooms:
- Training Room 1: Microsoft Word Basics
- Training Room 2: Letters and Memos
- Training Room 3: Graphics
- Training Room 4: Reports
- Training Room 5: Tables
These training rooms are designed to teach you the basic components of common documents. Training rooms include the following components:
- information on when to use and how to produce documents you will use at home, school, and work
- demonstrations that teach basic software commands specific to Microsoft Word 2007
- practice activities to help you with concepts presented in training rooms
- opportunities to assess your understanding of the concepts presented in the training rooms
Time to Work
In order to help you plan and organize your time, suggested completion times for each training room are listed below. Depending on your skill and experience, you may work through some training rooms faster, and others may take more time. Working through the training rooms efficiently will ensure that you have enough time to complete the entire course. These are suggested time lines to help keep you on track.
Training Room 1: Microsoft Word Basics
Training Room 2: Letters and Memos
Training Room 3: Graphics
Training Room 4: Reports
Training Room 5: Tables
approx. 30 min
approx. 2.5 hours
approx. 1.5 hours
approx. 2.5 hours
approx. 1 hour
Checking My Work
Once you have completed the training rooms, compare your practice activities to the exemplars provided to determine whether or not you have a good understanding of the concepts presented. Make sure to contact your instructor if you have questions about this process.
Use the INF1030: Word Processing 1 Software Skills Checklist to evaluate your level of understanding, and check off the skills that you are able to demonstrate as you progress through the training rooms. You must be competent in all software skills presented in the training rooms before beginning your final project. Print or save a copy of the Software Skills Checklist now.
You can repeat training rooms and demonstrations as necessary if you have difficulties with the software or if your work differs from the exemplars. You can also refer to Help menus and online references for software training and demonstrations. If you have any problems, your instructor is there to help.
Going Beyond
Information processing is one of many courses related to the business world. Consider taking other Business, Administration, and Information Technology courses to round out your learning experience. You might also be interested in other courses on the Microsoft Office suite of programs:
INF 1050: Database
INF 1060: Spreadsheet 1
INF 1070: Presentation Software
INF 2050: Word Processing 2
INF 3060: Word Processing 3
1.1. Training Room 1
Training Room 1—Introduction to Microsoft Word® 2007

© Dmitrijs Dmitrijevs/shutterstock
You have already spent many years in school, and chances are you have worked with word-processing software throughout your schooling and on your home computer. Many students feel that they are already skilled in word processing, and don't see how they can benefit from a word-processing course. Word-processing programs are some of the most widely used computer applications, but there might be a lot you don’t know about them. This course will teach you how to use word-processing software efficiently to produce many of the kinds of documents that you will use in all aspects of your life. Mastering the power of word-processing software will save you time and make your work look great. Think of the benefits of doing your school assignments faster, and of the many uses of word processing as you enter the workforce.
This course is the first of three courses that will lead you towards becoming certified in Microsoft Word. When you complete INF3060: Word Processing 3, you will have learned and practised all of the skills required to become a Microsoft Word Certified Application Specialist, a highly distinguished and well-known designation in all industries and corporations.
Let's begin with some basic word-processing software skills before we move on to document production. If you are new to word processing, ensure that you carefully work through the training rooms and let your instructor know if you need help. You can repeat the training rooms until you are comfortable with the skills being taught. If you have experience with word-processing software, a quick review of the basics may be beneficial—you might discover an alternative way to perform a task, or learn shortcuts to speed up your work.
In this training room you will
- learn key features of Microsoft Word® 2007
- use help functions and online references
- learn how to navigate a document
- learn how to edit, spell check, and print documents
- read and watch demonstrations to discover some of the main features of Microsoft Word 2007
- access additional help functions and online references should you require more instruction or software assistance
When you open Microsoft Word 2007, you will recognize some familiar features and functions, but you might not be familiar with the new user interface, which organizes commands into what is referred to as a ribbon. In this course you will be looking at how to use this ribbon most effectively while producing documents.
1.2. Page 2
Training Room 1—Introduction to Microsoft Word® 2007
Key Features of Microsoft Word 2007
Carefully study the Microsoft Word 2007 screen to see how the user interface has changed and to learn about some of the new features.
Go to the Instructional Videos and choose “The Screen of Microsoft Office 2007” to see how to use Microsoft Word 2007 screen features.
Use Help Functions and Online Resources
Resourceful, adaptable, life-long learners know where to look for information. There are several ways to find information and teach yourself how to use your word-processing software. You can
- use the built-in and online help functions
- access online resources and demonstrations

© Slash331/shutterstock
Go to the Instructional Videos and select “Accessing Help” to see how to access help for Microsoft Word 2007.
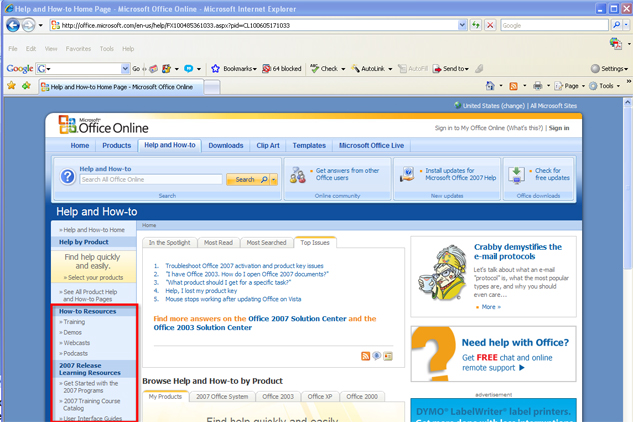
Microsoft has developed a variety of how-to resources to support the users of their products. From Microsoft Online, you can access training, demonstrations, webcasts, podcasts, and information on how to become Microsoft Office Certified. You can go there to refresh your memory or to learn a new skill.   
Microsoft product screen shot(s) reprinted with permission from Microsoft Corporation.
Navigating Documents

© Liv friis-larsen/shutterstock
It is important to be able to move through a document efficiently to save time during document production.
Some of the basic navigating functions and their definitions are listed below.
The Insertion Point is the vertical blinking line that shows you where text will be inserted in your document (also known as a cursor).
Word Wrap allows you to type continuously without having to hit Enter at the end of the line (the text automatically wraps to the next line).
The Enter key is used to create blank lines by moving the cursor down in the document. Be careful — sometimes hitting the Enter key too much can add unnecessary blank lines at the end of your document, causing blank pages when it’s time to print.
To delete a character to the right of the cursor, press Delete. To delete a character to the left of the cursor, press Backspace. You can also select unwanted text by holding down the left button of the mouse as you highlight the text and hitting either the Delete key or the Backspace key.
In previous versions of Word (not in Word 2007), the Insert key will activate the Overtype Mode to type overtop of or replace text.
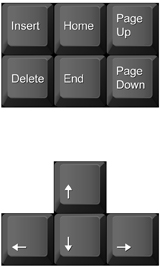
Find the keys below on your keyboard. These keys help you to navigate your document seamlessly as you type. Every time you reach over and use the mouse, your productive time decreases. By knowing where these keys are and how to use them, you won't have to take your hands away from the keyboard.
| Desired Movement | Press | Desired Movement | Press |
| Next character | Next line | ||
| Previous character | Previous line | ||
| Next word |  + + |
Next paragraph | + |
| Previous word | + |
Previous paragraph | + |
| Beginning of line |  |
Next screen |  |
| End of line |  |
Previous screen |  |
| Beginning of document | + |
Go to page | + |
| End of document | + |
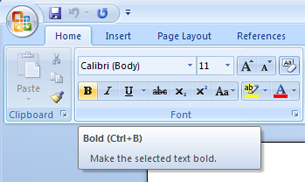
A quick trick to speed up your work is to start learning and practising software keyboard shortcuts keys, such as Ctrl + B for Bold. In Microsoft Word, you can hover your mouse over the command buttons for a pop-up that contains the command name, description, and available keyboard shortcut.  
Microsoft product screen shot(s) reprinted with permission from Microsoft Corporation.
Edit and Spell Check Text and Print Documents
The main advantage of word-processing software is the ability to move and manipulate text in a document quickly and easily.
Go to the Instructional Videos and select “How to Insert, Delete, or Move Text” to learn how to insert and delete text.
Go to the Instructional Videos and select “Using Copy and Paste.” This demonstration will show you how to select and move text using the cut, copy, and paste features.
Spelling and grammar checks are vital steps for any document as they ensure that your ideas are communicated clearly. Go to the Instructional Videos and select “How to Make Spelling and Grammar Corrections.” This demonstration shows you how to use these important functions to catch and fix errors in your documents.
Think you're ready to print? Want to know what your document looks like at a certain stage of completion? By going to the Instructional Videos and selecting “Print Previewing Your Document,” you will discover how to preview a document to see how it will look when it is printed.
1.3. Page 3
Training Room 1—Introduction to Microsoft Word 2007
Ready?
Ask yourself the following questions to determine if you are ready to move on in the course:
- Can I identify the parts of my word-processing screen?
- Was I able to access the Help feature?
- Can I navigate a document using the cursor and shortcut keys?
- Do I know how to edit text?
- Can I use Print Preview and print my documents?
If you answered yes to all of these questions, you are ready move on to the next training room and start document production. If you answered no to any of the questions, take a minute to repeat the relevant demonstration until you are ready to proceed.
1.4. Page 4
Training Room 1—Introduction to Microsoft Word 2007
Check Point
- Use the Software Skills Checklist and check off those skills you feel confident in demonstrating.
- Check with your teacher if you feel you need a more detailed follow-up tutorial or instructions.
When you are comfortable with the concepts presented, you are ready to start document production. Repeat the training sessions until you are ready to proceed, or check with your teacher for follow-up tutorials or instructions.
1.5. Training Room 2
Training Room 2—Letters and Memos
As you go through school, become involved in the community, get a job, and apply for post-secondary education, there are lots of opportunities to send and receive many types of correspondence.

© Pedro Tavares/shutterstock
In this training room you will
- learn how to create and customize letters and memos
- practise writing letters and memos
- read and watch demonstrations to learn about letter and memo creation
- practise using the software to complete five practice activities
- use help and online references for software assistance when you need it
- save practice activities in an INF1030 WP1: Letters folder
- check your work using exemplar and answer keys provided
When you write letters and other correspondence, not only are you sending important information, you are creating an image of yourself in the eyes of the reader. Sometimes your correspondence is your only opportunity to make an impression on your recipient. It is essential to ensure that your documents are just right before you send or publish them. Inaccurate information, poor use of language, or sloppy formatting could result in miscommunication or the reader’s unfavorable impression of the sender. To avoid this situation, consider the following suggestions.
- Use the spelling and grammar check.
- Proofread your document, paying attention to the flow of ideas and the accuracy of names, dates, and places.
- Ask someone else to proofread your work — a writer often misses his or her own mistakes. If finding someone else to proofread is difficult, you can also read your work out loud. You can sometimes pick up on mistakes when you are concentrating on saying your words instead of reading them.
When you are sure the information you are sending is accurate and complete, your text is error-free and the format is correct, the correspondence is ready to be sent or published. By the end of this training room, you will have the knowledge and skills to create high-quality letters and memos.
1.6. Page 2
Training Room 2—Letters and Memos
Letters
When and why have you sent or received a letter?

© JoLin/shutterstock
You might have sent a letter 
- to your grandmother, thanking her for the birthday money she sent in the mail
- to the manufacturer of your new jeans when they fell apart after only three washes
- when you saw your ideal job advertised
- to your city or town council representative to express your frustration over an increase in your local recreation centre’s entrance fees
A letter is often a good choice when you need to communicate with friends and family, businesses, or your community.
Creating a Letter
Personal letters are to people you know. You might use a personal letter to share information, send a thank you, invite someone to a gathering, or perhaps express your sympathy. Personal letters have a friendlier, more relaxed tone than business letters.
A personal business letter is written by an individual to an organization, perhaps to apply for a job, request or share information, or sometimes to make a complaint or seek a remedy to a situation. Personal business letters use a more formal tone and language than do personal letters.
Full-block-style letters are the easiest, fastest, and most commonly used style of letter. All parts of the letter are aligned along the left margin.
You will now be led through a letter from top to bottom to discover the necessary letter parts and formatting requirements.
Return Address
Letters start with the return address — this is the sender's address and it starts approximately 2" from the top of the page. To start your letter in the correct spot, you can
- hit your enter key 4 times
- set your top margin to 2”
- vertical center the text in the document (from top to bottom of the page)
To learn how to change margins to adjust the workspace of your document, go to the Instructional Videos and select “Setting the Margins.”
Go to the Instructional Videos and select “Vertical Center a Document.” This demonstration will show you how to vertical center your text from top to bottom of the page.
Look at the following example to see a properly formatted personal business letter.
In the return address, include the sender's street address or box number, town or city, province, and postal code. The sender's name can be included in the return address, but it can also be omitted because it appears in the writer's identification at the end of the letter.
When writing out the address, use the two-letter abbreviation codes for provinces and territories in Canada, or for states if your letter is going to the United States. Below is a reference table for the two-letter Canadian abbreviations.
Click on the link to see Canadian provincial and territorial abbreviations.
| NAME | ABBREVIATION |
| Alberta | AB |
| British Columbia | BC |
| Manitoba | MB |
| New Brunswick | NB |
| Newfoundland and Labrador | NL |
| Northwest Territories | NT |
| Nova Scotia | NS |
| Nunavut | NU |
| Ontario | ON |
| Prince Edward Island | PE |
| Québec | QC |
| Saskatchewan | SK |
| Yukon | YT |
Canadian postal codes are in ANA NAN format (where “A” stands for alphabetic character and "N" stands for number) (e.g., T8N 2W1). The postal code is separated by one space and a hyphen is not used.
In a personal letter to friends and family, the return address is optional. The return address adds an air of formality, so you may exclude this part of the letter if sending correspondence to people you know.
In a personal business letter, the return address is always included. Not only does this add to the formality, it is also a quick way to tell the recipient of your letter where you can be contacted.
Following the return address, hit the Enter key twice to leave one blank line between the return address and the date.
Date
The standard Canadian date format is month, day, and year; (for example, September 15, 2010). In your letters, do not abbreviate the month and be sure to include a comma between the day and the year. If you opt to use a date in numerical format, such as 03/12/10, you may cause your reader to wonder if this date means February 12th, or December 3rd. By writing out the month, you spare your reader this confusion.
After the date, hit the Enter key 4–8 times, depending on the length of the letter (for short letters, use more spaces for better visual balance; for longer letters use fewer spaces to create more room on the page for your content).
Inside Address
After the 4–8 spaces, insert the inside address. This is the name and complete address of the person or business you are sending the letter to. If you are sending a letter to an organization, it is always best to address the letter to a specific person and include their job title or position if you can.
After the inside address, hit the Enter key 2 times to leave one blank line.
Salutation
Next comes the salutation. In a personal letter, you can use the recipient’s first name only. When you are sending a personal business letter, include the recipient’s courtesy title (Mr., Mrs., Ms., or Dr). If you don't know the recipient’s name, you can always phone their organization or even search the company's Web site for a directory or contact information. Use “Dear Ladies and Gentlemen,” “Dear Personnel Director,” or “To Whom it May Concern” only when more specific contact information is unavailable.
Depending on the punctuation style you are working with, there are two ways you can punctuate the salutation.
- Two-point punctuation style places a colon ( : ) after the salutation, (e.g., Dear Mr. Boles
.
- No-point punctuation styles uses no punctuation, (e.g., Dear Mr. Boles).
Following the salutation, hit the Enter key 2 times to leave one blank line.
Subject Line
If you are preparing a personal business letter you may want to include a subject line. This is an optional line of text that summarizes the purpose of the letter. For example, SUBJECT:  Letter of Application.  The subject line can help the reader focus his or her attention on the intent and purpose of your letter.
Now hit the Enter key 2 times to leave one blank line.
Body
The body of the letter usually has three paragraphs. The first paragraph introduces the topic of the letter and sets its tone. The second paragraph gives details, shares information, or makes a request. The last paragraph closes the letter, gives follow-up information, and concludes in a positive manner. Paragraphs are single-spaced, aligned with the left margin, and separated by a blank line. The length and content of the letter will be determined by its purpose and what you need to communicate.
Once you have completed the body of your letter, hit the Enter key 2 times to leave one blank line.
Closing
Now it is time to end the letter by adding the complimentary closing. The complimentary closing signals to the reader that you are finished communicating and you are ready to "close" the letter. Closings may be formal (“Respectfully” or “Cordially”) or more personal (“Sincerely” or “Yours truly”).
Just as with the salutation, keep to one style of punctuation in the complimentary closing.
- Two-point punctuation styles place a comma after the closing (“Sincerely,”).
- No-point punctuation styles use no punctuation after the closing (“Sincerely”).
Now hit the Enter key 4–8 times (depending on the length of the letter — use more space for a short letter, and less space for a longer letter) so that you have enough space to handwrite your signature.
Signature
The signature is handwritten by the person sending the letter. The signature shows the reader you actually are the author of the letter.
Below the signature, be sure to include the writer's identification. This is the typed name of the person sending the letter, including their job title if appropriate. The job title can be typed following a comma after the writer's first and last name or on the line directly below.
Hit the Enter key 2 times to leave one blank line if you are adding notations.
Notations
Notations are used depending on the circumstances. Below are a variety of notations that may be included in your letter. They are only to be added if appropriate.
Typists initials. In business, office assistants will type letters and prepare documents for other staff, and would therefore use typist initials to identify themselves.
Enclosure. When you are sending your resume with a cover letter to apply for a job, you would use “Enclosure: Resume,” indicating that something else is accompanying the letter.
Carbon copy. You may have seen the carbon copy option (“cc”) in your email program. It is used when copies of the same letter are being sent to two or more people (e.g., cc: Keith Wilson, Attorney). When you use this notation on an email, everyone who is carbon copied can see the list of people to whom the email was sent.
Memorandum
A memorandum, also known as a memo, is a printed document, similar to an email, that is used to communicate information within an organization. Because the audience of a memo is within the same organization and the purpose is general communication, the formality of addresses and greetings is unnecessary. Memos, like emails, need to be clear and concise. There may be one or more paragraphs of information, and point form can be used. Omit unnecessary background information to keep the memo brief. Remember, the key is general communication to a group or all staff of an organization.
It is easy to enhance the visual appeal of the memo and highlight important information by formatting the font, style, size, and colour of the text. In the example linked below, note how fonts are used to draw attention to particular pieces. Also note how the spacing of the lines creates distinct visual parts so that the memo's purpose is easily identified and quickly read.
For specific directions on creating professional-looking memos, go to the Instructional Videos. Select “Memo” to learn proper layout techniques and how to apply formatting and styles.
1.7. Page 3
Training Room 2—Letters and Memos
Time to Practise
- Study the content, exemplars, graphics, and demonstrations presented in this training session, and review previous training sessions if necessary.
- Keyword search the Help menu and online help references, such as Microsoft Online Help and How-to, for additional software tips and training.
Practice 1
Match the letter parts labels to their correct positions in a letter.
Practice 2
In this activity you will be guided to edit a document. The editing directions are supported by quick demonstrations to show you how to make the changes.
- Open the file “Letter 1.” You will use this document to demonstrate that you know how to complete the tasks outlined in following the steps.
- In the document, set the margins to Top 1", Bottom 1", Left 1.25", and Right 1.25" in the Page Layout tab on the Ribbon.
- To see how to adjust the line spacing, go to the Instructional Videos and select “Changing the Line Spacing.”
- Select all of your text using Select All (Ctrl + A selects everything on your page). Set your Font to 12 pt., Times New Roman. For a demonstration on how to do so, go to the Instructional Videos and select “Adjusting the Font.”
- Align all the text in the document Left for a full-block-style letter. For a demonstration on how to do so, go to the Instructional Videos and select “Adjusting Text Alignment.”
- Create appropriate spacing between the letter parts using your Enter key. Click to see an example to compare your work to.
- Make good use of the space available on the page by adjusting the spacing between the date and the complimentary closing, if necessary.
- Run a spelling and grammar check and proofread the letter. Make any changes you believe would improve the letter.
- Print Preview the letter to see how it will look before printing.
- Save the adjusted document as “Letter 1” in your INF1030 WP1: Letters folder.
Practice 3
In this practice, you will create a letter using information provided for you. There are no demonstrations to assist you. Use this as a check to see if you understand the formatting necessary to prepare a personal letter. You may go back and check steps if you need assistance.
- Open a new, blank Microsoft Word® 2007 document.
- Save the document as “Letter 2” in your INF1030 WP1: Letters folder.
- Set the document font to 12 pt. Arial.
- Create a letter using the following information. Use full-block format. Apply the necessary and appropriate layout and formatting you have learned.
Return address
Date    
Inside address
Salutation 
Body   
Closing   
Writer's identification
Use your own address
Current date
Ms. K. Burra
Grand Prairie Composite High School
10213 – 99 St
Grand Prairie AB  T8V 2H3
Dear Ms. Burra:
Thank you for writing a reference letter for me. Over the past two years I have appreciated your guidance and support both in the classroom and as my basketball coach.
The letter you have written will support my application for a community scholarship; as well I plan on applying for a part time job to earn some money for my school trip during spring break.
Thank you again for the time you have invested in me. Good teachers and mentors are invaluable in the lives of teenagers.
Sincerely,
Your Name
- Take the time to spell and grammar check as well as proofread the letter to catch any mistakes.  Make any changes that would improve your letter.
- Print Preview the letter to see it in its final form.
- Save the document with your changes.
Practice 4
In this practice, you will be asked to write your own letter. There are no demonstrations to assist you. Use this as a check to see if you know how to prepare a personal letter. You may go back and check steps if you need assistance.
- Open a new, blank Microsoft Word® 2007 Document.
- Save the letter as “Letter 3” in your INF1030 WP1: Letters folder.
- Write a thank-you letter to someone who has made a difference in your life, inspired you, or has had a positive impact on you.
- Format the letter appropriately, including all necessary letter parts, using full-block style and 12 pt. Arial font.
- Spell and grammar check as well as proofread the letter to ensure your ideas are communicated clearly. Make any changes that would improve your letter.
- Print Preview the letter to see it in its final form.
- Save your final document.
Practice 5
In this practice, you will be asked to create a memorandum using information provided for you. There are no demonstrations to assist you. Use this practice as a check to determine if you know how to prepare a memorandum. You may go back and check steps if you need assistance.
- Open a new, blank Microsoft Word® 2007 document.
- Save the document as “Memo” in your INF1030: Letters folder.
- Create a memo with the following information.
- Apply the appropriate memo layout and formatting styles you have learned.
MEMORANDUM
TO:
FROM:
DATE:
RE:
J. Andrews, F. Jones
S. Haji, Chair — Safety Committee
August 3, 2012
Use of Computer-assisted Training Materials
I’m setting up a meeting on August 10, 2012, at 2:00 p.m. in the corporate boardroom to discuss the use of computer-assisted training materials for new employees. With your input, I’m hoping to develop some strategies to promote the use of these materials by the new hires.
I look forward to hearing your ideas and suggestions. See you then!
sh
- Be creative in formatting your title.
- Spell check and proofread your letter to ensure that it is error-free and ready to print.
- Print Preview the letter to see it in its final form.
- Save your final document.
1.8. Page 4
Training Room 2—Letters and Memos
Ready?
Self-check each practice session against the answer key provided. Your assignments might show a bit of variation if you chose to change the phrasing of some sentences. Be sure to focus on the formatting as well as spelling-related items.
Compare Practice 1 — Letter 1 to Letter 1 Answer Key.
Compare Practice 2 — Letter 2 to Letter 2 Answer Key.
Compare Practice 3 — Memo to Memo Answer Key.
How do your letters compare to the answer keys?
- If you noted fewer than 3 formatting or editing errors, move on to the next training session.
- If you noted 3 or more formatting or editing errors, review the training session again, and check with your instructor for assistance.
Check Point
Use the Software Skills Checklist and check off those skills you are confident in demonstrating.
Did you have difficulty with any of learning concepts or software features? If so, go back and review the information — you will use these skills in the next training sessions and in the final project.
1.9. Training Room 3
Training Room 3—Graphics
Did you ever have a lemonade stand as a kid? How did you advertise? You probably got out your markers and made a sign. Imagine the sign you will be able to create on your computer when you can add bullets, WordArt, and graphics.

© Valentyn Volkov/shutterstock
In this training room you will
- learn how to use bullets, numbers, and multilevel lists
- learn how to enhance your documents and create interesting posters and displays using graphics and WordArt
- use the software to complete three practice activities
- use Help menus and online references for assistance with software and training when you need it
- save practice activities in the INF1030 WP1: Graphics folder
- compare your practice activities to exemplars or answer keys
1.10. Page 2
Training Room 3—Graphics
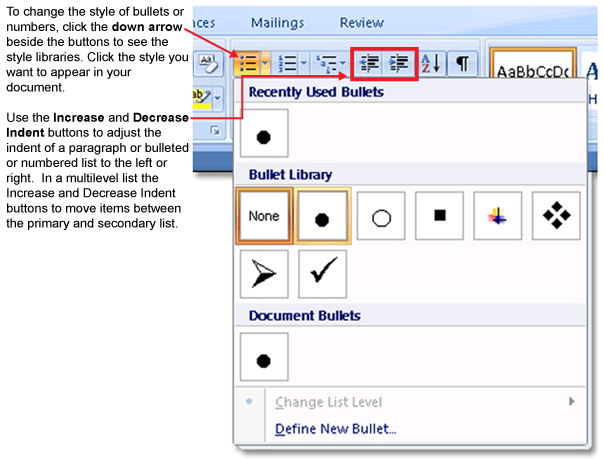
Bullets, Numbering, and Multilevel Lists
Bullets, numbers, and multilevel lists are used to organize and highlight key information in point form so it is easy to understand and remember. A multilevel list is a list that has indented subcategories, also known as a nested list.
Microsoft product screen shot(s) reprinted with permission from Microsoft Corporation.
Bulleted List Example
Lemonade Sale Supplies
- Lemons
- Sugar
- Water
- Cups
- Pitcher
- Table
- Chair
- Poster
Numbered List Example
Lemonade Sale Supplies
- Lemons
- Sugar
- Water
- Cups
- Pitcher
- Table
- Chair
- Poster
Multilevel List Example
Lemonade Sale Supplies
- Grocery Store
- Lemons
- Sugar
- Water
- Cups
- Items from Home
- Pitcher
- Table
- Chair
- Poster
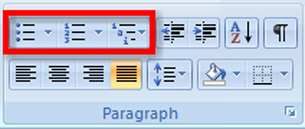
Bullets, Numbering, and Multilevel list buttons are located on the Home tab on the Ribbon. There are a few ways you can add bullets and numbers to your document
- Click the Bullets or Numbering button and type your text. Each time you press Enter, another bullet or number will be added. 
- Click on the text you have already typed, click on the Bullets or Numbering buttons.
- Start bullets by typing an asterisk ( * ) and then the Tab or Space key. Each time you press Enter, another bullet will be added.
- Start numbering by typing “1.” Then hit the Tab key or the Space key. Each time you press Enter, the next number will be added.
To see how bulleted and numbered lists are created in a document, go to the Instructional Videos and select “The Bulleted and Numbered List Feature.”
Microsoft product screen shot(s) reprinted with permission from Microsoft Corporation.
To learn how to create a multilevel list, go to the Instructional Videos and select “The Multilevel List Feature.”
Creating a Poster
When you create a poster or a display, you need to draw attention to a message. To begin, focus on an element that will capture a passerby’s eye and draw them in to your poster (a word, a picture, or even a colour). Once you have the reader’s attention, focus on a clear, concise message that delivers your key points. Avoid excessive text, which can overwhelm, confuse, and disinterest the reader.
Designing a Poster or Display

When we first learn to read, we are taught to start at the top left corner of the page and move right. Our eyes are trained to follow a Z pattern, starting at the optical center (the upper-left corner of the page). Knowing how your eye scans a page will help you decide where to place your text and graphics. Think of what you want your reader to see first, consider how the eye scans the page and makes connections between the graphics and the text, and decide what you want the reader to remember as they finish looking at the page.  A good place for business logos and contact information is in the bottom-right corner of the page.
Effective use of white space (blank space with no text or graphics) can highlight information, as well as provide a clean look.  
Using graphics is one of the most effective ways to create an interesting display. You know the saying “A picture is worth a thousand words”? Be discerning and choose just the right graphic.  Use the Insert tab, Illustrations group to add clip art or pictures saved from the internet, your digital camera, or a scanner. 
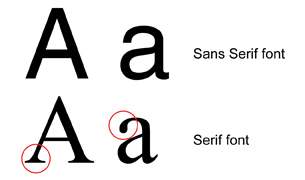
Text should be large enough to read at a distance — if your readers can’t read the text quickly as they walk by, your poster won’t get a second look. Sans serif fonts, such as Arial and Helvetica, are easier to read than serif fonts, such as Times New Roman, because the letters of the fonts don’t have the “serifs” — hooks or end strokes — that characterize serif fonts. (If you have taken any French courses, remember that sans means without, so sans serif means without the hooks or end strokes.) Use only one or two font styles for a more consistent look, and adjust the spacing between the text to make it easier to read.
Use capital letters, bold, italics, colour, and lines to highlight the main points of your poster, but use these features carefully—over-formatting a document makes it difficult for your audience to pick out what is important.
Bullets and numbers make information stand out, drawing the eye to each bullet or number marker in the text.
Now watch a series of video demonstrations to learn how to use Microsoft Word 2007 software features to create a poster.
Go to the Instructional Videos and select “WordArt.” Here, you will learn how to both insert and format WordArt.
Go to the Instructional Videos and select “Insert Text box.” After you've watched that demonstration, select “Insert Text box part 2.” These videos will teach you how to insert a text box, format the text, change the font (style, size, colour, bold, italic), and change the case features of Microsoft Word 2007.
To learn how to insert and format graphics in your documents, go to the Instructional Videos. Select “Inserting Graphics” to view a demonstration.
To create a visually appealing document, you may need to move and adjust the size of objects on your page. To learn how, go to the Instructional Videos and select “Adjusting Graphics.”
1.11. Page 3
Training Room 3—Graphics
Time to Practise
- Study the content, exemplars, graphics, and demonstrations presented in this training session, and review previous training sessions if necessary.
- Keyword search the Help menu and online help references, such as Microsoft Online Help and How-to, for additional software tips and training.
Practice 1
In this practice, you will be asked to create a bulleted, numbered, and multilevel list with provided information.
- Open a new, blank Microsoft Word® 2007 document.
- Save the document as “List” in your INF1030 WP1: Graphics folder.
- Create the following shopping list as a bulleted list.
 
SHOPPING LIST
- Milk
- Cheese
- Yogurt
- Carrots
- Broccoli
- Celery
- Apples
- Oranges
- Bananas
- Change the list to a numbered list.
- Change the list to a multilevel list by adding the categories “Dairy,” “Veggies,” and “Fruit” in the appropriate spots.
- Use the Increase and Decrease Indent buttons to make your list similar to following:
SHOPPING LIST- Dairy
- Milk
- Cheese
- Yogurt
- Veggies
- Carrots
-
Broccoli
- Celery
- Fruit         
- Apples
- Oranges
- Bananas
- Dairy
- Proofread and edit the list as necessary.
- Save the final document in your INF1030 WP1: Graphics folder.
Practice 2
In this practice, you will be asked to create a poster using details provided for you.
- Look at the Lemonade Sale1 poster as a basic example of a poster.
- Open a new, blank Microsoft Word® 2007 document.
- Save the document as “Poster 1” in your INF1030 WP1: Graphics folder.
- Make your own lemonade sale poster using
- WordArt
- text boxes
- graphics
- Apply formatting options to enhance the look of your graphic elements.
- Adjust the zoom to see the entire page and make any necessary changes to your graphic elements.
- Print Preview your document to see it in its final form.
- Save your document when you are happy with the final look.
1 lemons: © Valentyn Volkov/shutterstock
Practice 3
In this practice, you will first look at advertisements, and then create your own for a poster or display.
- Using magazines or the Internet, find two examples of full-page print advertisements. Study the layout, design, and placement of the graphics and text in the examples. Ask yourself the following questions: What is the message being conveyed? How do the graphics complement the message and enhance the visual appeal? How is colour used to draw attention or create a mood? How does the text formatting (font, style, and size) emphasize the message?
- Create your own poster or advertisement using Text boxes, WordArt, and Graphics. You might want to publicize
- a school drama production
- a community or school sporting event
- a public awareness campaign (e.g., recycling, wildlife conservation)
- an event such as a carnival, dance, rodeo, or committee meeting
- Print Preview your document to see it in its final form. Make any necessary final adjustments. Save your document as “Poster 2” in your INF1030: WP1 folder.
1.12. Page 4
Training Room 3—Graphics
Check Point
- Can you create bulleted, numbered, and multilevel lists? Do your lists look like the examples in the training room?
- Compare Poster 1 (the Lemonade Sale poster you created) to the exemplar1. Have you included all the necessary information, including appropriate graphics? Did you make any improvements to your poster that made it better than the example?
- Show Poster 2 to a friend, classmate, or your teacher for feedback, discuss the following points, and then make any changes necessary to improve your document:
- Does the text clearly communicate important information or details?
- Do the graphics and colours draw attention and enhance the message?  
- Is the layout of the text and graphics visually appealing and well placed on the page?
- Are there any suggestions for improvement?
Use the Software Skills Checklist and check off which skills you are confident in demonstrating.
Did you have difficulty with any learning concepts or software features? If so, go back and review the information — you will use these skills in the next training sessions and in the final project.
1 lemons: © Valentyn Volkov/shutterstock
1.13. Training Room 4
Training Room 4—Reports

© Alice/shutterstock
Yikes—your teacher has just assigned a research paper! No problem—you are taking INF1030: Word Processing 1. When you are finished your research, you will be able to quickly and easily create a professional-looking paper you can be proud of.
After you have completed the learning activities in this section, you will be able to handle any assignment or project confidently, easily, and proficiently.
In this training room you will
- learn how to create an outline for a report
- learn the basic format of a report
- learn how to create an attractive title page for the report
- learn how to use headers and footers to automatically number pages
- read and watch demonstrations to learn about report creation
- practise using the software to complete three practice activities
- use help and online references for software assistance when you need it
- save activities in your INF1030: WP1: Reports folder
- check your work using exemplars and answer keys
1.14. Page 2
Training Room 4—Reports
Reports
Reports are documents that present ideas and facts in a logical form so that readers can understand presented information, form opinions, and make decisions, if necessary.
The purpose of the report and the intended audience will determine the report’s length and format.
Reports can provide information, tell a story, or present an opinion.
Formal reports give information about a particular topic and are written according to a specific style guide, such as that of the Modern Language Association (MLA) or the American Psychological Association (APA).  In the workplace, businesses use a variety of formatting styles to reflect their corporate image and unique style of branding.
Lists and Outlines
You have already learned how to create bulleted, numbered, and multilevel lists in the graphics section of this module. Using lists and outlines for report-writing will help you organize your thoughts in a meaningful and logical way in order to begin the writing process. These lists can guide your writing and ensure you discuss every point you want to make.
Here is an example of an outline that will help you begin writing a report.
MICROSOFT BUSINESS CERTIFICATION
- Benefits of Certification
- Skills for business and technology
- Industry standards recognition
- Career options
- Certification Options
- Microsoft Office Word
- Microsoft Office Excel
- Microsoft Office PowerPoint
- Microsoft Office Access
- Career Connections
- Interests, Values, Beliefs, Resources, Prior Learning Experience
- Possible Career Paths
- ALIS Web site career planning
Formatting Business Reports
After completing your outline and then writing your report, you will format your report using a specific style. There are several formal report styles for you to choose from, so select a style appropriate for the purpose of your writing.
Click the links below to see examples of different report styles and their formatting.
Simple report for school or business
Reports for humanities (English and Social Studies): MLA
Reports for Social Sciences (Psychology): APA
As you probably noticed, reports can look very different depending on the formatting style the author uses. It is important to always check with your teacher or employer as to his or her preferred style.
In the following examples and demonstrations, you will discover the structure of a simple report, and then learn to apply formatting to enhance the look of the report and highlight important information.
Study this example to learn the format and structure of a simple business report.
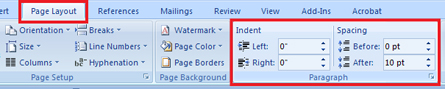
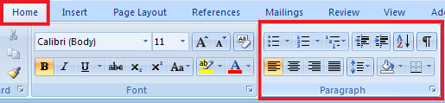
In Training Room 2: Letters, you discovered how to set line spacing and text alignment using the commands in the Paragraph group.   
The Paragraph group is the only group that appears in two tabs, the Home tab and the Page Layout tab. 
Microsoft product screen shot(s) reprinted with permission from Microsoft Corporation.
Microsoft product screen shot(s) reprinted with permission from Microsoft Corporation.
Below are two refresher demonstrations.
To review how to adjust line spacing options in your document, go to the Instructional Videos and select “Line Spacing Options.”
Go to the Instructional Videos and select “Text Alignment” to review alignment options.
Now, build your software skills by learning how to use tabs and indents. To do so, go to the Instructional Videos and select “Tabs and Indents.”
Headings and Subheadings
Well-placed, descriptive headings and subheadings help organize the body or content of a report in a logical manner, making the document easier to read. Headings highlight particular sections of the report, while subheadings are more specific to the individual ideas or topics covered in those sections. The headings and subheadings in your report correspond to the topics and subtopics in the outline of your report.
To learn how to use the formatting features in the font group to format headings and subheadings in a report, go to the Instructional Videos. Once there, select “Formatting Headings.”
Microsoft product screen shot(s) reprinted with permission from Microsoft Corporation.
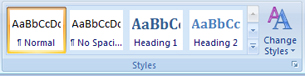
Microsoft Word 2007 has preformatted Quick Styles to make formatting your documents quick and easy. In the Home tab, in the Styles group, you will find a library of predefined sets of formats that include font, colour, size, and alignment decisions. Some of these styles also include borders.
See how easy it is to apply Quick Styles in your report by going to Instructional Videos and selecting “Using Quick Styles.”
Microsoft product screen shot(s) reprinted with permission from Microsoft Corporation.
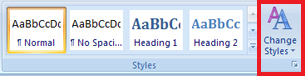
Go to the Instructional Videos and select “Change Styles.” This demonstration will show you how to change the Quick Styles you have used in your document using the Change Styles command.
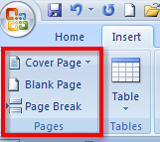
Page Breaks
Microsoft product screen shot(s) reprinted with permission from Microsoft Corporation.
Word will automatically insert a new page when there is enough text for more than one page. You can also insert page breaks in a document manually by using Control + Enter, or by using the Pages group on the Insert tab in the ribbon. This is useful when you want to control where a new page is inserted in a document.
Go to the Instructional Videos and select “Inserting Page Breaks.” This demonstration will show you how to use the Insert Page Break function in Microsoft Word 2007.
Report Title Pages
Now that you know how to insert page breaks, you will be able to use a similar function to create a title page for your report so that the entire report can be saved in one file. The title page comes at the beginning of a report and is meant to create interest, generate a first impression, and provide information, such as:
- the report’s title (and subtitle if there is one)
- the author’s name
- the name of the course for which the report has been prepared and the name of the teacher if prepared for a particular class
- the preparation date of the report
- complementary graphics relating to the report
Look at the following link to see an example of a report title page1 that includes all necessary information.
You can create a report title page in a separate document, or by inserting a page break to create a new page before your report begins. Keeping the entire report together in one file is beneficial if you are submitting your report electronically to your teacher.
Watch a demonstration on how to create a title page for your report, and insert and modify clip art to complement the title page. Go to the Instructional Videos and select “Formatting a Title Page.”
Go to Instructional Videos and select “Inserting a Graphic on the Title Page.” This video will demonstrate how to insert a graphic from a file in a report title page.
1 cover photo: © Dmitriy Shironosov/shutterstock
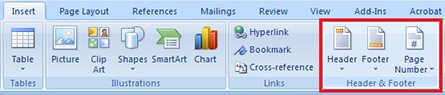
Headers and Footers
Microsoft product screen shot(s) reprinted with permission from Microsoft Corporation.
Headers are inserted at the top of a page, footers are inserted at the bottom. Both carry information about the document, such as page number, the report’s submission date, the author’s name, and the title of the report. This information is repeated on every page.
To insert headers, footers, and page numbers in a document, go to the Insert tab, then the Header and Footer group.
To learn how to insert page numbers in your report, go to the Instructional Videos and select “Numbering Pages.”
Go to the Instructional Videos and select “Page Numbering with a Title Page.” This demonstration will show you how to insert pages in a report that has a title page.
Once you have formatted your report, you will want to preview it to make sure that all formatting is in place. To learn how to preview a document using Scroll, Zoom, and Print Preview, go to the Instructional Videos. Once there, select “Previewing Your Document.”
1.15. Page 3
Training Room 4—Reports
Time to Practise
Practice 1
In this practice, you will be asked to create a report outline using provided information. Use this as a check to determine if you understand the formatting necessary to create a multilevel list. You may go back and check steps if you need assistance.
- Open a new, blank Microsoft Word® 2007 document.
- Save the document as “Outline” in your INF1030: WP1: Reports folder.
- Create the outline below for the WorldSkills Competition, using the Multilevel List feature.
- Choose Arial 12 point font.
- Type in the title of the report in CAPITAL LETTERS, bold.
- Hit your Enter key twice to leave one blank line between the title and the body of the outline.
- Make sure the body of the outline is regular font (not bold), and Capitalize Each Word.
- Click the Multilevel List button and select a style that uses both numbers and letters.
- Type the headings and subheadings using the Increase and Decrease Indent buttons to change the numbered list to an alphabetic list.
- Spell check and proofread to catch any mistakes.
- Print Preview the outline to see it in its final form.
- Save the finished document with your changes.
WORLDSKILLS COMPETITION
- What is WorldSkills
- Overview
- Vision
- Location
- Events
- Skills Categories
- Ceremonies
- Activities
- Partners
- Governments
- Industry
- Education
Practice 2
In this practice, you will be asked to create a tile page for a report. Use this as a check to determine if you understand the formatting necessary to prepare a title page for a report. You may go back and check steps if you need assistance.
- Open a new, blank Microsoft Word® 2007 document.
- Save the document as “Title Page” in your INF1030: WP1: Reports folder.
- Spend a bit of time investigating the WorldSkills Competition using the Internet — once you have a feel for the competition, create a report title page. The following information should appear on your title page:
- Title: WorldSkills Competition
- Subtitle: Connecting Youth, Skills, and the Future
- By: Your Name
- The current date
- Use formatting, styles, or WordArt to give your document professional appeal.
- Insert a graphic appropriate to the spirit of the competition.
- Take the time to spelling and grammar check as well as proofread the title page to catch any mistakes.
- Preview your title page and make any necessary adjustments to make the page visually appealing and professional-looking.
- Save the document with your changes.
Practice 3
In this practice, you will format a simple business report (the text of the report is provided for you). Use this as a check to determine if you understand the formatting necessary in report preparation. You may review the demonstrations in this training room if you need help. Refer to the Simple Business Report exemplar as a guide to help you prepare this document.
- Open the document report and save it as “Report” in your INF1030: WP1: Reports folder.
- Select the report, change Line Spacing in the Paragraph tab to double space.
- Centre and format the title, subtitle, and byline of the report.
- Align-left the entire body of the report, starting with “Overview.”
- Format the headings — OVERVIEW, THE ROAD TO WORLDS, SKILLS CATEGORIES, and WORLDSKILLS FACTS. Headings should be bold and uppercase, or choose an appropriate style.
- Format the subheadings “skills canada alberta” and “locations” to Capitalize Each Word.
- In the “Report” file, single space and indent the following long quotation 1 inch left and right.
"WorldSkills is a powerful means for building a global skills-respect culture. It enables the best of the world's young skilled people to motivate and inspire successive generations to see that vocational skills can lead to secure and fulfilling lives in a fast-changing, competitive world.”
—Jack Dusseldorp, President of WorldSkills
“Overview of World Skills” (13 November 2008). Reproduced by permission.
- Insert page numbers in the footer of the report, using the Header and Footer Group.
- Single space the Works Cited page, leaving one blank line between each bibliography entry.  Select the bibliography entries and create a .5 inch hanging indent. 
- Compare your document to the simple business report exemplar to check your formatting, then make any necessary changes to your report.
- Take time to spelling and grammar check as well as proofread the report to catch any mistakes.
- Print Preview the report to see it in its final form.
- Save the document.
1.16. Page 4
Training Room 4—Reports
Check Point
Self-check each practice session against the answer keys provided.
Check your Outline from Practice 1 against the exemplar.
Check your Title Page from Practice 2 against the exemplar1.
Check your Report from Practice 3 against the report answer key.
How did your documents compare to the exemplars and key provided?
- If your practice activities have fewer than three errors, move on to the next training session.
- If you had any difficulties working with your practice activities or had more than three errors, review the training session again, and check with your instructor for assistance.
Use the Software Skills Checklist and check off which skills you are confident in demonstrating.
Did you have difficulty with any of concepts or software features presented in this training room? If so, go back and review the information as you will use these skills in the next training sessions and in the final project.
1 cover photo: © Dmitriy Shironosov/shutterstock
1.17. Training Room 5
Training Room 5—Tables
MICROSOFT OFFICE |
||
Module |
Program |
Application |
INF1030 |
Word |
Word Processing |
INF1060 |
Excel |
Spreadsheet |
INF1070 |
PowerPoint |
Presentation |
INF1050 |
Access |
Database |
         
Tables help you organize information in rows and columns so your data is displayed in an easy-to-read format. Tables let you extract essential facts and figures from your work so your audience can quickly focus on the information you are presenting.
Think about how you can use tables in your personal life. What sort of information makes sense to display as a table?
Tables can be used to create a personal contact list of friends, or perhaps to report your science lab results.
In this training room you will
- learn basic table structure
- learn how to create a table using Tabs
- learn how to create tables using the table software feature
- read and watch demonstrations to learn about creating tables
- practise using the software to complete three practice activities
- use help and online references for software assistance when you need it
- save practice activities in your INF1030: WP1: Tables folder
- check you work using exemplars and answer keys
1.18. Page 2
Training Room 5—Tables
Tables
There are two ways you can create tables in Microsoft Word 2007. The first method involves setting and adjusting tabs; the second method uses the table feature.
Basic Table Structure
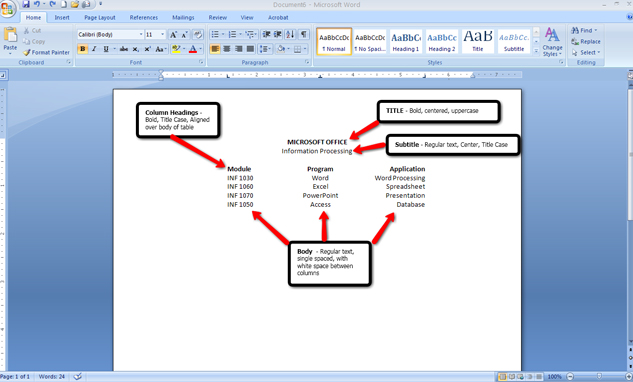
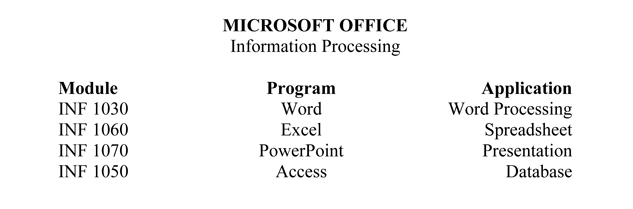
In order to create a table, you need to know the basic parts included in a table and how they are structured. Study the following exemplar to learn the names of the table parts and see the proper format for a table.
Microsoft product screen shot(s) reprinted with permission from Microsoft Corporation.
You may notice that the table columns are aligned in a variety of ways. The first column is left-aligned, the middle column is centered, and the last column is right-aligned. Look at the diagram below and notice how different types of tabs are used to align text.
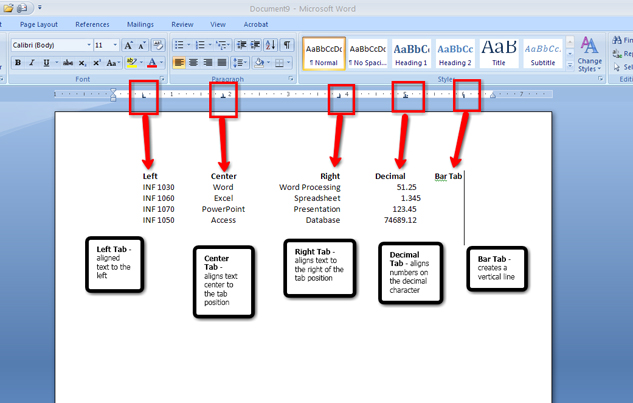
Microsoft product screen shot(s) reprinted with permission from Microsoft Corporation.
Go to the Instructional Video, and select “Setting Tabs on the Ruler.” This demonstration will allow you to discover how to set tabs on the ruler so that you can use this function to begin creating a table.
Microsoft product screen shot(s) reprinted with permission from Microsoft Corporation.

Microsoft product screen shot(s) reprinted with permission from Microsoft Corporation.
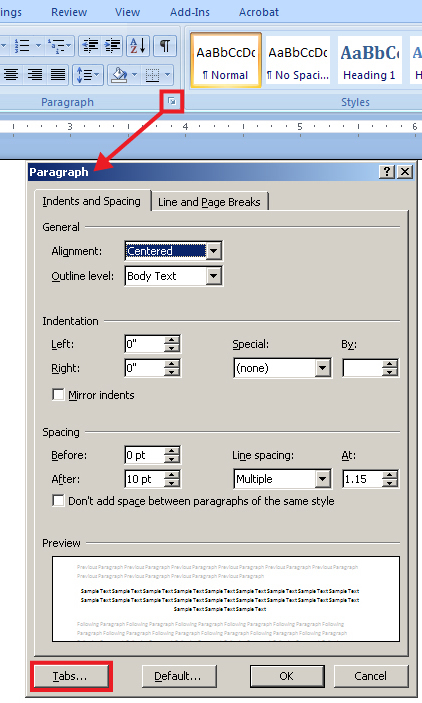
You can also access the Tab dialog box from the Paragraph group on the ribbon.
Now that you know what tabs are and how to set them, you‚Äôre ready to create a table. To create a simple table using tabs, go to the Instructional Videos and select “Setting Table Tabs with the Tab Dialog Box.”
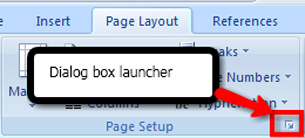
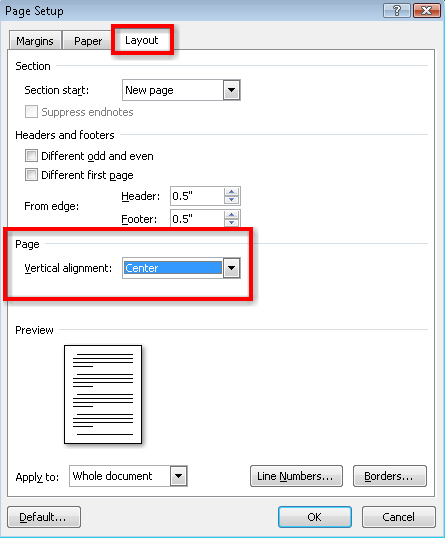
It is customary to vertically centre a table (from top to bottom) on a page to give the page visual balance. This can quickly be done in the Page Setup group in the Page Layout tab, and by choosing the dialog box launcher.
Microsoft product screen shot(s) reprinted with permission from Microsoft Corporation.
Microsoft product screen shot(s) reprinted with permission from Microsoft Corporation.
Now you are familiar with the main parts of a table, what tabs are, how to set them, and also how to vertically centre your table on a page.
Create a Table Using the Table Command
Microsoft product screen shot(s) reprinted with permission from Microsoft Corporation.
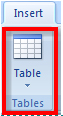
The table command in the Insert tab on the ribbon is another way to create tables. Insert a table by selecting the number of rows and columns you need. In a table, rows run horizontally (left to right), while columns run vertically (top to bottom), creating cells to hold your data. This is illustrated in the picture below.

Go to the Instructional Videos and select “Creating a Table Using Tabs.” This demonstration will show you how to create a table by clicking the Table button in the Insert tab.
When the table is selected, the Table Tools Design and Layout tabs appear for you to edit the table. 
Use the Layout tab to add and delete rows and columns, merge or split cells, change the cell size or autofit your table to the text, and change the alignment of your text in the cell.

Microsoft product screen shot(s) reprinted with permission from Microsoft Corporation.
Now that you know how to set up a table, you can learn how to delete rows, columns, or cells in a table using the Table Tools Layout tab. To do so, go to the Instructional Videos and select “Deleting Cells, Rows, and Columns.”
In the Table Tools Design tab you can add shading, borders, and preformatted styles to your tables. Spend some time exploring these formatting features to see how they change the look of your table. More detailed instruction on how to use the Table Tools tabs is given in INF2050: Word Processing 2. 
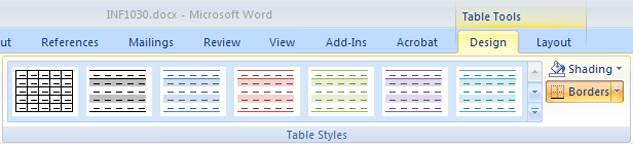
Microsoft product screen shot(s) reprinted with permission from Microsoft Corporation.
Go to the Instructional Videos and select “Formatting a Table.” This demonstration will teach you how to use the Shading command in the Table Tools Design tab to highlight information and draw attention to your table. Remember to format the title of the table as well as the column headings in bold.
Once your table is formatted, you should centre the table horizontally and vertically on the page.  Use the left, center, or right alignment buttons in the Home tab to change the alignment of your table on your page.
HINT: Use Ctrl + L to align left; Ctrl + R to align right; Ctrl + E to align centre.
1.19. Page 3
Training Room 5—Tables
Time to Practise
Now that you have an understanding of how to create tables, the practice activities below will help you apply your knowledge.
Practice 1
In this practice, you will be asked to create the following table by setting and using Left, Center, and Right tabs with provided content. You may go back to the demonstrations and check steps if you need assistance.
- Open a new, blank Microsoft Word® 2007 document.
- Save the document as “Table 1” in your INF1030: WP1: Tables folder.
- Create and format the following table using tabs. 
- Make sure your line spacing is set to single (Home tab, Paragraph group in the ribbon).
- Set the following tabs on your ruler or using the Tab dialog box: Left tab .5”; Center tab 3”; Right tab 6”.
- Type the title: “MICROSOFT OFFICE” — bold, centre, uppercase.
- Hit the Enter key twice to leave one blank line between the title and the subtitle.
- Type the subtitle: “Information Processing” — centre, Capitalize Each Word.
- Hit the Tab key to move the cursor to the first tab setting.
- Enter the column headings: “Module,” “Program,” and “Application,” using the Tab key to move to each column. ¬†
- Enter the body text for the table using the Tab key to move to each column. Use normal type for the body (not bold).
- Centre the table vertically on the page using the Page Layout group: click the Page Setup dialog box and select the Layout tab.
- Use the Spelling and Grammar check and proofread the table to ensure the information is correct.
- Print Preview the letter to see it in its final form.
- Save your document.
Practice 2
In this practice, you will be asked to create a table by using the Table function with provided content.
- Open a new, blank Microsoft Word 2007 document.
- Save the document as “Table 2” in your INF1030: WP1: Tables folder.
- Click the Insert Tab, Table button.
- Create a table with three columns and two rows.  Select Autofit to Contents.
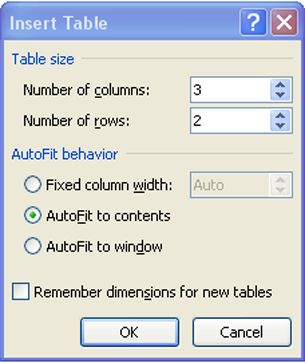
Microsoft product screen shot(s) reprinted with permission from Microsoft Corporation.
- Practise inserting an additional four rows to the table after it has been created. (You might want to review the demonstrations if you have forgotten how to do this.)
- Enter the following information into your table.
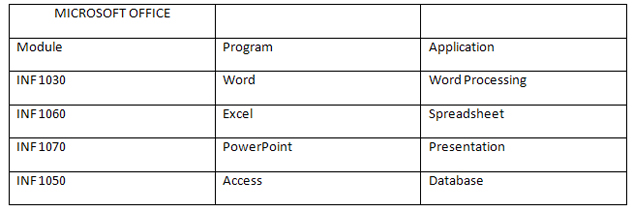
- Select all three columns in the first row of the table and, in the Table Tools tab, select the Layout tab, then select Merge Cells. The three cells merge into one cell.
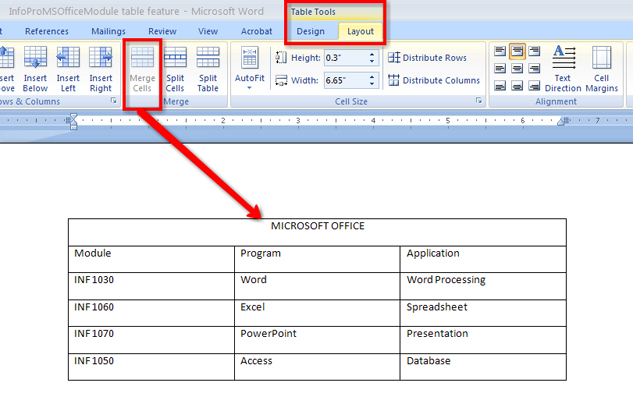
Microsoft product screen shot(s) reprinted with permission from Microsoft Corporation.
- In the Table Tools Layout tab, adjust the alignment of your text in the cells to center.
- Bold the title and column headings in your table.
- Use the Table Tools, Design tab to apply Shading to the title row and a complimentary shade to the column headings row.
- Centre the table horizontally on the page using the center button in the Paragraph group or Ctrl + E.
- Vertical-centre the table using the Page Layout tab — look for the Center button in the Alignment group. 
- Spell check and proofread the table to ensure the information is correct.
- Make any formatting adjustments you feel are necessary to enhance your table.
- Print Preview the table to see it in its final form.
- Save the document.
Practice 3
In this practice, you will create an attractively formatted contact list for a minimum of five friends using a table. You can create your table by setting the tabs or you can use the Table command — the choice is yours. Your address book table must meet the following criteria:
- Include a table title and appropriate column headings. You must include at least four columns of information, but you may choose to include more. Some suggestions for column headings are phone numbers, birthdays, email addresses, street addresses, or any other important, appropriate information.
- Format to your table to make it visually appealing.
- Horizontal- and vertical-centre the table on the page.
- Save the document as Table 3 in your INF1030: WP1: Tables folder.
1.20. Page 4
Training Room 5—Tables
Check Point
Self-check each practice session against the answer keys provided. Your assignments might show some variation depending on your formatting choices, such as font or colour. Be sure that your practice tables demonstrate your knowledge and understanding of the basic table structure and formatting taught in this training room.
Check your Practice 1 table against the Practice 1 answer key.
Check your Practice 2 against the Practice 2 answer key.
Check your Practice 3 against the Practice 3 sample.
How do your documents compare to the answer keys and exemplars?
- If you are able to easily create tables using both tabs and the table command, move on to the next training session.
- If you had any difficulty creating tables or have made three or more formatting or editing errors, review the training session again, and check with your instructor for assistance.
Use the Software Skills Checklist and check off which skills you are confident in demonstrating.
Did you have difficulty with any of the concepts or software features? If so, go back and review the information as you will use these skills in the final project.
1.21. Project 3 Summary
Project 3—Documents for Personal Use
Project Summary
When you can use word-processing software to produce professional-looking documents quickly and easily, you have developed skills that you will use in all aspects of your life. Consider the benefits of saving time while creating quality work. Think of how you will use your skills in your personal life, in your other school subjects, and as you enter post-secondary education or the workforce. People with skills stand out. Be one of those people.
This course is designed to honour the time it takes you to learn new skills. When you are comfortable with the skills presented in the training rooms, move on to your final project.