Section 1
| Site: | MoodleHUB.ca 🍁 |
| Course: | Math 20-3 SS |
| Book: | Section 1 |
| Printed by: | Guest user |
| Date: | Tuesday, 2 December 2025, 7:01 AM |
Description
Created by IMSreader
Table of contents
- 1. Section 1
- 1.1. Lesson 1
- 1.2. Launch
- 1.3. Are You Ready?
- 1.4. Refresher
- 1.5. Discover
- 1.6. Explore
- 1.7. Explore 2
- 1.8. Explore 3
- 1.9. Explore 4
- 1.10. Connect
- 1.11. Lesson 1 Summary
- 1.12. Lesson 2
- 1.13. Launch
- 1.14. Are You Ready?
- 1.15. Refresher
- 1.16. Discover
- 1.17. Explore
- 1.18. Explore 2
- 1.19. Connect
- 1.20. Lesson 2 Summary
- 1.21. Lesson 3
- 1.22. Launch
- 1.23. Are You Ready?
- 1.24. Refresher
- 1.25. Discover
- 1.26. Explore
- 1.27. Explore 2
- 1.28. Explore 3
- 1.29. Connect
- 1.30. Lesson 3 Summary
- 1.31. Section 1 Summary
1. Section 1
Section 1: Viewing and Representing 3-D Objects
Section 1 Introduction

If you are interested in cars, you have probably flipped through brochures or magazines or checked online to look at photos and illustrations or videos that advertise the latest models. Viewing a single photograph or drawing generally isn’t enough—to appreciate all the latest features, you need to study the vehicles from all sides.
In the Module 5 Project: Produce a Set of Drawings and a Scale Model, you will create a model of a three-dimensional object. One of your tasks will be to draw this model from various points of view. In Section 1 you will explore how to sketch these views. As well, you will use isometric dot paper to investigate how to represent a three-dimensional object in two dimensions.
1.1. Lesson 1
Section 1: Viewing and Representing 3-D Objects
Lesson 1: Drawing Three-Dimensional Objects in Two Dimensions

Brand X Pictures/Thinkstock
Focus
In science classes you may have seen or worked with three-dimensional models of molecules. Three-dimensional models have length, width, and height. The model in the photograph shows how certain atoms are joined to form a molecule. Models are used to represent molecules because it is often difficult to see all three dimensions on a flat surface, such as the page of a book or a computer screen. Since a computer screen or a book's page has only length and width, it is important to be able to represent a three-dimensional object in two dimensions.
In this lesson you will investigate two different ways to represent three-dimensional objects in two dimensions.
Lesson Question
In this lesson you will investigate the following question:
- How are three-dimensional objects represented in two dimensions?
Assessment
Your assessment for this lesson may include a combination of the following:
- course folder submissions from the Try This and Share sections of the lesson
- your contribution to Mathematics 20-3: Glossary Terms
- Lesson 1 Assignment (Save a copy of your lesson assignment to your course folder now.)
- the Project Connection
In this course you may come across Self-Check questions, Try This questions, and other activities that may or may not be assessed.
Remember that these questions and activities provide you with the practice and feedback that you need to successfully complete this course. You should respond to all the questions and place those answers in your course folder. Your teacher may wish to view the work that you have stored in your course folder to check on your progress and to see if you require assistance.
Materials and Equipment
- calculator
- graph paper
- square dot paper
- isometric dot paper
- straight edge
- pencil crayons
Time
This lesson has been designed to take 150 minutes; however, it may take more or less time depending on how well you are able to understand the lesson concepts. It is important that you progress at your own pace based on your own learning needs.
1.2. Launch
Section 1: Viewing and Representing 3-D Objects
Launch
This section checks to see if you have the necessary background knowledge and skills required to successfully complete Lesson 1.
Complete the following Are You Ready? questions. If you have difficulty or any questions, visit Refresher for a review or contact your teacher.
1.3. Are You Ready?
Section 1: Viewing and Representing 3-D Objects
Are You Ready?
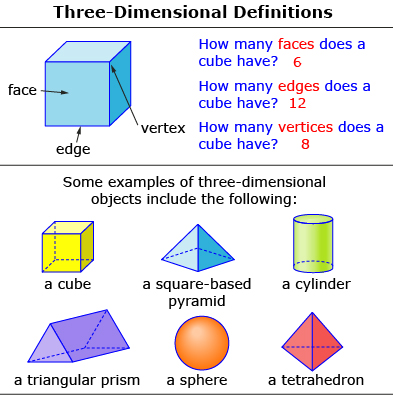
In this lesson you will apply your knowledge of some of the terminology associated with three-dimensional objects. Solids are examples of three-dimensional objects.
- A cube is an example of a geometric solid. Give three more examples of geometric solids. Answer
- What is the face of a solid? Answer
- How many faces does a rectangular prism have? A cardboard box is an example of a rectangular prism. Answer
- What is an edge of a rectangular prism? Answer
- How many edges does a rectangular prism have? Answer
- What is a vertex of a rectangular prism? Answer
- How many vertices does a rectangular prism have? Answer
If you answered the Are You Ready? questions without problems, move on to Discover.
If you found the Are You Ready? questions difficult, complete Refresher to review these topics.
1.4. Refresher
Section 1: Viewing and Representing 3-D Objects
Refresher
If you don't know the answers in Are You Ready?, or require more information, then study rectangular prisms as examples of three-dimensional objects in the graphics that follow.
Three-Dimensional Object
Initial Definition
A three-dimensional object has length, width, and height. In mathematics, the word figure is used for a mathematical model of real-world objects with common geometric attributes.
Example
A right-rectangular prism is one example of a three-dimensional figure.

Go back to Are You Ready? and try the questions again. Contact your teacher if you continue to have difficulty with the questions.
1.5. Discover
Section 1: Viewing and Representing 3-D Objects
Discover
In this section you will investigate ways of looking at three-dimensional objects. For the first activity you will need some paper.
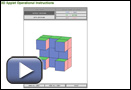
Try This 1
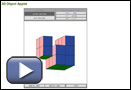
You will sketch all possible views of three-dimensional objects. These objects are composed of cubes and can be viewed using 3D Object Applet.
Follow the instructions to see the different views of the three-dimensional object:
- Use your mouse to rotate the object. Click on the object and then move the mouse in the direction of rotation.
- Use the arrow keys on your keyboard to rotate the object. The left and right arrows will turn the object horizontally. The up and down arrows will rotate the object vertically.
You should now be able to view the object from the sides, from the front and back, and from the top and bottom.
If you rotate this object, you can view the object directly from the front. You will see the following figure.
- Sketch and label this front view.
- Draw and label all the other possible views. To keep track, you may want to colour the squares to match the object in the applet.
- How many views are possible?
- Are all the views different? Why or why not?
- Use the applet to create a new three-dimensional object by following these instructions:
- Click on “Show All Cubes” to reset the cube.
- Select a view button under “Adjust Figure by Layers: Front - Back, Top - Bottom, or Left - Right.”
- Click on the coloured cubes to delete a cube.
- Click on the white cubes to add a cube.
- Draw and label all possible views for the new object. If you are working with a partner, challenge each other with more complicated objects.
- Did you notice any relationship between parallel views, such as top and bottom, front and back, or left and right? Are they always the same views, or can they be different?
![]() Save your sketches and responses to your course folder.
Save your sketches and responses to your course folder.
Share 1
Share your responses to the questions in Try This 1 with a classmate or with a group of people.
- To represent the 3-D objects in two dimensions, how many views are necessary? Does it depend on the object? Explain how you would choose the number of views needed.
- For question 6, what similarities and differences between the relationships were observed?
![]() If required, save a copy of your discussion in your course folder.
If required, save a copy of your discussion in your course folder.
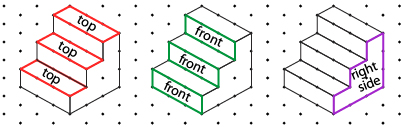
1.6. Explore
Section 1: Viewing and Representing 3-D Objects
Explore
In Discover you investigated the six possible views of objects made up of cubes. A view is a two-dimensional (flat) drawing of one of the faces of a three-dimensional object. As you discovered in Try This 1, not all views are necessarily unique.
Example

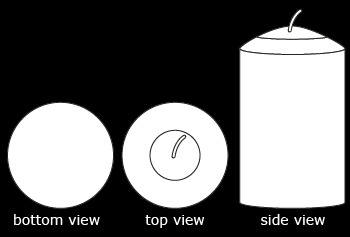
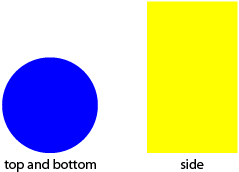
iStockphoto/Thinkstock
Draw the candle's different views. How many different views do you see in the photo?
Solution
There are three views, as shown in the following illustration.
There is only one side view. The top and bottom views are similar but slightly different due to the candle's wick.
Go to pages 219 to 221 of MathWorks 11 and read “Explore the Math,” including Examples 1 and 2. As you read the passages, think about the following:
- Notice how the terms views and elevations are used in the same way (interchangeably).
- List some situations where views or elevations are helpful.
- How are component parts diagrams an example of elevations?
You can now practise drawing views in Self-Check 1.
1.7. Explore 2
Section 1: Viewing and Representing 3-D Objects
Self-Check 1
- Draw the views of the three-dimensional object shown in 3D Object Applet. Pencil crayons may help organize the views.
Answer
-
Give at least two examples of solid objects that have just one distinct view. Answer
- Do question 1 of “Discuss the Ideas” on page 222 of MathWorks 11. Answer
- Do question 2 of “Discuss the Ideas” on page 222 of MathWorks 11. Answer
- Do question 3 of “Discuss the Ideas” on page 222 of MathWorks 11. Answer
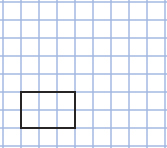
Another way of sketching a three-dimensional object is to use graph paper. Print at least two sheets of graph paper. Work through the following example by drawing each step on your own piece of graph paper.
Example
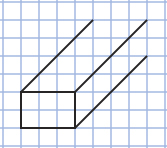
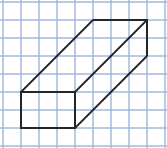
Draw a face-on view of a rectangular prism that is 3 units wide, 2 units high, and 4 units long.
Solution
Step 1: Draw the face that will appear closest to you. You can choose any of the six prism faces. One choice is the face that is 3 units wide and 2 units high.
Step 2: Since the length of the prism is 4 units, draw the diagonals that will be visible.
Step 3: Complete the prism.
Try This 2
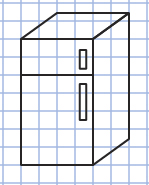
Choose any three-dimensional object you can see in the room you are presently in. Sketch a face-on view of this object on graph paper or on square dot paper. If you’re working in your home, some suggestions are a fridge, a stove, a microwave, cupboards, or a couch.
Need some help? Here is how a refrigerator might be drawn. ![]()
![]() Save your sketch to your course folder.
Save your sketch to your course folder.
1.8. Explore 3
Section 1: Viewing and Representing 3-D Objects
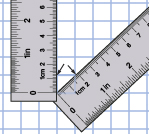
You may have noticed while drawing on the graph paper that the diagonal line sections are longer than the horizontal and vertical sections. The diagram shown here illustrates this difference.
A third way to represent a 3-D object in a two-dimensional diagram is to use isometric dot paper. This paper is great for drawing shapes to scale because every diagonal and vertical dot is an equal distance apart. Print several copies of isometric dot paper for this lesson.
Representations using isometric dot paper are called edge or corner views.
Example
Draw on isometric dot paper an edge or corner view of a rectangular prism that is 3 units wide, 2 units high, and 5 units long.
Solution
Watch Drawing a Rectangular Prism.
Read pages 234 to 237 for an additional example on using isometric dot paper. As you read through the example, don’t worry about how the scale of the box is found. You will spend time with scale drawings later in this module. For now, pay careful attention to steps 1 to 6 that focus on drawing with isometric paper.
The following interactive geoboard allows you to form isometric diagrams of three-dimensional figures.
Try This 3
Use the interactive geoboard or isometric dot paper to draw an isometric sketch of the three-dimensional object shown in 3D Object Applet.
![]() Save a screenshot of your isometric sketch to your course folder.
Save a screenshot of your isometric sketch to your course folder.
1.9. Explore 4
Section 1: Viewing and Representing 3-D Objects
Self-Check 2
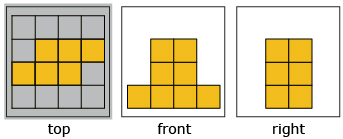
- Use the interactive geoboard or isometric dot paper to create an isometric sketch of the following three-dimensional objects.

Answer
It is now time to add new math terms, definitions, and examples/notes to your Mathematics 20-3: Glossary Terms document, which you have been adding to and saving in your course folder. Complete the missing pieces of the document, and save it to your desktop. Note that some terms, definitions, and examples/notes have already been provided in the document. If you have misplaced your copy of the Glossary Terms document, you can get a new one from the Toolkit.
In this lesson the new terms you will add are the following:
- three dimensions
- two dimensions
- isometric dot paper
- view
- face-on view
- edge or corner view
1.10. Connect
Section 1: Viewing and Representing 3-D Objects
Connect
Going Beyond
In this lesson you represented three-dimensional objects in two dimensions. Isometric views are often the easiest to visualize.
Example
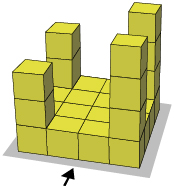
How many cubes make up the object shown in the top screen in 3D Applet Example? Check your answer.
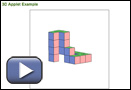
Solution
Counting the cubes in columns from left to right, there are 4 + 3 (partially hidden) + 3 + 2 + 3 (front row) + 3 (right-hand row) = 18.
There are 18 cubes in the figure.
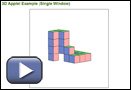
Share 2
Work with a partner. Use the bottom screen in 3D Applet Example to create a block object. Then challenge your partner to count the number of cubes in the object.
Project Connection
The Module 5 Project: Produce a Set of Drawings and a Scale Model involves representing and creating a three-dimensional object.
- Turn to page 209 of the textbook and read “Project Overview” and “Final Presentation Checklist” to get an understanding of the Module 5 Project.
- Complete the “Get Started” portion of the project on page 209.
- Contact your teacher to make sure the object you have chosen is appropriate.
![]() You will be presenting this entire Module 5 Project at the end of the module. Make sure you save your work in your course folder.
You will be presenting this entire Module 5 Project at the end of the module. Make sure you save your work in your course folder.
Lesson 1 Assignment
Your lesson assignment contains some problems for you to solve using the knowledge gained during the lesson. Now you will have the chance to apply the concepts and strategies learned to a new situation. Show work to support your answers.
You will need two sheets of graph paper and one sheet of isometric dot paper, or use the interactive geoboard and take screen shots of your responses.
Open the Lesson 1 Assignment that you saved to your course folder and complete the questions.
1.11. Lesson 1 Summary
Section 1: Viewing and Representing 3-D Objects
Lesson 1 Summary
John Foxx /Stockbyte/Thinkstock
Artists must be able to represent three-dimensional objects on canvas. In this lesson you explored three different ways of representing three-dimensional objects in two dimensions. These methods included drawing six views, using graph paper and isometric graph paper to sketch face-on and edge views, and using dot paper to create three-dimensional figures.
1.12. Lesson 2
Section 1: Viewing and Representing 3-D Objects
Lesson 2: Drawing Three-Dimensional Objects from Their Views
Focus
The ability to visualize three-dimensional objects from their views, or vice versa, is very important in many trades. A machinist, for example, is a person who uses tools such as a computer numerical control (CNC) machine to manufacture parts required for a job. To program the machine, the machinist needs to interpret blueprints, which are two-dimensional representations of three-dimensional objects.
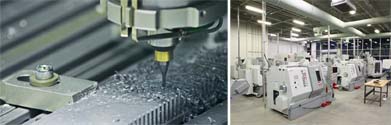
drill: iStockphoto/Thinkstock; power: © NAIT Photography
In Lesson 1 you represented three-dimensional objects in two dimensions. One method you explored was sketching the views of the object: front and back, top and bottom, left and right. In this lesson you will do the reverse by reconstructing three-dimensional objects from their views.
Lesson Question
In this lesson you will investigate the following question:
- How are three-dimensional objects drawn from two-dimensional views?
Assessment
Your assessment for this lesson may include a combination of the following:
- course folder submissions from the Try This and Share sections of the lesson
- your contribution to the Mathematics 20-3: Glossary Terms
- Lesson 2 Assignment (Save a copy of your lesson assignment to your course folder now.)
Materials and Equipment
- isometric dot paper
- graph paper
- straight edge
Time
This lesson has been designed to take 150 minutes; however, it may take more or less time depending on how well you are able to understand the lesson concepts. It is important that you progress at your own pace based on your own learning needs.
1.13. Launch
Section 1: Viewing and Representing 3-D Objects
Launch
This section checks to see if you have the necessary background knowledge and skills required to successfully complete Lesson 2.
Complete the following Are You Ready? questions. If you have difficulty or any questions, visit Refresher for a review or contact your teacher.
1.14. Are You Ready?
Section 1: Viewing and Representing 3-D Objects
Are You Ready?
In previous mathematics courses you constructed common three-dimensional objects from their nets. A net of a geometric solid is a two-dimensional figure that can be folded into a geometric solid. Some of the nets you explored were for the cube, the rectangular prism, and the pyramid.
Can you identify what three-dimensional object can be constructed from each of these three nets?

If you answered the Are You Ready? questions without problems, move on to Discover.
If you found the Are You Ready? questions to be difficult, complete Refresher to review these topics.
1.15. Refresher
Section 1: Viewing and Representing 3-D Objects
Refresher
If you don’t know the answers in Are You Ready?, or if you require more information, do the following review activities.
Use the Net applet to study the nets of three-dimensional objects.
View Exploring Surface Area, Volume, and Nets (Object Interactive) to watch the nets for different 3-D objects fold and unfold.
Go back to Are You Ready? and try the questions again. Contact your teacher if you continue to have difficulty with the questions.
1.16. Discover
Section 1: Viewing and Representing 3-D Objects
Discover
Can you build a figure that matches a given front, top, and side view? The following Try This activity tests your ability to visualize and build three-dimensional figures.
Try This 1
Step 1: Open 3D and Orthographic Views - Activity A.
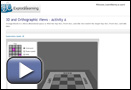
Screenshot reprinted with permission of ExploreLearning.
Step 2: Click on “Exploration Guide,” and follow the instructions under “Using the Gizmo.”
Step 3: Read “Playing the Game” in the “Exploration Guide.”
Have fun!
- How do the top and bottom views compare for any 3-D figure you build? Why is the bottom view not provided?
- How do the front and back views compare? Explain.
- How do the left and right views compare for any 3-D figure you build?
- Can you position the blocks if you're given only two views? Why or why not?
Share 1
Discuss your answers to Try This 1 with a classmate or with a group of people.
- Why must the three views you used to build the 3-D figure be perpendicular to each other?
![]() If required, save a copy of your discussion in your course folder.
If required, save a copy of your discussion in your course folder.
1.17. Explore
Section 1: Viewing and Representing 3-D Objects
Explore
The views you used to build 3-D objects in Discover are often referred to as orthographic views. The word ortho means “perpendicular.” Each view is perpendicular, or at a 90° angle to another side.
- The top view is perpendicular to front and side views.
- The front view is perpendicular to top and side views.
- The side view is perpendicular to top and front views.
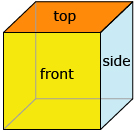
Think of a cube. Each orthographic view could fit into a cube since the front, the right side, and the top all meet at right angles.
Remember that an orthographic view is a two-dimensional representation. You may need one, two, three, or all six views to represent the original object.
Notice how many views are required to represent each object in the rest of this lesson.
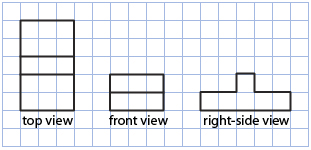
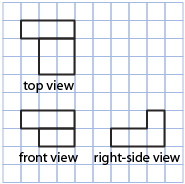
Try This 2
What three-dimensional object do the following views define? Follow the steps to draw the object on isometric dot paper.
Step 1: First, determine the maximum dimensions of the object. ![]()
Step 2: Second, sketch in a prism on isometric dot paper with these maximum dimensions.
Step 3: Last, add and erase lines until the figure is complete. Check your drawing. ![]()
![]() Save your drawing to your course folder.
Save your drawing to your course folder.
The three-dimensional object is a set of stairs.
1.18. Explore 2
Section 1: Viewing and Representing 3-D Objects
Example
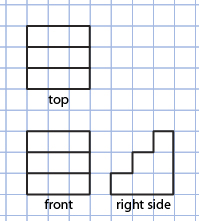
On isometric dot paper, draw the three-dimensional object defined by the following orthographic diagram.
Note that the lines through the inside of the views represent changes in depth, height, or length.
Solution
Watch Orthographic Three-Dimensional Object.
Self-Check 1
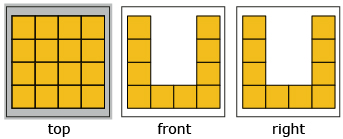
- What three-dimensional object do the following views define?
Answer
You will need to print isometric paper for the following question. You may also wish to print graph paper if you wish to copy the orthographic diagrams given in the question.
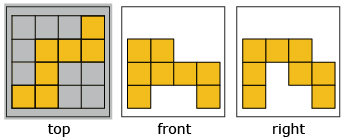
- On isometric dot paper, draw the three-dimensional object that is defined by the following views.
Answer
It is now time to add new math terms to your Mathematics 20-3: Glossary Terms document.
The new terms you will add in this lesson are
- orthographic views
- nets
1.19. Connect
Section 1: Viewing and Representing 3-D Objects
Connect
Going Beyond
Orthographic views can be thought of as slots in a board through which a solid object can pass.
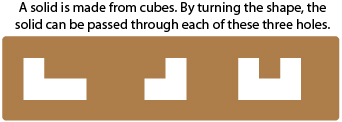
- Describe what this shape will look like.
- Build this shape using interlocking cubes.
Lesson 2 Assignment
Your lesson assignment contains some problems for you to solve using the knowledge gained during the lesson. Now you will have the chance to apply the concepts and strategies learned to a new situation. Show work to support your answers.
You will need one sheet of isometric dot paper.
Open the Lesson 2 Assignment that you saved to your course folder and complete the questions.
1.20. Lesson 2 Summary
Section 1: Viewing and Representing 3-D Objects
Lesson 2 Summary

CAD: Hemera/Thinkstock; computer: Hemera/Thinkstock
Drafting and design technologists use computer aided drafting (CAD) software to design technical drawings. These drawings may include orthographic views and three-dimensional representations. In this lesson you used some of the same techniques that a drafting technologist uses. Specifically, you created three-dimensional drawings from orthographic views.
1.21. Lesson 3
Section 1: Viewing and Representing 3-D Objects
Lesson 3: Creating Three-Dimensional Models
Focus
Hemera/Thinkstock
When you were younger, did you create models of buildings, cars and trucks, bridges, or even entire cities using building blocks such as LEGO? In this lesson you will revisit that time to explore the relationships between drawings of three-dimensional objects and the objects themselves. If you have LEGO pieces stored away, it’s time to take them out. You will create three-dimensional models!
Lesson Question
In this lesson you will investigate the following question:
- How are three-dimensional models created from two-dimensional views?
Assessment
Your assessment for this lesson may include a combination of the following:
- course folder submissions from the Try This and Share sections of the lesson
- your contribution to the Mathematics 20-3: Glossary Terms
- Lesson 3 Assignment (Save a copy of your lesson assignment document to your course folder now.)
Materials and Equipment
- straight edge
- one of the following:
- LEGO pieces or other building blocks
- modelling clay or playdough
- sugar cubes
- scissors
- tape or a glue stick
Time
This lesson has been designed to take 150 minutes; however, it may take more or less time depending on how well you are able to understand the lesson concepts. It is important that you progress at your own pace based on your own learning needs.
1.22. Launch
Section 1: Viewing and Representing 3-D Objects
Launch
This section checks to see if you have the necessary background knowledge and skills required to successfully complete Lesson 3.
Complete the following Are You Ready? questions. If you have difficulty or any questions, visit Refresher for a review or contact your teacher.
1.23. Are You Ready?
Section 1: Viewing and Representing 3-D Objects
Are You Ready?

Images Etc Ltd/Photographer's Choice/Getty Images
The largest model of a cube is the Atomium (an iron crystal magnified 165 billion times) in Brussels, Belgium. The structure stands 102 m high and was the main pavilion for the Brussels World's Fair of 1958. The cube was built to symbolize peace and unity among all people.
In this section you will review the construction of three-dimensional figures from their nets. You will need scissors and tape or a glue stick.
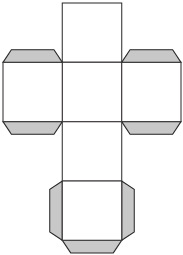
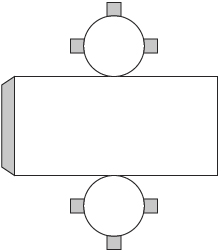
Print out each of the following nets to practise building 3-D models of each figure.
- Build a 3-D model of a cone from the cone net.
- Build a 3-D model of a pyramid (square base) from the square pyramid net.
- Build a 3-D model of a cylinder from the cylinder net.
- Build a 3-D model of a cube from the cube net.
- Puzzle this out. Try the hexominos puzzle activity on page 121 in your textbook. Answer
If you answered the Are You Ready? questions without problems, move on to Discover.
If you found the Are You Ready? questions difficult, complete Refresher to review these topics.
1.24. Refresher
Section 1: Viewing and Representing 3-D Objects
Refresher
If you don't know the answers in Are You Ready?, or require more information, go to Exploring Surface Area, Volume, and Nets (Object Interactive) to watch nets for 3-D objects fold and unfold.

Go back to Are You Ready? and try the questions again. Contact your teacher if you continue to have difficulty with the questions.
1.25. Discover
Section 1: Viewing and Representing 3-D Objects
Discover

Stockbyte/Thinkstock
In this section you will research why people create three-dimensional models.
Try This 1
Why are 3-D models produced? Use the Internet, a library, or any other source to answer this question.
Share 1
With a partner, or with a group of people, share the reasons you found for creating 3-D models in Try This 1.
![]() Create a combined list and save this information to your course folder.
Create a combined list and save this information to your course folder.
1.26. Explore
Section 1: Viewing and Representing 3-D Objects
Explore
In Discover you researched possible reasons for the creation of three-dimensional models. For example, you may have found out that landscape architects, developers, and city planners use software to model projects. People in these professions often create physical models to show clients and the public what the end product will look like.
You have likely seen models of buildings, bridges, rail lines, ships, aircraft, machine parts, and vehicles of all types. In Section 2 you will use digital media to practise building 3-D models from 2-D orthographic views.
Try This 2
Step 1: Open 3D and Orthographic Views - Activity B.
Screenshot reprinted with permission of ExploreLearning.
Step 2: Click on “Exploration Guide” and follow the instructions under “Using the Gizmo.”
Step 3: Read the “Playing the Game” instructions in the “Exploration Guide.” Have fun playing the game.
Step 4: Answer the “Assessment Questions” once you have played a few rounds.
Share 2
With a partner, or with a group of people, review what you did in Try This 2 by discussing the following questions:
- How might a top view not show all the details required to build a 3-D model?
- How could you add blocks to a 3-D object without changing one of the views? Explain.
![]() Create a summary of the key points discussed and the answers to the Share questions. Save this information in your course folder.
Create a summary of the key points discussed and the answers to the Share questions. Save this information in your course folder.
1.27. Explore 2
Section 1: Viewing and Representing 3-D Objects
You have now had experience building models from 2-D views in a digital environment. Try building models using a variety of other manipulatives.
- If you have access to LEGO pieces or other building materials, like sugar cubes, building blocks, playdough, dice, or anything else you can think of, you will need them now.
- If you don't have any physical materials to build a model, you can use virtual LEGO pieces online. You can find the LEGO materials by using a search engine and the keywords “LEGO digital designer.” You can also use the 3D Object Applet from Lesson 1.

Try This 3
- Given the front, side, and top views that follow, construct a possible three-dimensional object using whatever materials you have handy.
- Do the orthographic views represent the three-dimensional object? Confirm your answer by building a 3-D model. Note that the arrow points to the front of the object.
![]() Save your work to your course folder.
Save your work to your course folder.
1.28. Explore 3
Section 1: Viewing and Representing 3-D Objects
Self-Check 1
- Given the front, side, and top views that follow, construct a possible three-dimensional object. You can use blocks, sugar cubes, playdough, an online applet, or anything that works for you.
Answer
- Given the front, side, and top views that follow, construct a possible three-dimensional object.
Answer
It is now time to add new math terms to your Mathematics 20-3: Glossary Terms document.
In this lesson the new term you will add is
- three-dimensional models (3-D models)
1.29. Connect
Section 1: Viewing and Representing 3-D Objects
Connect
Going Beyond
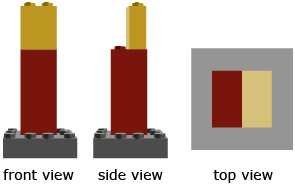
Which of the following four smaller views of the model airplanes are not orthographic views? Explain your answer.
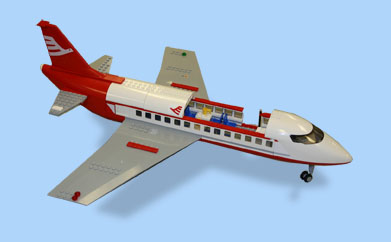
A. 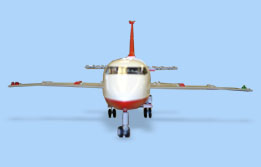 B.
B. 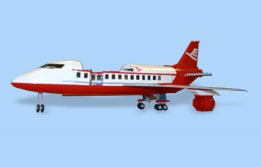
C. 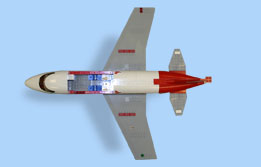 D.
D. 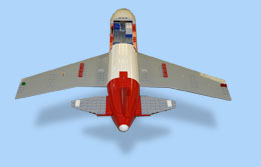
Project Connection
Read through the section of Module 5 Project: Produce a Set of Drawings and a Scale Model that involves the creation of a three-dimensional model. This is on page 247 of the textbook. You don't yet have enough information to complete this section because your model will have to be built to scale. You will learn about building scale models in Section 2 of this module.
Lesson 3 Assignment
Your lesson assignment contains some problems for you to solve using knowledge gained during the lesson. Now you will have the chance to apply the concepts and strategies learned to a new situation. Show work to support your answers.
Open the Lesson 3 Assignment that you saved to your course folder and complete the questions.
1.30. Lesson 3 Summary
Section 1: Viewing and Representing 3-D Objects
iStockphoto/Thinkstock
Lesson 3 Summary
Part of the creative process is visualizing the end result. A powerful aid is the use of models. Three-dimensional models are used for engineering projects such as the construction of bridges, buildings of all types, gas plants, refineries, and power-generating plants. In this lesson you created three-dimensional models. Will you adapt a model you created for your Module 5 Project?
1.31. Section 1 Summary
Section 1: Viewing and Representing 3-D Objects
Section 1 Summary
Hemera/Thinkstock
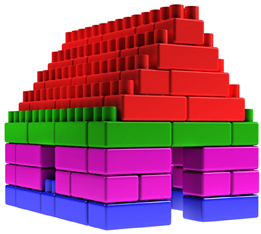
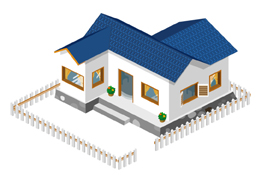
Graphic artists have a variety of techniques at their disposal to make two-dimensional illustrations appear three-dimensional. One of these techniques is isometric drawing. The sketch of the house is an isometric representation.
As part of the Module 5 Project: Produce a Set of Drawings and a Scale Model, you are expected to sketch an isometric diagram of a box by using isometric dot paper as an aid. You explored this technique in Lesson 1.
In Lessons 2 and 3 you examined drawing orthographic views of three-dimensional objects. Orthographic views are ways of presenting in two dimensions a three-dimensional object from more than one point of view. Orthographic views reveal what could be hidden with only a single drawing. For instance, imagine that you want to buy the house shown in the illustration. You would want to see other views of the house, such as the back and the far side.