Lesson 1
| Site: | MoodleHUB.ca 🍁 |
| Course: | Math 20-3 SS |
| Book: | Lesson 1 |
| Printed by: | Guest user |
| Date: | Tuesday, 2 December 2025, 6:58 AM |
Description
Created by IMSreader
1. Lesson 1
Module 6: Surface Area
Lesson 1: Area and Surface Area
Focus
The bark canoe was first used by First Nations people across Canada. This canoe was well suited for travel on lakes or rivers. The crafts were later used by voyageurs to transport furs and other goods between trading posts during European exploration of North America. The basic design was lightweight and manoeuvrable, yet the canoe was sturdy enough to carry heavy loads. The canoe's basic design has stood the test of time.
There are still a few dedicated canoe artisans who follow traditional construction techniques. In the photograph, the birchbark cover is carefully stitched together. The amount of bark needed depends on the canoe’s surface area.
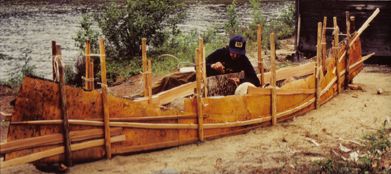
Henri Vaillancourt
In this lesson you will explore the surface area of a variety of three-dimensional objects.
Lesson Question
- How can a net be used to explain the relationship between area and surface area?
Assessment
Your assessment for this lesson may include a combination of the following:
- course folder submissions from the Try This and Share sections of the lesson
- your contribution to the Mathematics 20-3 Glossary Terms and the Formula Sheet
- Lesson 1 Assignment (Save a copy of your lesson assignment document to your course folder now.)
- the Project Connection
In this course you may come across Self-Check questions, Try This questions, and other activities that may or may not be assessed.
Remember that these questions and activities provide you with the practice and feedback that you need to successfully complete this course. You should respond to all the questions and place those answers in your course folder. Your teacher may wish to view the work that you have stored in your course folder to check on your progress and to see if you require assistance.
Materials and Equipment
- paper
- scissors
- tape or a glue stick
- calculator
Time
This lesson has been designed to take 150 minutes; however, it may take more or less time depending on how well you are able to understand the lesson concepts. It is important that you progress at your own pace based on your own learning needs.
1.1. Launch
Module 6: Surface Area
Launch
This section checks to see if you have the necessary background knowledge and skills required to successfully complete Lesson 1.
Complete the following Are You Ready? questions. If you have difficulty or any questions, visit Refresher for a review or contact your teacher.
1.2. Are You Ready?
Module 6: Surface Area
Are You Ready?
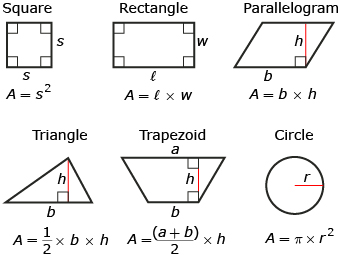
In previous mathematics courses, you found the area of various two-dimensional shapes. Hopefully you recall using these formulas.
- Find the area of one side of a sheet of standard copy paper. Express your answer to the nearest tenth of a square inch. Answer
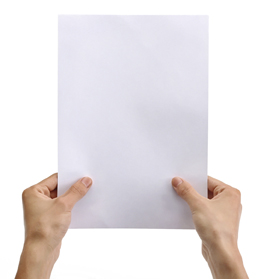
iStockphoto/Thinkstock
- A circular no-entry sign is 45 cm in diameter. What is the area of the sign’s front side? Round your answer to the nearest square centimetre. Answer
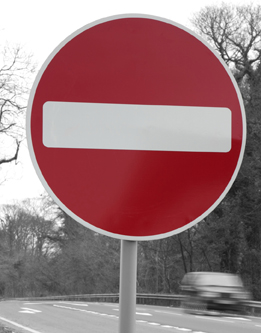
iStockphoto/Thinkstock
- The trapezoidal window outlined in blue on the photo has the dimensions outlined by the graphic. What area of glass is needed to fill the window? Answer
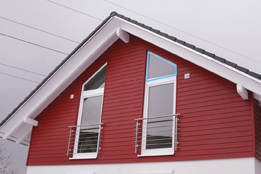
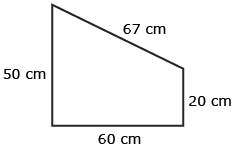
iStockphoto/Thinkstock
If you answered the Are You Ready? questions without any issues, move on to Discover.
If you had some difficulty with the Are You Ready? questions, complete Refresher.
1.3. Refresher
Module 6: Surface Area
Refresher
If you had trouble with the Are You Ready? questions, or if you require more information, use the following activites to guide your review of area formulas.
|
Area Formulas
|
 |
|

Go back to Are You Ready?, and try the questions again. Contact your teacher if you continue to have difficulty with the questions.
1.4. Discover
Module 6: Surface Area
Discover
In Module 5, one important question asked when making models was this: How much material is needed? If you are referring to the object’s surface, this question is really asking this: What is the surface area of the model?
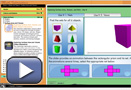
In Exploring Surface Area, Volume, and Nets—Use It, you will investigate what surface area means. Click on the button and use the information to complete Try This 1.
Try This 1
Select the “Use It 1: Nets” tab of the applet to begin each investigation.
Investigate the following three-dimensional objects:
- rectangular prism
- rectangular pyramid
- triangular pyramid
Answer the following questions for each object. You can organize your responses in a chart similar to the one that follows.
- Select a 3-D object from the area showing all six objects, and then choose the correct net for that object from the choices given. (Hint: Use the slider from the applet to help identify the correct net.) Sketch the net in your chart.
- Use either the “Use It 1: Nets” or “Use It 2: Views” tab from the applet to help answer these questions:
- How many faces does the net have?
- What 2-D shape does each face have?
- What 2-D area formula could you use to find the area of each face?
- Describe a strategy you could use to find the total surface area of the 3-D object.
Rectangular Prism Rectangular Pyramid Triangular Pyramid Sketch of Net
Number and Shape of Each Face Formulas Used to Find the Area of Each Face Strategy Used to Find the Total Surface Area of the 3-D Object
![]() Save your responses to your course folder.
Save your responses to your course folder.
Share 1
Share your responses to the Try This 1 questions with a partner or with a group of people. How did the strategies identified to find the surface area of the 3-D object compare? After comparing responses, discuss the following questions:
- What is the difference between an area of a 2-D shape and the surface area of a 3-D object?
- How can a net be used to help find the surface area of a 3-D object?
As you work on Share 1, refer to the Share Rubric. This information will help you understand what your teacher is expecting.
![]() If required, save a copy of your discussion in your course folder.
If required, save a copy of your discussion in your course folder.
1.5. Explore
Module 6: Surface Area
Explore
Hemera/Thinkstock
In previous mathematics courses, much of your work with area has involved two-dimensional shapes. In this lesson your focus will be on the surface area of three-dimensional objects. As you may have noted in Discover, the surface area of a 3-D solid is the sum of the areas of all the solid's sides, faces, or exposed surfaces.
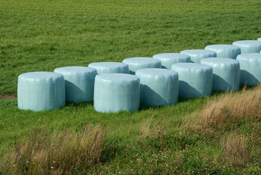
In Lesson 1 you will explore the surface area of a variety of different 3-D solids. You will begin by exploring the surface area of cylinders, such as the round bales shown in the photo.
Try This 2
To prevent spoilage in feed for animals, one option for farmers is to create silage bales. A silage bale is a cylindrical bale of hay or grain covered in plastic. This covering prevents weathering and creates silage, partially fermented feed. Silage is rich in nutrients and can be used as feed during winter. Bales range in size, but you can assume the bales in the photograph are 5 ft in diameter × 5 ft long.
To know how much plastic to buy for the silage, the farmer must first know the surface area of each bale.
One way to determine the surface area of each round bale is to draw a net.
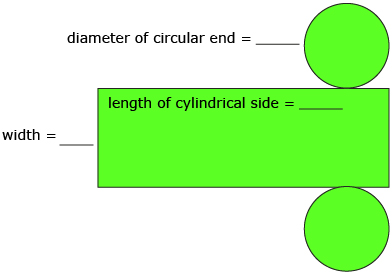
- Fill in the values for width and diameter on the net diagram.
- How is the length of the cylindrical side related to each of the bale’s circular ends? Calculate this length, and fill in the information on the net.

-
Calculate, in square feet, the area of the side (the rectangle) of the bale. Round to one decimal place.
- Find the area of each circular end of the bale. Round your answer to one decimal place.
- Determine, to one decimal place, the bale’s surface area.
- Use the surface area of a cylinder formula
 to check your answer to question 5. How do your answers compare?
- If the farmer has 100 bales, how much plastic will need to be purchased? Round your answer to the nearest square foot.
![]() Save your work in your course folder.
Save your work in your course folder.
1.6. Explore 2
Module 6: Surface Area
Self-Check 1
Complete question 1 of “Build your Skills” on page 134 of the textbook to check your understanding of the surface area of a cylinder. Answer
In Try This 2 you saw that the surface area of a cylinder is made up of the area of its component pieces: two circles and a rectangle. These pieces can be examined using the net of the 3-D object. You will now explore the surface area of a rectangular prism and pyramid. Pay close attention to how the net is again used to find the surface area of these 3-D objects.
Try This 3
Use the Exploring Surface Area, Volume, and Nets applet in “Explore It” mode to help answer the following questions. Make sure you have selected “Surface Area” for the rectangular prism and rectangular pyramid before you begin.
-
- Use the applet to create a rectangular prism with a length of 6 m, a width of 5 m, and a height of 4 m. What is the rectangular prism’s surface area?
- Draw a net of this rectangular prism. How many faces are shown in your net?
- How many terms are there in the applet's calculation of the surface area? Relate each part of the surface area formula used in the applet,
 , to the net you drew of this prism.
- Use the applet to create a rectangular prism with a length of 6 m, a width of 5 m, and a height of 4 m. What is the rectangular prism’s surface area?
-
- Use the applet to create a rectangular pyramid with a length of 6 m, a width of 5 m, and a vertical height of 4 m. What is the rectangular pyramid’s surface area?
- What do k1 and k2 represent? Why wasn’t the height of the pyramid, 4 m, used directly in the calculation of surface area?

- Sketch a net of this pyramid. Include the dimensions.
- Relate each part of the surface area formula used in the applet,
 , to the net you drew of this pyramid.
- Use the applet to create a rectangular pyramid with a length of 6 m, a width of 5 m, and a vertical height of 4 m. What is the rectangular pyramid’s surface area?
![]() Save your answers to your course folder.
Save your answers to your course folder.
Share 2
Share your responses to the questions in Try This 3 with a classmate or with a group of people. Then refer specifically to the nets created in questions 1.b. and 2.c. as you discuss the following questions:
- What sides in a rectangular prism are identical? What sides in a rectangular pyramid are identical?
- How could your understanding of identical sides from the question above help simplify the formula for the surface area of a rectangular prism? How could the formula for the surface area of a rectangular pyramid also be simplified?
![]() If required, save a copy of your discussion in your course folder.
If required, save a copy of your discussion in your course folder.
1.7. Explore 3
Module 6: Surface Area

The following example explores the surface area of a triangular prism. Before you read through the example, use the Exploring Surface Area, Volume, and Nets applet from Try This 3 to view the net and the surface area formula for a triangular prism.
Example
Anton and Xera have volunteered to paint over the graffiti on a skateboard ramp. They took measurements of the ramp and noticed that the top, back, and two sides could be approximated by a triangular prism.
Xera and Anton sketched the prism and used the information to calculate the surface area they need to paint. They plan to give the ramp two coats. What is the total area that they must buy paint for? Note: The bottom will not be painted.
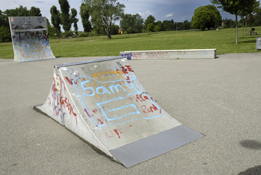
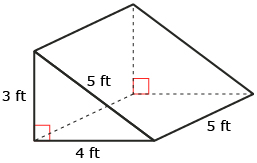
iStockphoto/Thinkstock
Solution
Draw the net with dimensions showing the four sides that need to be painted.
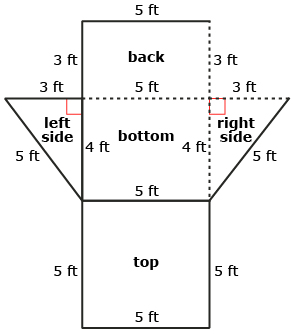
SA = (area of rectangular back) + (area of square top) + (2 × area of triangular side)
Since Anton and Xera want to apply two coats of paint, they need to buy enough material to cover an area of 2 × 52 ft2 = 104 ft2.
![]()
- Review “Example 2” on pages 120 and 121 of the textbook for an additional example of finding the surface area of a triangular prism.
- Review “Example 3” on pages 122 and 123 for an extra example of finding the surface area of a rectangular prism.
1.8. Explore 4
Module 6: Surface Area
Self-Check 2
- A wooden window box is constructed from three rectangular pieces of wood and two identical trapezoidal end pieces. What surface area needs to be painted if you only paint the outside of the box?
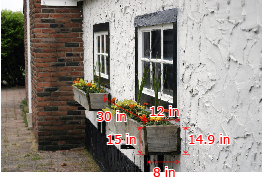
iStockphoto/Thinkstock
Draw a net of the planter. Then, determine the surface area of the outside of the planter. Answer
It is now time to add new math terms, definitions, examples, and notes to your Mathematics 20-3: Glossary Terms document. Complete the missing pieces of the document, and save it to your desktop. Note that some terms, definitions, examples, and notes have already been provided in the document.
In this lesson the new term you will add is
- surface area
At this time, you may want to add the two-dimensional area formulas provided in Launch and the cylinder surface area formula used in Try This 2 to your Formula Sheet. You will be referring to these formulas throughout Module 6.
1.9. Connect
Module 6: Surface Area
Connect
Going Beyond
The surface area of a cone can also be determined by finding the area for each shape in the cone's net. The area formulas for the shapes in the net are used to develop the surface area formula for the cone. The formula for the surface area of a cone is developed below.
You may find it helpful to have a 3-D model of a cone as you work through the following steps. You can print the net of a cone to help build your 3-D model.
Call the radius of the cone’s circular base r and the slant height of the side h. The slant height is measured along the cone’s surface from the base to the top of the cone.
Now compare your 3-D cone to its net.
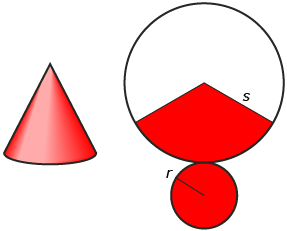
Look at the net. The red portion of the large circle is the surface of the cone.
The large circle of radius s has a circumference of ![]() and an area of
and an area of ![]() .
.
But part of that circle is missing!
The part of the large circle coloured red is formed from an arc that is exactly as long as the circumference of the small circle. The circumference of the small circle is ![]() .
.
Now look at the circumference of the large circle. Compare the red part of the circumference to the whole circumference. You find the following fraction.
![]()
You can use this ratio to calculate the area of the red portion of the cone to be

So, the surface area of the cone = area of the conical side + area of the circular base.
![]()
Project Connection
The Module 6 Project is actually a combined project for Modules 6 and 7. Take some time to familiarize yourself with the project goals and requirements. You will begin working on the project steps in Lesson 4 or when you feel comfortable with surface area.
Lesson 1 Assignment
Your lesson assignment contains some problems for you to solve using knowledge gained during the lesson. Now you will have the chance to apply the concepts and strategies that you have learned to a new situation. Show work to support your answers.
Open the Lesson 1 Assignment that you saved to your course folder and complete the questions.
1.10. Lesson 1 Summary
Module 6: Surface Area
Lesson 1 Summary
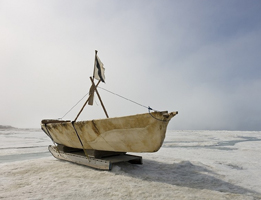
Kevin G Smith/AlaskaStock/Glowimages
Umiaks were large open boats used by the Inuit in the Canadian Arctic. The frames were fashioned from driftwood and were covered with seal or walrus skins. It is likely the Inuit a thousand years ago used boats similar to the one in the photograph in their migration across the Arctic Ocean from Eastern Siberia.
The quantity of skins required to cover the umiak’s frame depended on the surface area of the frame. In this lesson you explored surface area and its relationship to the nets of three-dimensional objects.