Module 5 Project
| Site: | MoodleHUB.ca 🍁 |
| Course: | Math 30-3 SS |
| Book: | Module 5 Project |
| Printed by: | Guest user |
| Date: | Monday, 3 November 2025, 4:51 AM |
Description
Created by IMSreader
1. Module 5 Project
Module 5 Project
Designing a Yard
Process
Towards the end of each lesson, under Project Connection, you may be prompted to complete a part of the Module 5 Project. You can access the entire project from this page at any time.
Make sure to save all work from each Project Connection in your course folder. You will submit your Module 5 Project to your teacher at the end of Module 5. Check with your teacher about how you should submit your project work before you begin.
To help you successfully manage the project and your time, you will be directed to parts of the project throughout the lessons as you learn the necessary concepts. You are encouraged to take the time to complete each part of the project as you complete the lessons.
Presentation
The most important part of your project presentation is clearly explaining and supporting your reasoning with relevant visuals and calculations. Make sure to show all your work.
Review the Module 5 Project Rubric to ensure you understand how you will be assessed on this project.
You can choose any format you prefer for the final presentation of this project. Some options include a written document, virtual or real poster, website, or video.
iStockphoto/Thinkstock
Project Introduction
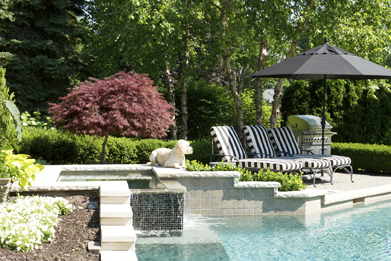
Many homes include a yard that the homeowner can customize. People often include gardens, storage, furniture, as well as other items in their yards. With a bit of work, it is possible to make a yard both functional and attractive. In this project you will use polygons as an inspiration to design an aesthetically pleasing yard. You will then design a patio garden and the trusses for the roof of a shed.
Part 1: Inspiration for a Yard
In this part of the project, you will use polygons as an inspiration to help design a yard for a customer.
- Start to Plan
iStockphoto/Thinkstock
Polygons, such as triangles, can be useful in structural applications, or they can simply be nice to look at, such as beautiful mosaic tile floors. To use polygons as an inspiration to design a yard, you will begin by making a collection of pictures that include polygons. You may want to consider structures, furniture, plants, landscaping, and other items that you might find in a yard. Describe the purpose of the polygons you find. They might be functional, have visual appeal, or both. Architectural decoration, for example, is beautiful, yet it may also be part of a building’s structure. Sculptures may also have structural features to keep them upright. If you don’t know what purpose a polygon serves, make your best guess and explain your reasoning.
Assemble a collection of images that includes polygons. Try to find many different shapes. Indicate where the polygons are located in each image. For each polygon, write a description that includes the following information:
- Why did you choose the image?
- What type of polygon is shown (for example, an isosceles trapezoid or a hexagon)?
- What are the approximate dimensions of the polygon?
- What are some of the properties evident in the polygon (for example: are any of the sides parallel; are any of the internal angles equal)?
- Does the polygon serve a functional purpose, or an aesthetic purpose, or both?
- Yard Plan Checklist
Before you move to the next part of your project, check to make sure you have all of the following saved to your course folder:- a collection of at least five images
- descriptions for each polygon based on the questions in Start to Plan
Adapted from MathWorks 12 Student Book/Teacher Guide. (Vancouver:Pacific Educational Press, 2011.)
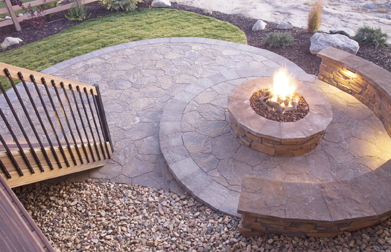
Part 2: Designing a Patio Garden
Patio gardens are a source of pride and joy for many people. They provide a connection to nature, which is often lacking in high-density housing. Planting vegetables on patios can also provide a source of food. Many people find tending their gardens to be relaxing.
Patio gardens are unlike traditional gardens in that the plants must be placed in containers rather than in the ground. These containers, or planter boxes, are often arranged around the patio to create a sense of enclosure and privacy for residents.
In this project, your job will be to design a garden for a patio. The owners of the townhouse have some specific requirements for the garden, but you will create the actual design.
You will propose your plan to the owners of the townhouse, along with an overall price for the cost of the materials for the design. The owners expect
- a garden suitable for a space measuring 4.5 m by 3.0 m (15 ft by 10 ft)
- at least two different geometric shapes of planter boxes
- at least two types of transformations used for the arrangement of the planter boxes
- Start to Plan
Your patio garden can be as simple or as complex as you would like, as long as it meets the expectations set out by the owners. Before you begin working on your design, there are several questions you need to answer. Be sure to address these questions in your planning:- What sizes and shapes of containers are commonly used in patio (or container) gardening?
- What types of material are the containers and planter boxes available in?
- How wide should the paths or spaces between containers be, if people are going to walk through the garden?
- How can you combine the shapes to make use of at least two types of transformations?
- How will you calculate the cost of your design?
- Design the Patio Layout
Now that you have finished researching the types of containers and planter boxes available, it's time to design your patio garden. Use graph paper and choose a scale that works for you. Try to avoid choosing too small a scale, because it will make the details of your design hard to see. Be sure to write your scale on your design.
Sketch out your design. As you create your garden, remember the expectations the homeowners have regarding your plan.
As you create your designs, remember to record the quantity of each type of planter box you use, because you must include an itemized cost for your design in your presentation. - Garden Design Checklist
Put your garden design and your research on plants, containers, and planter boxes into a document you can present to the homeowner. Explain how you made use of transformations to achieve your final design. Before you move to the next part of your project, check to make sure you have saved the following to your course folder:- a patio garden design for a 4.5 m by 3.0 m patio with the scale clearly labelled
- a legend or key that clearly indicates which type of container or planter box is used and where
- your explanation of the choice of planter boxes, as well as a statement about the transformations used in the design
- an itemized cost list for your garden that shows the quantity and cost of each planter box used, as well as the overall cost of the design
Adapted from MathWorks 12 Student Book/Teacher Guide. (Vancouver:Pacific Educational Press, 2011.)
Part 3: Roof Trusses
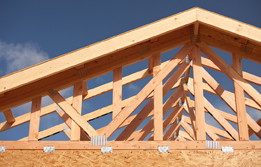
© Andy Dean/23056797/Fotolia
This roof frame was built with Fink trusses. Notice that the end truss has extra boards to attach sheathing.
In the yard, you plan to build a shed to store tools and gardening equipment. To build the roof, you plan to use Fink trusses. Fink trusses are one of the most common roof trusses in residential building designs and can be found all over North America. You may have a Fink roofing truss holding up the roof of your own house. The design is frequently used because it makes efficient use of wood and distributes forces in a way that is unlikely to collapse.

When building a roof truss, you must take into account the slope of the roof. If the slope of the roof is not steep enough, snow can accumulate on the roof in winter and cause the roof to collapse. Local building codes specify slopes that results in roofs that can withstand the maximum expected snowfall in the area.
- Start to Plan
You plan to use the following specifications for the truss. The truss must be symmetrical and it must be built of the strongest design. The strongest way to build the truss is to have the joints of the truss along the slant be directly in the middle of the slants, and to have the lower joints evenly spaced along the base.
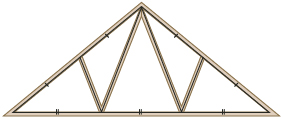
You will need to choose the width of your shed and the roof angle that you will use. The customer has asked that the shed be between 8 and 16 ft wide. Typical roof angles are between 14° and 56°. Once you have decided on the measurements, you must calculate each length of the truss and all the internal truss angles. Since each truss will be symmetrical, you will only need to solve for the dimensions on half of the truss. Then you can mirror the dimensions to solve for the dimensions on the other half.
Solve the dimensions of the left side of the truss, and record their values in the table provided. Keep a record of your calculations, and be prepared to hand them in with your table showing the truss dimensions.
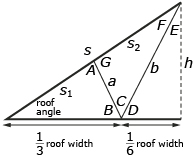
Lengths
Angles
roof width (you decide)
roof angle (you decide)
 roof width
∠A
 roof width
∠B
h
∠C
s
∠B + ∠C
s1
∠D
s2
∠E
a
∠F
b
∠G

You will need to remember what you know about trigonometric ratios, the properties of triangles and lines, the sine law, and the cosine law.
When you have filled out the table, calculate the length of each piece of truss, remembering that each truss is symmetrical. Sketch a completed truss with all angles and lengths.
- Roof Truss Checklist
Before you move on to the conclusion of this project, check to make sure you have saved the following to your course folder:
- table of lengths and angles
- record of all calculations
- sketch of completed truss with angles and lengths
Conclusion
Write a brief conclusion to your Module 5 Project: Designing a Yard. Include a personal reflection of what you feel you learned from the project, both during and after completion. Be sure to explain why you felt the way you did. Gather this conclusion and all three parts of the project for submission.
Project Assessment
Your Module 5 Project will be evaluated by your teacher using the evaluation guidelines in the project rubric. Read the rubric carefully. Make sure you are aware of how you will be assessed. You can print or save a digital copy of the Project Rubric as a guide to help you complete your project.
Don’t forget to submit your completed Module 5 Project to your teacher at the end of Module 5.
To determine h, you can draw a simplified diagram that includes only parts of the previous diagram. Replace r and the ![]() roof width with values you have chosen, and then use the sine law to determine h.
roof width with values you have chosen, and then use the sine law to determine h.
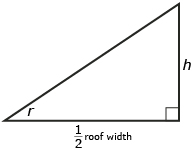
Drawing simplified diagrams may help you determine many measurements in this activity.
Though there are multiple ways to find all the dimensions, you may find it helpful to solve the problem in this order:
h, b, ∠D, ∠E, ∠F, ∠B + ∠C, s, s1, s2, a, ∠A, ∠B,∠C, ∠G.