Project 1
| Site: | MoodleHUB.ca 🍁 |
| Course: | INF2020 |
| Book: | Project 1 |
| Printed by: | Guest user |
| Date: | Monday, 3 November 2025, 5:22 PM |
Description
Created by IMSreader
1. Project 1
Project 1: Learning the Alphanumeric and Symbol Keys
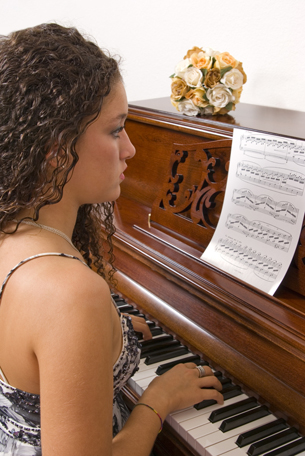
© Brian Chase/shutterstock
While Rikea enjoyed her piano lessons, she didn’t always enjoy the many hours of practice that were required. There was always room for improvement in speed, rhythm, accuracy, and technique on the piano keyboard. However, Rikea had determination. Today she is an accomplished concert pianist.
Like Rikea, you’ll gain proficiency on a keyboard that will serve you well for the rest of your life. Keyboarding will introduce you to the alphanumeric keys, service keys, and punctuation keys, as well as to the numeric keypad. It is the goal of this section to get you touch typing at a speed of 30–50 words per minute on the alphanumeric keypad, with no more than one uncorrected error, and 100–150 keystrokes per minute on the numeric keypad on four one- to four-digit numbers, with no more than one uncorrected error.
If it seems you are not doing as well as you would like, don’t give up. Persevere. If you do a little each day, you’ll eventually reach the goal you desire, just like Rikea.
In this project you will learn about properly setting up your computer workstation. You will read about ergonomics, and you will be given tips and shown images and video demonstrations to help you set up a proper workstation. You will be introduced to the alphanumeric keys on the alphanumeric keypad. You will learn their reaches and practise the correct finger to use on those keys. You will also be introduced to punctuation keys—such as commas and periods—and some service keys—such as Enter, Delete, and Backspace. When you are familiar with the keys and the reaches, you will take some time to practise the keys. When you feel ready, you will perform some timed writings with your teacher observing. You will then discuss your results in comparison to performance standards. Your teacher will give you guidance, help you determine your speed and accuracy, and give you feedback on your typing technique.
Project Assessment(s)
In this project, you will be assessed in these areas:
- touch typing skills—completing a number of exercises and timed writing tests
- touch typing technique—addressed through workstation routines and the completion of a technique assessment
- basic competencies developed in your learning of the alphanumeric keypad
Skill Level
In Keyboarding your goal is to touch type at a speed of between 30–50 words per minute on the alphanumeric keypad and 100–150 keys per minute on the numeric keypad, with no more than one uncorrected error. The lengths of timings for this section are two and three minutes. Check the assessment documents to see where your skill level falls.
Estimated Required Time
In order to properly develop your touch typing skills on the alphanumeric keypad and the numeric keypad, you should commit to daily learning and memorization of the keys. You may need to spend some time practising the key locations and doing practice timed tests until you feel confident that your skill level matches the assessment requirements of this course. Most of the time you will spend in this course will be practice time. This project will take you somewhere between 10 and 15 hours, which includes covering course material, practising, completing exercises and self-checks, and communicating with your teacher.
Environmental Impact
To save on electricity, make sure you turn off your computer and everything on your workstation when you are finished practising.
1.1. Page 2
Project 1: Learning the Alphanumeric and Symbol Keys
Why Learn to Keyboard?
Computers have become necessities in many parts of people’s lives—at work, at school, and at home. People have computers in their offices, homes, and vehicles. They use many types of mobile devices, like laptops, BlackBerry products, and other PDA devices while on the go. Businesspeople often carry a computer with them to meetings and to do work while travelling. Farmers use computers to keep track of farming activities and to maintain their accounting systems. Students use computers to access information on the Internet for school assignments, complete online coursework, and keep in touch with friends. People use spreadsheets or accounting software to manage their finances. Businesses use computers for a multitude of purposes.
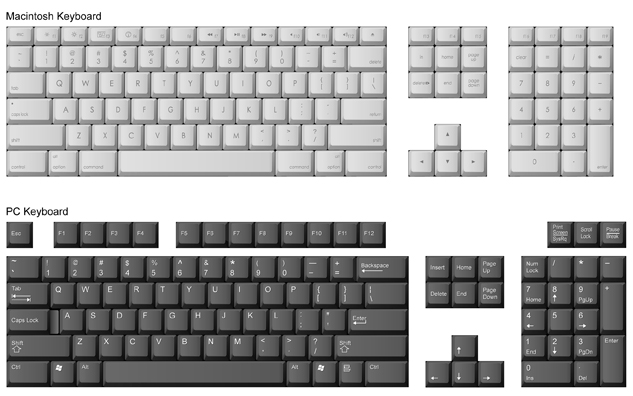
keyboarding: a term synonymous with touch typing
touch typing: typing without having to look at the keys
QWERTY: a keyboard having the standard arrangement of keys on the alphanumeric keypad; the first six letters in the third row
The efficient use of a computer involves knowing the functions of the computer and the software package you are using as well as knowing the keyboard—knowing how to type without looking at the keys. Keyboarding, also known as touch typing, reduces inputting time while decreasing the stress involved in computer use. Touch typing also reduces physical stress on the body while inputting data.
Each level of Keyboarding will teach you how to type on the QWERTY (standard) keyboard using alpha (alphabet), numeric (numbers), and symbol keys as well as the numeric keypad.
1.2. Page 3
Project 1: Learning the Alphanumeric and Symbol Keys
What Do I Need to Do?
Before you begin working through this Keyboarding course, you will need to learn about ergonomics, how to correctly set up your workstation, and how to be aware of workstation security. To do this, follow these steps:
Step 1: Create a new word-processing document. Save the file in the Project 1 folder and name it “Ergonomics.” To review how to open a word-processing file, watch the demonstration “Creating and Saving a File.”
Step 2: Add a header and/or footer to your file that includes your name, assignment name, and date. If you are using Microsoft® Word®, watch the demonstration “The Header and Footer of a Document” to review formatting headers and footers.
Remember: The demonstrations provided in steps 1 and 2 are also provided in the Toolkit so you can reference them at any time throughout this course.
- Using the Internet, the glossary, or a dictionary, look up the word ergonomics and write a definition in your own words in your word processing document. Save your Ergonomics document.
Step 3: Now that you know what ergonomics is, take some time to read the information in the Workstation Setup—Ergonomics document. Do you have anything to add to your definition of ergonomics? If so, open your document and make the changes. Then resave the document.
Step 4: Watch the “

© Juriah Mosin/shutterstock
Step 5: Study the following diagram on arranging a work surface. It is important to ensure that you, too, have a clean, well-organized area in which to work.
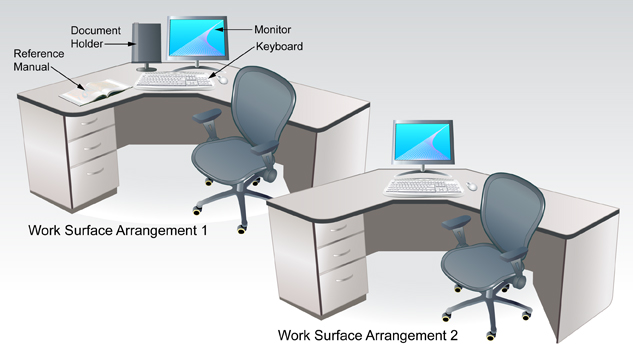
Adapted from: © sahua d/shutterstock. book: © Dan Gerber/shutterstock
This is your opportunity to improve your computer workstation. Using the information and routines you have been given, make appropriate adjustments to your furniture, equipment, and resources. If you have access to a camera, take before and after pictures.
Answer the following questions in your Ergonomics document.
- How many changes did you make?
- What corrections were you not able to make because of inadequate furniture, accessories, or lab restrictions?
- What does practising good ergonomics and setting up an efficient, safe, and organized work station mean to you?
- How can making this practice a habit help you in the long run both personally and as you enter into the workforce?
Resave your document.

© Juriah Mosin/shutterstock
Remember: Make stretching a part of your routine. Practise the exercises you have been shown every 30 minutes. Be sure to exercise your shoulders, back, neck, wrists, fingers, and arms.
Step 6: Read the document Workstation Security for information regarding hardware and software security and keeping your personal work secure.
- Answer the following questions. You can use Internet search terms to perform some research on these topics as well.
a. List three ways to protect your equipment or secure your work.
b. List three ways you can protect your computer from viruses.
- In the Ergonomics document you created, comment on your areas of strength and weakness. Set a goal to improve one or two areas you identified as needing improvement. Here are a few examples of possible goals:
- I remember to stretch every 30 minutes to help reduce muscle fatigue.
- I save files frequently as I work and backup important files regularly.
Step 7: Complete a self-evaluation of your workstation routines to identify areas that you may need to work on throughout the module.
Refer to the Workstation Routines Rubric to self-evaluate your workstation routines. Revisit this rubric periodically throughout the course to self-evaluate your progress in making appropriate workstation routines a daily habit.
Take time now to correctly set up your workstation.
1.3. Page 4
Project 1: Learning the Alphanumeric and Symbol Keys
How to Do It
Keystroking
Proper keystroking is very important. If you hold any of the keys down, the character you are typing repeats itself. That’s why the keys must be struck with a quick, sharp tap—just enough to cause the key to begin its movement. Don’t strike the keys too hard—it’s not necessary to use a great deal of force. The only way to learn how to strike the keys is through feel and practice.
Alpha Keys and Symbol Keys
Home Row

home row: eight keys (A, S, D, F, J, K, L, and ;) located in the centre row of the alphanumeric keypad; the base or home from which all other keys are reached
anchoring: keeping at least one finger touching or raised slightly above its position in home row so that the fingers do not lose their proper keyboarding position
alpha character: an alphabetical letter key on a keyboard
alphanumeric keypad: the keypad used for typing text; has keys for all of the letters of the alphabet and punctuation keys
The set of eight keys from which you will reach all the other keys on the alphanumeric keypad is called home row. The home row for the left hand comprises the A, S, D, and F keys. For the right hand, the home row comprises the J, K, L, and ; (semicolon) keys. You should keep at least one finger on, or hovering just above, the home row at all times so that on extended reaches you’ll be able to come back to home base and get the direction for other keys. This is known as anchoring.
Home row is the base from which all other keys are reached; for this reason you will learn these keys first. Home row consists of eight keys located on the second row of alpha characters on the alphanumeric keypad. Your left hand controls the A, S, D, and F keys; and your right hand controls the J, K, L, and ; (semicolon) keys.
The fingers used to strike the home-row keys take the names of the keys: A finger, S finger, D finger, F finger, J finger, K finger, L finger, and semi (short for the word semicolon) finger.
There is a small line or dot that is raised on either the D and K keys (Macintosh) or the F and J keys (all other keyboards). These marks allow you to feel the position of your fingers and know that they are on the correct keys without having to look at them.
Left-hand Home Row, Space Bar, and Backspace Key
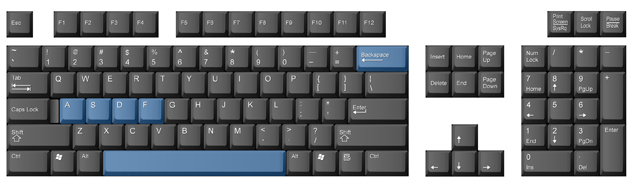
You will first be introduced to the A, S, D, and F keys; the space bar; and the Backspace key. You should take some time to practise the reaches to these keys several times before you begin.

The space bar is struck with the thumb on the right hand. The left thumb is never used in keyboarding. You will need to keep either the ring finger (L finger) or the little finger (semi finger) of your right hand anchored as you reach to the space bar with your right thumb.

The Backspace key is struck with the little finger on the right hand. Make sure you keep your finger anchored on the J key while striking the backspace key.
It’s good to make a mental picture of your finger travelling from its home position to another key. At the same time, memorize the distance and the direction that your finger has to travel to strike each key.
1.4. Page 5
Project 1: Learning the Alphanumeric and Symbol Keys
Right-hand Home Row and Shift Keys

This lesson introduces you to the J, K, L, and semicolon keys as well as the Shift keys.
For all of the other keys that you will be learning, it is strongly suggested that you practise moving your finger from home row to the new key and back to home row several times while watching your finger make the move. Pay special attention to the distance and the direction your finger has to travel to get to the intended key. Allow your brain and the muscles in your hands to “memorize” this distance and direction because later on you won’t be looking at the keys while you are practising. As you type, envision the path your fingers make and say each letter to yourself as you strike it.

Shift key: one of several service keys that makes uppercase letters and allows characters from the top row to be typed
Now that you’ve learned the eight letters of home row, you’ll learn to use the Shift keys to make capital letters. Capital letters are called uppercase letters. Small letters are called lowercase letters.
The little finger on each hand is used to operate either Shift key. The right-hand Shift key is used if you want to capitalize a letter typed with the left hand. The left-hand Shift key is used if you want to capitalize a letter typed with the right hand.
For example, if you want to type a capital A, you will anchor on the J key (keep the J finger at home), make an extended reach to the right and downward to the right-hand Shift key, and press the A key with the little finger on your left hand. If you want a capital K, anchor on the F key, make an extended reach to the left and downward to the left-hand Shift key with the little finger on the left hand and hit the K key with the middle finger on your right hand.
Making capital letters involves the use of two keys, so it might take a bit more practice to use them proficiently. To make a capital letter, you must remember to hold the shift key down long enough for the letter key to be struck.
Follow through Practice 1 to practise using the home row keys through to the shift keys.
Left-hand Home Row
fff ddd sss aaa fff ddd sss aaa fff ddd sss aaa
Right-hand Home Row
jjj kkk lll ;;; jjj kkk lll ;;; jjj kkk lll ;;;
Remember to keep your hands on home row, tap the space bar with your right thumb, and try to memorize the keys and their locations.
Home Row Together
aaa ;;; sss lll ddd kkk fff jjj aaa ;;; sss lll ddd kkk fff jjj
fff aaa ddd fad fad aaa sss kkk ask lll sss all sad
aaa ddd lad ddd add sss aaa ;;; as; as; alas ddd dad
fad sad lad dad ask as; fall alas flask lass falls
Keep working on the home row until you can type any of these combinations without looking at your hands.
Adding Capital Letters with Shift
When you are typing capital letters, always hit the Shift key with the opposite hand. For example, if you want a capital A and are typing it with your left hand, you must press the Shift key with the right pinky finger. This is tricky, so make sure you spend some time practising.
aAa sSs dDd fFf jJj kKk lLl ;:;
Sad Fad Dad Lad Lass Flask Alaska KKK JJJ
To type in all capital letters (uppercase) without having to hold the Shift key down, press the Caps Lock key once. Only letters will be capitalized. This key does not affect number and symbol keys. Pressing the Caps Lock key a second time will turn off the capitalization function.
service key: any key that does not type a character
So far, you have learned to touch type with the left and right home row keys, the space bar, and some of the service keys, namely the Backspace, Shift, and Caps Lock keys. Now it’s time to reach out for some of the other keys, both above and below home row. As before, when you learned to use the Backspace and Shift keys, make sure you anchor on home row while you reach out for keys that are not on home row.
Reaching Other Keys from the Home-Row Position


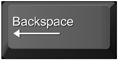
The E Key
The E key is struck with the D finger. It is a natural reach up from the D key to the E key.
Watch your finger make the move to the E key several times, and memorize the distance and direction your D finger has to travel to reach the E key. Use the A finger or the F finger as an anchor so that you can return to home row easily.

The I Key
The I key is struck with the middle finger of the right hand. The I key is a natural reach up from the K key. Watch your finger make this path a few times, and memorize the distance and direction your finger has to travel from the K key to get to the I key.
Remember to keep one finger on or hovering just above home row so that you can always come back to home base. Either the semi finger or the J finger is the best anchor for the reach to the I key. Try each one to see which is most comfortable for you.
The T Key
The T key is struck with the F finger. This is not a natural reach. To get to the T key, your F finger has to extend upward and to the right. Again, trace out this distance and direction, and memorize it with both your brain and your hand muscles before doing the practice exercises. The A finger serves as a good anchor for the reach to the T key.
Remember to take regular breaks from typing!

The Period Key
You are now going to learn the first punctuation key that is not on home row. The period key is struck with a natural downward reach with the L finger. Anchor on the J key. A period at the end of a sentence is followed by one space (strike the space bar once with your right thumb).

The N Key
The N key is struck with the J finger. This is an unnatural reach because the J finger has to move downward and to the left. Leave at least one finger on home row as an anchor.
Follow through Practice 2 to practise the E, I T, N, and period keys just covered. Take time to review previously covered keys as well.
E, I, T, Period, and N
The E key uses the D finger (middle) on your left hand. It is a natural reach up.
ddd ded eee ddd ded eee ddd ded eee she ded led ded he; sees; she led; he led;
The I key uses the K finger (middle) on your right hand. It is a natural reach up.
kkk kik iii kkk kik iii lid kik if is; Id Sid disk kid said
The T key uses the F finger (index) on the left hand.
fff ttt fff ftf ftf ttt fff tft ftf ttt fff kit ate tie it is at
When typing a period, use the L finger (ring) on your right hand. Space once after a period at the end of a sentence, and space once after a period following an abbreviation. Space once after a semicolon.
lll l.l … lll l.l ea. St. std. Id.
The N key uses the J finger (index) on the right hand.
jjj nnn jjj nnn jnj jnj nnj nnj ten and net
1.5. Page 6
Project 1: Learning the Alphanumeric and Symbol Keys
Other Keys Reached from Home-Row Position

The H Key
The H key is a sideways reach with the J finger. Anchor on the semi key, and reach sideways to the H key. Practise making this move a few times.

The R Key
The R key is a natural reach up from the F key with the F finger. Watch your fingers make this path and memorize the direction and distance.

The O Key
The O key is a natural upward reach with the L finger. Watch your finger make this path, and memorize the distance and direction. Anchor on the J key.

The Comma (,) Key
You are about to learn the next punctuation mark—the comma. A comma is always followed by one space.
The comma is typed with the K finger in a natural downward reach. Anchor on the semi key.
Follow through Practice 3 to practise the H, R, O, and comma keys just covered. Take time to review previously covered keys as well.
H, R, O, and Comma
The H key uses the J finger (index) on your right hand.
jjj jhj hhh jjj hjh jhh has he she ash had half
The R key uses the F finger (index) on your left hand.
fff rrr fff frf frf rrf ffr far err fir road rotten
The O key uses the L finger (ring) on your right hand.
lll lol ooo lll how ode foe old ode; oak sod
The comma uses the K finger (middle) on your right hand. Remember to leave one space after a comma.
Kkk k,k ,,, kkk k,k it, an, or, if it is, as soon as, three
More Practice
sink rink link kink tone done lone none then than thin this
jots lots lets jets held herd hard hand rain raid said sail

Have you taken a break lately?
A Bunch More Alphabetic Keys

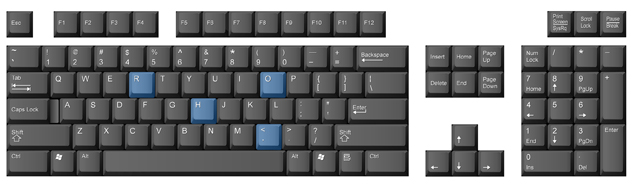
The C Key
The C key is a natural downward reach with the D finger. Anchor on the A key, and let your D finger make its move to the C key. Watch as your finger makes this path. Memorize the distance and the direction.
The P Key
The P key is struck with the semi finger. It is a natural upward reach from the semi key. Anchor on the J key. You might find that you need to move your hand a bit to help in this move if your little finger has trouble reaching the P key.

The U Key
The U key is struck with the J finger. It is a natural reach up from the J key. Anchor on the semi key, and move your index finger from the J key to the U key. Memorize the distance and direction.

The M Key
The M key is a natural downward reach with the J finger. Anchor on the semi key. Practise a few times, watching the distance and direction your finger travels from the J key to the M key.
Follow through Practice 4 to practise the C, P, U, and M keys just covered. Take time to review previously covered keys, as well as the new keys.
C, P, U, and M
The C key uses the D finger (middle) on your left hand.
ddd ccc ddd dcd ccd ddc ace can arc deck car cannot act
The P key uses the semicolon finger (pinky) on your right hand.
;;; ppp ;p; ;;p pp; ppp pen nap ape pen pal page pale
The U key uses the J finger (index) on your right hand.
jjj juj uuu jjj jju uuj jug flu urn jet just
The M key uses the J finger (index) on your right hand.
jjj mmm jmj mmj jjm me mom ham hem jam fame
1.6. Page 7
Project 1: Learning the Alphanumeric and Symbol Keys
The Rest of the Alphabetical Keys
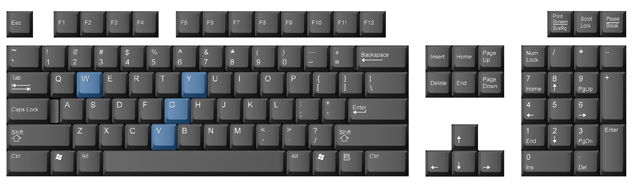

The Y Key
The Y key is struck with the J finger. The reach is extended sideways and upward to the left. Use the L key or the semi key as your anchor.

The G Key
The G key is a sideways reach to the right with the F finger. Practise this reach as you have the others.

The W Key
The W key is struck with the S finger. It is a natural upward reach from the S key. Anchor on the A key or the F key, and practise the S-W move.

The V Key
Strike the V key with the F finger. It is a natural reach downward from the F key. Anchor on the A key, and alternate striking the F and V keys several times. Note the distance and direction your finger travels.
Follow through Practice 5 to practise the Y, G, W, and V keys just covered. Take time to review previously covered keys as well as the new keys.
Y, G, W, and V
The Y key uses the J finger (index) on your right hand.
Jjj jyj yyy jjj jyy yip joy yard yarn yield Yule
The G key uses the F finger (index) on your left hand.
Fff ggg fgf ggf ffg egg leg get log sing song dog
The W key uses the S finger (ring) on your left hand.
Sss www sws wws sww hew own war white swans swim winter wheat
The V key uses the F finger (index) on your left hand.
Fff vvv fvf vvf ffv via eve van move over love vie very view
More Practice
There is a carton of milk on this dock.
Mail a file card to the nearest stores.
Roll the dimes.
She has the food.
Elm St. is ahead.
She asked Ann for five half litres of cold milk.
Have you taken a break lately?
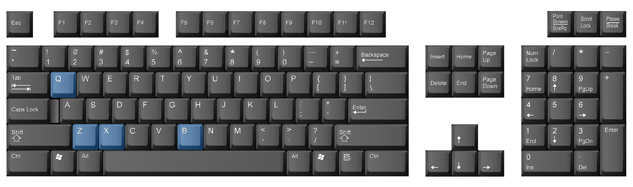

The B Key
The B key is struck with the F finger. It is an extended downward reach from the F key. Anchor on the A key, and trace out the distance and direction from F to B. Memorize that direction and distance.

The X Key
The X key is a natural downward reach with the S finger. You can anchor on the F key or on the A key. Choose the anchor that is most comfortable for you. Let your S finger strike the X key several times. Watch and memorize the distance and direction of finger movement.

The Q Key
The Q key is a natural upward reach from the A key. Anchor on the F key, and type the A-Q path several times. Watch the distance and direction of the finger movement.

The Z Key
You have reached the last of the alphanumeric keys. The Z key is a natural downward reach from the A key. Anchor on the F key, and strike the A and Z keys several times. Memorize the distance and direction the A finger has to travel to the Z key.
Follow through Practice 6 to practise the B, X, Q, and Z keys. Continue to review the previous keys covered. Remember, your goal is to memorize their locations and reaches in order to develop your speed and accuracy.
B, X, Q, and Z
The B key uses the F finger (index) on your left hand.
Fff bbb fbb bbf bag rob ebb bent bin big back bend
The X key uses the S finger (ring) on your left hand.
Sss xxx ssx xxs vex mix wax next taxi sixty Texans taxes
The Q key uses the A finger (pinky) on your left hand.
Aaa qqq aqq qqa quiet quip quote quick aqua quilt
The Z key uses the A finger (pinky) on your left hand.
Aaa zzz azz zza zip zap zed zig zag zing seize Belize
More Practice
Two courses are open; science and art.
Three members went: Ivan, Xander, and Helene.
When Jean called me, I was not at home.
Send them red, white, and green copies.
Our teams would not quit because of the size and voice of their fans. Their jumps and tricks brought the win.
Grab your camera and take a quick shot. Are you ready? Get that shot!
1.7. Page 8
Project 1: Learning the Alphanumeric and Symbol Keys
Some Other Useful Punctuation, Symbol, and Service Keys
You are now going to learn some of the service keys as well as some punctuation and symbol keys on the keyboard.


The Apostrophe (’) Key
The apostrophe key is used in contractions and to show possession.
- possession: Tom’s motorcycle is red.
contraction: Don’t drive too fast.
The apostrophe key is struck by moving the semi finger sideways and to the right. Practise typing the path from the semi key to the apostrophe key several times.

The Colon ( Key
The colon is typed by holding the left-hand Shift key down while striking the semi key. Because two keys are needed to type the colon, you may find that you need to type a bit slower, as with all the characters involving more than one key.
A colon is followed by one space and is used to introduce a list or series of items.
The Quotation Mark (“) Key
Quotation marks are used to signal direct quotations. Quotation marks should not be separated from the quoted text by a space. The closing quotation mark always follows the end punctuation in a piece of quoted text. The quotation mark is typed by anchoring on the J key, holding down the left Shift key, and striking the apostrophe key. This will require a right sideways reach from the semi key with your little finger.

The Question Mark (?) Key
The question mark is used to end a sentence that asks a question. Like the period and colon, a question mark is followed by one space. However, if the question is a quote, the closing quotation mark will immediately follow the question mark.
- Examples: Did Martin pass his apprenticeship exam?
Sharon asked, “Did Martin pass his apprenticeship exam?”
The question mark is typed by making a natural downward reach with the semi finger while anchoring on the J key.
Follow through Practice 7 to practise the apostrophe, colon, quotation marks, and question mark keys. Remember you should always be reviewing keys already covered, as well as practising proper technique.
Apostrophe (’), Colon (, Quotation Mark (“), and Question Mark (?)
The apostrophe key uses the semicolon finger (pinky) on your right hand.
;;; ’;; ;;’Jan’s it’s we’ll your’s they’re
The colon key uses the semicolon finger (pinky) on your right hand. You must press the Shift key with your left hand and the semicolon key to make a colon. Space once after a colon.
;;; ::: ;;: :;; Ms. Lia: Dear Mr. Mai: Remember to buy school supplies: paper, pens, and a calculator.
Quotation marks are found on the apostrophe key. Remember to press the Shift key with your left hand while pressing the apostrophe with your pinky finger on your right hand. Quotation marks signal direct quotations or dialogue.
“How are you today?” asked the instructor.
Sharon asked, “Did Martin pass his apprenticeship exam?”
The question mark key uses the semi colon finger (pinky) on your right hand. You must press the Shift key with your left hand and then tap the question mark key to get a question mark. The question mark is followed by one space.
;;; ??? ;?? ;?? Now? How? Who? Why? Where? When?
Did Martin pass his apprenticeship exam?
Have you taken a break lately?
1.8. Page 9
Project 1: Learning the Alphanumeric and Symbol Keys

The Exclamation Mark (!) Key
- An exclamation mark is used to end a sentence that shows an exclamation or expression of surprise. It’s followed by one space.
- Example: She outran everyone in her class! Second place was 10 seconds behind her.
The exclamation mark is typed by anchoring on the F key, holding down the right Shift key with the semi finger, and making an extended upward and outward reach to the left with the A finger to the second row above home row on the number 1.


The Parenthesis Keys
Parentheses are used to add or set off a piece of text within a body of text. The left parenthesis comes directly in front of the text; the right parenthesis comes directly after the text. The left parenthesis does not have a space after it.
The left parenthesis key is struck while holding down the left Shift key, anchoring on the J key, and making an extended natural reach with the L finger to the 9 key in the top row.
The right parenthesis key is struck while holding down the left Shift key, anchoring on the J key, and making an extended natural reach with the semi finger to the 0 key in the top row.
- The right parenthesis is used to end the text that follows the left parenthesis. It is not preceded by a space, but it is followed with one space if more text follows it. If the right parenthesis ends the statement, it is followed immediately by the ending punctuation mark. If the end punctuation mark comes before the right parenthesis, the parenthesis is followed by one space.
- Example: The first-quarter report (January, February, and March) shows a net profit of $520 000.
Sylvia won the highest academic achievement trophy (which everyone expected would happen).

The Hyphen (-) Key
The hyphen key is struck by making an unnatural upward reach to the top row of keys with the semi finger. The semi finger has to travel directly upward, not following its natural direction.
The hyphen key is used to make a dash by striking the hyphen key twice and putting no spaces before, after, or between the hyphens. In many word-processing programs, the two hyphens will be converted to a dash automatically after the space bar is struck or after an end punctuation mark is typed. A dash has no space before or after it.

The Enter Key
The Enter key allows you to put a hard stop at the end of a line and move the cursor to a new line. It is also used to put extra spaces between sections of text. This key is a large key located at the far right side of the alphanumeric keypad, on the same row as home row. It is reached by anchoring on the J key and extending the semi finger as far to the right as you can reach.

The Tab Key
The Tab key (also known as the tabulator) is struck by using the A finger to make an upward and left-outward reach to the first row above home row. Trace out this distance and direction several times. The word-processing software you are using has preset tab (default tab) stops every five spaces. If you press the Tab key repeatedly, your cursor will jump across the screen five spaces at a time (unless you have changed the tab settings).
A tab is used to separate text into columns or to indent new paragraphs.
Now, watch the video ‚ÄúSetting Tabs in Microsoft Word®.‚Äù
Follow through Practice 8 to practise the exclamation mark, left and right parentheses, hyphen, Enter, and Tab keys just covered. Take time to review previously covered keys as well.
The exclamation mark is found on the number 1 key, above the Q key. It is an extended reach with the pinky finger on your left hand. Remember to press the Shift key with your right hand when you press the number 1 key.
111 !!! 11! !!1 She outran everyone in her class! The second place winner came in 10 seconds after her.
Left and right parentheses, , are found on the 9 key and the 0 key—above the O and P keys. When typing a left or right parenthesis, you must shift with your left hand and press the correct parenthesis.
Sylvia won the highest academic achievement trophy (which everyone expected would happen).
The first quarter report (January, February, and March) shows a net profit of $520,000.
The hyphen (-) is also found two rows above home row, to the right of the 0 number key. This key does not need a shift with your left hand. Use the pinky finger on your right hand to type a hyphen.
;;; --- ;;; --- self-made one-third three-quarters part-time
The Enter key uses the semicolon finger on your right hand. It is used to move the cursor to the next line to start a new paragraph or to create a column or list.
Hockey practice
4-H
Ballet
Football
Video Games
Drawing
The Tab key is usually used to indent paragraphs. To tab text, use the pinky on your left hand.
Today, Air Canada flies to major airports in North America. Where will your next travel destination be?
You have all the information you need to be on your way to proficiency in touch typing. Now you need to practise. As in Rikea’s example, you need constant and regular practice to develop your instinct to keyboard without looking at your hands. Take the time to learn every key and its reach, and memorize that reach so that you can type whatever text is given to you blindfolded.
Continue to practise the keys already covered. Remember, you are only mastering the alphanumeric keypad right now— the numeric keypad is to come.
Open Project 1 Exercises and complete Exercises 1 and 2. Print the exercises after you have saved them in your Keyboarding folder.
You will need your copy of the Project 1 Assessment to record your results for the timed writings. Ensure that you have your teacher sign the document as evidence that you have completed all assignments.
1.9. Page 10
Project 1: Learning the Alphanumeric and Symbol Keys
Checking Your Work
Print Technique Evaluation, Workstation Routines Rubric, and Basic Competencies Rubric. You should be monitoring yourself according to these documents. Your teacher will be assessing you as well throughout the course. Discuss with your teacher how you are doing in these areas.
Finishing Up
Once you are finished typing, clean up your workstation. Shut down your computer and all other hardware to save on electricity.
1.10. Training Room 1
Project 1: Learning the Alphanumeric and Symbol Keys
Training Room 1: Calculating Your Speed
Counting Words per Minute (WPM)
In keyboarding a “word” consists of five keystrokes. A keystroke is any letter, number, or symbol key you strike, as well as the space bar and Enter key.
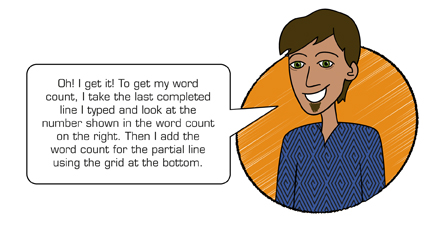
To calculate your speed per minute, count the number of total keystrokes used and divide by 5 to find the number of total words typed. Then divide the total word count by the number of minutes you were typing. If your word processing software has a word count, then this process is easy. If, for example, you typed for a total of 2 minutes and typed 250 keystrokes, you would first divide 250 by 5 for a total of 50 words. Then, since you typed for 2 minutes, you would divide 50 by 2 to get 25 words per minute.
For most of the exercises in this course, each line will have a number to the right of the line. This number shows how many words are in the line, saving you from having to do the calculations to find the number of words in the line. Along the bottom of the text, there are number grids showing the word count for each line. If you do not complete a line of typing, you can use the numbers along the bottom of the text to find the number of words in the partial line.
Example
....1....2....3....4....5....6....7....8
There are a total of 30 words in this passage. If you typed as far as the word go in the last sentence, you would have typed 24 words plus another 2 words from the partial line for a total of 26 words. If you typed this in 1 minute, your speed would be 26 words per minute, or 26 wpm. If you typed it in 2 minutes, your speed would be 26 √∑ 2 = 13 wpm. If you typed the first two lines in 1 minute, your speed would be 16 wpm.
Take a minute to try typing the previous example using a timing device (timer) or have a friend or family member time you. Don't worry about your errors at this time. Remember to use Courier font and to hit the Enter key at the end of each line so that your text looks like the passage you are typing. Remember, the goal of this course is to reach a minimum speed of 30 wpm. How did you do?
When calculating your speed on the numeric keypad, your speed will be recorded in keystrokes per minute (kpm) rather than in words per minute (wpm). If you struck 120 keys in 1 minute, record your speed as 120 kpm. If you struck 120 keys in 2 minutes, record your speed as 120 √∑ 2 = 60 kpm.
1.11. Page 2
Project 1: Learning the Alphanumeric and Symbol Keys
Proofreading and Error Count
The practices and exercises you complete will encourage you to make corrections to your work. If your teacher sees the types of errors you make, he or she can make recommendations as to how to correct specific types of errors. In most exercises, you’re expected to proofread the work you type, print your work, and circle errors that were not corrected while you were typing.
An incorrect word is counted as one error, no matter how many errors are in it. A word includes the space and punctuation after it. When recording your error count, count all errors and indicate that number. The number of errors is not divided by the length of the timing. This indicates the total number of errors, not the errors per minute.
Rules for Finding Errors
Following are eight rules for finding errors, each followed by an example illustrating the error. The first line in each example is correct. Compare it with the second line, and note the errors that have been highlighted.
Rule 1: Any misstroke is an error.
- Example
- She fed us egg salads and Ed fed us turkey.
She fed os egg salads and Ed fed os turkey,
Rule 2: Never count more than one error per word. Even if a word has many errors in it, only one error is counted.
- Example
- Dad and I aim to tame the doe.
Dad mad I aim to tnae the deu.
Rule 3: The spacing and punctuation after a word are a part of that word. An error in spacing or in punctuation is counted as an error in that word.
- Example
- You see, he fell; he got hurt.
You see. he fell, he gothurt.
Rule 4: Each word left out of the text is counted as an error.
- Example
- I guess Lisa is here; Jeff said she is.
I guess Lisa here; Jeff said she is.
Rule 5: A repeated word is counted as an error.
- Example
- I expect to sell six tickets for the play.
I expect to sell six tickets for the the play.
Rule 6: A transposition (typing words or letters in the wrong order) counts as one error.
- Examples
- Please pick up some wax paper.
Please pick some up wax paper.
I guess Lisa is here; Jeff said she is.
I guess Lisa is here; Jeff siad she is.
Rule 7: A word that is not properly indented or aligned counts as one error.
- Example
- We gave half to him and half to her.
We gave half to him and half to her.
Rule 8: If there is an error in line spacing, it counts as an error with the sentence immediately preceding it.
- Example
- We took John a small gift.
He told us he liked it.
I liked it also.
We took John a small gift.
He told us he liked it.
I liked it also.
1.12. Page 3
Project 1: Learning the Alphanumeric and Symbol Keys
Error Types and Error Analysis
Some types of errors are very common. The following are some common error types.
Type 1: Opposite-hand Errors
This error type involves using the correct finger on the opposite hand. For example, if you wanted to type the letter ‘e’ with the middle finger of your left hand, but typed the letter ‘i’ with the middle finger of your right hand instead, you made a type of opposite-hand error called the e-i error.
If you find you are making opposite-hand errors, slow down when typing these keys and say each letter to yourself as you strike it.
Type 2: Side-by-side Character Errors
This type of error occurs when you strike a letter beside the one that should have been struck. Common examples of this type of error are m-n errors, r-t errors, and e-r errors. Again, if you find that you make certain side-by-side character errors, slow down when typing those keys and say each letter to yourself as you strike it.
Type 3: Transposition Errors
This type of error involves typing two letters in the opposite order. For example, typing thsi instead of this. Saying each letter to yourself as you strike it will help you overcome this error type.
Type 4: Concentration Errors
Some errors do not fit a specific category. They usually occur because you are not concentrating on what you are doing. Beginning typists must keep their minds on their work, thinking of each letter as it is struck. Other errors may occur because the reach is difficult for you.
You may correct errors during your timed writings by using the backspace or delete key. You’ll discover, though, that this will bring your typing speed down; but perfect accuracy will get you a better mark overall than typing fast with many errors. It is recommended that you correct errors as you complete your timed tests. Once you have completed a timed test, make sure you proofread your work and circle any errors that have not been corrected.
Don’t feel self-conscious about your keyboarding errors. Submitting work with errors in it gives your teacher the opportunity to analyze your error types and to give you suggestions for improving your typing accuracy and technique. It’s all part of the learning process. You are a beginning typist—you are supposed to make mistakes!
Go to Time to Practise to practise error identification and speed calculations.
You will need your copy of your Project 1 Assessment to record your results for the timed writings. If you have already printed it out, great. If not, take a minute to print a copy of Project 1 Assessment.
You have now gained experience in identifying errors and timed writings. Your goal is to be able to type 30–50 wpm with no more than one error. Take a minute to look at the following reference chart, which includes evaluations for words per minute. How do you compare? If you are at the minimum goal already, great! If you need more practice, work on developing your speed.
REFERENCE CHART: KEYBOARDING AND NUMBER PAD RATES
Course |
Keyboarding Rate |
Number Pad Rate |
||
wpm* |
Weighting |
kpm† |
Weighting |
|
INF2020 text numeric |
30 |
30/50 |
100–103 |
6/10 |
31 |
31/50 |
104–107 |
6/10 |
|
32 |
32/50 |
108–111 |
6/10 |
|
33 |
33/50 |
112–115 |
7/10 |
|
34 |
34/50 |
116–119 |
7/10 |
|
35 |
35/50 |
120–123 |
7/10 |
|
36 |
36/50 |
124–127 |
8/10 |
|
37 |
37/50 |
128–131 |
8/10 |
|
38 |
38/50 |
132–135 |
8/10 |
|
39 |
39/50 |
136–139 |
9/10 |
|
40 |
40/50 |
140–143 |
9/10 |
|
41 |
41/50 |
144–147 |
9/10 |
|
42 |
42/50 |
148–150 |
10/10 |
|
43 |
43/50 |
|
||
44 |
44/50 |
|
|
|
45 |
45/50 |
|
|
|
46 |
46/50 |
|
|
|
47 |
47/50 |
|
|
|
48 |
48/50 |
|
|
|
49 |
49/50 |
|
|
|
50 |
50/50 |
|
|
|
* wpm = words per minute
† kpm = keys per minute
When you are ready to move on, begin Project 2.
1.13. Project 1 Summary
Project 1: Learning the Alphanumeric and Symbol Keys
Project 1 Summary
Upon completion of your practice timed writings and the calculation of your words per minute, you will be able to check the assessment guide to see whether you have met the desired competencies for the alphanumeric keypad. Check with your teacher for feedback about your workstation routines and your typing technique. Make sure you are always sitting properly and ensure that your workstation is neatly organized.
Communicate with your teacher about your progress and results of this project.