Module 3
| Site: | MoodleHUB.ca 🍁 |
| Course: | Biology 30 [5 cr] - AB Ed copy 1 |
| Book: | Module 3 |
| Printed by: | Guest user |
| Date: | Thursday, 18 September 2025, 4:30 PM |
Description
Created by IMSreader
1. Module 3
Module 3: Linear Measure
Module 3 Introduction
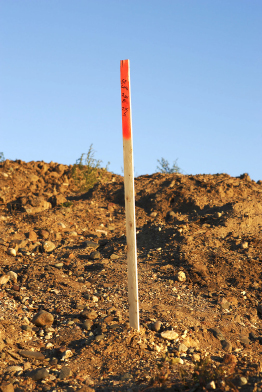
© Jonathan Larsen/shutterstock
If you have been around new building sites, you have probably noticed wooden survey stakes. Survey stakes are used to lay out property lines and foundation perimeters, and to mark heights for grading and excavation.
Survey stakes are placed in position by surveyors who take careful measurements of distance and depth. What they measure depends on the building plans set out by engineers and architects.
Measuring is important in all kinds of work and activities, ranging from sewing to construction. You may have heard the saying, “Measure twice, cut once.” What does this saying tell you about the importance of measurement?
Estimation is another important skill. Have you ever tried to design your own costume for a party or a holiday? How much material did you need, and how did you estimate the quantity before going to buy your supplies?
In this module you will learn more about measurement and estimation, and you will learn how both imperial and SI units can be used for both. Be prepared to be active as you investigate the following questions:
- How are measurement skills used to determine perimeter, circumference, and midpoints?
- What is essential to the skill of estimation?
You will also use your design from the Unit 1 Project as you work through Module 3 and to complete your Unit 2 Project.
Save a copy of the Module 3 Glossary in your course folder now. The Module 3 Glossary is a list of all of the new terms you will see in the lessons. Each time you see a definition, open your copy of the Glossary. Use the space available to add notes or drawings to help your understanding. You will be able to use your personal Glossary as a study tool.
1.1. Lesson 1
Module 3: Linear Measure
Lesson 1: Estimating and Measuring Length and Distance
Focus
© jean morrison/shutterstock
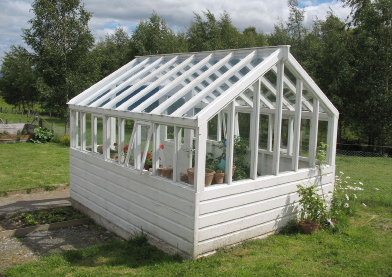
Justina is designing a small greenhouse for her yard. She has gone over to her neighbour’s yard for some ideas. She likes the look of her neighbour’s greenhouse, but she is not sure the design is large enough for her needs.
Unfortunately, Justina did not bring her tape measure with her, so she is not able to take precise measurements. Instead, Justina walks the length and width of the greenhouse, and she estimates that the greenhouse is about five metres long and three metres wide. Justina goes inside the greenhouse and discovers there is a lot of head room, even for her. Justina is taller than many of her friends.
How would you estimate the dimensions of the greenhouse in the photograph?
Lesson Questions
In this lesson you will explore these questions:
- What can you use to estimate length and distance for common imperial and SI units?
- How can you improve your estimates of linear measures?
- How can you estimate the dimensions of two-dimensional and three-dimensional objects?
- How can you determine the perimeter of two-dimensional and three-dimensional objects?
Assessment
You will complete the Lesson 1 Assignment Booklet for assessment. Download the Lesson 1 Assignment Booklet and save it in your course folder now. You will receive instructions on how to complete the Assignment Booklet later in the lesson. You will also be prompted to start working on the Unit 2 Project.
There are other activities that you will complete throughout this lesson. It is important to complete all activities and save them in your course folder. Your teacher may ask to see your work at any time.
The lesson provides you with opportunities to investigate, review examples, and practise the knowledge and skills you are learning. In Self-Check activities you can compare your answers to see if you are on track. If you are having difficulty with concepts or calculations, contact your teacher.
Required Materials and Equipment
You will need a ruler or tape measure that shows imperial and SI units.
1.2. Page 2
Module 3: Linear Measure
Get Started
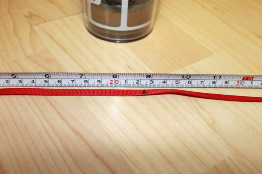
In the following Try This activity you will review the common imperial units of linear measure.
 Try This
Use a tape measure or ruler to measure out each of these common units of length: one inch, one foot, and one yard. What common objects would be about one inch in length? How about one foot and one yard?
If you didn’t have a tape measure handy, how could these common objects help you estimate lengths?
Do you remember the relationships between inches, feet, and yards?
1.3. Page 3
Module 3: Linear Measure
Explore
 Try This
In this Try This activity you will test your skill in estimating length using SI and imperial units. If possible, work with a partner.
TT 1. Complete Estimating Length Using SI and Imperial Units.
 Share
Share
Have a discussion with your partner about the estimates you made. What units did each of you use in your estimates? How did your length estimates compare to your partner’s? Did you use the same units your partner used? Did you find some units easier to use for estimating than others? For example, can you visualize an inch more easily than a centimetre?
Write a couple of sentences to summarize your discussion. Describe how you would decide the best units for estimating a given length or distance. Feel free to use examples in your summary.
Save your worksheet and your discussion summary in your course folder.
1.4. Page 4
Module 3: Linear Measure
Bringing Ideas Together
In the Explore section you polished your estimation skills. Probably without even knowing it, you used an object or a part of your body to estimate lengths. In other words, you used a referent. For instance, you may have paced off the width of your front yard to estimate the distance in yards. Or you might have used your height to estimate the height of your bedroom. You may even have used the width of your thumb to estimate the length of your foot. You used referents in Unit 1 to explore SI and imperial units.
 Self-Check
SC 1. What referents could you use for the units of measure in the following table? A common referent for the inch is given as an example.
|
Unit |
Referent |
|
1 in |
width of a thumb |
|
1 ft |
|
|
1 yd |
|
|
1 mm |
|
|
1 cm |
|
|
1 m |
|
SC 2. Use your referents from SC 1 to estimate the dimensions of the following common items. Give your answers in SI and imperial units.
- the height of your kitchen table
- the length, width, and height of your refrigerator
- the length, width, and height of your family’s or neighbour’s car or truck
- the length, width, and thickness of a magazine
Determining a Value for the Perimeter
Often you will need to find the perimeter or distance around an object in order to solve a problem. Knowing the perimeter is essential in tasks such as hanging wallpaper, fencing, installing baseboards, and framing pictures.
The applet, “Perimeter,” shows how to calculate the perimeter for a shape that is not regular. Select [PLAY] to watch the animation.
Example 1

© bhowe/shutterstock
Maxine is planning a rectangular patio for her backyard. She has room for a patio that measures 15 ft long × 12 ft wide. Maxine has decided that the patio will be built using interlocking bricks, but she wants a wooden frame around the perimeter. What is the total length of framing Maxine will need?
Solution
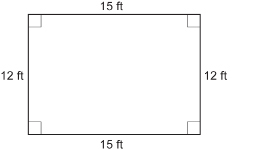
The perimeter, P, is the length of the four sides added together.
![]()
Maxine will need 54 ft of framing for her patio.
Formulas for Perimeter
You are probably familiar with the formulas for the perimeters of rectangles and squares.
If ![]() = length and w = width, the perimeter for a rectangle is
= length and w = width, the perimeter for a rectangle is
![]()
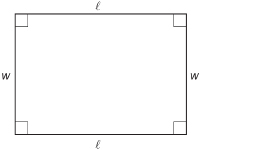
Open “Perimeter and Area (Rectangle).” This demonstration provides examples of perimeter calculations for rectangles. Move the ![]() - and w-slider to change the length and width of the rectangle. Make a rectangle the size of Maxine’s patio from Example 1. Did you get the same perimeter?
- and w-slider to change the length and width of the rectangle. Make a rectangle the size of Maxine’s patio from Example 1. Did you get the same perimeter?
If s = length of each side, the perimeter for a square is
![]()
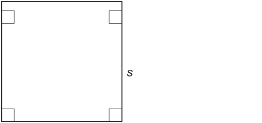
Open “Perimeter and Area (Square).” This demonstration provides examples of perimeter calculations for squares. Move the s-slider to change the side length of the square.
The following examples show how formulas can help you solve perimeter problems.
Example 2
Paula wants to purchase a decorative wallpaper border for her living room. The room is rectangular and measures 4 m by 5 m. How much border will Paula need to buy?
Solution
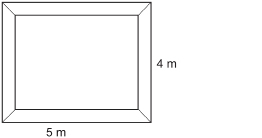
You are given w = 4 m and ![]()
Paula will need to buy 18 m of wallpaper border.
How do you go the other way? How do you find the length of the sides when the perimeter is known? Work through Example 3 to find out.
Example 3
The perimeter of a square tile is 4 ft. How long is each side?
Watch “Example 3 Solution” to find out.
Perimeter of Irregular Shapes
If a shape is not rectangular or square, you will often need to work with the sides separately.
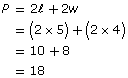
Example 4
A triangular flower bed is 12 ft × 5 ft × 14 ft. Luc wants to put a decorative border around the flower bed. What length of decorative border will he need?
Solution
![]()
A total of 31 ft of decorative border is needed.
Self-Check
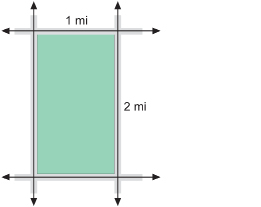
SC 3. In farming areas in Western Canada, north-south roads are normally two miles apart, and east-west roads are one mile apart. These roads divide the land into a plot.
How far would you drive to go around such a plot once?
SC 4. A road-maintenance worker is replacing the white reflective tape on the border of a stop sign. If the sign is 10 in on one side, how much tape will she need for the sign? Express your answer in feet and inches.

© Stacie Stauff Smith Photography/shutterstock
SC 5. The perimeter of a rectangular picture is 50 cm. If the width of the picture is 10 cm, what is the length of the picture?
 Mastering Concepts
Try this question. When you are finished, check your answer.
A floor plan for a guest room is shown in the diagram. The guest room still needs baseboards installed. A student is helping his mother determine the length of baseboard needed.
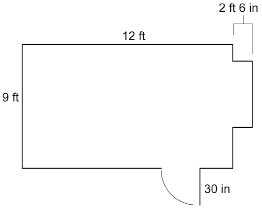
The student suggests finding the perimeter of the following figure to estimate the length of baseboard needed.
The student’s mother suggests the student needs to adjust her estimate to account for the 30-in doorway, because no baseboard will be needed for the doorway. Specifically, how does the doorway affect the length of baseboard needed? Her mother also comments that there’s a part of the wall that sticks out by 2 ft 6 in. How does that change things?
After their discussion, the student and her mother feel ready to purchase the right length of baseboard for the guest room.
Baseboard at the local building supply store sells for $0.86 per linear foot. How much would it cost to install baseboards in the guest room according to the floor plan?
1.5. Page 5
Module 3: Linear Measure
Lesson 1 Summary
© debr22pics/shutterstock
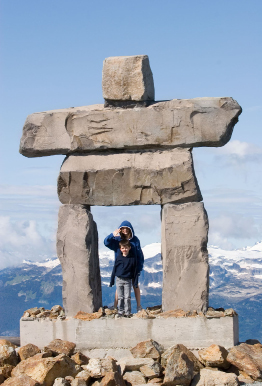
The Inuit erected stone figures on the arctic landscape. These stone figures, or inukshuks, were created for many reasons—to point the way for travellers, to indicate a good hunting or fishing area, to mark a place of respect, or to be a memorial. This tradition was common to all peoples of the circumpolar region.
Look at the height of the children standing on the base of the inukshuk in the photograph. From this photograph what would you estimate the height of the inukshuk to be?
In this lesson you explored these questions:
- What can you use to estimate length and distance for common imperial and SI units?
- How can you improve your estimates of linear measures?
- How can you estimate the dimensions of two-dimensional and three-dimensional objects?
- How can you determine the perimeter of two-dimensional and three-dimensional objects?
Check your level of understanding of the materials covered in this lesson by completing “Lesson 1 Traffic Lights.” If you select an amber or red traffic light in the multimedia piece, you will receive information about additional work you can complete to improve your understanding of the topics. Complete the suggested work before you proceed to the Lesson 1 Assignment. If you experience difficulty, contact your teacher before starting the Lesson 1 Assignment.
 Assignment
Retrieve the Lesson 1 Assignment Booklet you saved in your course folder at the start of this lesson. Complete the Assignment. Resave your Assignment Booklet in your course folder and submit a copy to your teacher for assessment.
Unit 2 Project
Before you move on to Lesson 2, you should start thinking about how you can apply the skills you mastered in Lesson 1 to the Unit 2 Project.
1.6. Lesson 2
Module 3: Linear Measure
Lesson 2: The Circle
Focus

© Natalia Bratslavsky/shutterstock
One of the most photographed buildings in Inuvik, Northwest Territories, is what the locals call the Igloo Church. The word igloo comes from the Inuit word for home. The shape of the church looks like the snow igloos built by the Inuit for shelter.
Construction of the church began in 1958. The church’s builder, Brother Larocque, faced many problems. One problem was the permafrost on which the church was built. To prevent the building’s interior heat from melting the permafrost and causing the structure to shift or sink, the church was built on a deep gravel foundation. So far, the building has not moved, which is a real credit to its design.
The base of the church is circular and is 23 m in diameter. What would you estimate the circumference—the distance around the church—to be?
Lesson Questions
In this lesson you will explore these questions:
- How can you estimate the circumference of a circle?
- What is the formula for circumference?
- How can you apply the formula for circumference to practical situations?
Assessment
You will complete the Lesson 2 Assignment Booklet for assessment. Download the Lesson 2 Assignment Booklet and save the file in your course folder now. You will receive further instructions on how to complete the Assignment Booklet later in this lesson.
Remember to save all activities, including those that are not part of the Assignment, in your course folder.
Required Materials and Equipment
You will need the following supplies:
- a ruler or tape measure that shows imperial and SI units
- several blank sheets of letter-sized paper
- various circular objects, such as jar lids or cans of various sizes
- several metres of string, ribbon, or yarn
- a calculator
1.7. Page 2
Module 3: Linear Measure
Get Started
In the following Try This activity you will review the circle.
 Try This
If possible, work with a partner to complete this activity.
Step 1: With a pen or pencil, trace the outline of a circular object, such as the lid of a jar, on a blank piece of paper.
circumference: the perimeter of, or the distance around, a circle
semicircle: half of a circle
The distance around this circle is called the circle’s circumference.
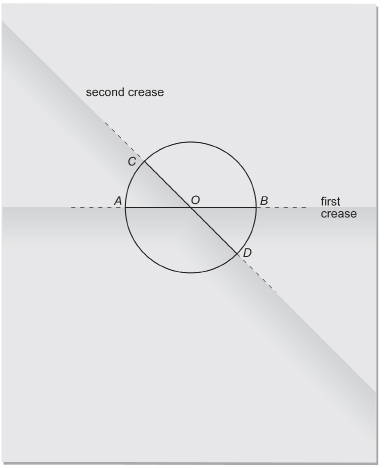
Step 2: Hold the paper up to the light. Fold the paper in two so that the circle is divided into two halves. When you open your sheet of paper, you will see a crease dividing your circle into two semicircles. Label the points A and B where the crease cuts the circle.
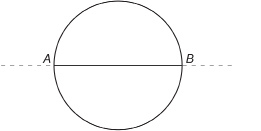
diameter: a line segment that divides a circle in half
A diameter of a circle passes through the circle’s centre point.
Step 3: Take your pen or pencil, and trace over the crease from point A to point B. Segment AB, which divides the circle into halves, is called a diameter.
Step 4: Fold the paper a second time to form a second diameter. Label this diameter CD. Label the point where CD crosses AB, O.
centre: a point of a circle that is at the circle’s middle
radius: a line segment that joins the centre of a circle to a point on the circumference of the circle
The centre of the circle, O, is where the two diameters cross. Segments OA, OB, OC, and OD are radii. A radius is a segment that joins the centre of the circle to a point on the circumference of the circle.
Step 5: Label your diagram, illustrating the centre, a radius, a diameter, and the circumference. Place your labelled diagram in your course folder.
1.8. Page 3
Module 3: Linear Measure
Explore
You will explore the relationships between the radius, diameter, and circumference of a circle.
 Try This
Work with a partner.
Complete the following table using at least five circular objects, such as jar lids or cans. Make sure that all of your objects are different sizes.
Step 1: Using a tape measure or a ruler, measure, to the nearest millimetre, the diameter and radius of each object. Trace around each object, and use paper folding as described in the Get Started section. Use a separate blank sheet of paper for each object.
Step 2: Determine the circumference by carefully wrapping a length of string around the object. Cut the string to match the circumference as precisely as you can. Then lay the cut length of string along your ruler or tape measure to measure the string.
Step 3: Enter your measurements in the table.
TT 1. Use your calculator to determine the ratio ![]() correct to one decimal place.
correct to one decimal place.
|
Object |
Radius (mm) |
Diameter (mm) |
Circumference (mm) |
Circumference Diameter |
|
|
|
|
|
|
|
|
|
|
|
|
|
|
|
|
|
|
|
|
|
|
|
|
|
|
|
|
|
|
Step 4: Answer TT 2, TT 3, and TT 4. Then tape each string to its corresponding tracing, label each tracing, and place the papers in your course folder.
TT 2. For each object, how many times longer is the diameter than the corresponding radius? Explain your answer.
TT 3. About how many times is the circumference of each object longer than the object’s diameter?
View the video “Unrolling a Circle” to help you answer this question.
TT 4. Does the size of the circle affect the ratio,![]() ? Explain your answer.
? Explain your answer.
 Share
Share
Post your answers to TT 1–TT 4 in the discussion area or share them with your partner.
You may add the responses of other students to your data so that you have additional rows of information to make conclusions about the ratio, ![]() .
.
Discuss the effect of circle size on the value of this ratio. Use your data to back up your thinking.
Write the final version of your answers to the Try This questions, and place a copy of your answers in your course folder.
1.9. Page 4
Module 3: Linear Measure
Bringing Ideas Together
Circles have been around for a long time. Just look at the architecture of historical buildings, such as the Taj Mahal and the Golden Temple.

© wong yu liang/shutterstock
This is the Taj Mahal.

© Ella/6375788/Fotolia
This is the Dome of the Rock.
Watch “Circles Are All Around Us,” which shows that circles remain important in the present and can be found in many modern settings. The multimedia piece also describes properties of circles, some of which you’ve already discovered in this lesson.
While watching, focus on the relationship between the diameter and circumference of a circle. Also try the interactive portion, which demonstrates the relationship between a circle’s diameter and circumference.
At the end of the interactive portion, the Greek letter ![]() (pi) is described. The value
(pi) is described. The value ![]() is given as 3.14. In the Explore section, you discovered that the ratio of the circumference of a circle to its diameter is always the same and is a bit larger than 3.
is given as 3.14. In the Explore section, you discovered that the ratio of the circumference of a circle to its diameter is always the same and is a bit larger than 3.
Because this ratio does not depend on the size of the circle, the value of this ratio can be represented by one symbol. Mathematicians also use the symbol because no decimal number can be used to represent the value exactly. The symbol represents the exact value of the ratio, ![]() .
.
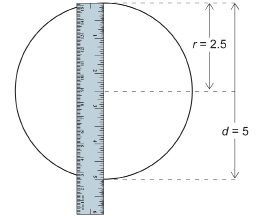
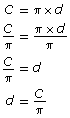
If C = circumference and d = length of the diameter, then
![]()
The value of ![]() can be calculated to any number of decimal places.
can be calculated to any number of decimal places.
![]()
So, the value of ![]() is more than 3. It is close to 0.141 592 more than 3. See a very precise—but not exact—representation of 0.141 592 in the animation “A Circle Unrolled.” Select play in the animation.
is more than 3. It is close to 0.141 592 more than 3. See a very precise—but not exact—representation of 0.141 592 in the animation “A Circle Unrolled.” Select play in the animation.
The number for ![]() is a non-terminating, non-repeating decimal number. That means you cannot write a long-enough decimal representation to give its exact value. Fortunately, you do not have to memorize pi’s value, since there is a
is a non-terminating, non-repeating decimal number. That means you cannot write a long-enough decimal representation to give its exact value. Fortunately, you do not have to memorize pi’s value, since there is a ![]() key on your calculator!
key on your calculator!
The formula for ![]() has been added to the Formula Sheet. Download the “Formula Sheet” now and save it to your course folder. Like you do with the Glossary, every time you encounter a new formula, retrieve your copy of the Formula Sheet. If the formula is on the Formula Sheet, add notes or sketches to give the formula meaning to you. You can also add formulas to the Formula Sheet at any time.
has been added to the Formula Sheet. Download the “Formula Sheet” now and save it to your course folder. Like you do with the Glossary, every time you encounter a new formula, retrieve your copy of the Formula Sheet. If the formula is on the Formula Sheet, add notes or sketches to give the formula meaning to you. You can also add formulas to the Formula Sheet at any time.
You will use the Formula Sheet throughout the remainder of the course. Remember to save your changes to your course folder. Your Formula Sheet will be a great study tool.
Did You Know?
Some people put to the test their skill at memorizing digits of ![]() . In 2004, Daniel Tammet recited 22 514 digits of
. In 2004, Daniel Tammet recited 22 514 digits of ![]() . He did this without a mistake, and it took him over five hours to complete this task.
. He did this without a mistake, and it took him over five hours to complete this task.
Pi and the Formula for Circumference
Before you look at examples, review what you know about ![]() and its use in a formula for circumference. Watch “A Formula for Circumference.”
and its use in a formula for circumference. Watch “A Formula for Circumference.”
Example 1

© Pierdelune/shutterstock
The Temple of Hercules—near Rome, Italy—was built in the second century BCE. This temple has a diameter of 14.8 m.
- Estimate the temple’s circumference.
- Use your calculator to determine the circumference, correct to the nearest tenth of a metre.
- How can you tell if your answer to part b is reasonable?
Solution
- Circumference is about three times the diameter.
So, the circumference is approximately
3 × 15 m = 45 m
- You know, d = 14.8 m. You want to determine C.
Since the diameter was given, use

Enter the following keystrokes on your calculator.

If your calculator does not have a pi key, use 3.1416 for pi in your calculation.
3.1416 × 14.8 = 46.495 68
Round your answer to one decimal place (nearest tenth of a metre). You will find that you round up, since the second decimal in the product is a 9, regardless of whether you used the keystroke for pi or whether you entered the value for pi.
Therefore, . Remember,
  means “approximately equal to.”
So, the circumference of the temple is approximately 46.5 m.
- The answer is reasonable, since the estimate in part a was 45 m.
Example 2
The diameter of the circular lid of an ice cream pail is 21 cm.
- Estimate the lid’s circumference.
- Use your calculator to determine the circumference, correct to the nearest tenth of a centimetre.
- How can you tell if your answer to part b is reasonable?
Solution
- Circumference is about three times the diameter.
So, the circumference is approximately
3 × 21 cm = 63 cm
- You know that d = 21 cm. You want to determine C.
Since the diameter was given, use

Enter the following keystrokes on your calculator.

Your display should be 65.973 445 . . ..
Round your answer to one decimal place (nearest tenth of a centimetre). You will find that you round up, since the second decimal in the product is 7.
Therefore,
So, the circumference of the lid is approximately 66.0 cm.
- The answer 66.0 cm is reasonable since the estimate in part a was 63 cm.
Using Radius to Determine Circumference
The circumference can also be found directly from the radius.
Remember that the diameter, d, of a circle is twice as long as its radius, r.
d = 2 × r or d = 2r
Once again, multiplication is understood and does not need to be shown in the formula.
If you combine the formulas for circumference and diameter, you will get the following.

Examples 3 and 4 show how this formula can be applied.
Example 3
The radius of a bicycle wheel is 14 in.
- Estimate the circumference of the wheel.
- Calculate how far the wheel travels when it turns through one rotation. Express your answer in feet and inches. Round to the nearest inch.
- Is the answer to part b reasonable?
Solution
- Since r = 14 in, d = 2 × 14 in or 28 in.
So, the circumference is about 3 × 28 in, or 84 in.
- Since the radius was given, use

Enter the following keystrokes on your calculator.

Your display should be 87.964 594 . . ..
Round to the nearest decimal place. So, the circumference is about 88 in.
1 ft = 12 in, and 7 × 12 in = 84 in.
88 in = 7 × 12 in + 4 in, or 7 ft 4 in.
The wheel will travel 7 ft 4 in when it rotates once.
- The answer to part b is reasonable since the estimate in part a was 84 in.
 Self-Check
It is time to apply your skills! When you are finished, check your answers.
SC 1. The diameter of a circular element on an electric stove is 25 cm.
- What is the element’s radius?
- Estimate the circumference of the element.
- Calculate the circumference of the element to the nearest centimetre.
SC 2. The radius of a two-dollar coin is 14 mm. What is its circumference to the nearest millimetre?
Finding the Diameter and Radius from the Circumference
Suppose you were given the circumference of a circle, how would you find its diameter and radius?
The formula that involves circumference and diameter is ![]() To find the diameter, divide both sides of the equation by
To find the diameter, divide both sides of the equation by ![]() .
.
Example 4

© Carole Castelli/shutterstock
When a golf ball rolls on the green, it moves a distance of 13.5 cm each time it makes one rotation. What is the diameter of the ball, correct to the nearest tenth of a millimetre?
Solution
View the solution in “Example 4 Solution.”
Self-Check
It’s time to check your skill! When you are finished, check your answers.
SC 3. The circumference of a baseball is 9.4 in. What is its diameter and radius to the nearest tenth of an inch?
SC 4. Without using your calculator, estimate the diameter of a circular cake pan with a circumference of 27 in.
 Mastering Concepts
Try this question. When you are finished, check your answer.
A golfer is about to putt 12 ft 4 in from the cup. How many times must his ball rotate to reach the hole? The diameter of the golf ball is 1.68 in.
1.10. Page 5
Module 3: Linear Measure
Lesson 2 Summary

© Tyler Olson/shutterstock
Many people associate the igloo with the Inuit of Canada’s Eastern Arctic. The igloo is an example of the ingenuity of a people building a shelter from limited materials at hand. The first layer of snow blocks is laid in a circle. Successive blocks cut from the inside of the igloo spiral upward and inward to form the classic domed shape.
The shape of the igloo makes the room both remarkably roomy and comfortable. The igloo illustrates the relationship between the circumference of the base and the diameter of the circular shelter.
In this lesson you explored these questions:
- How can you estimate the circumference of a circle?
- What is the formula for circumference?
- How can you apply the formula for circumference to practical situations?
Check your level of understanding of the materials covered in this lesson by completing “Lesson 2 Traffic Lights.” If you select an amber or red traffic light in the multimedia piece, you will receive information about additional work you can complete to improve your understanding of the topics. Complete the suggested work before you proceed to the Lesson 2 Assignment. If you experience difficulty, contact your teacher before starting the Lesson 2 Assignment.
You discovered that the circumference of a circle is approximately three times the diameter. Also, you discovered that the ratio ![]() was the same for all circles and that this ratio is represented by the symbol
was the same for all circles and that this ratio is represented by the symbol ![]() . From this ratio, you developed formulas for circumference. You applied these formulas to calculate the circumference of a circle when given either the diameter or radius. As well, given the circumference of a circle, you used these formulas to find the diameter and/or radius.
. From this ratio, you developed formulas for circumference. You applied these formulas to calculate the circumference of a circle when given either the diameter or radius. As well, given the circumference of a circle, you used these formulas to find the diameter and/or radius.
 Assignment
Retrieve the Lesson 2 Assignment Booklet you saved in your course folder at the start of this lesson. Complete the Assignment. Resave your Assignment Booklet in your course folder and submit a copy to your teacher for assessment.
Unit 2 Project
Before you move on to Lesson 3, you should start thinking about how you can apply the skills you mastered in Lesson 2 to the Unit 2 Project.
1.11. Lesson 3
Module 3: Linear Measure
Lesson 3: Midpoints
Focus
© mashe/shutterstock
Jeff has designed a playhouse for his younger brother and sister. Jeff intends to bolt the frame of the playhouse together. But, he has run into a problem. Jeff needs to drill a hole into a ceiling beam to attach a chandelier. If the hole is not centred, the chandelier will be off-centre.
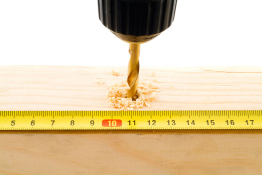
How will Jeff find the centre of the beam in which he will drill the hole? Jeff has a tape measure in imperial units, and he is not sure how to handle fractions. Can you help him? How can you be sure you have located the centre of the beam?
Lesson Questions
In this lesson you will explore this question:
- How can you determine the midpoint of a linear measurement such as length, width, height, depth, diagonal, or diameter of a three-dimensional object?
Assessment
You will complete the Lesson 3 Assignment Booklet for assessment. Download the Lesson 3 Assignment Booklet and save the file in your course folder now. You will receive further instructions on how to complete the Assignment Booklet later in this lesson.
Remember to save all activities, including those that are not part of the Assignment, in your course folder.
Required Materials and Equipment
You will need the following supplies:
- a ruler or tape measure showing both imperial and SI units
- a compass for drawing circles
- blank sheets of paper
- a square from a geometry set
- a calculator
1.12. Page 2
Module 3: Linear Measure
Get Started
In the following Try This activity, you will investigate one method for finding the middle of a rectangular object.
 Try This
At first you may find it a challenge to accurately identify the middle of an object. Try marking the middle of some objects presented in the interactive activity, “Find the Middle.”
From your experience with “Find the Middle,” it’s clear that a guess-and-check approach does not always get you to the middle.
The following approaches are both more methodical and more reliable. Work with a partner if possible.
Folding to Find the Midpoint
Step 1: Take a blank sheet of standard paper, like those commonly used in computer printers (8.5 in × 11 in). Fold the sheet of paper in half from top to bottom.
Step 2: Then fold the paper in half again, this time from left to right.
Step 3: When you open the folded sheet, the creases will pass through the centre of the sheet.
This method worked to find the centre of the sheet of paper. But what if you were trying to find the centre of a rectangular wood board? Folding wood to find the middle would not be an option. How could you find the middle of the wood board? Here is one possibility.
Using the Diagonal to Find the Midpoint
Non-adjacent vertices are vertices that are not end points of the same side. For example, a diagonal of a rectangle is a line joining opposite corners.
Step 1: Pretend your sheet of paper is a wood board. Lay a ruler or straight edge from one corner of the sheet to the opposite corner. Use your pen to draw this diagonal. What do you notice?
Step 2: Use your straight edge to draw in the second diagonal.

The diagonals of the rectangle cross each other where the creases meet. This is the middle point of the sheet of paper (or of your imaginary wood board).
vertical: perpendicular to the level of the ground
On a sheet of paper, the vertical direction is parallel to the left and right sides of the paper.
horizontal: parallel to the level of the ground
On a sheet of paper, the horizontal direction is parallel to the top and bottom sides of the paper.
midpoint: the point at the middle or centre of an object
Step 3: How far is the midpoint of the sheet from the edges of the sheet? Use your ruler or tape measure to check these distances. Remember to measure the distances along the vertical and horizontal creases.
You have just discovered two ways to find the middle of a rectangular object. This middle point is also referred to as the midpoint.
Place your sheet with folds, diagonals, and notes about finding the centre of a rectangle in your course folder.
In the calculation to measure the distances from the midpoint to the edges of the sheet, you may have noticed it can be inconvenient to work with decimals and inches—especially if you are using a tape measure and working with lumber.
When speaking about lumber, a 1 × 6 is actually a board that is just ![]() in ×
in × ![]() in. The 1 × 6 gets its name from its dimensions before it is made smaller through drying and planing. How would you divide the finished dimension of this board (
in. The 1 × 6 gets its name from its dimensions before it is made smaller through drying and planing. How would you divide the finished dimension of this board (![]() in ×
in × ![]() in) by 2?
in) by 2?
Sometimes being able to calculate with fractions is easier than calculating with decimals. So, before going further, you will review dividing fractions.
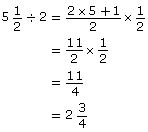
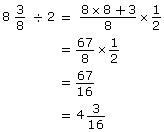
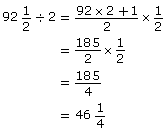
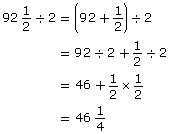
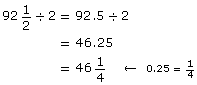
Example 1
What is ![]() ?
?
Solution
Method 1
View “Example 1 Solution.”
Method 2
You could use your calculator to solve the equation, since you likely know the decimal equivalent of the fraction ![]() is 0.75.
is 0.75.
![]()
![]()
![]()
So,
![]()
Example 2
Find ![]()
Solution
Check using your calculator.
![]()
![]()
 Self-Check
The following questions could be encountered in carpentry, sewing, or in many other occupations. Check your answers using a calculator. If you are working with a partner, take turns dividing the fractions and using the calculator.
SC 1.
![]()
SC 2.
![]()
SC 3.
![]()
SC 4.
![]()
11 ÷ 2. From the sides of the sheet, the centre should be 4.25 in, which is 8.5 in ÷ 2. (Note that
4.25 in =
1.13. Page 3
Module 3: Linear Measure
Explore
In the following Try This activity, you will explore a method of finding the centre of a circular disk. This is the same method carpenters use.
Finding the Centre of a Circle
 Try This
Work with a partner if possible.
Step 1: On a blank sheet of paper, draw a circle by tracing the bottom of a cylindrical shape, like a soup can, glass, or jar lid.
Step 2: Find the centre of this circle by folding the circle in half with two different folds (as you did in the last lesson). Mark the centre you found, which will be where the two folds meet.
Imagine your circle is wooden and can’t be folded. How could you find the centre? Follow these steps:
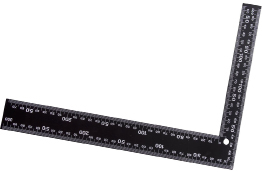
Step 1: Place a square from a geometry set—or simply the square corner of another sheet of paper or a book—on the circle. The right angle of the square is on the circumference. Mark where the edges of the square cross the circle by A and B. Join points A and B.
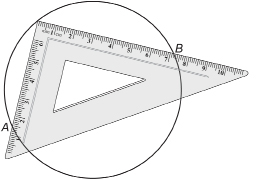
TT 1. What is segment AB? How can you check your answer by paper folding?
Step 2: Place the square on the circle in a new position but so that the right angle of the square is still placed somewhere on the circumference. Mark where the edges of the square cross the circle using letters C and D. Join points C and D.
TT 2. How did using the square a second time help you to locate the centre of the circle?
TT 3. Explain, in your own words, how a carpenter might use a carpenter’s square to locate the centre of a wooden, circular disk.
TT 4. Identify situations where you might need to find the centre of a circular object.
© 7505811966/shutterstock
You have seen that placing a carpenter’s square (or a square from a geometry set) on a circle allows you to draw the diameter of the circle.
Now suppose you start with a diameter already placed on a circle. The end points are connected by line segments to some point on the circle circumference. The diameter and connecting lines will form triangle ABC.
Watch “Angle Inscribed in a Semicircle.” If necessary, move point B until ![]() is 180°. Segment BC is now the diameter of the circle.
is 180°. Segment BC is now the diameter of the circle.
TT 5. Will the angle formed by the connecting lines always form a right angle? To find out, move point A around on the circumference in “Angle Inscribed in a Semicircle.”
1.14. Page 4
Module 3: Linear Measure
Bringing Ideas Together
three-dimensional object: an object having length, width, and height or depth
An object in which one of its three dimensions is not relevant may be considered to be a two-dimensional object. For example, a thin sheet of paper may be considered to be a 2-D object, but a rectangular wooden block would normally be considered 3-D.
In the Get Started and Explore sections, you investigated finding the centre of a three-dimensional object, such as a rectangular board or a circular disk.
The next few examples apply the new skills you have acquired.
Example 3
John wants to drill a hole at the centre of a circular disk. He used his carpenter’s square to locate the centre. He wants to check the radius before he drills. If the disk has a diameter of ![]() what is the radius of the circular disc?
what is the radius of the circular disc?
Solution
First, estimate your answer. The radius is half the length of the diameter. The radius of the disc should be a little more than 4 in, since the diameter is a little longer than 8 in and ![]()
Method 1
Divide fractions.
The radius is ![]() This answer is reasonable, as the estimate was a little more than 4 in.
This answer is reasonable, as the estimate was a little more than 4 in.
Method 2
Use decimals and your calculator.
![]()
So,
![]()
Therefore,
![]()
The radius is 4.1875 in.
Note: ![]()
So,
![]()
The radius if the disk is ![]()
Example 4
A 2 × 4 board is ![]() long. Where should this board be marked in order to cut the board into two shorter 2 × 4 boards of equal lengths? Express your answer as a whole number and fraction.
long. Where should this board be marked in order to cut the board into two shorter 2 × 4 boards of equal lengths? Express your answer as a whole number and fraction.
Solution
Method 1
Divide fractions.
Method 2
Divide the whole number separately from the fractional part.
Method 3
Use decimals.
![]()
So,
The stud should be marked ![]() in from one end to cut it into two equal lengths.
in from one end to cut it into two equal lengths.
 Self-Check
It is time to apply your problem-solving skills to locate midpoints. When you are finished, check your answers.
SC 5. Masie wants to drill halfway through a 2 × 4 piece of lumber, which is ![]() thick. How deep should she drill?
thick. How deep should she drill?
SC 6. Marty wishes to locate the centre of a circular disk with a diameter of ![]() What is the radius of the disk?
What is the radius of the disk?
SC 7. Randy wants to drill a hole in the centre of a drawer front. If the front of the drawer is 30 cm × 15 cm, where is the centre located from the edges of the drawer front?
SC 8. Where should a board ![]() long be cut to obtain two equal lengths?
long be cut to obtain two equal lengths?
 Mastering Concepts
Try this question. When you are finished, check your answer.
Suppose you were given a triangular piece of wood with three equal sides. How would you locate the centre of the wood?
1.15. Page 5
Module 3: Linear Measure
Lesson 3 Summary
© Konstantin Gushcha/shutterstock
You have likely heard the saying “Measure twice and cut once.” If you have applied your carpentry skills to build a project, you know how accurate that advice is. Carpenters routinely use the skills you explored in this lesson to make accurate cuts and avoid waste.
In this lesson you explored this question:
- How can you determine the midpoint of a linear measurement such as length, width, height, depth, diagonal, and diameter of a three-dimensional object?
You explored how to locate midpoints of discs and rectangles. You also applied fractions to determine a measure when dividing a length in half.
 Assignment
Retrieve the Lesson 3 Assignment Booklet you saved in your course folder at the start of this lesson. Complete the Assignment. Resave your Assignment Booklet in your course folder and submit a copy to your teacher for assessment.
Unit 2 Project
Now, before you move on to the next lesson, you should sketch out your Unit 2 Project.
1.16. Lesson 4
Module 3: Linear Measure
Lesson 4: Linear Problems
Focus

© Adisa/shutterstock
Taking your surf board to Hawaii could be a little tricky, but some airlines actually allow it! If you designed a product for sale as part of your Unit 1 Project, you should know there are restrictions on the size of parcel you can mail, just as there are restrictions on airline luggage.
The air traveller in the photograph will be checking more than two bags prior to his flight. Airlines in Canada have restrictions on the number and weight of bags travellers can check. Airlines also limit the linear dimensions of each checked bag. The total of the length, width, and height cannot exceed 158 cm. You will be assessed a surcharge if you exceed the limits for the number, weight, or linear dimensions of checked baggage.
Surcharges for extra pieces, or for overweight and oversized items, can be pricey. Baggage restrictions are just one type of linear measurement problem you will encounter in this lesson.
Lesson Questions
In this lesson you will explore these questions:
- How do you solve perimeter, circumference, and size problems based on linear dimensions?
- How can you determine if your answers to linear measurement problems are reasonable?
Assessment
You will complete the Lesson 4 Assignment Booklet for assessment. Download the Lesson 4 Assignment Booklet and save the file in your course folder now. You will receive further instructions on how to complete the Assignment Booklet later in this lesson.
Remember to save all activities, including those that are not part of the Assignment, in your course folder.
Required Materials and Equipment
You will need the following supplies:
- a ruler or tape measure that shows imperial and SI units
- a large suitcase
- a calculator
1.17. Page 2
Module 3: Linear Measure
Get Started
In the following Try This activity you will review the formulas for perimeter and circumference.
 Try This
Complete “Matching Formulas.”
The formulas in the drag-and-drop activity are on the Formula Sheet. Retrieve your copy of the Formula Sheet that you saved to your course folder earlier in this lesson. Like you do with the Glossary, add notes or sketches about each of the formulas to the Formula Sheet.
You will use the Formula Sheet in this lesson and throughout the remainder of the course. Remember to save your changes to your course folder.
1.18. Page 3
Module 3: Linear Measure
Explore
In the following activity you will explore linear measurement restrictions airlines set on checked baggage.
 Self-Check
Work with a partner. When you are finished, check your answers.
Canadian airlines restrict the size of checked baggage. Bags with a total length, width, and height measurement of more than 158 cm are assessed a surcharge.
SC 1. Suppose you are in Florida and the measuring tape you have only shows inches. What is the 158-cm limit in inches? Round your answer to the nearest inch.
SC 2. Find the biggest suitcase or bag in your house or school. (A hockey bag will work too.) Measure the dimensions of the suitcase. Does the length + width + height of the suitcase exceed the airline limit?
SC 3. Complete the following table by indicating the maximum each missing measurement could be without exceeding the airline’s size limit.
|
Length |
Width |
Height |
|
80 cm |
40 cm |
|
|
30 in |
|
10 in |
|
1 ft 6 in |
8 in |
 Try This
TT 1. Design a bag that will carry as many clothes as possible and not be awkward to carry. The bag must not exceed the size limit of 158 cm. Create a rough sketch that includes the bag’s dimensions. Show any calculations you used to determine the best dimensions for the bag.

© sabri deniz kizil/shutterstock
 Share
Share
Share the sketch of your bag design with your partner. Explain why you chose the dimensions you did and how this design maximizes the amount of clothes you can easily carry. What would you change about your design after discussing your design with your partner?
Save notes from your discussion and your revised design in your course folder.
1.19. Page 4
Module 3: Linear Measure
Bringing Ideas Together
In Explore you examined one type of linear measurement problem. In the examples and Self-Check activities that follow, you will meet a wide variety of measurement problems.
Example 1
Bill’s front door has a semicircular window, like the one in the photo, with a base length of 60 cm.
© Jenson/shutterstock
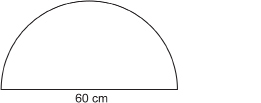
- Estimate the perimeter of the window.
- Calculate the perimeter, correct to the nearest centimetre.
Solution
- You must add the length of the semicircular curve to the 60-cm base of the window.
The length of the semicircular curve is one-half the circumference of a circle with the same diameter.
A circle with a diameter of 60 cm would have a circumference of about 3 × 60 cm or 180 cm.
So, the length of one-half of the circle, the semicircular curve, is about 90 cm (180 ÷ 2).
The perimeter of the window is about 90 cm + 60 cm = 150 cm.
- The circumference of a circle, if given the diameter, is C =
 d.
d.
So, the length of the semicircular curve .
.
Therefore, the perimeter of this window is
The perimeter of the window is about 154 cm. This answer is reasonable, since the estimated answer was
150 cm.
Example 2
Tracey is building a fence. The fence posts are 8 ft apart. Tracey will nail vertical spruce fence boards, which are ![]() in wide, across the 8-ft gap.
in wide, across the 8-ft gap.
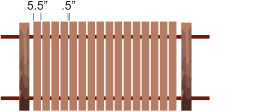
- How many boards will Tracey use if she wants about a
 -in space between the boards?
- How much space must Tracey allow on each side of her boards, if the boards are evenly spaced across the 8-ft gap?
Solution
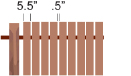
Each fence board plus a gap is

Two boards would be
6 in + 6 in = 12 in, or 1 ft
So, Tracey needs two boards for every foot within the 8-ft gap.
2 × 8 = 16 boards
In total, Tracey needs 16 boards.
- Since Tracey will use 16 boards, each with a width of
 , the boards will cover
But, 8 ft between posts is
8 × 12 in = 96 in
So, the total for all the gaps between boards is
96 in - 88 in = 8 in
Now Tracey must allow for 17 gaps because there is a gap between the first board and the post.
So, the gap between boards must be

Note: 0.47 in is almost . So, Tracey can use her imperial tape measure to measure the gap for the fence boards.
This answer is reasonable, since the gap must be slightly less than , or 0.5 in.
Example 3
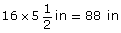
The following diagram shows the layout of a running track.
The ends are semicircles 50 m in diameter. The perimeter of the track is 400 m.
- Estimate the length, d, of each straight side. Note that, in this question, d does not represent diameter.
- Determine d to the nearest tenth of a metre.
Solution
View “Example 3 Solution.”
 Self-Check
When you are finished, check your answers.
SC 4. The diameter of a tennis ball is 6.5 cm. How many times will the ball roll to travel 10 m? Round your answer to a whole number of rotations. But, first, estimate your answer.

© Kelpfish/5695281/Fotolia
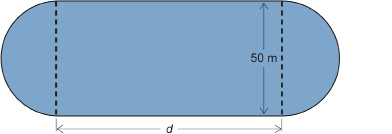
SC 5. A residential property has the shape of one quarter of a circular disk.
As a way of keeping his two dogs on the property, the owner plans to place a chain-link fence along the edge of the property. The chain-link fence costs approximately $8.00 per metre. What is the cost of fencing the property? Round to the nearest dollar.
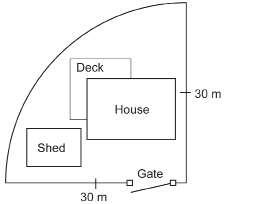
SC 6. Jan has prepared a flower bed at one corner of her house. The flower bed is shaped as in the diagram.
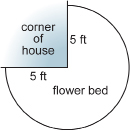
What is the perimeter of the flower bed? Round your answer to one decimal place. But, first, estimate your answer.
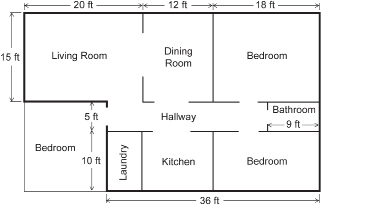
SC 7. The following are plans the Popowich family received from their building contractor for their new house.
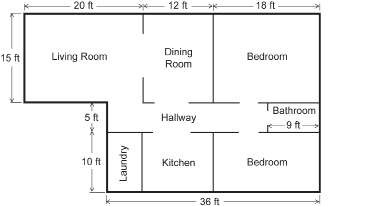
- What is the perimeter of their house according to these plans?
- After the Popowich family looked over the plans, the family considered adding an extra bedroom to the house according to this revision to the plans. What is the perimeter of their house according to the revised plans?
SC 8. Lumber sold as 1 × 6 boards actually have a thickness of ![]() and a width of
and a width of ![]() . The height of a stack of 1 × 6 boards is
. The height of a stack of 1 × 6 boards is ![]() . How many boards are there in the stack?
. How many boards are there in the stack?
 Mastering Concepts
A 1-m length of wire is bent into a square. Another 1-m length of wire is bent into a circle.

The diagram is not drawn to scale.
Determine which is larger, the side length of the square or the diameter of the circle. First use an estimation technique. Then base your answer on a more precise calculation.
1.20. Page 5
Module 3: Linear Measure
Lesson Summary

© Evok20/shutterstock
There are restrictions on parcels that can be sent through the mail or by courier. One of these restrictions is based on the linear dimensions of the package. The maximum size for one company is based on the formula, size = length + 2 × width + 2 × height. Determining whether your shipment is below the maximum allowable size is just one example of linear problems you will encounter in everyday situations.
In this lesson you explored these questions:
- How do you solve perimeter, circumference, and size problems based on linear dimensions?
- How can you determine if your answers to linear measurement problems are reasonable?
Check your level of understanding of the materials covered in this lesson by completing “Lesson 4 Traffic Lights.”
If you select an amber or red traffic light in the multimedia piece, you will receive information about additional work you can complete to improve your understanding of the topics. Complete the suggested work before you proceed to the Lesson 4 Assignment. If you experience difficulty, contact your teacher before starting the Lesson 4 Assignment.
In addition to problem situations involving parcel or baggage size, you explored problems involving perimeter and circumference. These problems involved both SI and imperial units.
 Assignment
Open your Module 3 Assignment Booklet. Complete the Lesson 4 Assignment.
Unit 2 Project
Before you move on to the next lesson, contact your teacher for advice on how to continue your Unit 2 Project.
1.21. Module 3 Summary
Module 3: Linear Measure
Module 3 Summary

© Milos Jokic/shutterstock
Are you making progress modifying the design you developed in Unit 1? Many of the important skills that help you decide what changes you need to make involve measurement.
In this module you explored measurement of length and distance. You refined your skills handling imperial and SI units of linear measurement. You examined perimeter, circumference, midpoints, and more general examples involving linear dimensions. You also used your estimation skills to confirm whether or not your answers were reasonable.
In this module you developed important measurement skills when you explored these questions:
- How are measurement skills used to determine perimeter, circumference, and midpoints?
- What is essential to the skill of estimation?
A picture can tell a story. The “Module 3 Lessons Summary” is a collection of images from each lesson that describe the math you explored. What do you remember about each image? Can you relate each image to something new you learned in this module? Watch the “Module 3 Lessons Summary” now.