Unit 1 Project
1. Unit 1 Project
Unit 1 Project: Design a Habitat or a Product for Sale
This project is intended to take a total of six hours, from the initial planning stages to the final product. You will choose to design either a habitat or a product for sale, but not both!

CREDIT: TORONTO STAR
Volunteers work on the Habitat for Humanity project at Neilson and McLevin in Scarborough.
The build, its biggest in Canada, will include 40 homes.
© Vector Mushrooms/shutterstock
Have you heard of Habitat for Humanity? Habitat for Humanity is a volunteer organization dedicated to building affordable housing. A habitat is where people or animals live. A habitat could describe your community, a recreation centre, your school, your home, or your room; or, a habitat could be the shelter for your pet, a barn, or an area for your favourite animal at a zoo or animal sanctuary. To build a habitat, careful plans, drawn to scale, are necessary.
For the Unit 1 Project, you might want to extend the idea of habitat to areas where people live or meet. Using this expanded definition, you might choose one of the following project options:
- Design a deck for your house.
- Plan your dream room.
- Design a home for your pet.
- Reorganize the garage.
- Landscape a yard.
These are just a few ideas to get your creative juices flowing. Think about where you live or work. What changes would you make?
Would you rather design a product for sale? If so, you might choose to design one of the following products:
- a toy and its package
- a carving and its package
- your own invention
Whatever you choose to design, the habitat or product must make sense for you and where you live. Keep in mind that it is often better to dedicate your time and effort to designing something simple. Don’t forget that you want to do your best work and complete the task in six hours.
Keep your teacher informed about what you have decided to do and the progress you are making. If you run into problems, ask your teacher for help.
It’s time to get down to details. Here are the steps to take to complete your Unit 1 Project.

Step 1: Explain why you chose your habitat or product design, and explain why the design is important to you.
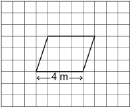
Step 2: Complete two scale diagrams for your design. One diagram must show SI measures, and the other diagram must show imperial measures. A scale diagram is an outline sketch of your proposal, with measurements shown.
You may wish to print and use the 0.5-cm Grid Paper Template, available in the Toolkit.
Alternatively, you might wish to complete your sketch digitally. There are many free sketching programs available online. Ask your teacher for help if you have trouble finding a software program. Regardless of whether you sketch by hand or digitally, remember that you must show the appropriate measures on both diagrams.
Step 3: Add a scale showing the measure each square represents to your diagrams. For example, if one square on your diagram is equal to 10 cm or 6 in, write 1 square = 10 cm or 1 square = 6 in. Of course, the scale you choose will depend on your design.
Step 4: Show one area calculation, using the appropriate metric units, to describe one aspect of your project. It could be a rectangular area. Show all of the steps in your calculation, including the units.
Step 5: Show how to convert the area you chose to describe in Step 4 from SI units to imperial units. Show all of the steps in your conversion.
Step 6: Show one volume calculation, using the appropriate SI units, to describe one aspect of your project. It could be the box for your product or the volume of a room, for example. Show all of the steps in your calculation, including the units.
Ask your teacher how to submit your project. Your project will be evaluated based on the following scheme. There are 15 marks possible.
|
Score |
Problem |
Connections |
Visualization |
Representation |
Communication |
|
3 |
An appropriate approach is taken for the entire project, and all tasks are complete. |
A satisfactory connection to the student’s own interests and experiences is made. |
There are complete diagrams for both parts of the project. |
All required mathematical representations are completed and correct. |
The response explicitly states correct and insightful examples of personal experience, societal, or technological relevance of the project design. |
|
2 |
An appropriate approach is taken for the entire project, but the project is incomplete in some aspect. |
Progress has been made to relate the project to the student’s own interests and experiences, but the connection is still incomplete. |
There is completion of both diagrams, but with minor omissions. |
All required mathematical representations are completed, but with minor errors. |
Progress has been made to communicate, but some clarification would be appropriate. |
|
1 |
A partially correct approach is taken, or a correct approach is taken for only part of the project. |
A minor attempt is made to relate the project to the student’s own experiences and interests. |
There is only partial completion of both diagrams, or only one diagram is completed. |
An initial attempt at using required mathematical representations, with major errors or omissions, is made. |
There is some communication about engagement in the project. |
|
0 |
There is little or no engagement in the project. |
No connections are made. |
There is no attempt at a diagram. |
There is no attempt at using mathematical representations. |
There is little or no communication about engagement in the project. |