Module 4
| Site: | MoodleHUB.ca 🍁 |
| Course: | Biology 30 [5 cr] - AB Ed copy 1 |
| Book: | Module 4 |
| Printed by: | Guest user |
| Date: | Thursday, 18 September 2025, 4:30 PM |
Description
Created by IMSreader
Table of contents
- 1. Module 4
- 1.1. Lesson 1
- 1.2. Page 2
- 1.3. Page 3
- 1.4. Page 4
- 1.5. Page 5
- 1.6. Lesson 2
- 1.7. Page 2
- 1.8. Page 3
- 1.9. Page 4
- 1.10. Page 5
- 1.11. Page 6
- 1.12. Page 7
- 1.13. Lesson 3
- 1.14. Page 2
- 1.15. Page 3
- 1.16. Page 4
- 1.17. Page 5
- 1.18. Lesson 4
- 1.19. Page 2
- 1.20. Page 3
- 1.21. Page 4
- 1.22. Page 5
- 1.23. Lesson 5
- 1.24. Page 2
- 1.25. Page 3
- 1.26. Page 4
- 1.27. Page 5
- 1.28. Lesson 6
- 1.29. Page 2
- 1.30. Page 3
- 1.31. Page 4
- 1.32. Page 5
- 1.33. Module 4 Summary
1. Module 4
Module 4: Area
Module 4 Introduction
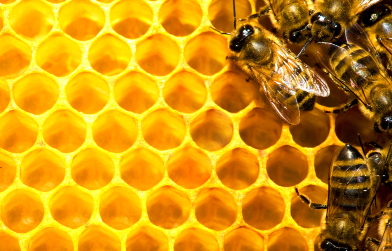
© Tischenko Irina/shutterstock
Honeybees are master designers. Mathematicians have proven that the hexagonal pattern on the comb is the best way of dividing up a region into cells of equal area. The amount of wax required and the energy expended by the workers are kept to a minimum. The cells are all the same size. There are approximately four cells per square centimetre or 25 cells per square inch.
Architects too must consider if their building designs make the best use of area while minimizing costs. When you modify your project design, area and materials will be an important consideration.
In this module you will explore estimating areas and using those estimates to check whether your answers to area problems are reasonable. Some of the problem situations you will meet in this module involve areas of two-dimensional shapes, such as squares, rectangles, parallelograms, trapezoids, and circles. As well, you will explore the surface area of prisms, pyramids, cylinders, and cones. You will also investigate how changing the scale or dimensions of geometric shapes affects their areas.
In this module you will further develop your skills as you actively investigate the following questions:
- How do you estimate and calculate the area of two-dimensional shapes and the surface area of three-dimensional objects?
- What effect does a change to dimensions have on area and surface area?
Save a copy of the Module 4 Glossary in your course folder now. The Module 4 Glossary is a list of all of the new terms you will see in the lessons. Each time you see a definition, open your copy of the Glossary. Use the space available to add notes or drawings to help your understanding. You will be able to use your personal Glossary as a study tool.
1.1. Lesson 1
Module 4: Area
Lesson 1: Estimating Area
Focus
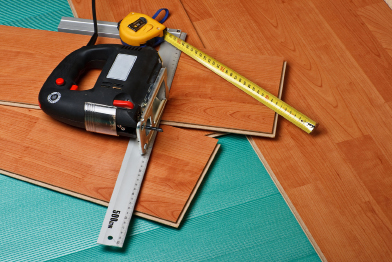
© Dmitry Melnikov/shutterstock
Suppose your Unit 2 Project is a plan for renovating the family room in your home. To estimate the cost of new laminate flooring, you need to include an estimate of
- the total coverage area of the floor
- any possible waste (as a result of cuts)
The flooring will have to be cut to fit
- along the walls
- around a fireplace (if there is one)
- on and/or around stairs
- around furnace vents (if there are vents)
- any smaller areas of the room, such as a closet
Does your family room have any unusual features? How would you estimate the amount of flooring you would purchase?
Lesson Questions
In this lesson you will explore these questions:
- How are referents used to estimate area measurements using SI and imperial units?
- In what situations are SI and/or imperial units for measurement used?
- How can the area of a regular or irregular shape be estimated using an SI or imperial grid?
Assessment
You will complete the Lesson 1 Assignment Booklet for assessment. Download the Lesson 1 Assignment Booklet and save it in your course folder now. You will receive instructions on how to complete the Assignment Booklet later in the lesson. You will also be prompted to start working on the Unit 2 Project.
There are other activities that you will complete throughout this lesson. It is important to complete all activities and save them in your course folder. Your teacher may ask to see your work at any time.
The lesson provides you with opportunities to investigate, review examples, and practise the knowledge and skills you are learning. In Self-Check activities you can compare your answers to see if you are on track. If you are having difficulty with concepts or calculations, contact your teacher.
Required Materials and Equipment
You will need the following supplies:
- a ruler or tape measure that shows imperial and SI units
- two copies of Quarter-Inch Grid, available in the course Toolkit
1.2. Page 2
Module 4: Area
Get Started
In the following Try This activity you will review the common imperial units of area measure.
 Try This
Go to your course folder and take out the 13 one-square-foot pieces you made in Module 2, Lesson 2. If you do not already have these squares, use the instructions from that lesson to make them.
Use your tape measure to confirm that each piece is a square one foot on each side.
TT 1. How many square feet are in 1 yd2? Hint: Form a square yard using your square-foot pieces.
You will recall that another common imperial area unit is the square inch. Use your ruler to sketch a square that measures 1 in on each side.
Do you remember the relationship between the square foot and the square inch?
TT 2. Complete the following statements by entering the number of units.
Place a copy of your answers in your course folder.
1.3. Page 3
Module 4: Area
Explore
The square-foot piece of newspaper you used for TT 1 and TT 2 is an excellent referent. You can envision the area of 1 ft2 more easily now because of it. You have been using referents in many of the past lessons, and now the focus is on the use of referents to estimate areas.
 Self-Check
SC 1. What referents do you use for the units of measures shown in the following table? Two common referents for the square inch are given as an example. Make sure your referents are accurate. Be sure to measure!
When you have completed the table, check your answers against some sample referents.
|
Unit |
Referent |
|
1 in2 |
postage stamp, thumbprint |
|
1 ft2 |
|
|
1 yd2 |
|
|
1 mm2 |
|
|
1 cm2 |
|
|
1 m2 |
|

© AKaiser/shutterstock
In the next activity you will test your skill in estimating areas using SI and imperial units.
Before you begin estimating, consider which units would be the best to use to measure the different areas. Often, the most appropriate units allow for small whole numbers to be used in the measurement.
For example, the book cover in the picture has an area of 99 in2. This area is also equal to 0.076 yd2—not a whole number of square yards. You would sound a little strange saying the area of the book cover is 0.000 016 ac! Not only would it be strange, but it would also be hard to visualize the size as a small fraction of an acre. So, why might you think a square inch is the best unit for measuring the area of this book?
A good choice of units allows for small whole numbers to be used in the measurement. By choosing inches, you can express the area measurement as 99 in2.
Think of your bedroom. Would it be appropriate to express the area of your bedroom in square inches? What would be a more appropriate imperial unit?
Do you remember what SI stands for?
Would it be appropriate to express the area of your bedroom in square centimetres? What would be a more appropriate SI unit?
 Try This
Work with a partner, if possible.
TT 3. Complete “Estimating Area Using SI and Imperial Units.”
 Share
Share
Compare the units and measurements you used in your table from TT 3. With a partner or in a group, discuss the following questions:
- Did some units cause the measurements to be very large or very small values?
- Which units helped keep the measurement values manageable, reasonably sized whole numbers?
After your discussion of the preceding questions, write a short paragraph. In the paragraph explain how you can find appropriate units to measure the area of an object. Place this paragraph in your course folder for future reference.
1.4. Page 4
Module 4: Area
Bringing Ideas Together
Often estimating an area will help you decide whether or not a calculated answer is reasonable.
Example 1
A room measures 3.05 m by 3.96 m.
- Estimate the room’s area.
- Calculate the room’s area in square metres. Round to two decimal places.
Solution
- Round each measure to the nearest metre.

So, the area of the room is about 3 m × 4 m = 12 m2.
This answer is reasonable, since the estimate was 12 m2.
Example 2
The top of a rectangular couch cushion is 23 in by 26 in. Jo wants to purchase enough material to cover the cushion.
- Estimate the area in square feet.
- Calculate the area in square feet. Round to two decimal places.
Solution
Watch the following animated solutions:
© Lepas/shutterstock
Example 3
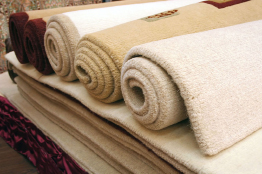
Estimate the number of square yards of carpet needed for a room that measures 14.5 ft × 12 ft.
Solution
Remember 1 yd = 3 ft. So, 14.5 ft is almost 5 yd, and 12 ft = 4 yd.
Therefore, the area is about 5 yd × 4 yd = 20 yd2. About 20 yd2 are needed to carpet the room.
In your work in Unit 1, you learned that, in Canada, many items are advertised in both imperial and SI units.
The following is a partial guide for your reference.
|
Square Foot |
Square Yard |
Square Metre |
|
|
|
 Try This
TT 4. Try to add to the partial guide. Use the Internet or investigate a local building supply or home decorating store to expand the guide.
Save your work to your course folder.
Now, put your area estimation skills to work!
 Self-Check
Answer the following questions. When you are finished, check your answers.
SC 2. Lunay’s rectangular driveway is 12.5 ft wide and 59 ft long.
- Estimate the area in square yards.
- Calculate the area to the nearest tenth of a square yard.
- Compare your answer for question b to the estimate. What does the estimate tell you?
SC 3. A binder cover is 27 cm by 29 cm.
- Estimate its area.
- Calculate the area. Is your answer reasonable?
Estimating Areas of Shapes That Are Not Rectangular
In your work to this point, you have been calculating the areas of rectangles and squares. You know that the areas you have found for these figures are the number of square units within each figure (cm2, in2, ft2, m2, and so on).
Watch “Area: Demonstration Applet.” This applet can be used to calculate areas for squares and rectangles. Areas are found both by counting unit squares and by applying the formula, ![]() which is a shortcut for finding out how many unit squares the rectangle contains.
which is a shortcut for finding out how many unit squares the rectangle contains.
Notice that the final number of squares counted is the same as the answer displayed for Area = length × width. Make rectangles with different dimensions to see that the number of squares counted is always the same as the area calculation provided on the right side of the applet.
two-dimensional (2-D) shape: an object having just two dimensions
A 2-D object has length and width but no depth or thickness.
Of course, not all areas are square or rectangular. The next applet illustrates how the area of an irregular two-dimensional (2-D) shape can be approximated by counting unit squares.
A 2-D shape can be drawn on a flat surface. A 2-D shape has length and width.
Watch the animation “Area Example: Area of a Figure.” Select [PLAY] to watch the animation.
On the right, the figure was broken up into parts and area formulas, which, as you will see in the next two lessons, are used to refine an estimate. In this lesson you will just count the squares to obtain the estimate. Notice that in the estimate there were 32 squares, which lay entirely within the figure. There were 50 squares that covered the entire figure.
A better estimate than either 32 or 50 unit squares is the average of these two estimates.
What is the average of 32 and 50? Remember, the average of two numbers is found by adding the numbers together and dividing the result by 2.
Notice how close this estimate, 41 units2, is to the calculated value of 40.
Try this technique to estimate the area of the 2-D shape in the next Self-Check question.
Self-Check
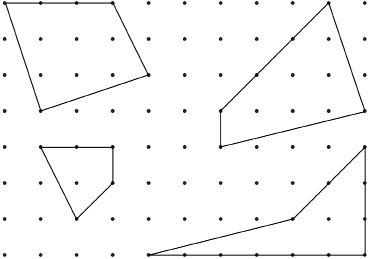
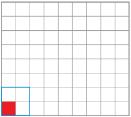
SC 4. Open and print “Irregular Two-Dimensional Shape.” You will need one copy to count the number of unit squares that are totally within the figure, and you will need a second copy to count the number of squares that totally cover the figure. Then find the average of the two counts. Hint: Make your count easier by using a highlighter to count the squares.
SC 5. If each square in the diagram is 1 cm on a side, what unit would your estimate have?
 Mastering Concepts
Try these questions. When you are finished, check your answers.
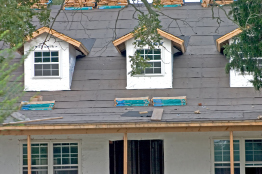
© L Barnwell/shutterstock
Have you watched workers shingle a roof, or have you even helped shingle a roof? Asphalt shingles are sold by the square or by the bundle. A square is the number of shingles needed to cover 100 ft2—an area 10 ft by 10 ft. A bundle is one-third of a square. The weight of a bundle can be handled by one person.
MC 1. How many square feet are in a bundle?
MC 2. Contractors estimate that a bundle will normally cover 32 ft2, as there is always waste at the ends of the roof and by features such as chimneys and vents. If a bundle is ![]() of a square, how many square feet of shingles per square is allowed for waste?
of a square, how many square feet of shingles per square is allowed for waste?
MC 3. What percent of a square is allowed for waste?
MC 4. A roof is 1000 ft2 in area. How many bundles of shingles would a contractor estimate are needed to shingle that roof?
1.5. Page 5
Module 4: Area
Lesson Summary

© Bartosz Ostrowski/shutterstock
Many young couples dream of owning a home. If you have looked at home advertisements in flyers or in the newspaper, you will have seen that the area of houses for sale is quoted in either square feet or square metres. These areas, derived from real estate agents’ measurements, are only estimates. This lesson dealt with area estimates too.
In this lesson you explored these questions:
- How are referents used to estimate area measurements using SI and imperial units?
- In what situations are SI and/or imperial units for measurement used?
- How can the area of a regular or irregular shape be estimated using an SI or imperial grid?
You discovered that your skill in estimating area depends on associating linear units in both the SI and imperial systems with common items, such as the top of a card table for the square yard. These items are called referents, and your referents are likely different from another person’s referents.
Also, you practised estimating areas in problem situations to confirm whether or not your calculated answers were reasonable. You even estimated non-routine areas using grids.
 Assignment
Retrieve the Lesson 1 Assignment Booklet you saved in your course folder at the start of this lesson. Complete the Assignment. Resave your Assignment Booklet in your course folder and submit a copy to your teacher for assessment.
Unit 2 Project
Before you move on to the next lesson, you should start thinking about how you can apply the area skills you mastered in Lesson 1 to the Unit 2 Project.
1.6. Lesson 2
Module 4: Area
Lesson 2: Area Formulas
Focus
© J.D.S./shutterstock
Design is all about the shape of things. How is your Unit 2 Project shaping up?
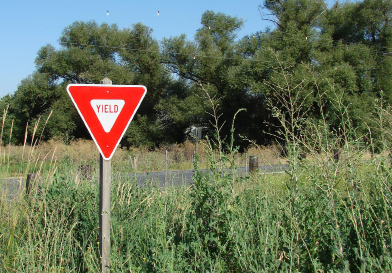
Drivers know from the shape of traffic signs what each sign represents. Yield signs are triangular. Stop signs are octagonal. Information signs are rectangular. Most countries follow the same standards for shape, graphics, and colour. These standards make it easier for international travellers who may not speak the local language but will still know what the sign represents. In the United States and Canada, for instance, orange signs are used at construction sites.
Traffic signs are covered with a reflective coating, so they can be seen more easily at night and in low-lighting conditions. The amount of reflective coating used depends on the area of the sign. By the end of the lesson you should be able to determine the quantity of coating needed for the yield sign in the photograph.
Lesson Questions
In this lesson you will explore these questions:
- How are the areas of common shapes, such as parallelograms and triangles, calculated?
- How are the areas of composite shapes involving rectangles, squares, parallelograms, and triangles determined?
Assessment
You will complete the Lesson 2 Assignment Booklet for assessment. Download the Lesson 2 Assignment Booklet and save it in your course folder now. You will receive instructions on how to complete the Assignment Booklet later in the lesson. You will also be prompted to start working on the Unit 2 Project.
Remember to save all activities, including those that are not part of the Assignment, in your course folder.
Required Materials and Equipment
You will need the following supplies:
- a ruler or tape measure that shows imperial and SI units
- several sheets of quarter-inch grid paper (available in the course Toolkit)
- scissors
- tape
- a calculator
1.7. Page 2
Module 4: Area
Get Started
In the following Try This activity you will review the area formulas for a parallelogram and a triangle. When you are finished, put your responses to the questions in your course folder.
 Try This
Print at least four copies of Quarter-Inch Grid. You will need these sheets for this activity and for the activities in Explore.
Quad means “four.” Lateral means “side.”
In your work in previous lessons, you explored finding areas of rectangles and squares. Rectangles and squares are examples of a much larger group of four-sided shapes. Polygons with four sides are known as quadrilaterals.
Following are some sample quadrilaterals.
 Self-Check
SC 1. Look at this sample of rectangles.
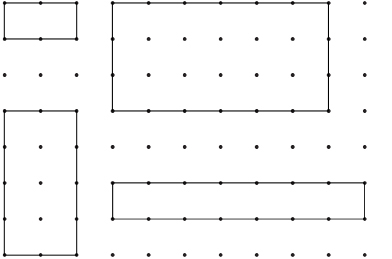
There are two aspects that make rectangles special amongst all quadrilaterals. Can you identify these aspects from looking at the sample rectangles?
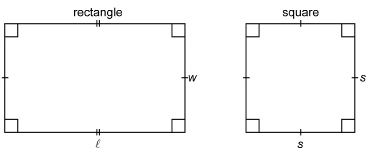
Often when rectangles are sketched, hatch marks are used to indicate the sides that have equal length. The small squares shown in the diagram of a rectangle and a square also have a special meaning. They tell you that these corners are right angles.
There are lots of other special quadrilaterals. A parallelogram is the one you will be looking at next. Like a rectangle, a parallelogram’s opposite sides have equal length and are parallel. The difference is that the angles are not all right angles.
1.8. Page 3
Module 4: Area
Explore 1
Now that you have reviewed some characteristics of polygons, you may be wondering about the area of these shapes. For example, you may be curious about the area of a parallelogram. Well, that is the topic of the next activity.
 Try This
Watch the animation “Area Relationship,” or use the following three steps to explore the relationship between the area of a parallelogram and the area of a rectangle with similar dimensions.
Step 1: Print one copy of Parallelogram.
Step 2: Cut out the parallelogram.
Step 3: Cut along the dashed line segment representing the height. Move the triangle that was on the left to the right. Fit the cut-out triangle with the rest of the shape to form a rectangle.
Based on what you saw from the “Area Relationship” animation or from the steps above, complete these questions.
TT 1.
- What was the length of the base of the original parallelogram?
- What was the height of the original parallelogram?
TT 2.
- What is the length of the rectangle?
- What is the width of the rectangle?
- How do these values compare to the base and height of the original parallelogram?
TT 3.
- What is the area of this rectangle?
- How does this area compare to the area of the original parallelogram?
Place a copy of your answers in your course folder.
Try This
Use “Demonstration Applet: Perimeter and Area (Parallelogram)” to explore how the area of a parallelogram relates to its dimensions. Notice the following about this multimedia piece.
- The variable m is used for the base of the parallelogram.
- The variable h is used for the height.
- You should not use the slider under n.
- The perimeter of the parallelogram is given (which you can ignore).
Use the applet to create the same parallelogram you explored in the previous Try This activity (TT 1 to TT 3). The area calculated by the applet should match the area of the parallelogram you calculated in TT 1 to TT 3. Did yours match? You will notice that slant height/length is a variable in the applet that you do not use in the area calculation.
TT4. When would slant length/height be useful?
Place a copy of your answer in your course folder.
Areas of a Parallelogram and a Rectangle Compared
In the previous activities you showed that the area of a parallelogram is the area of a rectangle with the same base and height. In other words, area of parallelogram = base × height, or A = bh.
You discovered a way to find the area of a parallelogram by rearranging the parallelogram’s area to make another figure. Rearrangement of areas can be used to gain insight into the area of a triangle as well.
Try This
In this activity you will explore the area of a triangle.
Step 1: On a sheet of grid paper, draw two identical triangles; or print and use Pair of Triangles. A sample is shown below.
TT 5.
- What is the length of the base of each triangle?
- What is the height of each triangle?
Step 2: Cut out both triangles. Arrange the triangles to form a parallelogram with the same base length as the base of each triangle.
TT 6.
- What is the length of the base of the parallelogram?
- What is the height of the parallelogram?
TT 7.
- What is the area of the parallelogram?
- What is the area of each triangle?
 Share 1
Share your answers to TT 7 with a partner or group. How did the areas of the parallelograms and triangles compare? What relationship can you see between these areas? How is this relationship shown in the formulas used to calculate the area of a parallelogram and the area of a triangle?
Write a paragraph that answers these Share questions. Use example values from your discussion partners in your explanation.
Place this paragraph in your course folder for future reference.
Area of a Triangle
In the Try This activity you just completed (TT 5 to TT 7), you may have noticed that the area of a triangle is half the area of a parallelogram with the same base and height. This idea can be expressed this way.
Try This
Use the applet “Area of a Triangle” to explore the area of triangles and the formula ![]() .
.
Note that, in the applet, altitude = height. When you use the applet, include triangles with all of the following shapes.
1.9. Page 4
Module 4: Area
Bringing Ideas Together
In the Explore you discovered how to use formulas to determine the area of a parallelogram and the area of a triangle.
- area of a parallelogram = base × height, or

- area of a triangle

Example 1
A 30-in square cloth is folded along the diagonal to make two triangles. What is the area of each triangle?
Solution
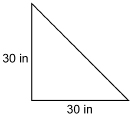
b = 30 in
h = 30 in
The area of each triangle is 450 in2.
Example 2
A snake’s skin is covered with small parallelograms.
© Sergej Razvodovskij/shutterstock
One of the small parallelograms is pictured as follows.
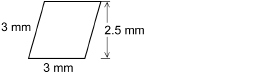
What is the area of this parallelogram?
Solution
b = 3 mm
h = 2.5 mm
The area of the parallelogram is 7.5 mm2.
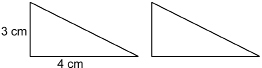
Example 3
Find the area of the following triangle.
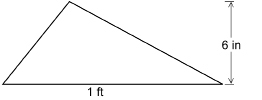
Solution
Each side must be expressed in the same units. Remember that 1 ft = 12 in.
b = 1 ft = 12 in
h = 6 in
![]()
So,
![]()
The area of the triangle is 36 in2.
Now practise your skill in finding area.
 Self-Check
Answer the following questions. When you are finished, check your answers.
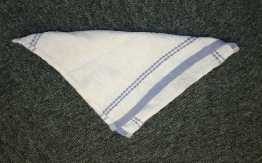
SC 2. A bedspread is turned down as shown.
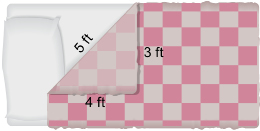
What is the area of the triangular portion?
SC 3. A railroad crosses a highway as shown.
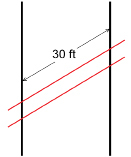
The distance between the parallel rails is 4 ft 8.5 in. What is the area of the road between the tracks?
1.10. Page 5
Module 4: Area
Explore 2
Composite Shapes
Often, more complicated figures are formed by combining simpler geometric shapes.
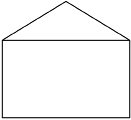
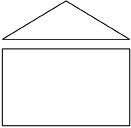
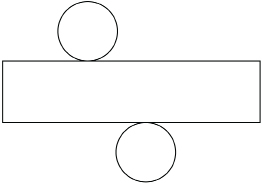
For instance, the end of a garage looks like a triangle on top of a rectangle. This more complicated shape can be considered to be a composite figure.
Combining simpler shapes, such as the triangle, rectangle, parallelogram, and circle, results in a composite figure.
In the next activity you will investigate the area of a trapezoid.
composite figure: any shape formed by combining simpler shapes
trapezoid: a quadrilateral with one pair of parallel sides

In this trapezoid, the pair of sides that are parallel are marked by arrows.
 Try This
If possible, work with a partner.
In this activity you will investigate the shape of a trapezoid and how aspects of its shape can help you determine its area.
Save your work from this Try This activity and Share 2, which you will complete in a few moments. You will be prompted to include this communication in your Lesson 2 Assignment soon.
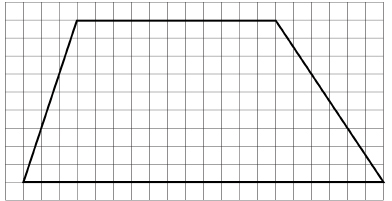
Draw a trapezoid on a sheet of Quarter-Inch Grid. Draw a trapezoid on the grid paper. If you are working with a partner, draw different trapezoids.
In Get Started you reviewed finding areas of parallelograms and triangles. You were introduced to the concept that many objects are composites, containing objects of many different shapes.
TT 8. Identify different-shaped objects that are combined to form the trapezoid above. Sketch these shapes within the diagram.
TT 9. Come up with a strategy you would use to calculate the area of the trapezoid using the areas of the component shapes you have identified.
 Share 2
Share your work from TT 8 and TT 9 with other students. You will probably see many different approaches from the one you developed. Evaluate each of the strategies.
- Have they identified appropriate shapes within the trapezoid?
- Do the formulas they used in TT 9 make sense?
- Which approach has the fewest shapes within the trapezoid?
Make a list of aspects that make certain approaches more effective in your opinion. Summarize what you have discussed in this Share by answering the following questions and saving them in your course folder.
- Which approach seems to be the most effective at calculating the area of the trapezoid?
- Calculate the area for the trapezoid using a minimum of two of the approaches you have seen. Do you get the same answer with each approach?
- Which approach will you use in the future? Why?
Save a copy of your discussion in your course folder. Include a copy of your work from the Share 2 section in Part 1 of your Lesson 2 Assignment document.
Splitting the Trapezoid
Were you surprised by the number of approaches of calculating the area of the trapezoid in the previous activity? Did one of the approaches identify only two component shapes? If not, you might find the approach you will see in the following Self-Check helpful for your future work.
 Self-Check
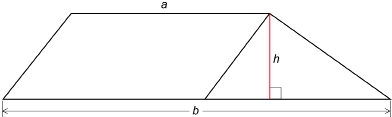
Draw a trapezoid without using a grid. Call the height h and the lengths of the two parallel sides a and b.
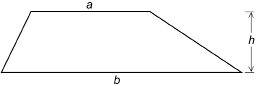
Then divide the trapezoid into two triangles.
SC 4. The upper triangle has a base length of a units long and a height of h units. What is the area of the upper triangle?
SC 5. The lower triangle has a base of b units and a height of h units. What is the area of the lower triangle?
SC 6. What is an expression for the area of the trapezoid?
If you did not identify the trapezoid as containing two triangles, redo the previous Try This activity (TT 8 and TT 9) to see if this approach allows you to calculate the area of a trapezoid.
1.11. Page 6
Module 4: Area
Bringing Ideas Together
In Explore you discovered that the area of a trapezoid is composed of the areas of two triangles.
For the trapezoid in Explore, with height h and parallel sides a and b,

One way of remembering this formula is to think of ![]() as the average of the lengths of the two parallel sides, a and b. So,
as the average of the lengths of the two parallel sides, a and b. So,
area of a trapezoid = average of the two parallel sides × height
The multimedia piece “Area of a Trapezoid” shows another way to explain why the formula ![]() works.
works.
Work through the following examples to test the use of the average length of parallel sides to calculate area.
Example 4
A piece of fabric for a quilt is pictured below.
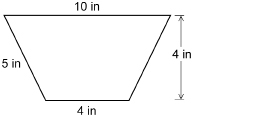
What is the area of this piece of fabric?
Solution
Method 1
Apply the formula ![]() .
.
a = 10 in
b = 4 in
h = 4 in
The area of the piece of fabric is 28 in2.
Method 2
Apply the following formula.
area = average of the two parallel sides × height
To find the average of the parallel side, add the sides together and divide by 2.
So,

The area of the piece of fabric is 28 in2.
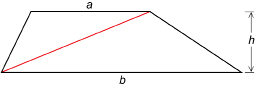
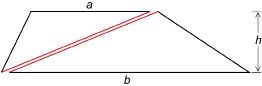
Method 3
Divide the trapezoid into two triangles by dividing from the upper-left vertex to the lower-right vertex. This shows that there are two triangles making up the trapezoid. Each triangle has a height of 4 in.
|
Lower Triangle
b = 4 in, h = 4 in
|
Upper Triangle
b = 10 in, h = 4 in
|

The area of the composite shape is the sum of the areas of these triangles.
![]()
The area of the piece of fabric is 28 in2.
More Composite Figures
Investigate how simple shapes can be combined to form composite figures in “Exploring Composite Figures.” (You may ignore circles for now; circles will be covered in the next lesson.)
In the next few examples you will examine areas of composite figures.
Example 5
As part of a community historical project, Anita is planning to paint a mural on the back of her garage.
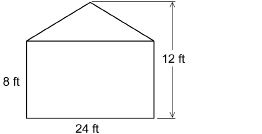
What area can Anita paint?
Solution
Step 1: Separate the composite figure into simpler shapes.
Step 2: Transfer the dimensions of the composite figure to these simpler shapes.
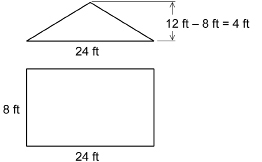
Step 3: Calculate the area of each simple shape.
Step 4: Combine the areas of the simpler shapes.

Anita could paint a mural 240 ft2 in area on the back of her garage.
Now it’s your turn!
 Self-Check
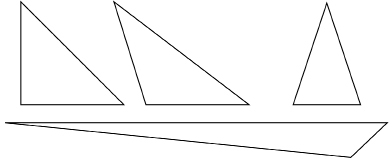
SC 7. The following flag is used by maritime ships to signal “starboard.”

What is the area of this flag?
SC 8. Hong is going to apply some fertilizer to the lawn next to her house. The lawn is shaped like this.
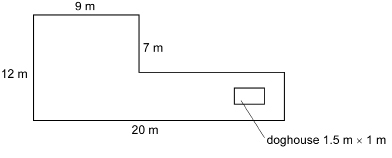
What is the area of the lawn?
SC 9. A stop sign is a regular octagon. Each side is 10 in long. The distance from the top of the sign to the bottom is approximately 24.14 in.
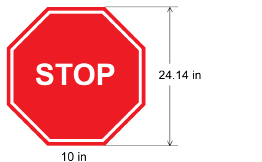
What is the area of the stop sign to the nearest square inch?
SC 10. Look at the composite shape.
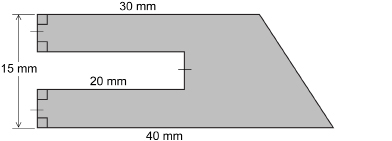
You can infer that the top and bottom of the shape are parallel from the small squares in the left corners of the illustration. There is a rectangular cutout 20 mm deep with a height one-third of the total height of the shape.
Calculate the area of the composite shape.
 Mastering Concepts
Try this question. When you are finished, check your answer.
In Explore, you derived the formula for a trapezoid by dividing the shape into two triangles. You could have found the formula by dividing the trapezoid into a parallelogram and a triangle.
Show that this method also gives you the formula ![]() .
.
1.12. Page 7
Module 4: Area
Lesson Summary

The Canadian flag is recognized by people all over the world. The flag is not only flown within Canada, it is often printed on products that Canada exports around the world.
Did you know that the flag is twice as long as it is wide and that the white square in the middle has the same area as the two vertical red stripes added together?
This lesson dealt with areas of simple shapes and the design of composite figures, like the Canadian flag.
In this lesson you explored these questions:
- How are the areas of common shapes, such as parallelograms and triangles, calculated?
- How are the areas of composite shapes involving rectangles, squares, parallelograms, and triangles determined?
Check your level of understanding of the materials covered in this lesson by completing “Lesson 2 Traffic Lights.” If you select an amber or red traffic light in the multimedia piece, you will receive information about additional work you can complete to improve your understanding of the topics. Complete the suggested work before you proceed to the Lesson 2 Assignment. If you experience difficulty, contact your teacher before starting the Lesson 2 Assignment.
You explored the area formulas for rectangles, squares, parallelograms, and triangles. You applied these formulas to find the areas of composite figures made up of these common shapes.
 Assignment
Retrieve the Lesson 2 Assignment Booklet you saved in your course folder at the start of this lesson. Complete the Assignment Booklet. Resave your Assignment Booklet in your course folder and submit a copy to your teacher for assessment.
Unit 2 Project
Before you move on to the next lesson, you should return to the Unit 2 Project and apply these skills to the tasks in your project related to the areas of common shapes.
1.13. Lesson 3
Module 4: Area
Lesson 3: Area Formulas 2
Focus
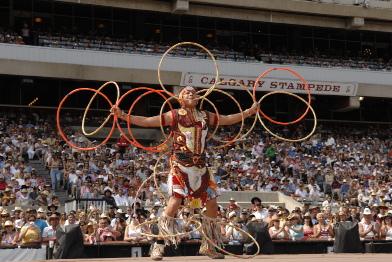
© 2007 Copeman Photography
Your Unit 2 Project involves design. The dancer in the photograph uses hoops to tell stories through intricate designs. The dancer positions the hoops to display birds and animals, such as the eagle, coyote, grouse, or butterfly. The hoops are circular, often handmade, and range in diameter. When the dancer locks the hoops together, the image created depends on the diameter and areas of the individual hoops.
Lesson Questions
In this lesson you will explore these questions:
- How are the areas of circles calculated?
- How are the areas of composite shapes involving circles determined?
Assessment
You will complete the Lesson 3 Assignment Booklet for assessment. Download the Lesson 3 Assignment Booklet and save it in your course folder now. You will receive instructions on how to complete the Assignment Booklet later in the lesson. You will also be prompted to start working on the Unit 2 Project.
Remember to save all activities, including those that are not part of the Assignment, in your course folder.
Required Materials and Equipment
For this lesson you will need
- a blank sheet of paper
- compasses
- scissors
- a measuring tape or ruler
- a calculator
1.14. Page 2
Module 4: Area
Get Started
In the following Try This activity you will review the relationship between the circumference and diameter of a circle.
 Try This
View “Exploring the Diameter and Circumference of Circles,” which reviews the relationships involving the circle you explored in Module 3. Then answer the questions in the Self-Check activity that follows. If you think you need to review these circle relationships further, contact your teacher.
 Self-Check
SC 1. Approximately how many times longer is the circumference of a circle than its diameter?
SC 2. What symbol is used, in mathematics, to represent the ratio of the circumference of a circle to its diameter?
SC 3. A circle has a radius of 3 in. What is the circle’s diameter?
SC 4. Estimate the circumference of the circle described in SC 3.
SC 5. Use your calculator to determine the circumference of the circle described in SC 3 to two decimal places.
You should now be ready to explore the area of a circle.
1.15. Page 3
Module 4: Area
Explore
In this activity you will explore the formula for the area of a circle given its radius. If possible, work with a partner.
 Try This
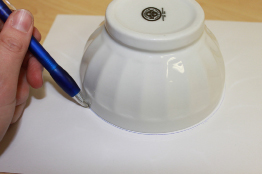
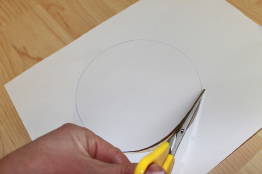
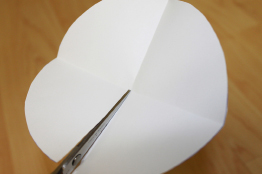
Step 1: Use your compass or a round object to draw a circle on a blank sheet of paper. Then, carefully cut out the circle.
Step 2: Fold the circle carefully in half to form a crease along a diameter. Use a ruler or tape to measure the diameter.

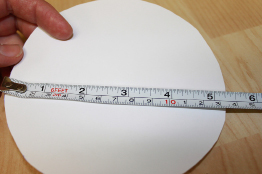
TT 1. What is the diameter of your circle to the nearest centimetre? What is the radius to the nearest centimetre?
TT 2. Using the formula ![]() determine the circumference of your circle to the nearest centimetre.
determine the circumference of your circle to the nearest centimetre.
Step 3: Fold your circle again so that the two diameters divide the circle into quarters. Cut along the creases to obtain four equal sectors of the circle. A sector is a pie-shaped piece of circle.
Step 4: Form a parallelogram with the pieces.
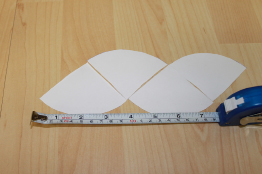
TT 3. Measure the base—the bottom side—of this shape (as shown in the photograph). How does the base compare to the circumference of the circle?
Step 5: Fold each sector in two. Then cut along the crease to form a total of eight narrower sectors. Now form a parallelogram by alternating the pieces as you did in Step 4.
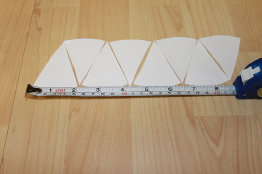
TT 4. Measure the base of this parallelogram. Round to the nearest centimetre. How does this measurement compare to the circumference of the original circle?
TT 5. Measure the height of the parallelogram. The height of the parallelogram is similar to what part of the circle?
To summarize the work you have just completed, view “Area of the Interior of a Circle Explanation.” Just click the play button to begin the animation.
TT 6. Calculate the area of the parallelogram. Calculate the area of the circle. How much difference did you find?
Use “Area of the Interior of a Circle Applet” to help answer TT 7. You will discuss this answer in the next Share section.
TT 7. How could you obtain a better approximation of the area of the circle?
 Share
Share
Once you have completed the activities in the Try This section above, discuss the following questions with a partner or group.
- How does the applet help you visualize the relationship between the area of a circle and the area of a parallelogram?
- How can you make the area of a circle become more and more like the area of a parallelogram?
- Why is the applet trying to show that the area of a circle is similar to the area of the parallelogram?
- How is this information used to build the area formula for a circle?
After your discussion, revise your answer to TT 7 and place a summary of your discussion and your responses in your course folder.
1.16. Page 4
Module 4: Area
Bringing Ideas Together
In the Explore you discovered that the area of a circle is approximately the area of a parallelogram formed by fitting wedges or sectors of the circle together. This procedure can be used to develop the formula for the area of a circle in terms of its radius.
The formula for the area of a circle was obtained from the parallelogram with a base of ![]() .
.
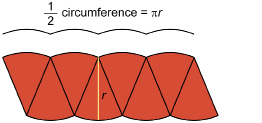
This is one-half the circumference of the original circle, because half of the sectors of the circle are across the top and half are across the base.
![]()
The height of the parallelogram is the radius of the circle, r. So,
Now study the examples that follow, which use the area of a circle formula. You will see that this formula works with SI and imperial units.
Example 1
© Lynne Furrer/shutterstock
The diameter of a circular steel maintenance-hole cover is 24 in. What is its area in square feet? Round your answer to two decimal places.
Solution
1 ft = 12 in
![]()
diameter = 2 ft
The area of the maintenance-hole cover is about 3.14 ft2. This is about three times the square of the radius.
Did You Know?
Maintenance-hole covers are made round so that they cannot slip down into the hole. A square, rectangular, or oval cover could fall into the hole. Can you think of why it is important that the cover not fall into the hole?
Example 2
© Edgewater Media/shutterstock
A circular punch bowl has a radius of 15 cm. If the bowl is filled to the brim, what area of the punch is exposed to the air? Round to the nearest square centimetre.
Solution
Approximately 707 cm2 of punch is exposed to the air.
Now practise your skills.
 Self-Check
Answer the following questions. When you are finished, check your answers.
© Eva Blanda/shutterstock
SC 6. A circular cookie cutter has a diameter of 3 in. What is the area of dough this cookie cutter will cut? Round to one decimal place.
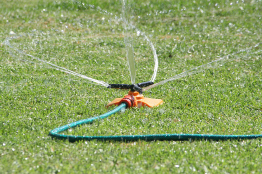
SC 7. A water sprinkler covers a circular area 12 ft in radius. What area does the water cover? Round to the nearest square foot?
SC 8. If you did not have a calculator, how might you estimate the area the sprinkler covered in SC 7?
Composite Figures
In Lesson 2 you investigated areas of composite figures. In this lesson you will explore composite figures involving circles. Use the applet “Exploring Composite Figures” to form the composite shape used in Example 3 that follows. The applet will show the formulas needed to calculate the area of each shape in the composite figure. This can be a helpful place to start when solving composite figure problems.
Example 3
The following is a plan for a backyard ice rink. The ends of the rink are semicircles.
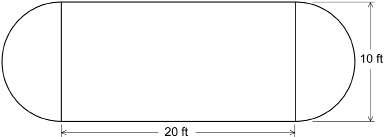
What is the area of the rink to the nearest square foot?
Solution
To find the area of the rink, you can separate the rink into a circle and a rectangle.
Find the area of the circle. The circle’s diameter is 10 ft, so the radius is 5 ft.
Find the area of the rectangle.

The area of the rink is approximately 279 ft2.
The Breakdown
As in the Example 3, the steps in finding areas of composite figures are as follows.
Step 1: Break the figure into simple shapes.
Step 2: Transfer the dimensions to the simple shapes.
Step 3: Find the area of each simple shape.
Step 4: Combine the areas. Sometimes you will add areas, and sometimes you will subtract areas.
Self-Check
Answer the following questions. When you are finished, check your answers.
You may find the applet “Exploring Composite Figures” helpful if you are stuck on a question.
SC 9. Bernie is preparing a costume for a party. She has cut a circle 16 cm in diameter out of a trapezoidal piece of cloth.
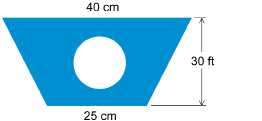
Determine the area of the remaining cloth. Round to the nearest square centimetre.
What two simple shapes are there in this composite figure?
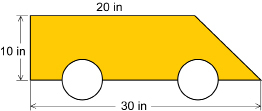
SC 10. The following is a side panel for a toy car. The wheels have a diameter of 6 in each. What is the area of the coloured panel? Round to the nearest square inch.
 Mastering Concepts
Try these questions. When you are finished, check your answers.
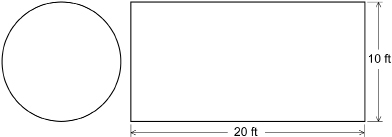
MC 1. What is the area, to the nearest square inch, of the largest circle that can be cut from a square floor tile that measures 1 ft2 in area?
MC 2. What area of the tile is waste?
1.17. Page 5
Module 4: Area
Lesson Summary
© Ian Bracegirdle/shutterstock
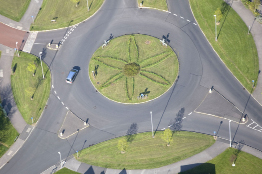
The design of traffic circles must take traffic volume and speed into account, as well as land available for development. If you examine the layout of the circle in the photograph, you will notice that the paved section is a composite figure made up of circles with the same centre but different diameters. How large do you think this traffic circle is, and what area do you think the traffic circle covers?
In this lesson you explored these questions:
- How are the areas of circles calculated?
- How are the areas of composite shapes involving circles determined?
Check your level of understanding of the materials covered in this lesson by completing “Lesson 3 Traffic Lights.” If you select an amber or red traffic light in the multimedia piece, you will receive information about additional work you can complete to improve your understanding of the topics. Complete the suggested work before you proceed to the Lesson 3 Assignment. If you experience difficulty, contact your teacher before starting the Lesson 3 Assignment.
In exploring these questions, you discovered the area formula for the circle, and you applied area formulas to find the areas of composite figures made up of common shapes, including circles.
 Assignment
Retrieve the Lesson 3 Assignment Booklet you saved in your course folder at the start of this lesson. Complete the Assignment Booklet. Resave your Assignment Booklet in your course folder and submit a copy to your teacher for assessment.
Unit 2 Project
Before you move on to the next lesson, you should return to the Unit 2 Project and apply the skills of this lesson to the areas you may need to resize.
1.18. Lesson 4
Module 4: Area
Lesson 4: Surface Area—Prisms
Focus

© Franck Boston/shutterstock
If you are modifying a product as part of your Unit 2 Project, one consideration may be the size of the container in which your product will be shipped to customers.
The cost of cardboard to manufacture containers like those pictured in the photograph depends on the containers’ total surface area. In this lesson you will investigate the surface area of three-dimensional objects with sides that involve common shapes, such as rectangles, parallelograms, and triangles. A rectangular shipping container is just one example.
Surface area is also an important consideration in renovations, construction, and decorating. Wallpaper, paint, sheet metal, wallboard, and insulation are just a few of many items in which surface area impacts cost.
Lesson Questions
In this lesson you will explore these questions:
- How are nets used as a strategy for finding the surface area of 3-D objects?
- How are formulas for the surface area of 3-D objects developed through examining nets?
Assessment
You will complete the Lesson 4 Assignment Booklet for assessment. Download the Lesson 4 Assignment Booklet and save it in your course folder now. You will receive instructions on how to complete the Assignment Booklet later in the lesson. You will also be prompted to start working on the Unit 2 Project.
Remember to save all activities, including those that are not part of the Assignment, in your course folder.
Required Materials and Equipment
For this lesson you will need
- four sheets of 0.5-cm or quarter-inch grid paper
- scissors
- tape
- a calculator
1.19. Page 2
Module 4: Area
Get Started
In the following Try This activity you will examine nets for three-dimensional objects, such as the cube, rectangular prism, pyramid, and face.
net: a two-dimensional (2-D) pattern used to create, by folding and joining, a three–dimensional (3-D) object
cube: a rectangular prism for which all faces are identical squares

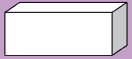
rectangular prism: a 3-D object for which all the sides are rectangles
A cardboard box is an example of a rectangular prism.
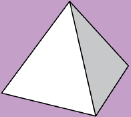
pyramid: a 3-D object having a polygonal base and triangular sides with a common vertex
The following is an example of a prism.
face: a 2-D side of a prism
The first net you will explore is a net for a cube or rectangular prism.
 Try This
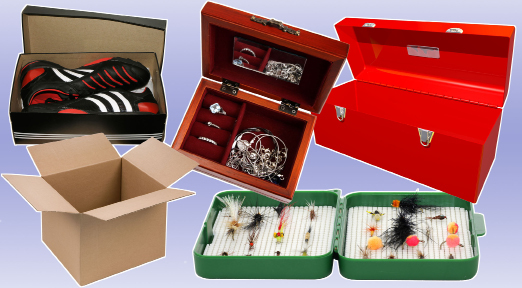
tackle box: © operative401/shutterstock, tool box: © Robert Spriggs/shutterstock, jewelry box: © Anton Derevschuk/shutterstock,
shoe box: © Andrei Nekrassov/shutterstock, cardboard box: © mates/shutterstock
Find a cardboard box—any rectangular prism or cube will do. For example, a cereal box, small raisin box, or shoe box.
Examine the 3-D object’s sides, and mark each side with an X. Pull the box apart. If possible, keep all the sides you marked with an X attached, and rip off any pieces you did not mark. Lay the pieces flat—what you now have is called a net.
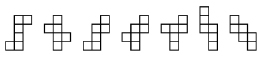
Depending on how you unfold the cube or rectangular prism, the net could look like any of the following examples.
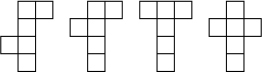
There are 11 nets altogether that are possible. Sketch as many of the other nets as you can.
1.20. Page 3
Module 4: Area
Explore
You have just explored the net of a cube or rectangular prism, now you will explore the nets for other 3-D objects.
 Try This
Go to “Exploring Surface Area, Volume, and Nets,” and try to identify the correct net for each 3-D object. Do not spend too much time on the cone and the cylinder. You will investigate the cone and the cylinder in the next lesson.
Now that you can form nets for 3-D objects, you will use nets to help find the surface area of 3-D objects.
 Self-Check
Step 1: Print a copy of “Rectangular Prism.” Cut out the prism, fold it, and then tape this net to form a rectangular prism. The grid should be on the outside of the prism.
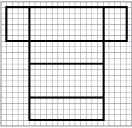
SC 1. Sketch of the rectangular prism you made, and show the prism’s dimensions.
SC 2. What are the areas of each face? Write the area on each face.
SC 3. What is the surface area of the prism based on the net?
You have just used a net to help find the surface area of a rectangular prism. A similar approach can be used to find the surface area of a pyramid.
Step 2: Print a copy of “Pyramid.” Cut out and tape your net together to form the prism.
Try This
TT 1. What is the area of each face?
TT 2. What is the total surface area of this pyramid?
 Share
Share
Choose either the rectangular prism calculations (SC 1 to SC 3) or the pyramid surface area calculations (TT 1 and TT 2) to work on during this Share.
Discuss the following questions with a partner or group.
- What patterns did you notice when you were finding the surface area of each side of the prism?
- What formula for surface area did you use for each side?
- Did some sides have the same surface area as others?
- How many sides were the same?
- Could you develop a formula to find the surface area of a rectangular prism or pyramid so you did not have to use a net in the future?
Share your answers to these questions and any formulas (or attempts at formulas) with other groups. What are the similarities and differences between the formulas you each created for finding the surface area of a prism or pyramid?
Place a summary of your discussions and resulting formulas in your course folder for future reference.
1.21. Page 4
Module 4: Area
Bringing Ideas Together
In Get Started and Explore you reviewed the nets of cubes, rectangular prisms, and pyramids. You can use nets to develop formulas for surface area.
 Self-Check
Take a look at the net for a cube with s units on a side.
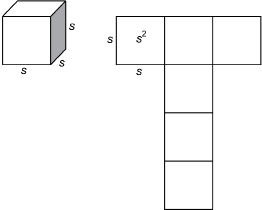
Answer the following questions. When you are finished, check your answers.
SC 4. What do you notice about the areas of the squares in the net?
SC 5. How many squares make up the net for a cube?
SC 6. What would you suggest for the formula for the surface area of a cube?
Next, consider the net for a rectangular prism with length ![]() , width w, and height h.
, width w, and height h.
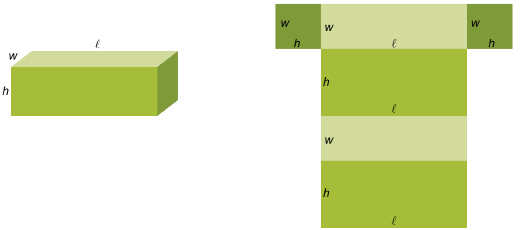
There are two faces with area ![]()
There are two faces with area ![]()
There are two faces with area hw.
So, the surface area of a rectangular prism is ![]()
If you worked on a rectangular prism in the Share activity, how does the formula you came up with compare with this formula?
Surface Area by Example
In the next few examples, you will sometimes apply these formulas and you will sometimes need to sketch the faces of the object to determine the surface area.

© Feng Yu/24837881/Fotolia
Example 1
What is the surface area of a sugar cube measuring 0.5 in on each side?
Solution
Each side, s, of the cube is 0.5 in.

The surface area of this sugar cube is 1.5 in2.
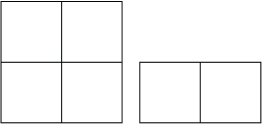
This answer is reasonable because, if you rearranged the six faces of the cube, the faces would form one square with sides of 1 in and a rectangle half the area of the square.
Example 2
What is the surface area of a cardboard container 2 ft long, 18 in wide, and 1 ft high?
Solution
All dimensions must be in the same units.
![]()
So, ![]()
The surface area of the box is 13 ft2.
You could also solve this question using square inches. Since 1 ft is 12 in, 2 ft is 2 × 12 = 24 in. Then, ![]() = 24 in, w = 18 in, and h = 12 in.
= 24 in, w = 18 in, and h = 12 in.

The surface area of the box is 1872 in2.
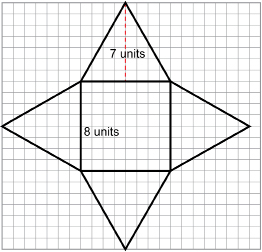
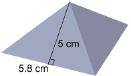
Example 3
What is the surface area of a pyramid with a square base measuring 10 cm on a side and 4 identical triangular faces with heights of 8 cm measured along the face?
Solution
In this solution you will see how to find the surface area of a pyramid. As you watch, pause the recording and try to predict the next step in solving the question.
View “Example 3 Solution.”
Example 4
Find the surface area of the triangular prism. Each triangular end is 4 cm along the base, 3 cm high, and 5 cm along the longest side. The prism is 10 cm long.

Solution
Sketch the faces of the prism and find their areas.
The base of the prism is a rectangle 10 cm by 4 cm.
![]()
The back of the prism is a rectangle 10 cm by 3 cm.
![]()
The slant face of the prism is a rectangle 10 cm by 5 cm.
![]()
Each triangular end is a triangle with a base of 4 cm and a height of 3 cm.

surface area of prism = area of base + area of back + area of slant face + (2 × area of triangle)
The area of the prism is 132 cm2.
Now check your mastery of surface area.
Self-Check
Answer the following questions. When you are finished, check your answers.
SC 7. A cubical shipping carton is 30 in on a side. What is the carton’s surface area in cubic feet?
SC 8. Over 90% of non-bulk goods shipped by ship, rail, and truck are in rectangular containers. A common container is 48 ft long, 8 ft wide, and 8 ft high. What is the surface area of this container?
SC 9. Jim is going to paint the walls and ceiling of his room. His room is 9 ft wide, 12 ft long, and 8 ft high. He wishes to estimate the area he will cover in order to buy enough paint. What is Jim’s estimate? (Notice that Jim won’t be painting the floor. In doing your estimate, you can ignore the door and window in Jim’s room.)
SC 10. A tetrahedron has 4 identical triangular faces. What is the surface area of the tetrahedron shown below?
 Mastering Concepts
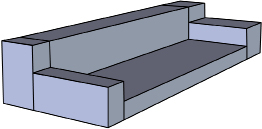
Try this question. When you are finished, check your answer.
Star plans to sew a slip cover for her couch. She needs to estimate the fabric required. How can she minimize her calculations?
1.22. Page 5
Module 4: Area
Lesson Summary
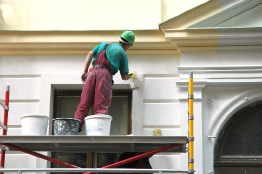
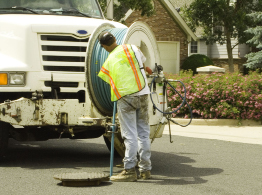
© Vladimirs Koskins/shutterstock
The worker in the photograph is making repairs to the exterior of a home. The cost of similar repairs depends on the extent of the area damaged. Area is a factor in the cost of materials, repairs, and renovations. Did you have to modify your Unit 2 Project based on area considerations?
In this lesson you explored these questions:
- How are nets used as a strategy for finding the surface area of 3-D objects?
- How are formulas for the surface area of 3-D objects developed through examining nets?
You explored the surface area of 3-D objects by analyzing the 2-D nets you can use to create these objects. In particular, a few of the nets you investigated were for cubes, rectangular prisms, and pyramids. From these nets you developed formulas and solved everyday problem situations involving surface area.
 Assignment
Retrieve the Lesson 4 Assignment Booklet you saved in your course folder at the start of this lesson. Complete the Assignment Booklet. Resave your Assignment Booklet in your course folder and submit a copy to your teacher for assessment.
Unit 2 Project
Before you move on to the next lesson, you should return to the Unit 2 Project and check whether surface area was one of the elements you had to modify.
1.23. Lesson 5
Module 4: Area
Lesson 5: Surface Area—Cylinders and Cones
Focus
© Philip Lange/shutterstock
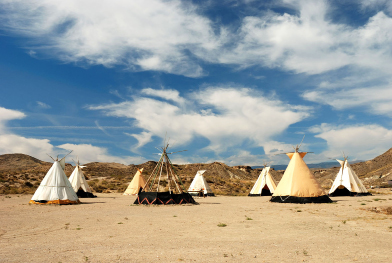
If you designed and modified a habitat as your Unit 2 Project, you will certainly appreciate the ingenuity of the First Nation peoples of the Canadian Prairies. Their cone-shaped teepees, which were developed in ancient times and used for centuries, kept them dry and comfortable.
Teepees were warm in the winter and cool in the summer. They were easy to dismantle and to transport as the people followed the herds of buffalo, which provided food and shelter. Buffalo skins were sewn together to make the teepee covers.
The size and shape of the covers is an application of the surface area of a cone. In this lesson you will explore the surface areas of cones and cylinders.
Lesson Questions
In this lesson you will explore these questions:
- How can you determine the surface areas of cones and cylinders?
- What are some everyday applications of the surface area of cones and cylinders?
Assessment
You will complete the Lesson 5 Assignment Booklet for assessment. Download the Lesson 5 Assignment Booklet and save it in your course folder now. You will receive instructions on how to complete the Assignment Booklet later in the lesson. You will also be prompted to start working on the Unit 2 Project.
Remember to save all activities, including those that are not part of the Assignment, in your course folder.
Required Materials and Equipment
For this lesson you will need the following supplies:
- compasses
- scissors
- tape
- a calculator
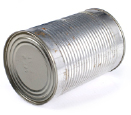
- a cylindrical can with a label, such as a can of soup
- a cone-shaped paper cup
1.24. Page 2
Module 4: Area
Get Started
In the following Try This activity you will examine the shapes and sizes of cylinders and cones. Investigate cones with the “Cone” demonstration applet. Drag the apex and the movable point on the circular base to examine possible shapes of a cone. Also rotate the cone to see the cone from various perspectives.
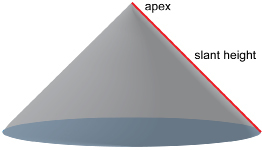
apex: the point furthest from a base in a cone
Now study cylinders with the “Cylinder” demonstration applet. Drag the movable points to change the radius and height of the cylinder. You will see that a cylinder can vary from the shape of a rod to the shape of a pancake. Also drag any point outside the cylinder to rotate the cylinder so that you can look at each base.
cone: a three-dimensional object made up of a flat circular base and an attached curved surface that comes to a point called the apex
cylinder: a three-dimensional object that has two congruent circular bases attached by a curved surface
 Try This
TT 1. Can you identify the cones and cylinders in “Classifying Cones and Cylinders”? Drag and drop each shape into the correct column.
You should now be able to tell the cylinder and cone apart. One intriguing, but only superficial, aspect of these objects is their surface area. The surface area of the cylinder and cone is found by examining the surfaces making up the object’s exterior.
1.25. Page 3
Module 4: Area
Explore
You will now explore the surfaces of a cylinder.
 Try This
Work with a partner, if possible.
Step 1: Examine a soup can or any other can with a removable label. Remove the label by cutting the label along a vertical line. Flatten the label to form a rectangle.
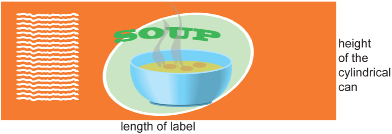
Step 2: Measure the length of the label and the radius of the circle on top of the cylinder with a ruler. Record this data in a table similar to the Circular Surface Measurements table shown.
Step 3: To measure the circumference of the circle top, use a string or roll the can one complete rotation, as shown in the demonstration “Can Circumference.”
Circular Surface Measurements
|
Item |
Measurement |
|
Length of Label |
|
|
Radius of Circle |
|
|
Circumference of Circle |
|
TT 2. How does the length of the rectangular label compare with the radius and circumference of the circular surface?
 Share
Share
Compare your results from TT 2 and the data recorded in the table with a partner or in a group.
- What do you notice about the lengths of the label compared with the radius and circumference of the circular top and bottom?
- Is there a relationship between the label length and the radius or circumference of the circle?
- Is this relationship always true for any cylinder?
Compare your data with the data of someone in your group to see if the relationship is still true.
Summarize this relationship and place a copy in your course folder for future reference.
 Self-Check
In this Self-Check activity you will assess your understanding of length relationships within the cylinder.
SC 1. Watch the animation “Constructing Cylinders,” and choose the correct answer.
Try This
You will now examine the net of a cylinder to help find the formula for the cylinder’s surface area.
TT 3. You saw in the Self-Check activity that the length of the rectangle is equal to the circumference of the circle end. If the radius of the cylinder is r units, what is the expression for the length of the rectangle?
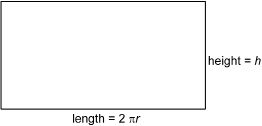
TT 4. If the height of the cylinder is h units, what is the formula for the area of the rectangular shape?
TT 5. In addition to the area of the rectangle, the surface area of the can also includes its two circular ends. What is the area of each circular end if the radius of the circle is r units?
TT 6. What is the total surface area of the can?
TT 7. Draw a net for a cylinder—the size doesn’t matter. Write the appropriate area formula on each part of your net. Measure the height and radius of your net. Calculate the area for each part of the net using your measurements. Cut out your net and tape it together to form a cylinder. The following diagram is just a guide.
TT 8. Confirm your calculations from TT 7 using the “Right Cylinder” demonstration applet. Set the height and radius using the sliders to find the surface area. Then select the “Surface Area” button to see the formulas and calculations for each surface of the net.
Place your work from TT 3 to TT 8 in your course folder, and include any corrections.
In the previous sections you examined the surface area of cylinders. Now you will explore the surface area of a cone. Pay attention to the similarities and differences between the surface areas of these two 3-D objects.
Try This
If possible, work with a partner.
A cone-shaped paper cup is helpful for this activity. If you have a cone-shaped paper cup, start with Step 1. If you do not have a conical paper cup, start at Step 2.
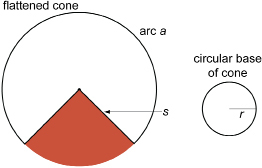
slant height: the shortest distance from the apex of a cone to its base along its curved surface
Step 1: Cut the cup along the slant height from the base to the apex.
Flatten the cup to form a shape similar to the following illustration.
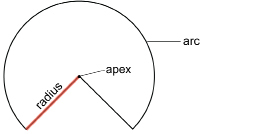
Study the cup in its flattened shape in order to answer the following question: How does the slant height s of the original cup compare to the radius of the flattened arc? Keep your thoughts in preparation for the Try This question that follows Step 2.
Step 2: Print the “Sample Net for a Cone.”
Cut out the sample net you just printed. Measure the radius of the arc.
Form the cone by pulling the straight line segments together. You may wish to tape the segments together to see that the paper forms a cone with a circular base.
Take measurements of the diameter of the base and the slant height. You will need these measurements for question TT 11.
TT 9. How does the slant height, s, of the original cone compare to the radius of the flattened arc?
TT 10. To what does the circumference of the original cone correspond when you look at the flattened cup?
Step 3: You will now determine the area of the original cone. Find the area of the flattened cup by comparing the flattened cup to a completed circle. The sector that completes the circle is coloured.

TT 11. Complete “Area Table.” In the column “Your Value,” you will enter your measurements from the cone you formed in Sample Net for a Cone. Round to two decimal places.
Compare your table with the one shown in the Suggested Answers, or check your work with your teacher.
TT 12. Explain why the following is true.
area of conical cup = ![]() × area of completed circle
× area of completed circle
Place your work from TT 9 to TT 12 in your course folder.
1.26. Page 4
Module 4: Area
Bringing Ideas Together
In Explore you found the surface area of a conical cup. Now you will study the conical cup’s net to develop the formula for the surface area of any cone.
![]()
circumference of circular base, which completes the arc, is ![]()
![]()
So, as in Explore,
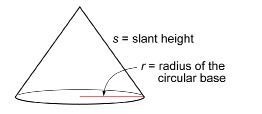
surface area of cone = area of conical surface + area of circular base
Remember, r is the radius of the base of the cone, and s is the slant height measured along the surface of the cone.
Take a look at “Exploring Surface Area, Volume, and Nets.” Use this applet to compare the surface area formula for a cylinder with that of a cone. You can use this to check your work as you go through the practice questions.
Now, you will practise using the formulas for the surface area of a cylinder and a cone. You will need a calculator.
Example 1
iStockphoto/Thinkstock
The cost of aluminum in a soup can depends on the can’s surface area. A cylindrical soup can is 6.5 cm in diameter and 9.5 cm high. What is its surface area? Round to one decimal place.
Solution
First, determine the radius.

Now you’re ready to calculate surface area.
The surface area is approximately 260.4 cm2.
Example 2
How could you estimate the surface area of the soup can in Example 1 to check whether the answer is reasonable?
Solution
Since ![]() you could first round the value of
you could first round the value of ![]() to 3.
to 3.
So, 2![]() is about 6.
is about 6.
Therefore, surface area of the cylinder is about 6rh + 6r2.
Also, you could round the radius 3.25 cm to 3 cm and the height 9.5 cm to 10 cm.
So,
This is close to the calculated answer, 260.4 cm2. The answer in Example 1 is reasonable.
Example 3
Determine the surface area of the following cone. Round to the nearest square centimetre.
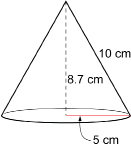
Solution
r = 5 cm
s = 10 cm (Note that s is the slant height. Do not use 8.7 cm, which is not the slant height.)
Once again, you could approximate the surface area by using 3 as a value of ![]() .
.
The surface area of the cone is 235.6 cm2. The answer is reasonable, as it is close to the estimate of 225 cm2.
Now it’s your turn. The following Self-Check questions can be solved in a similar manner to the examples you have just studied.
 Self-Check
Answer the following questions. When you are finished, check your answers.
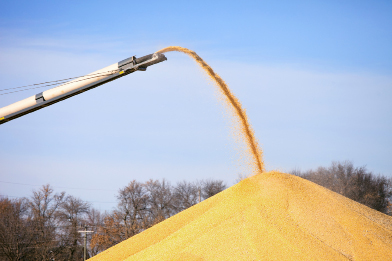
SC 2. During harvest on the Prairies, you will often see wheat stored in conical piles in the fields. The wheat is protected from soil moisture by a plastic ground sheet. A conical pile of wheat 15 ft in diameter will be about 3.5 ft high and have a slant height of about 8.3 ft. What is the surface area of the pile exposed to the air? Round to one decimal place.
© Wollwerth Imagery/20926714/Fotolia
SC 3. Jeremy is hired to paint a cylindrical silo that is 65 ft high and 20 ft in diameter. To buy enough paint, Jeremy must calculate the surface area of the silo. What is the area of the top and cylindrical side of the silo? Round to the nearest 100 ft2.
SC 4. A cylindrical fuel tank on Bev’s farm is 6 ft long and 4 ft in diameter. What is the total surface area of the tank? Round to the nearest square foot.
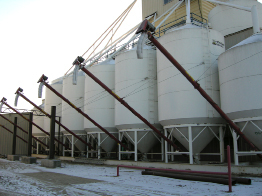
SC 5. This picture shows a view of a seed-cleaning plant in Alberta. The hoppers are shaped in the form of a cylinder on top of a cone. If the diameter of the cylinder is 12 ft, the height of the cylindrical portion is 18 ft, and the slant height of the cone is 8 ft, what is the area of the outside of the cylinder and cone? Round to the nearest square foot.
 Mastering Concepts
Try this question. When you are finished, check your answer.
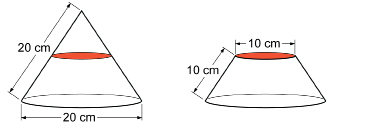
A wooden cone with a diameter of 20 cm and a slant height of 20 cm is cut halfway up into two pieces. The top is discarded. What is the surface area of the remaining bottom piece shown on the right (including the newly flattened top)? Round your answer to the nearest square centimetre.
1.27. Page 5
Module 4: Area
Lesson Summary

© Losevsky Pavel/shutterstock
Cylindrical and conical objects appear in modern architectural designs. Can you identify these objects in the music hall and surrounding buildings in the photograph? The area these objects cover are an important feature the architects had to consider.
In this lesson you explored these questions:
- How can you determine the surface areas of cones and cylinders?
- What are some everyday applications of the surface area of cones and cylinders?
Check your level of understanding of the materials covered in this lesson by completing “Lesson 5 Traffic Lights.”
If you select an amber or red traffic light in the multimedia piece, you will receive information about additional work you can complete to improve your understanding of the topics. Complete the suggested work before you proceed to the Lesson 5 Assignment. If you experience difficulty, contact your teacher before starting the Lesson 5 Assignment.
To answer these questions, you explored the surface area of cones and cylinders. You developed and applied the formulas for surface area for these objects in everyday contexts. Also, you extended your estimation skills to the surface areas of cylinders and cones.
 Assignment
Retrieve the Lesson 5 Assignment Booklet you saved in your course folder at the start of this lesson. Complete the Assignment Booklet. Resave your Assignment Booklet in your course folder and submit a copy to your teacher for assessment.
Unit 2 Project
Before you move on to the next lesson, return to the Unit 2 Project. Are there areas of cylinders or cones you need to address?
1.28. Lesson 6
Module 4: Area
Lesson 6: Perimeter, Area, and Understanding Scale (Factor)
Focus
© Stephen Leech/shutterstock
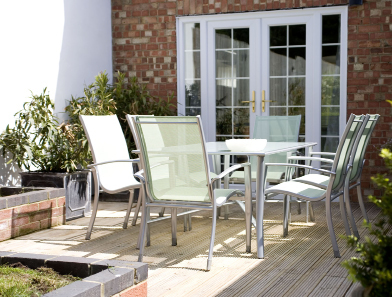
Raveena has taken a photograph of her neighbour’s deck. She wants to have a similar deck built at her home. However, as her backyard is not as large, she intends to scale back the size of the deck. The shape of Raveena’s deck will be the same, but her deck will cover a smaller area.
Raveena thinks that her deck will have to be half the area of her neighbour’s deck. How much shorter will the dimensions of Raveena’s deck be compared to her neighbour’s deck?
Lesson Questions
In this lesson you will explore these questions:
- How does changing one or more dimensions of a rectangle affect the rectangle’s perimeter?
- How does changing one or more dimensions of a rectangle affect the rectangle’s area?
Assessment
You will complete the Lesson 6 Assignment Booklet for assessment. Download the Lesson 6 Assignment Booklet and save it in your course folder now. You will receive instructions on how to complete the Assignment Booklet later in the lesson. You will also be prompted to start working on the Unit 2 Project.
Remember to save all activities, including those that are not part of the Assignment, in your course folder.
Required Materials and Equipment
For this lesson you will need
- two sheets of quarter-inch grid paper (available in the course Toolkit)
- a ruler
- a calculator
1.29. Page 2
Module 4: Area
Get Started
In the following Try This activity you will examine how changing the length of the sides of a square affects the square’s perimeter and area. Do you need a review before getting started? If so, you can review perimeter in Lesson 1 of Module 3; and you can review area in Lessons 1 to 3 of this module.
You will need a copy of Quarter-Inch Grid paper or use the demonstration applet “Perimeter and Area (Rectangle)”
 Try This
Remember that you are looking at changes in area and perimeter as you change the size of the square.
Step 1: Make a square that has sides of one unit; in other words, a square that is 1 × 1. You can do this either on the grid paper or using the applet.
If using the applet, change the length by moving the “l” slider. You see the results in both the diagram and in the grey display area at the top of the applet. Change the width by moving the “w” slider.
Step 2: Measure the perimeter and area of the square. Then record the measurements in the table “Perimeter and Area of Squares,” also shown in Step 4. Remember to save the table in your course folder.
Step 3: Make more squares, increasing the side by 1 each time (as indicated in the Perimeter and Area of Squares table). If you are using the grid paper, samples of 1 × 1 and 2 × 2 squares follow.
Step 4: Complete the table; then answer the Try This questions. The first two rows are completed for you.
Perimeter and Area of Squares
|
1 |
2 |
3 |
4 |
5 |
6 |
|
Length of a Side in Units |
Dimensions of Square |
Perimeter in Units |
perimeter of square perimeter of 1 × 1 square |
Area in Units2 |
area of square area of 1 × 1 square |
|
1 |
s = 1 |
4 |
|
1 |
|
|
2 |
s = 2 |
8 |
|
4 |
|
|
3 |
s = 3 |
|
|
|
|
|
4 |
|
|
|
|
|
|
5 |
|
|
|
|
|
|
6 |
|
|
|
|
|
When you are done, place your answers in your course folder.
Think of the 1 × 1 square as your starting point.
TT 1. How much larger is the perimeter of the square with a length of 3 than the original 1 × 1 square?
TT 2. How much larger is the area of the square with a length of 3 than the original 1 × 1 square?
TT 3. Based on the trend you have noticed in this table, if you made the sides of a square 7 times as long, how would the perimeter of the square change?
TT 4. If you made the sides of a square 7 times as long, how would the area of the square change?
TT 5. If you made the sides of a square k times as long, how would the perimeter of the square change?
TT 6. If you made the sides of a square k times as long, how would the area of the square change?
 Share
Share
Based on the Try This activity you just completed, discuss the following questions with a partner or in a group.
- What trends did you observe in the table?
- As the square side length changes, how does this change the perimeter and area?
- Did you only look at the data from the top of the chart down (smaller to larger)?
- Did you consider how things changed when the size decreased (from the bottom of the chart up)?
- Suppose the side length of a square is doubled, which is affected more—the perimeter or the area?
Summarize your discussion and place a copy in your course folder.
1.30. Page 3
Module 4: Area
Explore
In this Try This activity you will explore how the perimeter and the area of a rectangle change when the dimensions of the rectangle change.
 Try This
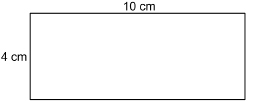
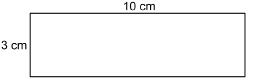
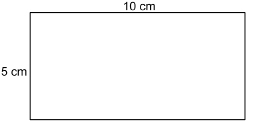
Step 1: Make a rectangle that has sides of 1 unit wide by 2 units long (1 × 2). You will need Quarter-Inch Grid, or you may use the demonstration applet “Perimeter and Area (Rectangle)” again.
Step 2: Calculate and record the perimeter and area for each rectangle. Then record the measurements in the table “Perimeter and Area of Rectangles,” also shown in Step 6. Remember to save your table in your course folder.
Step 3: Make another rectangle. To obtain the dimensions of the second rectangle, multiply the dimensions of the first rectangle, shown in red, by 2. So, for the second rectangle, the length will be 2 × 2 = 4, and the width will be 2 × 1 = 2.
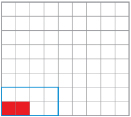
The original rectangle is drawn in red, and the rectangle for a scale factor of 2 is shown outlined in blue.
Step 4: Make a third rectangle. To obtain the dimensions of the third rectangle, multiply the dimensions of the first rectangle, shown in red, by 3. So, for the third rectangle, the length will be 3 × 2 = 6, and the width will be 3 × 1 = 3.
The numbers by which you multiply the dimensions of the original rectangle are called scale factors.
Step 5: Draw the rectangles for scale factors 4, 5, and 6. Each additional rectangle you draw will be similar in shape; that is, each rectangle will be twice as long as it is wide.
Step 6: Complete the table, and then use the table to answer the following Try This questions. The first two rows are completed for you.
Perimeter and Area of Rectangles
|
1 |
2 |
3 |
4 |
5 |
6 |
|
Scale Factor |
Dimensions of Rectangle |
Perimeter in Units |
perimeter of rectangle perimeter of original rectangle |
Area of Rectangle in Units2 |
area of rectangle area of original rectangle |
|
1 |
w = 1 |
6 |
|
2 |
|
|
2 |
w = 2 |
12 |
|
8 |
|
|
3 |
|
|
|
|
|
|
4 |
|
|
|
|
|
|
5 |
|
|
|
|
|
|
6 |
|
|
|
|
|
TT 7. What happens to the perimeter when the scale factor is increased by 1?
TT 8. If the scale factor were 7, how many times greater would the perimeter of the new rectangle be compared to the perimeter of the original rectangle?
TT 9. If the scale factor were 7, how many times larger would the area of the new rectangle be compared to the area of the original rectangle?
TT 10. If the scale factor were k, how many times longer would the perimeter of the new rectangle be compared to the perimeter of the original rectangle?
TT 11. If the scale factor were k, how many times larger would the area of the new rectangle be compared to the area of the original rectangle?
 Share
Share
Discuss the following questions with a partner or in a group. The questions are based on the charts you completed in the Try This parts of this lesson.
- Do you see a relationship between the numbers in column 1 and column 4 of the charts? If there is a relationship, what is that relationship?
- Do you see a relationship between the numbers in column 1 and column 6 of the charts? If there is a relationship, what is that relationship?
- Suppose both dimensions of a rectangle are doubled, which is affected more—the perimeter or the area?
Summarize your discussion and place a copy in your course folder.
1.31. Page 4
Module 4: Area
Bringing Ideas Together
In Getting Started, Explore, and Share you discovered the following:
- If both the length and width of a square or rectangle are changed, then the perimeter and area change.
- If the scale factor for changing a figure is k, the perimeter of the new figure is k times the perimeter of the original figure.
- If the scale factor for changing a figure is k, the area is k2 times the area of the original figure.
Study the following examples.
© Jiri Flogel/shutterstock
Example 1
The photograph of the British Columbia flag on the right has been enlarged.
Part 1
- By what scale factor has the small flag been enlarged?
- What is the perimeter, in units, of the original image of the flag?
- What is the perimeter of the enlargement?
- How many times longer is the perimeter of the enlargement than the perimeter of the original photograph?
- How does the scale factor predict the change in perimeter?
Solution
- The length of the enlargement is 12 units. The length of the original photograph is 6 units.

The width of the enlargement is 8 units. The width of the original photograph is 4 units.

Both the length and width were increased 2 times. The scale factor is 2.


perimeter of enlargement = 2 × perimeter of original
The perimeter of the enlargement is 2 times the perimeter of the original.
- The number of times the perimeter increases is equal to the scale factor.
Part 2
- What is the area, in square units, of the original photograph?
- What is the area of the enlargement?
- How many times larger is the area of the enlargement than the area of the original photograph?
- How does the scale factor predict the change in area?
Solution


Example 2
The square window in Jerritt’s bathroom is ![]() times as long on each side as his bedroom window.
times as long on each side as his bedroom window.
© David Hughes/shutterstock
© Joseph Calev/shutterstock
- How much shorter is the trim on the bathroom window than the same trim on the bedroom window?
- The amount of light a window lets in depends on its area. How many times less light does the bathroom window let in than the bedroom window?
Solution
- The scale factor is
 .
.
perimeter of Jerritt’s bathroom window = × perimeter of bedroom window
Jerritt’s bathroom window has times the length of trim of the bedroom window.
- The scale factor is
 .
.
area of Jerritt’s bathroom window = × area of bedroom window
Jerritt’s bathroom window lets in , or
, or  , times as much light as the bedroom window.
Example 3
Two rectangular blankets are the same shape but different sizes. The perimeter of the larger blanket is 4 times the perimeter of the smaller blanket. How many times is the area of the larger blanket than the smaller?
Solution
The scale factor is 4.
![]()
The area of the larger blanket is 16 times the area of the smaller blanket.
Example 4
The area of a square mirror is 25 times the area of a smaller square mirror. How many times longer is each side of the larger square mirror than the smaller?
Solution
number of times area changes = (scale factor)2
Since 25 = 52, the scale factor is 5.
The sides of the larger mirror are 5 times as long as the sides of the smaller mirror.
© Tischenko Irina/shutterstock
Example 5
The area of a photocopied image of sunflowers has an area ![]() the area of the original. How many times shorter is each side of the photocopied image compared to the corresponding side in the original?
the area of the original. How many times shorter is each side of the photocopied image compared to the corresponding side in the original?
Solution
number of times the area changes = (scale factor)2
Since ![]() , the scale factor is
, the scale factor is ![]() .
.
Each side of the photocopied image is ![]() of the length of the corresponding side in the original.
of the length of the corresponding side in the original.
 Self-Check
There are many practical applications involving changes in scale. Answer the following questions to apply these skills. When you are finished, check your answers.
© Dreef/4191313/Fotolia
SC 1. Janice is planning a rectangular enclosure for her llamas. She can only afford 100 m of fencing. How many times larger in area would a similarly shaped enclosure be if she could afford 300 m of fencing?
SC 2. Dakota has two square cake tins. One tin is 8 in on a side. The other tin is 12 in on a side. If Dakota bakes a cake in each tin, how many times larger is the area of the top of the larger cake than the smaller cake?
SC 3. Sigrid has used a photo enlarger at her school to double the area of a class photo.
- What is the scale factor? Round your answer to three decimal places.
- If the dimensions of the original photo were 5 in by 7 in, what are the dimensions of the enlargement? Round to the nearest inch.
SC 4. Renée is interested in model aircraft. She is building a ![]() model of the Harvard Trainer that was used to train Canadian pilots in World War II. If the length of the Harvard were 29 ft 6 in, how long will Renée’s model be to the nearest inch?
model of the Harvard Trainer that was used to train Canadian pilots in World War II. If the length of the Harvard were 29 ft 6 in, how long will Renée’s model be to the nearest inch?
SC 5. A square that measures ![]() mile on a side contains 160 ac. How many acres would there be in a square that measures 2 mi on a side?
mile on a side contains 160 ac. How many acres would there be in a square that measures 2 mi on a side?
SC 6. The dimensions of a rectangular deck are increased by a factor of 2.5. The original perimeter of the deck was 30 ft. What is the perimeter of the enlarged deck?
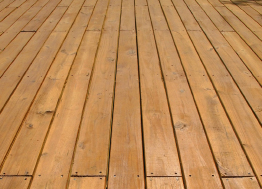
Hemera/Thinkstock
SC 7. How many times was the area of the deck in SC 6 increased?
Irregular Changes to Squares and Rectangles
The examples and the Self-Check questions dealt with squares and rectangles for which both dimensions were increased by a given scale factor. If both length and width are not increased by the same factor, it is best to solve each problem without using a formula involving a scale factor.
Example 6
A rectangle measures 10 cm by 4 cm. A second rectangle measures 30 cm by 4 cm.
Compare the perimeters and areas of the two figures.
Solution
The length of the second rectangle is 3 times the length of the first rectangle. The widths are the same.
Step 1: Compare the areas.
From the diagram, the area of the second rectangle appears to be 3 times the area of the first rectangle.
Check the following:
![]()
![]()
Since, 3 × 40 cm2 = 120 cm2, the second rectangle is 3 times the area of the first.
Step 2: Compare the perimeters.


The perimeter of the second rectangle is not 3 times the perimeter of the first rectangle. Three times the perimeter of the first rectangle would be 84 cm. The second rectangle’s perimeter is only 68 cm.
Example 7
A rectangle is 3 cm wide and 5 cm long. If it were made twice as wide and 3 times as long, how would the area and perimeter change?
Solution
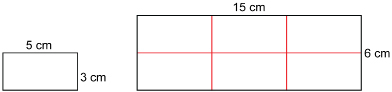
The new rectangle is 3 × 5 cm = 15 cm long and 2 × 3 cm = 6 cm wide.
Step 1: Compare the areas.
From the diagram, it appears that the new rectangle is 3 × 2, or 6, times the area of the original rectangle.
Check the following:
Since 6 × 15 cm2 = 90 cm2, the area was increased 3 × 2, or 6, times.
Step 2: Compare the perimeters.


Notice that the perimeter is not 2 times, or 3 times, or even 6 times the perimeter of the original figure. You have to determine the perimeters from the dimensions of each rectangle. There is no shortcut for perimeter.
Factors Affecting Area
From the previous two examples, notice that if the length of a rectangle is increased m times and its width is increased n times, the area increases m × n times. This formula applies to area only.
Self-Check
Answer the following questions. When you are finished, check your answers.
SC 8. The length of a certain rectangle is changed by a factor of 5 and its width by a factor of 2. If the area of the original rectangle were 23 ft2, what is the area of the new rectangle?
SC 9. The width of a square is enlarged 7 times. The length is increased by a factor of 9. How many of the original squares would fit into the new figure? Include a diagram in your solution.
 Mastering Concepts
Try these questions. When you are finished, check your answers.
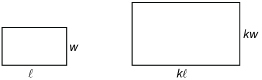
MC 1. Show that if both the length and width of a rectangle are scaled by a factor of k, the area of the new rectangle is k2 times the area of the original, and the new perimeter is k times the original perimeter.
MC 2. A rectangle is enlarged to give an area that is twice the original area. What changes to the length and/or width could have caused the doubling of area?
1.32. Page 5
Module 4: Area
Lesson Summary
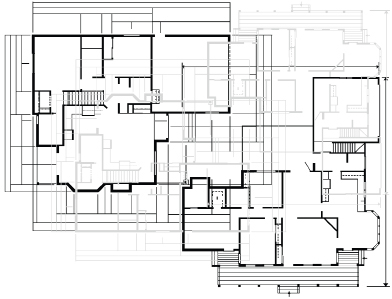
© Vector Mushrooms/shutterstock
House plans are scale drawings. If you knew the scale factor for the plans, you could calculate the dimensions or area of any part of the house by first taking measurements from the plans themselves. Any modifications to a scaled plan must be drawn to the same scale.
In this lesson you explored scale factors and their relationship to the perimeter and area of squares and rectangles, similar to the square and rectangles illustrated on the technical diagram.
In this lesson you explored these questions:
- How does changing one or more dimensions of a rectangle affect the rectangle’s perimeter?
- How does changing one or more dimensions of a rectangle affect the rectangle’s area?
Check your level of understanding of the materials covered in this lesson by completing “Lesson 6 Traffic Lights.” If you select an amber or red traffic light in the multimedia piece, you will receive information about additional work you can complete to improve your understanding of the topics. Complete the suggested work before you proceed to the Lesson 6 Assignment. If you experience difficulty, contact your teacher before starting the Lesson 6 Assignment.
 Assignment
Retrieve the Lesson 6 Assignment Booklet you saved in your course folder at the start of this lesson. Complete the Assignment Booklet. Resave your Assignment Booklet in your course folder and submit a copy to your teacher for assessment.
Unit 2 Project
You applied your knowledge of scaling in a variety of practical settings. Before you move on to the next lesson, return to the Unit 2 Project and check if you used scaling to modify your design.
1.33. Module 4 Summary
Module 4: Area
Module 4 Summary
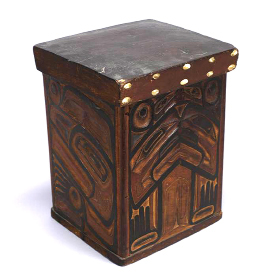
Bentwood chest, Haisla. 33 cm x 26 cm X 23.5 cm. Courtesy UBC Museum of Anthropology, Vancouver, Canada. A1764ab.
The bentwood box in the photograph is representative of the remarkable artistry and woodworking skills of the First Nations people of the Canadian West Coast. Carved boxes, such as the one shown, were used to store food or personal belongings. The sides of bentwood boxes were fashioned from a single rectangular cedar board. The board was scored, steamed, and bent into the shape you see. The base of the box was carefully shaped and fitted to produce a watertight container.
Finding the surface area of rectangular containers was one of the skills you practised in this module. This module extended your skills with the area of two-dimensional shapes and three-dimensional objects.
In this module you developed your skills as you investigated the following questions:
- How do you estimate and calculate the area of two-dimensional shapes and the surface area of three-dimensional objects?
- What effect does a change to dimensions have on area and surface area?
A picture can tell a story. The Module 4 Lessons Summary is a collection of images from each lesson that describe the math you explored. What do you remember about each image? Can you relate each image to something new you learned in this module? Watch the “Module 4 Lessons Summary” now.