Project 1
| Site: | MoodleHUB.ca 🍁 |
| Course: | Financial Management LearnEveryware Modules |
| Book: | Project 1 |
| Printed by: | Guest user |
| Date: | Wednesday, 24 December 2025, 8:20 AM |
Description
Created by IMSreader
Table of contents
- 1. Project 1
- 1.1. Training Room 1
- 1.2. Page 2
- 1.3. Page 3
- 1.4. Training Room 2
- 1.5. Page 2
- 1.6. Page 3
- 1.7. Page 4
- 1.8. Training Room 3
- 1.9. Page 2
- 1.10. Page 3
- 1.11. Page 4
- 1.12. Training Room 4
- 1.13. Page 2
- 1.14. Page 3
- 1.15. Page 4
- 1.16. Training Room 5
- 1.17. Page 2
- 1.18. Page 3
- 1.19. Page 4
- 1.20. Training Room 6
- 1.21. Page 2
- 1.22. Page 3
- 1.23. Page 4
- 1.24. Page 5
- 1.25. Project 1 Summary
1. Project 1
Project 1: The Accounting Cycle
Project Introduction
fiscal period: the period of time over which earnings are measured
accounting cycle: the steps of accounting activities that are followed during each fiscal period
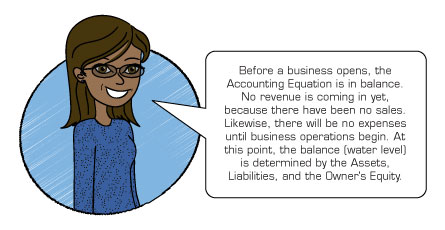
Accounting activities repeated in each fiscal period are referred to as the accounting cycle. A fiscal period is the period of time over which earnings are measured.
As in FIN1015, you will see the GAAP icon throughout this course. Do you know which GAAP principle is being referred to here? Check out GAAP below to see if you are correct.
6. The Time Period Concept
The Time Period Concept says that accounting takes place over specific time periods known as fiscal periods. These fiscal periods are of equal length and are used when measuring the financial progress of a business.
In FIN1015 you prepared the beginning balance sheet, set up a chart of accounts, and opened these accounts in the ledger for a new company. Now that the business is set up, you are ready to begin the day-to-day activities of the business and this accounting cycle.
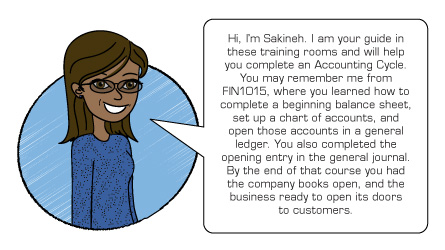
To walk you through this, Sakineh, the Financial Trainer, is ready to guide you through six training rooms that will prepare you for the final project, where you will work as an entry-level accounting clerk and showcase your knowledge in a portfolio presentation. The six training rooms are as follows:
- Training Room 1 will explain what source documents are and why they are important.
- Training Room 2 will show you how to analyze the day-to-day business transactions.
- Training Room 3 will show you how to analyze temporary capital accounts.
- Training Room 4 will show you how to enter these transactions into a journal.
- Training Room 5 will focus on petty cash and how journalize petty-cash transactions.
- Training Room 6 will show you how to post this information to the general ledger and verify your amounts in a trial balance.
Continue to Training Room 1, where Sakineh will explain the importance of source documents—the first papers a business receives.
Want a sneak peak at the full accounting cycle first? Check out the Interactive Accounting Cycle. Click on each step for a description of the step. FIN1020: Accounting Cycle 1 will address the first four steps only. You'll have to wait for FIN1030: Accounting Cycle 2 to learn about the last four steps.
1.1. Training Room 1
Training Room 1: Source Documents
Training Room 1 Introduction
Suggested Time: 130 minutes

© Accent/12323055/Fotolia
These day-to-day business activities are called transactions, which a business must record.
1.2. Page 2
Training Room 1: Source Documents
What I Need to Know
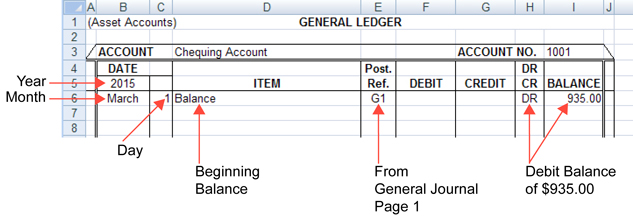
The first step in the accounting cycle is receiving the source document for a transaction. A source document is any piece of paper that provides details about a financial change in a business. This paper is proof that a transaction has occurred. For example, a sales receipt, an invoice, or a cheque issued by the business or received by the business is a source document. Take a moment to read about source documents in Step 1 of the Interactive Accounting Cycle.

Left to right: © c/6769163/Fotolia, © Kenneth V. Pilon/shutterstock, © Jason Stitt/281515/Fotolia
Why Is This Important?
Running a business generates documents that support the transactions of the company. Keeping track of and maintaining these source documents are an important part of good business practice.
Gurpreet is having a conversation with his cousin, Ravinder, who is an accountant. You may remember Gurpreet from FIN1015, where he started his business called Gurpreet’s Snow Removal.
View the multimedia piece “Why Source Documents are Important” to see what Gurpreet and Ravinder are discussing.
Gurpreet did some research. Complete Time to Work to see what he discovered.
1.3. Page 3
Training Room 1: Source Documents
Time to Work
Answer the following questions and submit the completed assignment to your instructor for assessment. Save a copy of your answers in your FIN1020 Course Folder as pr1-tr1-1. This stands for Project 1, Training Room 1, Assignment 1. This is the file naming format that is suggested for this course.
- Gurpreet discovered that he was not following two Generally Accepted Accounting Principles. Do you know what they are and how they apply to Gurpreet’s business?
Need a reminder? Then view GAAP for a refresher.
- There are federal regulations concerning keeping records. List three benefits of keeping complete and organized records that Gurpreet learned about when he looked at the Canada Customs and Revenue Agency website and searched for business records.
- What do you think some of the consequences would be if Gurpreet decides to eliminate source documents, because he has recorded them on the computer?
- Collect at least three samples of different source documents that you have used in your personal transactions. For example, a sales slip, debit receipt, etc. Submit these examples to your teacher.
Training Room 1 Summary

© Graça Victoria/431580/Fotolia
On reflection, Gurpreet has decided that it is important to keep the source documents to support his business records. He is now stapling all the source documents for the same business transaction together, and placing these in a file folder to refer to, if required.
As well as keeping any documentation, these transactions must be recorded in a journal. Before you can do that, it is important to understand how to analyze these transactions. Continue to Training Room 2 where Sakineh will explain how to perform this very important step.
1.4. Training Room 2
Training Room 2: Analyzing Transactions
Training Room 2 Introduction
Suggested Time: 160 minutes
Check your answer to see if you are right.
The beginning balance sheet.
The accounts on the left of a beginning balance sheet are recorded in the journal as debits, or DR, and the accounts on the right are recorded as credits, or CR. Debit totals must always equal credit totals. View the multimedia piece “Left = Right” to see an example of this.

This training room will show you how to decide when daily transactions are a debit or a credit, in order to enter them in the journal correctly.
1.5. Page 2
Training Room 2: Analyzing Transactions
What I Need to Know
T-accounts are partial skeletons of ledger account forms, showing the account title and the debit and credit sides of the account. View “T-Account” to see the T structure.
Why Is This Important?
T-accounts are used for rough work to help you analyze business transactions. They are also used by accountants to plan complex journal entries, before entering the transaction in the journal of the business. They are called T-accounts, because these forms are in the shape of a T, with debits on the left and credits on the right. T-accounts help ensure that you are always recording the same debit amount as the credit amount for each transaction. The value of this will become apparent as you analyze daily business transactions.
What Do I Need to Do?
First we need to do a little review from FIN1015.
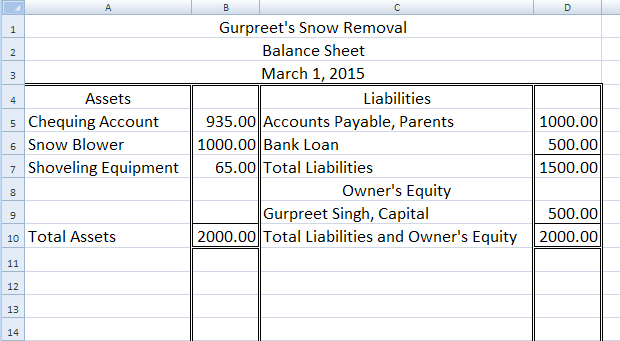
Take a look at Gurpreet’s beginning balance sheet below.
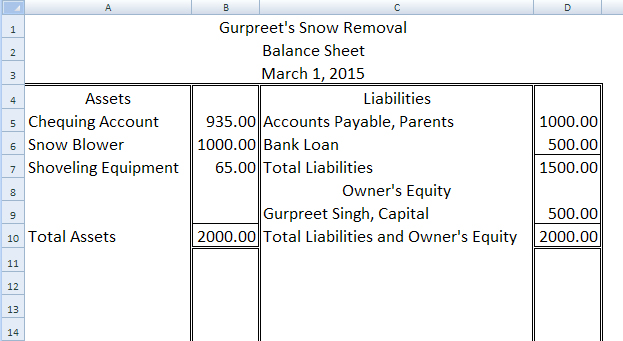
Microsoft product screen shot(s) reprinted with permission from Microsoft Corporation.
The accounts on the left side of the balance sheet—assets—have debit balances. The accounts on the right side of the balance sheet—liabilities and capital—have credit balances.

Microsoft product screen shot(s) reprinted with permission from Microsoft Corporation.
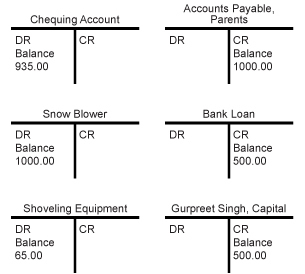
The T-accounts for Gurpreet's beginning balances are on the right.
If you add all the numbers under debits (DR), you will see that they equal the total of the numbers under credits (CR).
The balance side of each type of account never changes. Assets may get bigger or smaller, but they will always have a debit balance. Liabilities and capital may get bigger or smaller, but they will always have a credit balance. See “Left = Right Example 2” for a visual look at this concept.
Each transaction conducted by a business affects the accounting equation. For instance, any cash received or spent will change the total assets. Take a look at “Accounting Equation.”
The balance sheet totals have changed, but the left side still equals the right side. The T-accounts for this transaction are as follows:
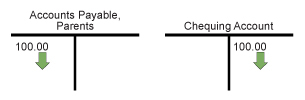
Both of these accounts have decreased. Gurpreet now owes his parents less money, so the amount owed, or the liability account that is going down, is a debit, on the left side of the T-account. An asset that is going down is a credit, on the right side of the T-account.
Let’s review.

© ktsdesign/3924820/Fotolia
Remember that in the balance sheet, assets are on the debit (left) side, so that is the balance side for assets. The balance side is always the increase side. Therefore, an asset going down would be on the opposite side—a credit. The chequing account going down is a credit.
The same is true for liability accounts. Liabilities are on the credit (right) side of the balance sheet, so that is the balance side for liabilities. The balance side is always the increase side. Therefore, a liability going down would be on the opposite side—a debit. The accounts payable, parents account going down is a debit.
Debits must always equal credits, so the amount on one side must always be the same as the amount on the other side.
Let’s try analyzing a couple of transactions together, and then you can do some practice before you go on to the Time to Work assignments.

© Alexey Afanasyev/8176652/Fotolia
Transaction 1
Gurpreet bought a new snow blower for his business for $600.00. You need to think through the question steps to decide which account to debit and which account to credit. Work through “Question Steps” now.
Transaction 2
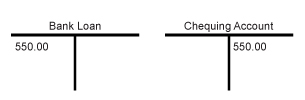
Gurpreet gave the bank $550.00 to repay some of his loan.
Do you remember the steps to record this?
This should become automatic as you work through more transactions. You might want to print the following Transaction Analysis Steps for easy reference. These steps are also available in the Toolkit for future reference.
Step 1: Which accounts are affected? (refer to the account titles and place on the T-accounts)
Step 2: What types of accounts are these?
Step 3: What does the T look like for this type of account? (refer to
Analyzing the Balance Sheet in Tips and Tricks in the Toolkit)
Step 4: Are these accounts increasing or decreasing?
Step 5: Are these accounts debits or credits?
1.6. Page 3
Training Room 2: Analyzing Transactions
Time to Practise
Practice 1
To complete this activity, open “Practice 1.”
Practice 2
Part 1: Beginning Balances
Use the following beginning balance sheet:
Microsoft product screen shot(s) reprinted with permission from Microsoft Corporation.
Complete the activity “T-accounts” by indicating the balance side of each. The first one has been done for you.
Part 2: Transactions
Using the T-accounts from Part 1, analyze the transactions in “T-Accounts Practice 2 Part 2,” putting the transaction number beside each amount. The first one has been done for you. Hint: When you have finished, all of the debits should equal all of the credits.
Part 3: New Totals in Accounts
What are the new totals of each account? Notice that total debits should still equal total credits.
Cash
Accounts Receivable
Supplies
Equipment
Bank Loan
Accounts Payable
Mortgage Payable
Frank Trotta, Capital
31770.00
1500.00
730.00
920.00
8150.00
1967.00
5475.00
19328.00
Part 4: Create a New Balance Sheet

© wimpos/12311117/Fotolia
A company does not create a new balance sheet every time a transaction is completed. In fact, a new balance sheet is usually only created at the end of each fiscal period. However, complete one now to see how transactions affect the balance sheet totals.
Notice that the accounting equation remains in balance.
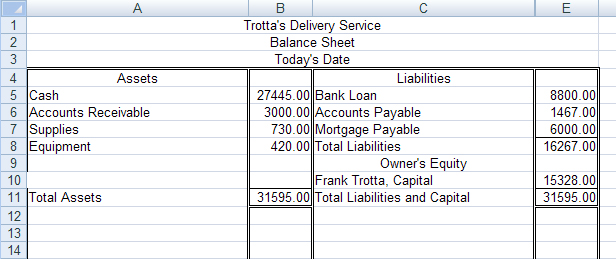
Open Balance Sheet Template and complete a new balance sheet for Trotta’s Delivery Service, using today’s date.
To check your work , go to Trotta's Delivery Service Answer.
You may wish to refer to the Balance Sheet Rubric for a guide to completing your work. This rubric is available for you in the Toolkit to access in the future.
The Balance Sheet Exemplar is available for you to refer to as an example of a completed balance sheet. Exemplars are also available in your Toolkit.
1.7. Page 4
Training Room 2: Analyzing Transactions
Time to Work
Use the following balance sheet:
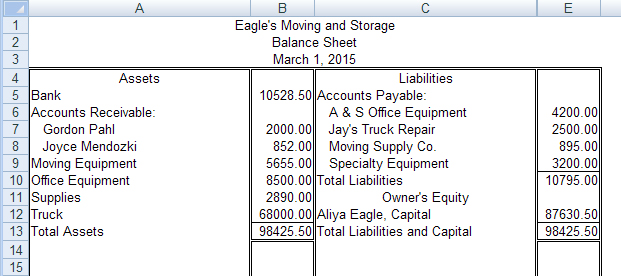
Microsoft product screen shot(s) reprinted with permission from Microsoft Corporation.
- Open T-Accounts Templates, and save it in your Course Folder as pr1-tr2-1a, or as instructed by your teacher.
Place an account title on the top of each T-account. You do not have to include accounts payable as part of the title, just the company names.
- Indicate which is the balance side.
- Place the beginning balance on the appropriate side of each T-account.
- Using the T-accounts you created, analyze the following transactions. Place the transaction number beside each amount.
- Paid for a new computer, $5000.00
- Received from Gordon Pahl, $1500.00
- Paid to A & S Office Equipment, $500.00
- Received from Joyce Mendozki, $852.00
- Owner invested money in the business, $2500.00
- Paid amount owed to Moving Supply Co., $895.00
- Received a cheque from Gordon Pahl for $300.00
- Sold old office equipment, $450.00
- Paid Specialty Equipment Co., $1000.00
- Charged a piece of moving equipment to Moving Supply Co., $400.00
- Complete a new balance sheet with the new balances, using today’s date.
Open Balance Sheet Template, and save it in your Course Folder as pr1-tr2-1b, or as instructed by your teacher.

© Stocksnapper/11643948/Fotolia
Training Room 2 Summary
This is a very important training room, because it provides you with the basics of analyzing transactions. You will build on this concept in the rest of the course, as well as completing any transactions in other courses, or in the workplace.
This room focused on the permanent accounts of assets, liabilities, and capital. The next training room shows you how to use T-accounts to analyze the temporary capital accounts of drawing, revenue, and expenses as a business continues its day-to-day activities.
1.8. Training Room 3
Training Room 3: Analyzing Temporary Capital Accounts
Training Room 3 Introduction
Suggested Time: 160 minutes
Click on the picture below to see what happens after one week of operation.
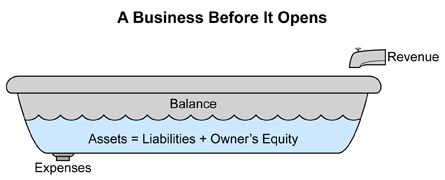
Revenue is coming in now that there are sales. At the same time, expenses increase—the owner now has to pay expenses such as employees’ wages, rent, utilities, and supplies.
If the business is successful, revenue will be greater than expenses and the balance (water level) will be higher than before business operations began; therefore, the business will have a profit. If expenses are greater than revenue, the balance (water level) will be lower than it was before business operations began; therefore, the business may have to adjust expenses, or even close operations.
1.9. Page 2
Training Room 3: Analyzing Temporary Capital Accounts
What I Need to Know
So far, we have looked at using T-accounts to help analyze the permanent accounts of a business—Assets, Liabilities, and Capital. This training room will show you how to analyze transactions affecting the temporary Capital accounts of Income Summary, Drawing, Revenue, and Expenses that you added to the chart of accounts of the ledger in FIN1015.
Microsoft product screen shot(s) reprinted with permission from Microsoft Corporation.
These accounts are called temporary, because they are only open for the duration of a fiscal period. At the end of the fiscal period, the amounts in these accounts will be transferred into the permanent Capital account. A fiscal period is any period of time over which earnings are measured, such as one month, six months, one year, or whatever time period the business wants to measure. You will learn about how these accounts are transferred at the end of the fiscal period in FIN1030.

© Andrzej/10549781/Fotolia
Why Is This Important?
A business must keep a record of all expenses and revenues to evaluate if it is making money or losing money, and to be aware of exactly how it is spending its money. This awareness will allow the business to try to reduce expenses and make decisions to help maximize its profits.
What Do I Need to Do?
Let’s take a closer look at these types of transactions to see how to record them in the temporary Capital accounts.
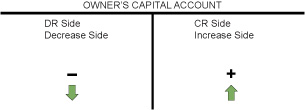
Recall the T-account for Capital below.
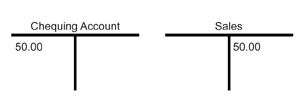
Revenue
Revenue is any money the business makes from its operations, such as sales from customers. This results in an increase to Capital. As you noticed in the last training room, the business could also have an increase in Capital if the owner decides to invest money into the business. By having this recorded separately, it is easy to see how profitable sales have been. The T-account for Revenue is exactly the same as the T-account for Capital.


© Alexey Afanasyev/8176652/Fotolia
For example, Gurpreet received $50.00 from his first customer, which he quickly deposited into his chequing account. What do you think the T-account looks like now?
Step 1: Which accounts are affected? (refer to the account titles and place on T-accounts)
Step 2: What types of accounts are these?
Step 3: What does the T look like for this type of account? (refer to
Analyzing the Balance Sheet in Tips and Tricks in the Toolkit)
Step 4: Are these accounts increasing or decreasing?
Step 5: Are these accounts debits or credits?

Notice that both of these accounts increased, but there is only one debit and one credit.
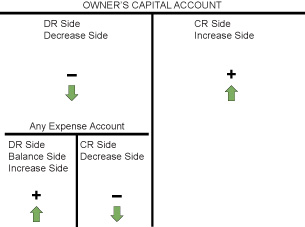
Expenses
The Expense accounts are used to track the money spent to keep the business operating. The more money spent on an item, the less Capital a business will have—or less profit.
An expense will decrease the Owner’s Capital. Therefore, it is on the decrease, or debit, side of the Capital account. This becomes the balance side for temporary Expense accounts. Expenses are added on the debit side. At the end of the fiscal period this total expense debit will be transferred to the owner’s permanent Capital account—decreasing Capital.
© Alexey Afanasyev/8176652/Fotolia
For example, let’s assume that Gurpreet used $75.00 from his chequing account to pay for gas for his truck. The two accounts that will be affected are the Chequing account and Truck Expense, since gas is part of the expense of driving a truck. What would these T-accounts look like?
Step 1: Which accounts are affected? (refer to the account titles and place on T-accounts)
Step 2: What types of accounts are these?
Step 3: What does the T look like for this type of account? (refer to
Analyzing the Balance Sheet in Tips and Tricks in the Toolkit)
Step 4: Are these accounts increasing or decreasing?
Step 5: Are these accounts debits or credits?
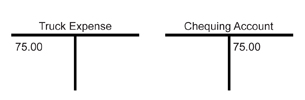
Again, debits equal credits—the left side equals the right side of the T-account.
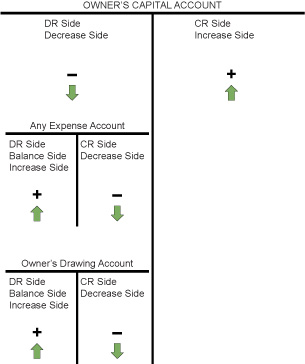
Drawing
The owner’s Drawing account is any money that the owner withdraws for personal use. The owner has the right to take out as much money as she or he wants—after all, she or he is the owner. This withdrawal decreases Capital and is treated exactly the same as an expense. You can think of it as the owner’s salary expense.
GAAP
1. The Business Entity Concept
The Business Entity Concept provides that the accounting for a business or organization be kept separate from the personal affairs of its owner, or from any other business or organization. This means that the owner of a business should not place any personal assets on the business balance sheet. The balance sheet of the business must reflect the financial position of the business alone.
© Alexey Afanasyev/8176652/Fotolia
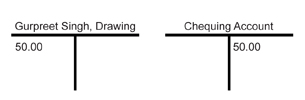
For example, if Gurpreet wanted to go out for dinner and a movie, he could withdraw $50.00 from his Chequing account. What would the T-account for this transaction look like?
Step 1: Which accounts are affected? (refer to the account titles and place on T-accounts)
Step 2: What types of accounts are these?
Step 3: What does the T look like for this type of account? (refer to
Analyzing the Balance Sheet in Tips and Tricks in the Toolkit)
Step 4: Are these accounts increasing or decreasing?
Step 5: Are these accounts debits or credits?
Income Summary
Income Summary is a temporary account used to store the total revenue, expenses, and profit/loss of a business. This account is only used at the end of the fiscal period when completing the closing entries for a business. The Income Summary account is not used until FIN1030 and will be discussed in more detail at that time.
1.10. Page 3
Training Room 3: Analyzing Temporary Capital Accounts
Time to Practise
Refer to the Analyzing Transactions chart below. You may also access Analyzing Transactions any time you need to by going to the Toolkit.

Don’t forget the steps to help you analyze transactions into their debit and credit parts.
Step 1: Which accounts are affected? (refer to the account titles and place on T-accounts)
Step 2: What types of accounts are these?
Step 3: What does the T look like for this type of account? (refer to
Analyzing the Balance Sheet in Tips and Tricks in the Toolkit)
Step 4: Are these accounts increasing or decreasing?
Step 5: Are these accounts debits or credits?

© Alexey Afanasyev/8176652/Fotolia
The totals on the left (debit) side of the T-account always equal the totals on the right (credit) side of the T-account.
Practice 1 and Practice 2
Work through the practice activities in “T-accounts Practice 1 and Practice 2.” Be sure that you are comfortable with analyzing transactions before continuing to the assessment assignment in Time to Work.
Practice 3 (Optional)
If you need more practice, go to Tetraccounting1.
1 Version 1.1 Developed for NAIT and McGraw-Hill, 2002 by Rebecca Marcil under a Creative Commons licence. Reproduced with permission. (http://digilearn.nait.ab.ca/careo/Accounting/PCgame/)
1.11. Page 4
Training Room 3: Analyzing Temporary Capital Accounts
Time to Work
When you are confident that you can analyze transactions, continue to your T-accounts assignment.
Do you remember the steps?
Step 1: Which accounts are affected? (refer to the account titles and place on T-accounts)
Step 2: What types of accounts are these?
Step 3: What does the T look like for this type of account? (refer to
Analyzing the Balance Sheet in Tips and Tricks in the Toolkit)
Step 4: Are these accounts increasing or decreasing?
Step 5: Are these accounts debits or credits?
Refer to the Analyzing Transactions chart to help you with this assessment assignment. The chart is also available in the Toolkit.
Complete the T-Accounts Assignment now.
Training Room 3 Summary

As we analyze daily transactions, it is important to remember that debits must always equal credits. This is called a double-entry accounting system and, therefore, provides a self-check so that you know if an error has been made.
It’s also important for you to know the balance sides of these accounts before you can analyze daily transactions. Remember that you can always refer to the Analyzing Transactions chart, available in the Toolkit. To help you think through your analysis, the Transaction Analysis Steps are also available in the Toolkit.
Continue to the next training room to see how to enter these transactions into a general journal.
1.12. Training Room 4
Training Room 4: Journalizing Transactions
Training Room 4 Introduction
Suggested Time: 160 minutes

As Sakineh just said, the first step in the accounting cycle is receiving the source documents. In this training room you will learn the next step—utilizing analysis to journalize the source documents.
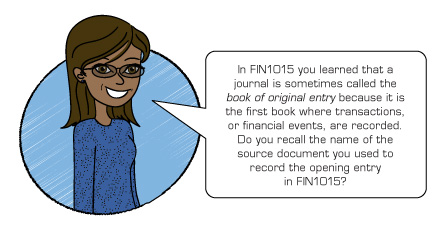
The process of recording transactions into a journal is called journalizing. You used a general journal to prepare the opening entry when you set up the accounting records in FIN1015. In this training session, you will further develop your skills by analyzing daily business transactions as you enter them into a general journal. See how journalizing fits into the Interactive Accounting Cycle by clicking on Step 2.
1.13. Page 2
Training Room 4: Journalizing Transactions
What I Need to Know
Daily Transactions
As you will recall from FIN1015, a general journal form is as follows:

Microsoft product screen shot(s) reprinted with permission from Microsoft Corporation.
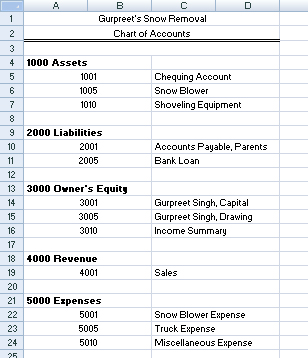
The account titles used when entering in the journal must be the same as in the chart of accounts. The following was used for Gurpreet’s Snow Removal:

Microsoft product screen shot(s) reprinted with permission from Microsoft Corporation.
You always journalize from a source document. You have already prepared the opening entry for this business from the beginning balance sheet—the source document.
The beginning balance sheet for Gurpreet’s Snow Removal is below.
Microsoft product screen shot(s) reprinted with permission from Microsoft Corporation.
This source document (beginning balance sheet) was used to enter the opening entry below.
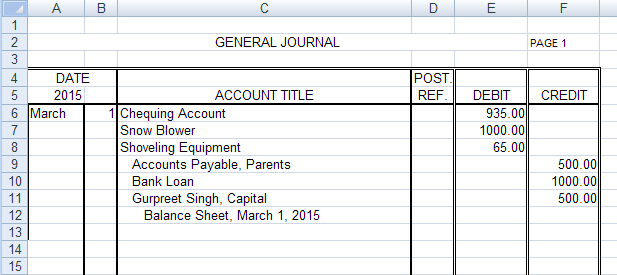
Microsoft product screen shot(s) reprinted with permission from Microsoft Corporation.

© Klara Viskova/shutterstock
Why Is This Important?
The journal is a daily record of any transactions conducted by a business.
Entering the source documents correctly in the journal is critical to keeping accurate financial records, which is essential for a successful business. That is why you have spent the last two training sessions learning how to analyze transactions to be entered into this important book.
What Do I Need to Do?
Let’s have a look at how Gurpreet would enter the transaction where he repaid his parents $100.00 of the amount that he owed them. Gurpreet wrote a cheque from his chequing account. The cheque is his source document.
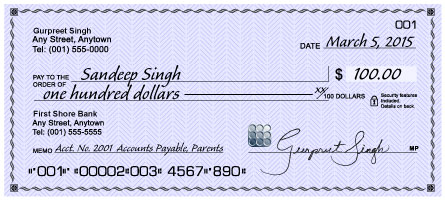
© Jamey Ekins/shutterstock
In the journal, T-accounts help to determine which account gets the debit and which account gets the credit.

© 2009 Jupiterimages Corporation
Recall that the T-accounts for this transaction were as follows:
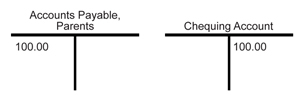
Note that this transaction is entered right after the opening entry that you completed in FIN1015.
Gurpreet would enter this in his general journal as follows:
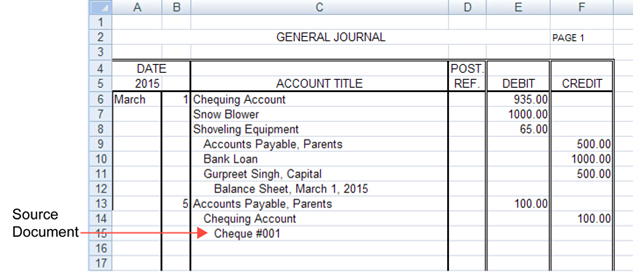
Microsoft product screen shot(s) reprinted with permission from Microsoft Corporation.
Only the day is entered in the date section, since the year and the month remain the same as the previous entry. Note that in accounting records, debit entries are always entered before credit entries. The credit is indented and the source document information is also indented, which makes it easy to read the information.
Go to “Click to view” to see instructions on how to indent in Microsoft Excel®.
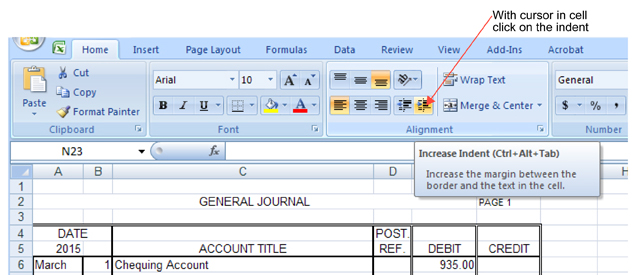
Microsoft product screen shot(s) reprinted with permission from Microsoft Corporation.
1.14. Page 3
Training Room 4: Journalizing Transactions
Time to Practise
Open Gurpreet’s General Journal and save this in your FIN1020 Course Folder as Gurpreet’s General Journal.
Journalize the following three transactions for Gurpreet, using the source documents below.
You may wish to draw the T-accounts for each transaction on a piece of paper to help you analyze the transaction or you can use T-Accounts Template. Remember that these are rough forms to help you sort through which accounts are debited and which are credited. As you get more familiar with this process, you may be able to skip drawing the T-accounts, at least for some of the more common transactions. Accountants often use T-accounts to sort out difficult or unusual transactions.
However, no matter how experienced a person is in entering transactions, the same steps must be thought through to determine which account is debited and which account is credited. Refer to the Transaction Analysis Steps if you need to refresh your memory.
Step 1: Which accounts are affected? (refer to the account titles and place on T-accounts)
Step 2: What types of accounts are these?
Step 3: What does the T look like for this type of account? (refer to Analyzing the Balance Sheet in Tips and Tricks in the Toolkit)
Step 4: Are these accounts increasing or decreasing?
Step 5: Are these accounts debits or credits?
You may also wish to refer to the Analyzing Transactions chart, available in the Toolkit.
When you have finished journalizing the three transactions, click on “Check your answers” at the end of this practice segment to see if your journal is correct. Be sure to save these transactions to update Gurpreet’s journal, since you will be using this in the next training session.
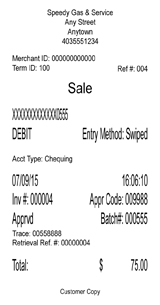
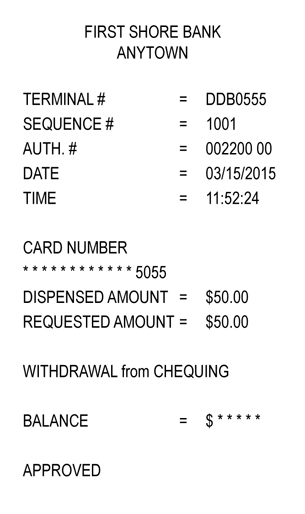
- On March 6, Gurpreet bought gas for his truck and used his debit card to withdraw money from his chequing account. Use the source document Debit Card—gas for truck.
Note that using a debit card is a credit to your account. A bank is a business and looks at this type of transaction from its perspective. The bank considers you a liability, and they owe you the money you have deposited. When you withdraw money, this is a debit to the bank's liability (or the amount owed to you) and a credit to the bank’s cash, since their money would be reduced. The term debit card comes from the bank, and is not to be confused with how you are entering the transactions for a business.
Gurpreet will also receive records from his bank for any transactions; therefore, he has those records as proof of the transaction. He will keep any transaction slips to check his bank record.
Recall the T-accounts you created for this in the last section.

- On March 10, Gurpreet withdrew $50.00 from his chequing account for his personal use.
Check your T-accounts before entering this transaction in the journal.

- On March 11, Gurpreet received $50.00 cash from his first customer for removing snow, and deposited the money in his chequing account.
Use Receipt No. 001 for the source document. Gurpreet wrote the following receipt in duplicate, one copy for his customer and one copy for his own records.
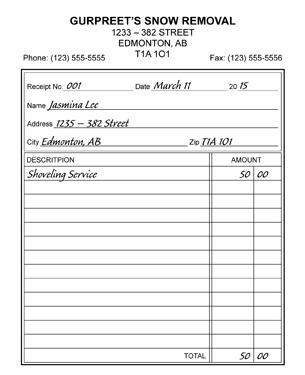
Check your T-accounts before you enter this transaction in the journal.

When you have completed the three transactions, check your answers.
Did you remember to enter the debit first and to indent the credits?
Did you remember to include the source document for each transaction and indent the source document?
Note that you can select these two amount columns and perform an auto sum to check that your debits equal your credits.
Did you remember to save your work? You will need this journal for the next training room.
Open General Journal Tempate, and save it as Gurpreet’s Journal Page 2. You will also need this journal in the next training room.
Using journal page 2, complete the following transactions for Gurpreet’s business for the rest of March. All revenue is put into the bank in the chequing account.
March 16: Received $200.00 from snow removal service, Receipt No. 002
March 17: Paid $50.00 for gas and oil for the snow blower, Cheque #002
March 20: Received $150.00 from snow removal, Receipt No. 003
March 22: Paid the bank $100.00 of amount owed, Cheque #003
March 24: Paid $75.00 for gas for his truck, Cheque #004
March 24: Received $100.00 from snow removal, Receipt No. 004
March 28: Paid his parents $100.00 of the amount owed, Cheque #005
To check your work, go to Gurpreet's Journal Page 2 Answer.
More Practice
Further journalizing practice is available for you below.
Note that a Chequing account is considered the same as cash, since the cash in the bank is readily available.
Open a new General Journal Template, and save the form as pr1-tr4-p (stands for Project 1, Training Session 4, Practice, which is the file naming format used for this course).
Using the account titles from Fine Fashions Chart of Accounts, journalize the following transactions for July on page 2 of a general journal.
July 1 |
Paid $2000 for rent, Cheque #100 |
5 |
Received $1000 for Sales, Receipt No. 020 |
7 |
Paid $1500 to F. Fisher for amount owed, Cheque #101 |
8 |
Received $3500 for Sales, Receipt No. 021 |
10 |
Paid $500 to repair store equipment, Cheque #102 |
10 |
Paid $400 for utilities, Cheque #103 |
16 |
Owner invested $3000 in the business, Memo #40 |
21 |
Sold old store equipment and received $1000, Receipt No. 022 |
25 |
Purchased supplies for $200.00, Cheque #104 |
29 |
Charged A/P L. Ritchie Company $2000.00 for supplies, Purchase Order #001 |
To check your work, go to Fine Fashions Journal Page 2 Answer.
1.15. Page 4
Training Room 4: Journalizing Transactions
Time to Work
When you are confident that you can analyze and journalize transactions, continue to the assessment assignment below.
Check the Journalizing Rubric to make sure you didn’t forget anything. All rubrics are available in the Toolkit for you to access at any time.
Remember that a Chequing account is considered the same as cash, since the cash in the bank is readily available.
Open General Journal Template, and save the form as pr1-tr4-a1, or as instructed by your teacher.
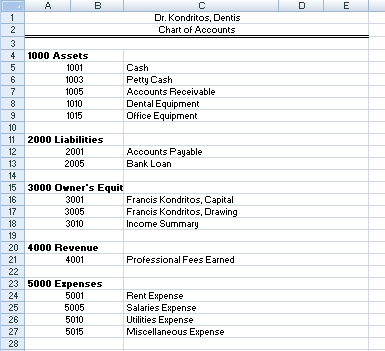
Using the account titles from Dr. Kondrito’s Chart of Accounts, journalize the following transactions on page 7 of a general journal.
| 1 | Paid rent for the month of May, $1500.00, Cheque #200 |
2 |
Received $20 000.00 for dental services, Receipt No. 111 |
8 |
Received $50 000.00 for Accounts Receivable, Receipt No. 112 |
14 |
Paid $25 000.00 to the bank on amount owed, Cheque #201 |
15 |
Charged Accounts Payable $1500.00 for dental equipment, Purchase Order #15 |
20 |
Owner withdrew $2000.00, Cheque #202 |
22 |
Paid Utilities $850.00, Cheque #203 |
23 |
Bought a new office chair for $500.00, Cheque #204 |
29 |
Purchased a new computer for $5000.00, Cheque #205 |
30 |
Paid salaries of $10 000.00, Cheque #206 |

© 2009 Jupiterimages Corporation
Training Room 4 Summary
This training room showed you how to record business transactions from source documents (such as the opening entry, cheques, receipts) in the general journal, so a business has a record of its day-to-day business activities.
The next training room will continue your training in journalizing by showing you how to set up a petty-cash fund and journalizing any associated transactions.
1.16. Training Room 5
Training Room 5: Petty Cash
Training Room 5 Introduction

© 2009 Jupiterimages Corporation
Suggested Time: 240 minutes

1.17. Page 2
Training Room 5: Petty Cash

© 2009 Jupiterimages Corporation
What I Need to Know
Gurpreet and Ravinder are having a conversation about petty cash. View the clip “Petty Cash” and see what Gurpreet and Ravinder are discussing.
petty-cash voucher: a form showing the amount paid and other details
A voucher is placed in the petty-cash box each time cash is taken out of the box.
Ravinder referred to two GAAP principles. Do you know what they are?
Check your answer after you have thought about it.
1. The Business Entity Concept
The Business Entity Concept provides that the accounting for a business or organization be kept separate from the personal affairs of its owner, or from any other business or organization.
5. The Principle of Objectivity
The Principle of Objectivity states that accounting will be recorded on the basis of objective evidence. Objective evidence means that different people looking at the evidence will arrive at the same values for the transaction.

© 2009 Jupiterimages Corporation
Why Is This Important?
Everybody likes to do things the easiest way possible. Gurpreet was prepared to take out money whenever he needed it, without worrying about any paperwork. However, as Ravinder pointed out, this could make things more difficult for him later, if his records were questioned, and he could not remember exactly where this money went. Therefore, he has decided to avoid any future problems and set up his petty-cash fund correctly.
What Do I Need to Do?
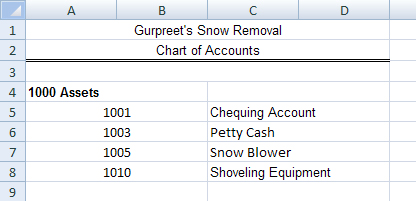
The first thing that Gurpreet did was to add the petty-cash account to his chart of accounts and open a new account in his ledger.
What kind of an account would petty cash be? All accounts have a number. What number do you think he chose for his petty-cash account?
Petty cash is money—something of value and, therefore, an asset. Any number starting with a 1 would be appropriate.
Open Gurpreet’s Ledger, update his chart of accounts, and open the Petty-Cash account.
View “Petty Cash Account Demonstration” for step-by-step instructions on how to proceed, including how to insert rows and/or copy forms into Excel®.
Does your ledger look like the following? Be sure to save this in your Course Folder. Call it Gurpreet’s Ledger to update any other ledgers that you have for him.
Microsoft product screen shot(s) reprinted with permission from Microsoft Corporation.
Microsoft product screen shot(s) reprinted with permission from Microsoft Corporation.
Establishing the Petty-Cash Fund
establishing the petty-cash fund: withdrawing cash and placing it into a petty-cash box or drawer
This must also be entered into the journal.
To establish a petty-cash fund, Gurpreet withdrew $200.00 from his chequing account. He felt that this would be enough money for the small purchases he may have to make during the month. What would the T-accounts for this transaction look like? Remember that a T-Accounts Template is available to you.
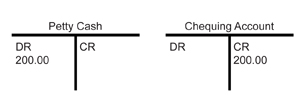
Open Gurpreet’s journal from your FIN1020 Course Folder (saved in Training Room 4), and journalize this transaction on page 1 of the journal. Be sure to save your work and then check your answer.

Microsoft product screen shot(s) reprinted with permission from Microsoft Corporation.
© 2009 Jupiterimages Corporation
Once the money is put in the petty-cash box, the total will remain the same; that is, the cash, plus the vouchers, will add up to the original amount, so it never has to be established again. This is the only debit that is ever made to Petty Cash.
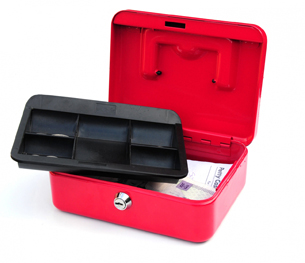
Gurpreet withdrew $20.00 from petty cash to purchase a lockable box to store the cash.
He then completed the following petty-cash voucher to be placed in the box:
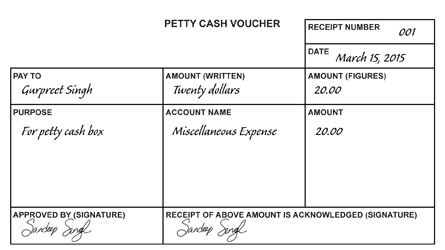
The cash box that Gurpreet purchased was $18.50. He placed the $1.50 change in the box, and stapled his receipt for the $18.50 to the voucher. He made a note on this voucher that the price was only for $18.50. The receipt stapled to the back, plus the extra $1.50 in the cash box, will verify this voucher. It is important to be very clear exactly where the money was spent.
Gurpreet wanted to go out after work with some friends, but he didn’t have time to go to the bank, so he took $50.00 from the petty-cash box.
Open the Petty Cash Voucher, and fill in the Purpose and Account Name lines.
Replenishing the Petty-Cash Fund
At the end of the month, Gurpreet goes to the petty-cash box to journalize all of the petty-cash vouchers and to replenish the amount of cash. Replenishing the petty-cash fund means removing the vouchers from the petty-cash box, and bringing the amount of cash in the box back up to the established amount—in this case, back up to $200.00.
The T-accounts for these two vouchers would look like the following:
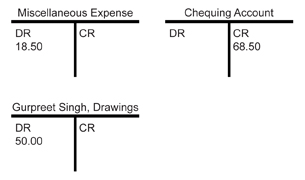
Notice that there are three T-accounts needed here, but the total debits still equal the total credits. The number of T-accounts will depend on the number of vouchers in the cash box. When Gurpreet puts the $68.50 back in the box, it will be replenished back to $200.00.
Gurpreet replenished his petty cash on March 31. Complete the journal entry for this in Gurpreet’s Journal Page 2, and compare your answer when you are finished. Be sure to save this, as you will need it in Training Room 6.

Microsoft product screen shot(s) reprinted with permission from Microsoft Corporation.
On rare occasions, the cash in the petty-cash box, plus the vouchers, may not equal the amount of petty cash initially established. What might cause this discrepancy?
- The change from a purchase may not have gone back in the petty-cash box.
- Change may have been put in the petty-cash box, but the receipt wasn’t stapled to the voucher.
- Giving incorrect change (either too much or too little).
- Removing money from the fund without leaving a voucher.
- Theft from the fund.
- Not balancing the fund properly at the end of the previous month.
- Using the petty-cash box as a miscellaneous storage box (throwing loose change in the box).

© 2009 Jupiterimages Corporation
Every attempt should be made to have accurate records and ethical use of the petty-cash fund. The person responsible for the petty-cash box must be accountable to all money going out of it. A business would question the person responsible for the petty cash, if it was continually short of funds. This could result in a loss of job or even criminal action.
However, sometimes honest mistakes happen. If there is more cash or less cash in the petty-cash box at the end of the month, the amount must be recorded in a Cash Short and Over account, in the income or revenue section of the ledger. The nature of this account is determined by its balance at the end of the accounting period. If the account ends up with a debit balance, it appears in the income statement as an expense. If the account ends up with a credit balance, it appears on the income statement as revenue. Most often, it is an expense.
Do you know which GAAP principle is at work here?
9. The Full Disclosure Principle
The full Disclosure Principle states that any and all information that affects the full understanding of a company’s financial statements, must be included with the financial statements.
Example of a Shortage in Petty Cash
Suppose that a company has established $100.00 for its petty-cash fund, and at the end of the month, the vouchers and cash remaining in the box are not equal.
Supplies |
26.00 |
Postage |
12.00 |
Sales Returns and Allowances |
2.50 |
Miscellaneous Expense |
49.50 |
Total Vouchers |
90.00 |
|
|
Cash in Petty-Cash Box |
8.50 |
|
|
Total Cash and Vouchers |
98.50 |
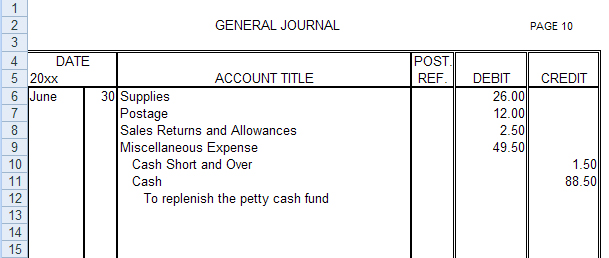
In this case, there is a cash shortage. The company wants to replenish the petty cash. This company uses the title Cash for its chequing account. Do you know what the journal entry would be for this?

Microsoft product screen shot(s) reprinted with permission from Microsoft Corporation.
Example of an Overage in Petty Cash
If at the end of the month, the total cash and vouchers added up to $101.50, there would be a cash overage of $1.50.
Do you know what the journal entry would be for this?
Microsoft product screen shot(s) reprinted with permission from Microsoft Corporation.
There is now $100.00 replenished in the petty-cash box.
1.18. Page 3
Training Room 5: Petty Cash
Time to Practise
Practice 1
For some practice, replenish another business’s petty cash. Open a blank General Journal Template and save it as pr1-tr5-p1.
This business has an established petty-cash fund of $250.00. The following vouchers were in the petty-cash box:
Voucher 1 Voucher 2 Voucher 3 Voucher 4 Voucher 5 |
Miscellaneous Expense Supplies Automobile Expense Jonah Wiley, Drawing Miscellaneous Expense |
$45.00 $26.00 $40.00 $75.00 $30.00 (note that you can join same accounts together) |
How much cash should there be in the petty-cash box?
There should be $250.00, minus the total of the vouchers ($216.00), in the petty-cash box, or $34.00.
Assume that the correct amount of cash is in the petty-cash box, and replenish the petty cash on page 5 of a general journal. Use April 30 of the current year to enter this transaction.
To check you work, go to Practice 1 General Journal Answer.
Practice 2
The June 20xx summary of petty-cash expenditures for Handyman Hardware is given below. The petty-cash fund was established for $250.00.
Petty-Cash Summary |
|
Supplies |
66.50 |
Automobile Expense |
86.50 |
Delivery Expense |
10.00 |
Miscellaneous Expense |
45.00 |
Postage Expense |
38.00 |
Total |
246.00 |
Part A—A Shortage in Petty Cash
The petty-cash box has $3.00 left in it on June 30, 20xx. There should be $4.00 left.
- Open General Journal Template and save it in your Course Folder as pr1-tr5-p2a.
- Journalize the entry to replenish the petty-cash fund on page 19 of the general journal.
- To check your work, go to the Practice 2 Part A General Journal answer.
Part B—An Overage in Petty Cash
Now assume the petty-cash box has $4.75 left in it on June 30, 20xx.
- Open General Journal Template, and save it in your Course Folder as pr1-tr5-p2b.
- Journalize the entry to replenish the petty-cash fund on page 19 of the general journal.
- To check your work, go to the Practice 2 Part B General Journal Answer.
Journalizing is a skill that improves with practice. Practice 3, 4, and 5 are provided here to help you improve that skill. They include journalizing daily transactions, as well as establishing and replenishing petty cash.
It is strongly recommended that you do at least one of the following three practice activities before you complete the assignments in Time to Work, which are for assessment.
1.19. Page 4
Training Room 5: Petty Cash
Time to Work
There are two assignments that you must complete for assessment. There is also an optional assignment. Please check with your teacher to see if you need to complete the optional assignment.
Assignment 1
Complete Training Room 5 Assignment 1.
Assignment 2
- Open General Journal Template, and save the form in your Course Folder as pr1-tr5-2.
- Use the account titles from the chart of accounts below:
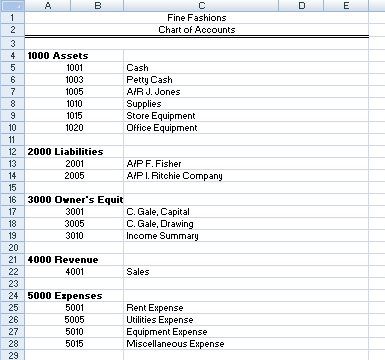
Microsoft product screen shot(s) reprinted with permission from Microsoft Corporation.
- Journalize the following transactions on page 2 of a general journal.
Transactions for July of the current year are below. The numbers in Column 1 refer to the day of the month.
July |
Transactions |
1 |
Establish a petty-cash fund, $200.00 |
1 |
Paid $2000 for rent, Cheque #100 |
5 |
Received $1000 for sales, Receipt #20 |
7 |
Paid $1500 to F. Fisher for amount owed, Cheque #101 |
8 |
Received $3500 for sales, Receipt #21 |
10 |
Paid $500 to repair store equipment, Cheque #102 |
10 |
Paid $400 for utilities, Cheque #103 |
11 |
Owner withdrew $300.00 for personal use, Cheque #104 |
16 |
Owner invested $3000 in the business, Receipt #22 |
21 |
Sold old store equipment for $1000, Receipt #23 |
25 |
Purchased supplies for $200.00, Cheque #105 |
29 |
Received $2000.00 from sales, Receipt #24 |
31 |
Replenished the petty-cash fund. There was $23.50 cash in the petty-cash box.
Use the following vouchers for the month:
|
Assignment 3 (Optional )
Check with your teacher before you attempt this optional assignment.
- Open General Journal Template, and save the form in your Course Folder as pr1-tr4-3.
- Use the account titles from the chart of accounts below:
Microsoft product screen shot(s) reprinted with permission from Microsoft Corporation.
- Journalize the following transactions on page 7 of a general journal.
Transactions are for May of the current year. The numbers in Column 1 refer to the day of the month.
1 |
Establish a petty-cash fund, $250.00 |
1 |
Paid $1500.00 rent for May, Cheque #200 |
2 |
Received $20 000.00 for dental services, Receipt #111 |
8 |
Received $50 000.00 for Accounts Receivable, Receipt #112 |
10 |
Bought new office equipment for $5000.00, Cheque #201 |
14 |
Paid $25 000.00 to the bank on amount owed, Cheque #202 |
15 |
Charged Accounts Payable $1500.00 for dental equipment, Purchase Order #15 |
20 |
Owner withdrew $2000.00, Cheque #203 |
22 |
Paid utilities of $850.00, Cheque #204 |
23 |
Bought new office chairs for $5000.00, Cheque #205 |
29 |
Purchased a new computer for $5000.00, Cheque #206 |
30 |
Paid salaries of $10 000.00, Cheque #207 |
31 |
Replenished the petty-cash fund. There was $85.50 cash in the petty-cash box.
Use the following vouchers for the month:
|

© Feng Yu/shutterstock
Training Room 5 Summary
In this training room you established a petty-cash fund, journalized daily transactions, and replenished the petty-cash fund at the end of the month. You should now be more aware of the various ethical issues surrounding the recording of petty cash to the accounting records of a business.
The next training room will show you how to post these entries to the ledger, so you know how much money remains in each account.
1.20. Training Room 6
Training Room 6: Posting and the Trial Balance
Training Room 6 Introduction
Suggested Time: 240 minutes
So far you have completed the first two steps of the accounting cycle—source documents and journalizing.
This training room is divided into two parts:
Part 1 covers Step 3 of the accounting cycle, which is posting the journal entries into the general ledger.
Part 2 covers Step 4 of the accounting cycle, which is verifying these postings by completing a Trial Balance from the general ledger.
Take a look at Steps 3 and 4 in the Interactive Accounting Cycle, and then continue on in Training Room 6.
1.21. Page 2
Training Room 6: Posting and the Trial Balance
Part 1 — Posting
What I Need to Know
In FIN1015 you learned how to open all the account names and numbers into the ledger account, and prepare the opening entry for a new company. You also posted the opening entry from the general journal into the ledger. Knowing those procedures prepares you for posting daily transactions, since it is very similar to what you have already accomplished.
Why Is This Important?
It is important to post these amounts in order to see exactly how much money is in each account. Remember, the journal is for daily transactions and some accounts may not have any activity, whereas others could have several transactions. It is hard to tell how much money is in each account until these amounts are posted into the ledger.
What Do I Need to Do?
A business may post daily from its journal, or less often, depending on how many transactions it has. Learn more in “Enter and Post.”
You are now going to open Gurpreet’s Journal, so that the amounts can be posted into his ledger. Save it in your Course Folder to update page 1 of the previous journal.
Let’s do a little review from FIN1015. Refer to Gurpreet’s journal and answer the following questions.
- What does Post. Ref. stand for?
The abbreviation Post. Ref. stands for Posting Reference.
- What do the numbers in the Post. Ref. column refer to?
The numbers in the Post. Ref. column refer to the account numbers from the ledger.
- Why are these numbers in the Post. Ref. column?
The numbers are in the Post. Ref. column because the money amounts have been posted or put into the corresponding account number in the ledger.
- Why are there no numbers in the rest of the Post Ref. column?
The amounts in these rows have not been posted into the ledger; only the opening entry has been posted from this journal.
- What does Posting Ref. mean?
It is a reference column that shows where the money has been posted.
Let’s also review what this would look like in the ledger.
Open Gurpreet’s Ledger and save it in your Course Folder to update the previous ledger.
Notice that the chart of accounts is at the front of the ledger. This is like a table of contents at the front of a book.
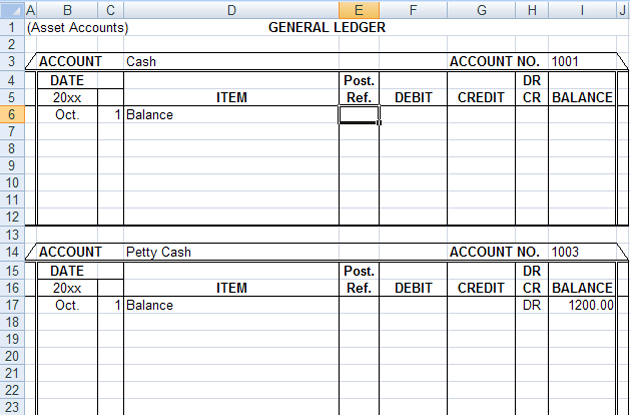
- Go to the asset accounts of the ledger. What does the information on row 6 mean?
Microsoft product screen shot(s) reprinted with permission from Microsoft Corporation.
- Why is there no money amounts in the petty-cash account?
There are no money amounts in the petty-cash account because nothing has been posted into the petty-cash account from the journal.
- Why are there only account names and account numbers for the revenue and expense accounts?
There are only account names and account numbers because the revenue and expense accounts are opened but no money has been posted yet.
You are now going to post the rest of the amounts from page 1 of this journal into the ledger. View the clip “Posting from Journal to Ledger” to see how to do the first few, and then try the rest on your own.
If you forget which side is the balance side, or the add side, refer to the Analyzing Transactions diagram.
Viewing both the journal and the ledger on your screen at the same time is very useful in the posting process. If you need help with how to do this in Excel®, check out the demonstration “Viewing Side by Side.”
To check your work, go to General Journal Page 1 Answer.
To check your work, go to Ledger (Page 1) Answer.
Now open Gurpreet’s Journal Page 2 from your Course Folder, and post the rest of the journal entries for March. Save the journal and the ledger when you are finished.
To check your work, go to General Journal Page 2 Answer.
To check your work, go to Ledger (Page 2) Answer.
1.22. Page 3
Training Room 6: Posting and the Trial Balance

© Jiang Dao Hua/shutterstock
Part 2 — Trial Balance
What I Need to Know
Just as a gymnast must stay balanced to continue across a balance beam, a business owner must continually keep the company books balanced to continue in business. A business cannot wait until the end of the year to determine if the books are balanced. The books must be balanced on a regular basis.
Why Is This Important?
A business does not have any place to check its work, as you have done in Part 1. However, the double-entry accounting system helps businesses to check their own work. Remember, the double-entry accounting system means for every debit there is an equal credit.
What Do I Need to Do?
To make sure that the ledger is in balance, or that debits equal credits, businesses need to add together all the debit balances to find the total debits, and then add together all the credit balances to find the total credits. These totals must be equal or an error has been made. An informal check of these balances may be done at any time.
trial balance: a list of all the debits and credits in the ledger
Its purpose is to prove that total debits equal total credits.
The formal accounting form used to check the equality of the debits and credits is called a Trial Balance. A trial balance is a list of all the debits and credits from the ledger, and is the last step in the Accounting Cycle. Check out Step 4 in the Interactive Accounting Cycle.
Let’s do a formal trial balance of Gurpreet Singh’s ledger to see if it is properly balanced. Open Trial Balance Template and save it as Gurpreet’s Trial Balance in your Course Folder.
The top heading is very similar to the balance sheet with the who, what, and when. If you need help with formatting the date as it appears in Excel®, view the demonstration “Changing the Date.”
Enter in the first three lines as shown below.

Microsoft product screen shot(s) reprinted with permission from Microsoft Corporation.
Open Gurpreet’s ledger, which you saved in your Course Folder at the end of Part 1. It is easiest to view these two Excel® files on the screen side by side. If you forgot how to do that, watch the demonstratioon “Viewing Side by Side.”
Now you need to enter all of the account titles and their balances from the ledger. If an account has a zero balance, however, you do not need to include it. Watch the first few, which are shown for you, in the demonstration “Debit/Credit Balances.”
Enter all of the account balances in the trial balance.
The last step is to add together the two columns to make sure that the debits equal the credits.
Watch the demonstration “Totaling the Trial Balance” for instructions on how to do this, as well as to verify that you entered your accounts correctly from the ledger.

© Howard Sandler/shutterstock
What Do You Do if the Trial Balance Does Not Balance?
Everybody makes mistakes—it happens.
If you find that your trial balance does not balance, following the steps in Finding Trial Balance Errors. The steps are listed from the most common error to the least common error, so it is best to look for your error in that order. These steps are also available in your Toolkit in Tips and Tricks.

© zimmytws/shutterstock
It looks like Gurpreet found an error in his records.

© Alexey Afanasyev/8176652/Fotolia
Watch “Discussion About Finding Errors” to see what Gurpreet and Ravinder are discussing.
To correct this entry, do you know which account would get the debit and which account would get the credit?
Think through the steps.
Step 1: Which accounts are affected? (refer to the account titles and place on T-Accounts)
Step 2: What types of accounts are these?
Step 3: What does the T look like for this type of account? (refer to Analyzing the Balance Sheet in Tips and Tricks in the Toolkit)
Step 4: Are these accounts increasing or decreasing?
Step 5: Are these accounts debits or credits?
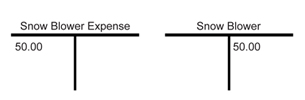
- The accounts that are affected are Snow Blower and Snow Blower Expense.
- Snow Blower is an Asset and Snow Blower Expense is an Expense.
- T-accounts are

- The Expense account is increasing—$50.00 should have been entered as an expense—a debit.
The Asset account is decreasing—$50.00 should never have been entered—a credit.
If you are ever unsure which account gets the debit and which account gets the credit, always do a rough T-account to help you think it through.
Gurpreet wrote an explanation of what had happened on Memo #1. What would the journal entry be to make this correction? Check your answer to see if you are correct. Note that you do not have to put this entry in your journal, because you did not make this error.

Microsoft product screen shot(s) reprinted with permission from Microsoft Corporation.
While you are doing the Time to Practise and Time to Work problems, you may want to refer to Analyzing Transactions to help you remember when to add and when to subtract in your ledger.
The following rubrics are also available for reference. All rubrics have a checklist to help you self evaluate your work.
Check in the Toolkit for help with these concepts and exemplars, or help with Excel®.
1.23. Page 4
Training Room 6: Posting and the Trial Balance
Time to Practise
There are three practice segments you may choose from before proceeding to your assignment in Time to Work.
You may do some or all of the practices to prepare for your assignment, which will be assessed.
1.24. Page 5
Training Room 6: Posting and the Trial Balance
Time to Work
The following assessment assignment includes journalizing, posting, and preparing the trial balance.
You may wish to refer to the rubrics available earlier in this training room, or in the Toolkit, to be sure you didn’t forget anything.
Assignment 1
Rita Ricardo has recently purchased the Waterfall Hotel, near the entrance to the Rocky Mountain parks area.
- Open General Journal Template, and save it in your Course Folder as pr1-tr6-journal.
- Use the account titles from Waterfall Hotel’s chart of accounts below. You will need to supply the correct source documents for each cash transaction. Start with Receipt #1 for any money received, and with Cheque #1 for any money paid, and number subsequent transactions accordingly.
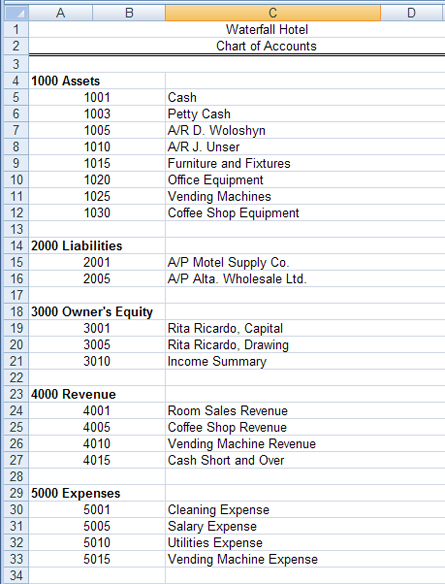
Microsoft product screen shot(s) reprinted with permission from Microsoft Corporation.
- Journalize the following transactions for June of the current year on page 2 of the journal.
June Transaction 1
Established a Petty-Cash fund of $200.00
1
Received cash for room sales, $1000.00
2
D. Woloshyn stayed in Room 401.
Room rate was $100.00 per night.
He stayed for four nights, and will pay at the end of the month, Invoice #1.
3
Received cash from coffee shop sales, $2500.00
5
Received cash from vending machine sales, $1200.00
6
Paid $200.00 to repair a vending machine
8
Bought a new machine for the office from Motel Supply Co., on credit.
The machine cost $3400.00.
The bill will be paid at the end of the month, Purchase Order #1.
10
The owner, Rita Ricardo, withdrew $2000.00 for personal use.
11
Sold an old office machine for cash, $500.00
12
Paid a utility bill, $700.00
15
Paid the employees’ wages, $1800.00
18
Room sales amounted to $3600.00 for the week.
Of the $3600.00, $2500.00 was cash, and $1100.00 was on account to J. Unser.
J. Unser will pay at the end of the month, Receipt #5 and Invoice #2.
20
Bought a new oven for the coffee shop from Motel Supply Co. for $2000.00.
The bill will be paid at the end of the month, Purchase Order #2.
21
Sold an old microwave oven to a member of the staff for $200.00 cash. 22
Discovered Office Equipment was debited for $1000.00, which should have been a debit to Vending Machines, Memo #12. Open General Journal Template, and start the next transaction on page 3. 25
Rita Ricardo, the owner, invested $8000.00 cash and also coffee shop equipment worth $4000.00.
Total investment is $12 000.00
26
Received cash for room sales, $2500.00 27
Received cash from vending machine sales, $1100.00 28
Paid Motel Supply Co. $2500.00 on account 30
Paid Jay’s Janitorial Service $1500.00 to clean the coffee shop 30
There was $73.00 left in the petty-cash box.
Replenish the petty-cash fund using the following vouchers:
Bought some small items for the office $50.00, Voucher #1
Paid to fix the vending machine $75.50, Voucher #2
- Open Ledger for the Waterfall Hotel, and save it in your Course Folder as pr1-tr6-ledger.
- Post the journal to the ledger.
- Open Trial Balance Template, and save it in your Course Folder as pr1-tr6-tb.
- Complete a trial balance for the Waterfall Hotel.
Training Room 6 Summary
You have now completed all four steps in Accounting Cycle 1: Source Documents, Journalizing, Posting, and the Trial Balance. You used source documents to journalize transactions in the general journal. You then posted these transactions to the ledger accounts and verified these postings by completing a trial balance.
If, at any time, you need to refer to the concepts in this project, go to the Toolkit and choose the Interactive Accounting Cycle.
You are now ready to begin your position as an entry-level accounting clerk and continue on to Project 2, a simulation of completing the books for a business.
1.25. Project 1 Summary
Project 1: The Accounting Cycle
Project Summary
In Project 1 you were introduced to the Accounting Cycle of a business —Source Documents, Journalizing, Posting, and the Trial Balance. Within a business, there are many day-to-day activities that need to be recorded. Project 1 introduced you to the importance of source documents, and how to analyze daily transactions. The project showed you how to analyze temporary capital accounts, and how to enter these transactions into a journal. You learned how to set up a petty-cash account, and how to enter those transactions into a journal. Finally, you learned how to post all of this information to the general ledger and verify your work using a trial balance.