Lesson 5: Factoring Special Polynomials
Module 3: Polynomials
Connect
![]() Lesson Assessment
Lesson Assessment
Complete the lesson quiz posted under the Assess tab or by using the Quizzes link under the Activites block. Also, ensure your work in your binder (course folder) is complete.
 Project Connection **NOT ASSIGNED**
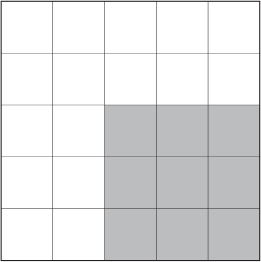
Recall the Discover activity in this lesson where a smaller square was cut and then removed from a larger square. This could be the basis for a cipher.
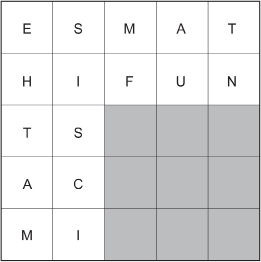
For example, if you wanted to encrypt the message “MATHEMATICS IS FUN,” you can do so with a 4 × 4 word square like the ones you learned about in Lesson1. A variation on that cipher is to encrypt the message in a larger 5 × 5 square. The following is a description of how that might be done.
Encrypt the phrase MATHEMATICS IS FUN using a variation of the word square cipher.
Step 1: Construct a 5 × 5 grid.

Step 2: Since the phrase has 16 letters and the square has 25 cells, you will not need to use all of the cells for your message. The nine squares in the lower-right corner will not be used for letters of the message. This area has been shaded to remind you of this.
Step 3: Place the letters of your message according to the order noted in the following diagram.
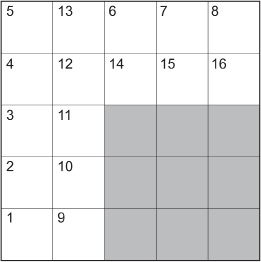
In this case:
Note: The reasoning behind the letter placement is found in the Math Lab. You would get the following if you removed the shaded square, vertically cut the remaining L-shape into two rectangles, and reassembled the two rectangles into a longer rectangle:

Step 4: Fill the shaded region with random letters.
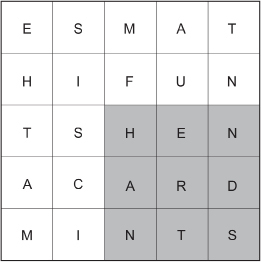
Step 5: Write the letters of the message in order from left to right. You have a choice of writing the letters in blocks with spaces in between or with no spaces in between.
ESMATHIF U NTSHEN AC ARDM INTS.
Your message is now encrypted.
Step 6: Construct a key. You will need a key to help the intended recipient of your code to decipher the message. He or she will need to know two things:
-
dimensions of the larger square
-
dimensions of the smaller (shaded) square
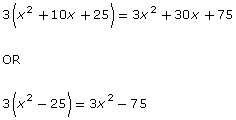
The following algorithm shows a simple way to create a key that provides both important pieces of information:
|
Step |
Action |
Example |
| 1 |
Set up the dimensions of the larger square as a binomial square or a product of conjugates. Then expand. |
OR
|
| 2 |
Multiply each term of the polynomial by the dimension corresponding to the side length of the smaller square. |
|
Now go to the Unit 2 Project and complete the Module 3: Lesson 5 portion of the project.
 Going Beyond

© Yuganov Konstantin/shutterstock
Have you read some of the e-mail math tricks that get sent around? The e-mails are about how a “magic formula” can be used to guess your age or your secret number. All of these tricks are based on algebra—don’t let them fool you!
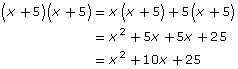
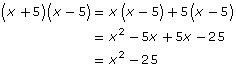
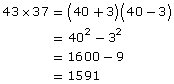
You have learned that a2 – b2 = (a + b)(a – b).
But perhaps you haven’t thought about how to use this to do fast mental calculations. See if you can guess how this trick can help you do the following in your head:
43 × 37
78 × 82
36 × 24
Do you see the pattern with these numbers?
Let’s do the first one.
Practice these and you’ll be able to impress your friends or your family members! If you think creatively about everything that you learn in mathematics and look for patterns, you will find some surprising applications.