Module 3
1. Module 3
1.13. Page 3
Module 3: Linear Measure
Explore
In the following Try This activity, you will explore a method of finding the centre of a circular disk. This is the same method carpenters use.
Finding the Centre of a Circle
 Try This
Work with a partner if possible.
Step 1: On a blank sheet of paper, draw a circle by tracing the bottom of a cylindrical shape, like a soup can, glass, or jar lid.
Step 2: Find the centre of this circle by folding the circle in half with two different folds (as you did in the last lesson). Mark the centre you found, which will be where the two folds meet.
Imagine your circle is wooden and can’t be folded. How could you find the centre? Follow these steps:
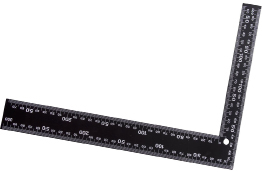
Step 1: Place a square from a geometry set—or simply the square corner of another sheet of paper or a book—on the circle. The right angle of the square is on the circumference. Mark where the edges of the square cross the circle by A and B. Join points A and B.
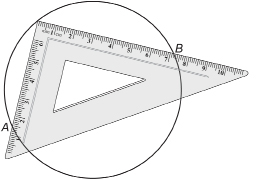
TT 1. What is segment AB? How can you check your answer by paper folding?
Step 2: Place the square on the circle in a new position but so that the right angle of the square is still placed somewhere on the circumference. Mark where the edges of the square cross the circle using letters C and D. Join points C and D.
TT 2. How did using the square a second time help you to locate the centre of the circle?
TT 3. Explain, in your own words, how a carpenter might use a carpenter’s square to locate the centre of a wooden, circular disk.
TT 4. Identify situations where you might need to find the centre of a circular object.
© 7505811966/shutterstock
You have seen that placing a carpenter’s square (or a square from a geometry set) on a circle allows you to draw the diameter of the circle.
Now suppose you start with a diameter already placed on a circle. The end points are connected by line segments to some point on the circle circumference. The diameter and connecting lines will form triangle ABC.
Watch “Angle Inscribed in a Semicircle.” If necessary, move point B until ![]() is 180°. Segment BC is now the diameter of the circle.
is 180°. Segment BC is now the diameter of the circle.
TT 5. Will the angle formed by the connecting lines always form a right angle? To find out, move point A around on the circumference in “Angle Inscribed in a Semicircle.”