Module 4
1. Module 4
1.15. Page 3
Module 4: Area
Explore
In this activity you will explore the formula for the area of a circle given its radius. If possible, work with a partner.
 Try This
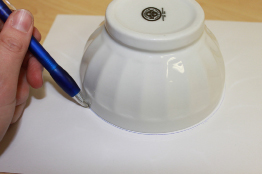
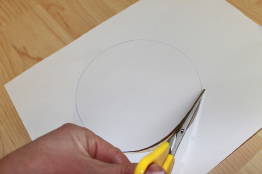
Step 1: Use your compass or a round object to draw a circle on a blank sheet of paper. Then, carefully cut out the circle.
Step 2: Fold the circle carefully in half to form a crease along a diameter. Use a ruler or tape to measure the diameter.

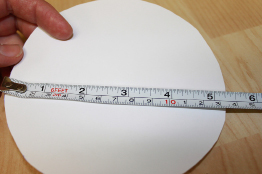
TT 1. What is the diameter of your circle to the nearest centimetre? What is the radius to the nearest centimetre?
TT 2. Using the formula ![]() determine the circumference of your circle to the nearest centimetre.
determine the circumference of your circle to the nearest centimetre.
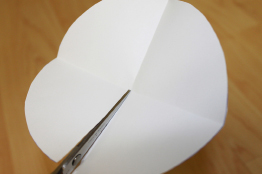
Step 3: Fold your circle again so that the two diameters divide the circle into quarters. Cut along the creases to obtain four equal sectors of the circle. A sector is a pie-shaped piece of circle.
Step 4: Form a parallelogram with the pieces.
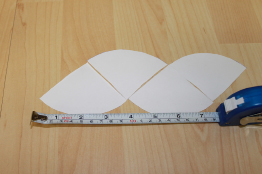
TT 3. Measure the base—the bottom side—of this shape (as shown in the photograph). How does the base compare to the circumference of the circle?
Step 5: Fold each sector in two. Then cut along the crease to form a total of eight narrower sectors. Now form a parallelogram by alternating the pieces as you did in Step 4.
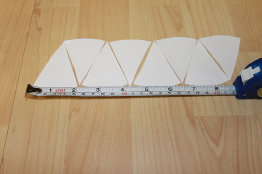
TT 4. Measure the base of this parallelogram. Round to the nearest centimetre. How does this measurement compare to the circumference of the original circle?
TT 5. Measure the height of the parallelogram. The height of the parallelogram is similar to what part of the circle?
To summarize the work you have just completed, view “Area of the Interior of a Circle Explanation.” Just click the play button to begin the animation.
TT 6. Calculate the area of the parallelogram. Calculate the area of the circle. How much difference did you find?
Use “Area of the Interior of a Circle Applet” to help answer TT 7. You will discuss this answer in the next Share section.
TT 7. How could you obtain a better approximation of the area of the circle?
 Share
Share
Once you have completed the activities in the Try This section above, discuss the following questions with a partner or group.
- How does the applet help you visualize the relationship between the area of a circle and the area of a parallelogram?
- How can you make the area of a circle become more and more like the area of a parallelogram?
- Why is the applet trying to show that the area of a circle is similar to the area of the parallelogram?
- How is this information used to build the area formula for a circle?
After your discussion, revise your answer to TT 7 and place a summary of your discussion and your responses in your course folder.