Module 6
1. Module 6
1.8. Page 3
Module 6: Triangles and Other Polygons
Explore
In the previous lesson you used grids and elastic bands to draw similar polygons. In this activity you will explore another method of sketching similar polygons. You will also review the relationships between similar polygons.
 Try This
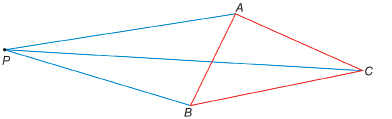
Step 1: Print the “Pivot Point and Triangle ABC” diagram.

Step 2: You may be reminded of the approach with elastics. However, instead of using elastics, join point P to each vertex of the polygon ![]() as shown here.
as shown here.
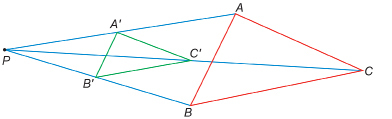
Step 3: Measure out halfway from P to A. Call this point ![]() Measure out halfway from P to B. Call this point
Measure out halfway from P to B. Call this point![]() Measure out halfway from P to C. Call this point
Measure out halfway from P to C. Call this point ![]() Join these points to form
Join these points to form![]()
In the last lesson you learned two things that are true for all similar polygons. What are those truths?
TT 2. How can you prove that the two triangles you just drew are similar triangles? Record your work to prove your results.
 Share
Share
Share and compare your work from TT 2 with a partner or group. Take note of the similarities and differences between the ways used to prove the triangles are similar. Discuss the following questions and summarize your discussion in a paragraph.
-
Is there one method that will work in all cases?
-
Did any of the methods use a scale factor or ratios to prove the triangles are similar?
-
How could a scale factor or ratio indicate the size of the similar polygon?
Save a copy of your summary paragraph in your course folder.